If you don't already, you should know about The Qt Company's enterprise device creation offering, a Qt-optimized pre-built software stack that lets you immediately get started with prototyping on a real device for embedded Linux and Android development. If you don't recognize the name, The Qt Company is the entity created by Digia to drive all of its' Qt related acivities. Full details are available in this press release. We'll provide an overview in this post, but first, the requisite video:
The video shows some snippets of the demo software in the product, including:- Presentation components with fluid scrolling and animation,
- Custom widgets for buttons, gauges, indicators,
- 2D and 3D graphing and data visualization components,
- Fully accelerated video playback with overlays and 3D transforms, and
- A WebGL-enabled HTML5 browser that's suitable for embedding.
The video doesn't do justice to the product though. You really need to see this in person to understand the full scope. Through YouTube, you can't get the sense of how easy it is to use controls that were built for touch. You can't see the fully double-buffered, tear-free video with semi-transparent overlays, and it's hard to get a sense of the polish that animation adds to the user experience.
For the impatient
- The Qt for Device Creation web page provides more details at https://qt.io/qt-for-device-creation, and
- You can download an evaluation copy from https://qt.io/device-eval
- The documentation is on-line at https://doc.qt.io/QtEnterpriseEmbedded/index.html
The highlights
Some of the demo image will look familiar. You'll see the ubiquitous Cinematic Experience demo, along with the Qt Everywhere demo.
You'll also see a crazy-cool demo of GPU effects for high-def video as shown in this picture: 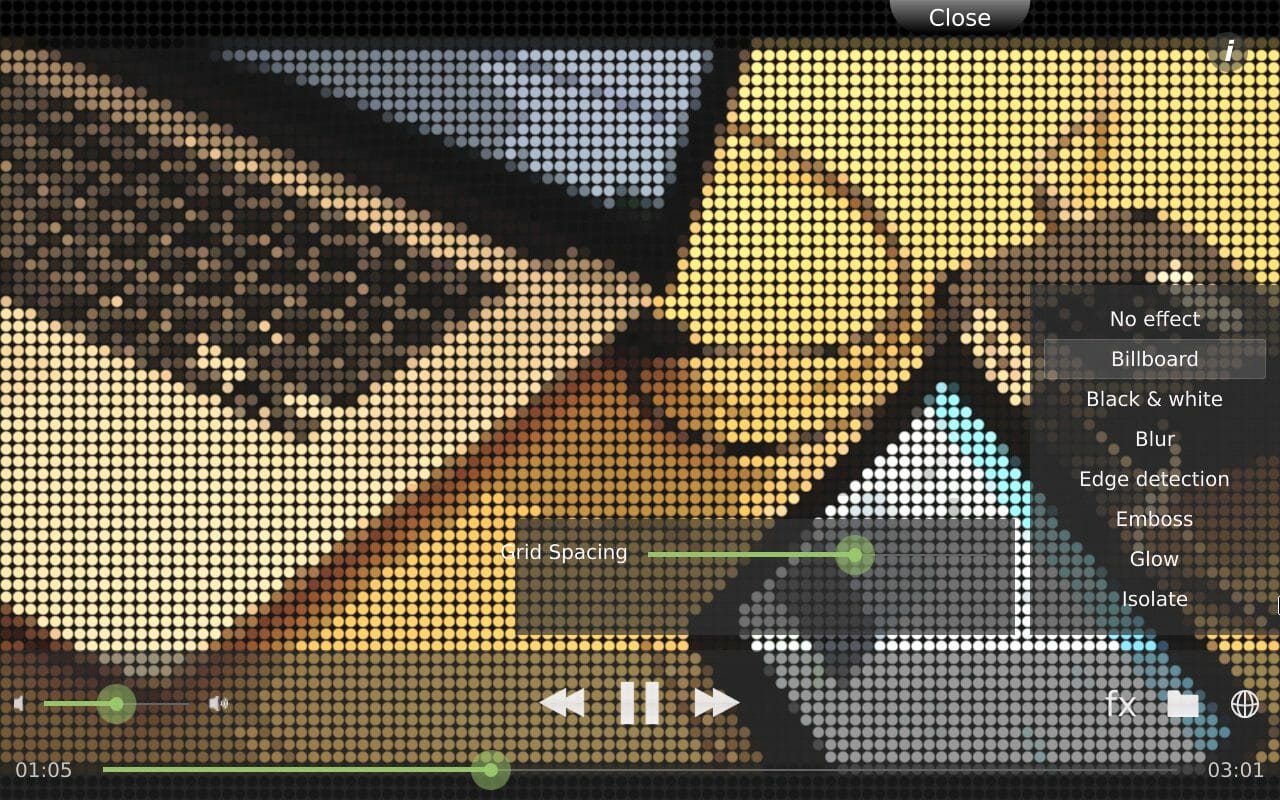 And this one:
 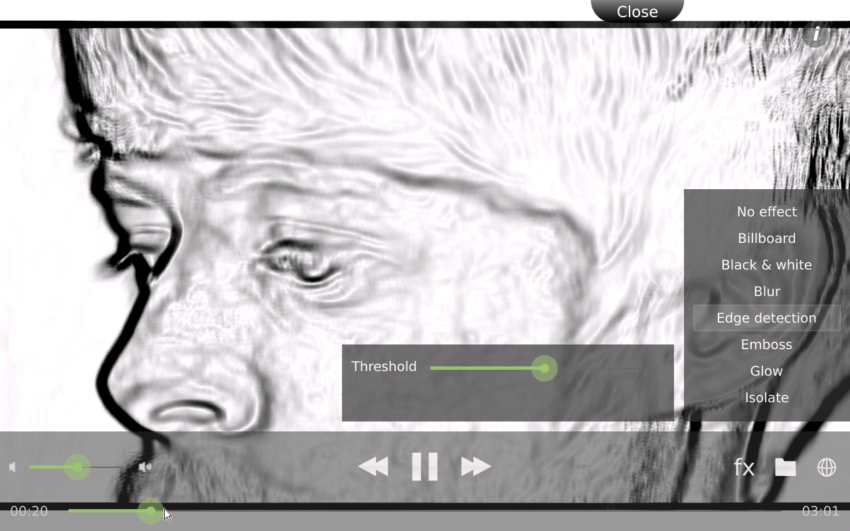 These are not only screen-shots of high definition videos playing at full speed with GPU accelerated transforms of their output, this demo also highlights the ease with which video and overlaid controls can be constructed using Qt Quick. If you've tried doing this with
 gstreamer and the mfw_v4lsink plugin, you'll know that this isn't easy.
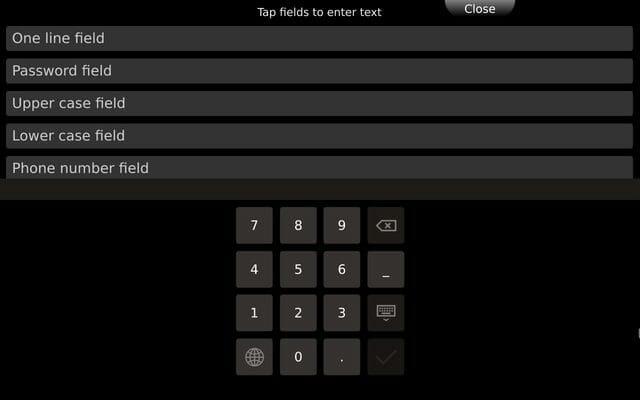
Another set of demos show a variety of production-ready controls, including a set of on-screen virtual keyboards, dials and progress bars, graphs, and data visualization tools, and even tools to control and prompt for wireless LAN configuration.


How long would it take you to create these components?
The Product
Not only has The Qt Company put together a beautiful piece of demo code, they've also wrapped this up in a product bundle which shrink-wraps the system creation process (including our kernel), and bundled it with Qt Creator, a best-of-breed integrated development environment that supports cross-development and cross-debug out of the box. The product should have you developing your code on day 1 with a toolbox full of parts to pick from, and with the backing of the folks who created the tools, libraries, and user interface components.
The structure
Another thing that's not clear from a video is that the video above showed an image created for embedded Linux, and more specifically, built using tools from The Yocto Project and The Freescale Community BSP. Because of this, your products can leverage the packages provided by those projects, and you can use the Yocto build system to integrate your components and tailor your build.
Installing the images
After installation, copying the reference image to an SD card (on /dev/sdc) is trivial. Assuming that your SD card or SATA drive shows up as /dev/sdc:
~/Qt/Boot2Qt-4.x/iMX6-eLinux/images$ sudo ./deploy.sh /dev/sdcext3 root filesystem. Building from sources
Building from sources is equally easy and well-documented, although it does take quite a while. The notes below follow the structure from the Building Your Own Embedded Linux Image document. They're not expected to be a reference, but to allow commentary about the steps in the official notes from The Qt Company for Freescale users.
Initialize repositories
You start by creating a build directory and initializing the repositories:
~/$ mkdir qt-embedded
~/$ cd qt-embedded
~/qt-embedded$ ~/Qt/Boot2Qt-4.x/sources/b2qt-yocto-meta/b2qt-init-build-env init --device nitrogen6x
Get https://gerrit.googlesource.com/git-repo
...
Initialized empty Git repository in /home/user/qt-embedded/poky/.git/
Updating origin
...
Yocto build system is ready
next initialize the build env for your target machine, for example:
...repo init and repo sync steps in the build of the Freescale Community BSP, and creates a sources/ tree with all of the meta data needed to build a userspace. ~/qt-embedded$ du -hs sources/
75M sources/
~/qt-embedded$ ls -l sources
lrwxrwxrwx 1 user user 50 Dec 18 19:32 meta-b2qt -> /home/user/Qt/Boot2Qt-4.x/sources/b2qt-yocto-meta
drwxrwxr-x 15 user user 4096 Dec 18 19:32 meta-fsl-arm
drwxrwxr-x 7 user user 4096 Dec 18 19:32 meta-fsl-arm-extra
drwxrwxr-x 18 user user 4096 Dec 18 19:32 meta-openembedded
drwxrwxr-x 11 user user 4096 Dec 18 19:32 pokyrepo manifest file are fixed, so the build won't break based on up-stream changes. ~/qt-embedded$ grep -A 4 meta-fsl .repo/manifests/manifest.xmlgit repositories though, which allows you to easily cherry-pick things and keep track of any of your local changes: ~/qt-embedded/poky/meta-fsl-arm-extra$ git show
commit e1085deb3d915d2a95a65cceadc77c6de0dadfb6
Author: Eric Nelson <eric.nelson@boundarydevices.com>
Date: Mon Oct 27 12:19:07 2014 -0700
u-boot-script-boundary: update to f87025237 (v2014.07)
Update to Ezurio (formerly Boundary Devices) U-Boot boot scripts 2014.07 tree.Build Yocto components
The Yocto build process follows Freescale conventions with a new target b2qt-embedded-image to build all of the Qt5.4 pre-requisites:
~/qt-embedded$ MACHINE=nitrogen6x . setup-environment.sh build
...
### Shell environment set up for builds. ###
You can now run 'bitbake '
~/qt-embedded/build$ export MACHINE=nitrogen6x
~/qt-embedded/build$ bitbake b2qt-embedded-image
...
Build Configuration:
BB_VERSION        = "1.22.0"
BUILD_SYS         = "x86_64-linux"
NATIVELSBSTRING   = "Ubuntu-14.04"
TARGET_SYS        = "arm-poky-linux-gnueabi"
MACHINE           = "nitrogen6x"
DISTRO            = "b2qt"
DISTRO_VERSION    = "1.6"
TUNE_FEATURES     = "armv7a vfp neon callconvention-hard cortexa9"
TARGET_FPU        = "vfp-neon"
meta
meta-yocto        = "(nobranch):18d859a8c982a76dda5bfe27a32d1a0905947d2e"
meta-fsl-arm      = "(nobranch):4e694e727aa8babfd0ba06c5e98bab3753b39a8b"
meta-fsl-arm-extra = "(nobranch):e1085deb3d915d2a95a65cceadc77c6de0dadfb6"
meta-oe           = "(nobranch):8065dd8456913457a0114ddb2b4bd4842847b2a3"
meta-b2qt
meta-fsl-extras   = ":"
...
NOTE: Tasks Summary: Attempted 3358 tasks of which 0 didn't need to be rerun and all succeeded.
~/qt-embedded/build$tmp/deploy/images/machinename/, although the b2qt-embedded-image doesn't create the normal .sdcard image by default. It simply builds the filesystem tar-balls for later use: ~/qt-embedded-build1/build$ ~/qt-embedded/build$ ls tmp/deploy/images/nitrogen6x/ -lS | head
total 97804
-rw-r--r-- 1 user user 85068507 Dec 18 22:54 b2qt-embedded-image-nitrogen6x-20141219045258.rootfs.tar.gz
-rw-rw-r-- 1 user user 8609210 Dec 18 22:51 b2qt-embedded-image-boot-nitrogen6x-20141219045258.tar.gzmeta-toolchain-b2qt-embedded-sdk target and the installer is placed in tmp/deploy/sdk/: ~/qt-embedded-build1/build$ bitbake meta-toolchain-b2qt-embedded-sdk
...
NOTE: Tasks Summary: Attempted 2370 tasks of which 0 didn't need to be rerun and all succeeded.
~/qt-embedded-build1/build$ ls -lSh tmp/deploy/sdk/b2qt*.sh
-rwxrwxr-x 1 user user 167M Dec 19 08:44 tmp/deploy/sdk/b2qt-eglibc-x86_64-meta-toolchain-b2qt-embedded-sdk-cortexa9hf-vfp-neon-toolchain-1.6.shBuild Qt5 and demo content
At this point, the output image doesn't contain any of the Qt libraries or demo applications, but the next steps will fix that. The first sets up some symlinks and configures Qt for our boards:
~/qt-embedded/build$ ~/Qt/Boot2Qt-4.x/sources/b2qt-build-scripts/embedded-common/init_build_env.sh \
          ~/Qt/Boot2Qt-4.x/sources/b2qt-build-scripts/embedded-linux/config.iMX6
Initializing build environment for iMX6-eLinux
This can take few minutes
your build environment is now ready~/qt-embedded/build$ ls -l build*.sh
lrwxrwxrwx 1 user user 81 Dec 19 08:50 build_all.sh -> /home/user/Qt/Boot2Qt-4.x/sources/b2qt-build-scripts/embedded-linux/build_all.sh
lrwxrwxrwx 1 user user 84 Dec 19 08:50 build_extras.sh -> /home/user/Qt/Boot2Qt-4.x/sources/b2qt-build-scripts/embedded-linux/build_extras.sh
lrwxrwxrwx 1 user user 83 Dec 19 08:50 build_image.sh -> /home/user/Qt/Boot2Qt-4.x/sources/b2qt-build-scripts/embedded-linux/build_image.sh
lrwxrwxrwx 1 user user 80 Dec 19 08:50 build_qt.sh -> /home/user/Qt/Boot2Qt-4.x/sources/b2qt-build-scripts/embedded-linux/build_qt.shbuild_all.sh script will reproduce the demo package: ~/qt-embedded/build$ ./build_all.sh
...
Scanning
Updating archive /home/user/qt-embedded/build/b2qt-embedded-demo-iMX6.7z
Compressing createUpdate.sh
Compressing createUpdateKey.sh
Everything is Ok
+ build_tag
+ '[' -d /home/user/Qt/Boot2Qt-4.x/sources/b2qt-build-scripts/embedded-linux/../.git ']'
+ echo 4.0.0
+ '[' '' = true ']'Deploy image
The step above not only builds the image, it also creates a shell script that allows you to deploy the image to SD card in the same manner as the pre-built image:
~/qt-embedded/build$ sudo ./deploy.sh /dev/sdc
...
Disk /dev/sdc: 3980 MB, 3980394496 bytes
255 heads, 63 sectors/track, 483 cylinders, total 7774208 sectors
Units = sectors of 1 * 512 = 512 bytes
Sector size (logical/physical): 512 bytes / 512 bytes
I/O size (minimum/optimal): 512 bytes / 512 bytes
Disk identifier: 0x00000000
Reformat disk '/dev/sdc', all files will be lost? (y/N)
...
-- STEP -- Deploying boot files
-- STEP -- Deploying rootfs, this may take a while
-- STEP -- Done
Final notes
We hope the comments above give you a feel for what the Qt product is, and what to expect from it, but we should also mention what the product is not. In particular, it is not an end product for custom images. The tools provided can help you in the process, but you shouldn't expect your Qt license to include support for things like kernel customization or support for ancillary packages. To quote from the documentation:
Note About Support Services for Yocto Tools By default, The Qt Company will only provide customer support for the Yocto recipes on the reference platforms, as delivered with Qt in the enterprise package, and setting up the development environment for them. Receiving support for any other configuration requires a separate service agreement between a customer and The Qt Company.
Because The Qt Company provides a well-supported framework, you can get this support from them or one of our other partners like Adeneo, O.S. Systems, RidgeRun, or Timesys. Reach out to us to get recommendations, and let us know when you have a chance to check out this package.