/filters:background_color(white)/2023-12/BD-SL-iMX6_New.png)
/filters:background_color(white)/2024-10/Nitrogen6_MAX-e1550281424511.png)
/filters:background_color(white)/2024-10/Nitrogen6_SoloX-e1550281599325.png)
/filters:background_color(white)/2024-10/Nitrogen6X-e1550281048735-2.png)
We've had lots of customers ask about cellular modem support on our i.MX6 boards, and in the past, have mostly just shrugged.Since most cell modems are USB or PCIe devices, configuration is a software task, and mostly done in userspace. The steps are also different for Android, embedded Linux and desktop distributions.In other words, its complicated.In this post, we'll walk through all of the steps needed to configure a specific set of modems under Ubuntu as a reference. If you're using another modem or another userspace, the details may be different, but the fundamentals will be the same.We used the Huawei E3131 USB dongle , and Huawei MU609 Mini-PCIe during this process, and will be adding them to our default kernels going forward.As you can see in this patch, we did have to add some USB device ids and make minor updates to the kernel as provided by the vendor. In the process, we should now also support the following Huawei models for various regions and carriers:
- MC323 CDMA: Downlink:153.6 kbps, Uplink: 153.6 kbps
- MU509 WDCMA: Downlink:3.6 Mbps, Uplink: 384 kbps
- MC509 EVDO: Downlink:3.1 Mbps, Uplink: 1.8 Mbps
- MU609 HSPA+: Downlink:14.4 Mbps, Uplink: 5.76 Mbps
- MU709 HSPA+: Downlink:21.6 Mbps, Uplink: 5.76 Mbps
- ME906 LTE: Downlink:100 Mbps, Uplink: 50 Mbps
- ME909 LTE: Downlink:100 Mbps, Uplink: 50 Mbps
- ME936 LTE: Downlink:100 Mbps, Uplink: 50 Mbps
For the impatient
These images contain Freescale-licensed content, so you will need to register on our web-site and log in before you can accept the license agreement and download the images from here:
- 20150126-nitrogen-3.10.17_1.0.2_ga-trusty-en_US-lxde_armhf.img.gz
- 20150211-nitrogen-3.10.17_1.0.2_ga-trusty-en_US-console_armhf.img.gz
The detailed description of our changes is here:
- 20150126-nitrogen-3.10.17_1.0.2_ga-trusty-en_US-lxde_armhf.description
- 20150211-nitrogen-3.10.17_1.0.2_ga-trusty-en_US-console_armhf.description
Programming the image
The images are slightly-less-than-4GiB image files containing the partition table, so you can copy it to an SD card or SATA drive on /dev/sdc using zcat and dd like so:
~/Downloads$ sudo umount /dev/sdc*
~/Downloads$ zcat 201501*.img.gz | sudo dd of=/dev/sdc bs=1M
~/Downloads$ sync
Or you can use Alex Page's USB Image Tool under Windows.If you're using our latest U-Boot and a Nitrogen6 Max board, you can use the new USB Mass Storage Gadget to program the eMMC. If not, there were some notes in our first release that describe a more complicated way of programming eMMC.
Contents
In the rest of this post we'll walk through the following:
Hardware Installation
Installing MU609 modem on Nitrogen6-Max board
The Nitrogen6_Max board has a PCI Express Mini Card slot and a built-in SIM card socket, so installation of the MU-609 is very straightforward.Insert the modem in the PCI-e socket as shown below.
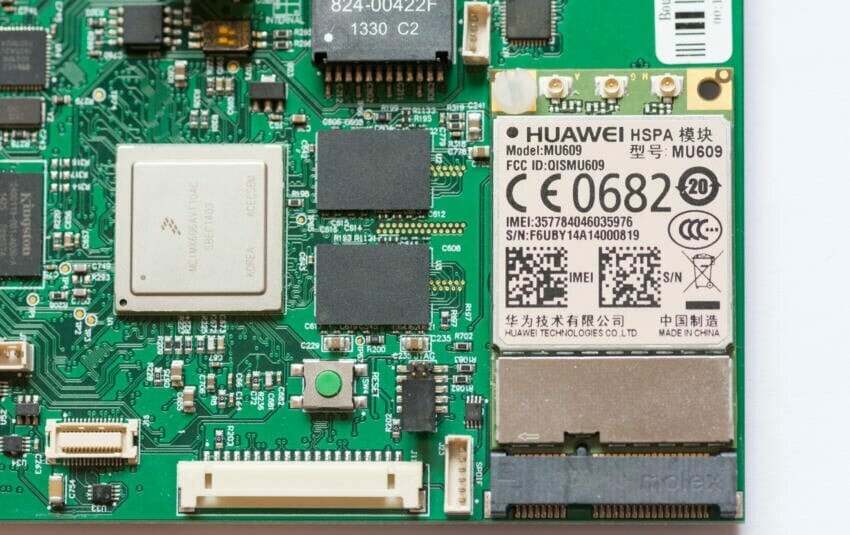
Nitrogen-Max board, top, MU609 modem inserted to the PCI-e socket. Connect the antennas to the modem card, as follows :
- M - MAIN GSM antenna
- G - GPS antenna
- A - AUX GSM antenna
If you have only one GSM antenna, connect it to the M mini coax connector.Then insert your SIM card to the socket in the bottom side of the board as shown in the figure below.
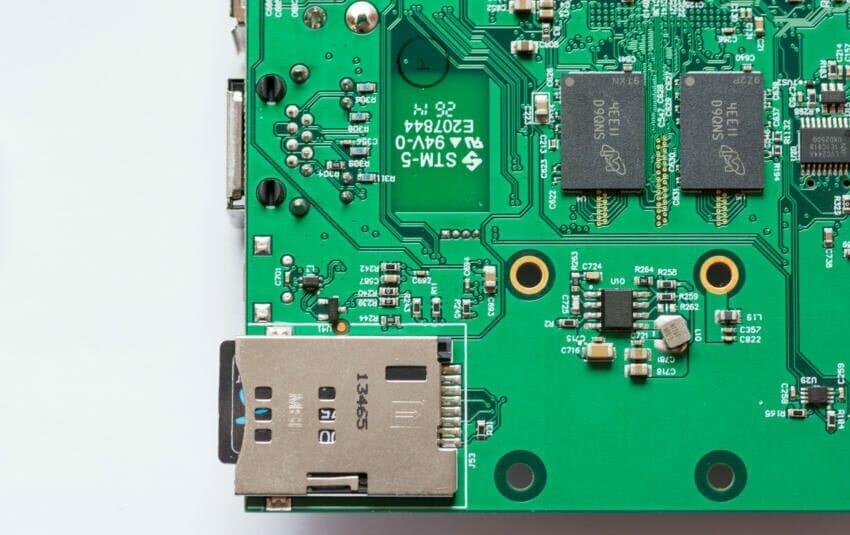
Nitrogen-Max board, bottom, SIM card inserted to the socket.
Installing MU609 modem on BD-SL-i.MX6, Nitrogen6X, or Nitrogen6_Lite boards
These boards require a mini PCI-e to USB adapter to connect the modem. They're cheap and easy to find (Search eBay for "mini PCI-e USB wireless SIM" keywords).If you need a free USB port, install a USB HUB, and problem solved.
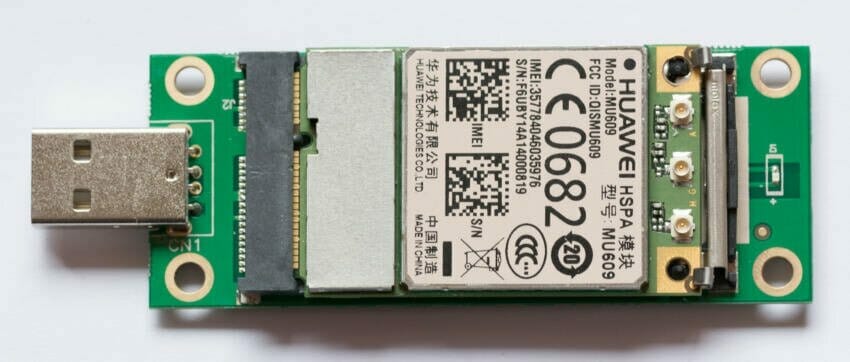
Mini PCI-e to USB Adapter, top with PCI-e MU609 modem  Mini PCI-e to USB Adapter, bottom, loaded with SIM card
Using modem on a headless (No GUI) Ubuntu system
Software prerequisites
Make sure you have the latest kernel installed, but at least the ABI >= 34 :
ubuntu@trusty-dev:/$ uname -r
3.10.17-34-boundary-4t3
ubuntu@trusty-dev:/$
If this is not the case, please type :
ubuntu@trusty-dev:/$ sudo apt-get update && sudo apt-get dist-upgradeWe will solve the modem handling tasks with the modemmanager package. This package provides a unified high level API for communicating with (mobile broadband) modems. ModemManager is a daemon that gets started at boot time.The modemmanager package provides a command line tool, named mmcli, to control the ModemManager daemon. That will be the tool used below.We will solve the connection handling tasks with the network-manager package. We can use the NetworkManager's huge database to use the cellular service provider data and settings. With the NetworkManager we can create connection configuration files, with specific parameters, that makes internet connection handling very easy.Make sure you have installed modemmanager , networkmanager 1.4.0 and uuid packages :
ubuntu@trusty-dev:/$ dpkg -l | grep -e modemmanager -e network-manager -e uuid
ii libossp-uuid16              1.6.2-1.3ubuntu1             armhf        OSSP uuid ISO-C and C++ - shared library
ii libuuid1:armhf              2.20.1-5.1ubuntu20.3         armhf        Universally Unique ID library
ii modemmanager                1.4.0-1                      armhf        D-Bus service for managing modems
ii network-manager             0.9.8.8-0ubuntu7             armhf        network management framework (daemon and userspace tools)
ii uuid                        1.6.2-1.3ubuntu1             armhf        the Universally Unique Identifier Command-Line Tool
If these packages are not installed, please type the following and then restart the system:
ubuntu@trusty-dev:/$ sudo apt-get install modemmanager network-manager uuidWe back-ported modemmanager 1.4.0-1 and libmbim 1.10.0-2.1 and libqmi 1.10.2-2 to Ubuntu Trusty Tahr to support the latest modems and service providers.If everything went well, your ModemManager and NetworkManager will start at boot time. You can check it like so:
ubuntu@trusty-dev:/$ ps -A | grep Manager
 662 ? 00:00:01 ModemManager
 722 ? 00:00:56 NetworkManager
When ModemManager starts it scans the serial ports for modems and it tries to recognize them. It takes quite long, 20-30 seconds (!!!) after the login prompt, so you'll need to be patient.
Testing whether the system recognizes the modem
You can check the presence of the USB modem device using lsusb:
ubuntu@trusty-dev:/$ lsusb
Bus 001 Device 006: ID 12d1:1573 Huawei Technologies Co., Ltd.
Bus 001 Device 005: ID 1c4f:0002 SiGma Micro Keyboard TRACER Gamma Ivory
Bus 001 Device 004: ID 1bcf:0005 Sunplus Innovation Technology Inc.
Bus 001 Device 003: ID 05e3:0605 Genesys Logic, Inc. USB 2.0 Hub
Bus 001 Device 002: ID 0424:2513 Standard Microsystems Corp. 2.0 Hub
Bus 001 Device 001: ID 1d6b:0002 Linux Foundation 2.0 root hub
The first one with 12d1:1573 key, that is the Huawei MU609 modem.You can check the modem's serial ports :
ubuntu@trusty-dev:/$ ls -a1 /dev/ttyU*
/dev/ttyUSB0
/dev/ttyUSB1
/dev/ttyUSB2
/dev/ttyUSB3
/dev/ttyUSB4
The Huawei modem creates five USB serial ports. Others may create fewer.At this point, you can see if modemmanager detects the modem with mmcli -L:
ubuntu@trusty-dev:/$ mmcli -L
Found 1 modems:
 /org/freedesktop/ModemManager1/Modem/0 [Huawei Technologies Co., Ltd.] MU609
ubuntu@trusty-dev:/$
And you can see more details of the modem with mmcli -m:
ubuntu@trusty-dev:/$ mmcli -m 0
/org/freedesktop/ModemManager1/Modem/0 (device id '2431657b772fc128a660f7b8c0587c213129ca8f')
 -------------------------
 Hardware | manufacturer: 'Huawei Technologies Co., Ltd.'
 | model: 'MU609'
 | revision: '12.105.29.00.00'
 | supported: 'gsm-umts'
 | current: 'gsm-umts'
 | equipment id: '357784046035976'
 -------------------------
 System | device: '/sys/devices/soc0/soc.1/2100000.aips-bus/2184200.usb/ci_hdrc.1/usb1/1-1/1-1.3'
 | drivers: 'option1, cdc_ether'
 | plugin: 'Huawei'
 | primary port: 'ttyUSB2'
 | ports: 'eth1 (net), ttyUSB1 (qcdm), ttyUSB2 (at), ttyUSB3 (gps), ttyUSB4 (at), ttyUSB0 (at)'
 -------------------------
 Numbers | own : 'unknown'
 -------------------------
 Status | lock: 'none'
 | unlock retries: 'sim-pin (3), sim-pin2 (3), sim-puk (10), sim-puk2 (10)'
 | state: 'disabled'
 | power state: 'on'
 | access tech: 'unknown'
 | signal quality: '0' (cached)
 -------------------------
 Modes | supported: 'allowed: 3g; preferred: none
 | allowed: 2g; preferred: none
 | allowed: 2g, 3g; preferred: none'
 | current: 'allowed: 2g, 3g; preferred: none'
 -------------------------
 Bands | supported: 'unknown'
 | current: 'unknown'
 -------------------------
 IP | supported: 'ipv4'
 -------------------------
 3GPP | imei: '357784046035976'
 | enabled locks: 'none'
 | operator id: 'unknown'
 | operator name: 'unknown'
 | subscription: 'unknown'
 | registration: 'unknown'
 -------------------------
 SIM | path: '/org/freedesktop/ModemManager1/SIM/0'
-------------------------
 Bearers | paths: 'none'
Finding the optimal antenna position
Now we stop NetworkManager and ModemManager temporarily, because we want to run some more tests:
ubuntu@trusty-dev:/$ sudo stop network-manager
network-manager stop/waiting
ubuntu@trusty-dev:/$ ps -A | grep Manager
 3215 ? 00:00:00 ModemManager
ubuntu@trusty-dev:/$ sudo killall ModemManager
ubuntu@trusty-dev:/$ ps -A | grep Manager
ubuntu@trusty-dev:/$
And we start screen serial console to communicate with modem on ttyUSB2 (primary port of the modem, as shown above).
ubuntu@trusty-dev:/$ screen /dev/ttyUSB2 115200Now you get an empty console screen. If local echo is not set, then type ATZ for the modem blindly, and that will reset it.Now type :
ATI Manufacturer: Huawei Technologies Co., Ltd. Model: MU609 Revision: 12.105.29.00.00 IMEI: 357784046035976 +GCAP: +CGSM,+DS,+ES OKThis tells us that the modem is present and working. Now type the following command, to check if your GSM antenna is set properly:
AT+CSQ +CSQ: 29,99 OKThis is the GSM signal quality in +CSQ: RSSI, BER format, whereRSSI = Received Signal Strength Indication, andBER = Bit Error Rate, currently unsupported, always 99The RSSI = 99 (+CSQ: 99,99) means an unknown or undetectable signal level.Here is a table to calculate the signal levels from RSSI :
| RSSI | 0 | 1 | 2 | 3 | 4 | 5 | 6 | 7 |
| level dBm | -113 dBm | -111 dBm | -109 dBm | -107 dBm | -105 dBm | -103 dBm | -101 dBm | - 99 dBm |
| RSSI | 8 | 9 | 10 | 11 | 12 | 13 | 14 | 15 |
| level dBm | -97 dBm | -95 dBm | -93 dBm | -91 dBm | -89 dBm | -87 dBm | -85 dBm | -83 dBm |
| RSSI | 16 | 17 | 18 | 19 | 20 | 21 | 22 | 23 |
| level dBm | -81 dBm | -79 dBm | -77 dBm | -75 dBm | -73 dBm | -71 dBm | -69 dBm | -67 dBm |
| RSSI | 24 | 25 | 26 | 27 | 28 | 29 | 30 | 31 |
| level dBm | -65 dBm | -63 dBm | -61 dBm | -59 dBm | -57 dBm | -55 dBm | -53 dBm | >-52 dBm |
Move/rotate your antenna and repeat the command above until you find the antenna's optimal position. In general, values below 10 will not work, values between 10 and 15 will have many disconnections, values between 15 and 20 are weak, but could work, values between 20 and 25 are good, and values above 25 are excellent. For LTE 100Mbps connections (Huawei ME906, ME909 modem) you'll need excellent signal quality, RSSI > 25 for reliable service.
Checking the subscriber information
You should check your SIM card, since it provides a lot of information:
AT+CIMI 3100262475092493 OKThis command will query your SIM card's IMSI number ( International Mobile Subscriber Identity )The first 3 digits of IMSI number is MCC ( Mobile Country Code )The following 2 (Europe) or 3 (North America) digits of the IMSI is the MNC ( Mobile Network Code )The remaining digits is the MIN ( Mobile Identification Number )You can check your MCC/MNC code in the following page :Mobile Country CodesFor example if your MCC is 310 and your MNC is 026 then you are a T-Mobile subscriber in USA .Why is this important ? Because on this page :Mobile Broadband Service ProvidersYou can find your APN number based on you MCC and MNC number, and that is necessary, when you want to create a connection setup, to dial up your service provider. Of course you may ask your service provider about these datas.If you get an error :
AT+CIMI +CME ERROR: Sim failureThen your SIM card is not inserted properly, or it is locked by the CardLock feature, or its broken.If the tests above pass, you can exit the screen console application ( Q, then Y ) .
Connecting to the internet
For doing that, you have to create a connection setup file as user "root" in the /etc/NetworkManager/system-connections directory, with the following content :
ubuntu@trusty-dev:/$ sudo cat /etc/NetworkManager/system-connections/MyModem
[connection]
id=MyMU609
uuid=15d742f1-2b5a-421e-9f27-fcb1fc26d72d
type=gsm
autoconnect=false
[ipv4]
method=auto
[gsm]
number=*99#
#username=blahblah
#password=blehbleh
apn=epc.tmobile.com
[serial]
baud=115200
The username and the password are usually not necessary, or can be anything. The uuid is a unique identifier you can create with the uuid command (which installed earlier) :
ubuntu@trusty-dev:~$ uuid
15d742f1-2b5a-421e-9f27-fcb1fc26d72d
ubuntu@trusty-dev:~$
The id can be anything that you can memorize easily ("MyMU609" is not mandatory). The same goes to for the file name "MyModem". It can be anything. You have to get the apn from your service provider, or from HERE , as described above, earlier.This is a minimal connection setup file. For detailed instructions, type :
ubuntu@trusty-dev:/$ man nm-settingsWhen finished, set the connection setup file's attribute to 0600 :
ubuntu@trusty-dev:/$ sudo chmod 600 /etc/NetworkManager/system-connections/MyModemAnd make sure that the file's owner:group is root. If the owner is not root, then the Network Manager will ignore the connection setup.
ubuntu@trusty-dev:/$ sudo chown root:root /etc/NetworkManager/system-connections/MyModemNow reboot, and wait for modemmanager to recognize the modem.Then enable modem :
ubuntu@trusty-dev:/$ sudo mmcli -m 0 -e
successfully enabled the modem
ubuntu@trusty-dev:/$
And check the connections :
ubuntu@trusty-dev:~$ sudo nmcli con list
NAME                   UUID                                  TYPE             TIMESTAMP-REAL
Wired connection 1     a66c3504-504a-4da8-8c1d-de9a80097367  802-3-ethernet   Wed Jan 21 12:49:14 2015
MyMU609                15d742f1-2b5a-421e-9f27-fcb1fc26d72d  gsm              Wed Jan 21 12:58:39 2015
Then you can dial (connect) to any of them :
ubuntu@trusty-dev:/$ sudo nmcli con up id MyMU609
ubuntu@trusty-dev:/$
You can see the status of the active connections like this :
ubuntu@trusty-dev:/$ sudo nmcli con status
NAME                   UUID                                   DEVICES  DEFAULT VPN  MASTER-PATH
Wired connection 1     a66c3504-504a-4da8-8c1d-de9a80097367   eth1     no      no   --
MyMU609                15d742f1-2b5a-421e-9f27-fcb1fc26d72d   ttyUSB2  yes     no   --
You can use the internet now, download, upload, browse, launch wget, as you like it. When finished, you can disconnect with the following command. You don't need to be in a hurry, service providers usually bill for data traffic and not connection time.
ubuntu@trusty-dev:/$ sudo nmcli con down id MyMU609
ubuntu@trusty-dev:/$
Pay close attention to the commands above, since we show both mmcli (modem manager) and nmcli (network manager).
Using modem on Ubuntu LXDE desktop
LXDE makes things much simpler.As above, make sure modemmanager 1.4.0 is installed. It should recognize the modem as described earlier:
ubuntu@nitrogen:/$ mmcli -L
Found 1 modems:
 /org/freedesktop/ModemManager1/Modem/0 [Huawei Technologies Co., Ltd.] MU609
ubuntu@nitrogen:/$
Fine.Now start the Network Manager via the menu:Main-Menu -> Preferences -> Network ConnectionsA window pops up. Push [+Add] button. Choose Mobile Broadband as connection type, then push [Create...] . Select Huawei Technologies HUAWEI Mobile as your cellular device, and push [Continue] :
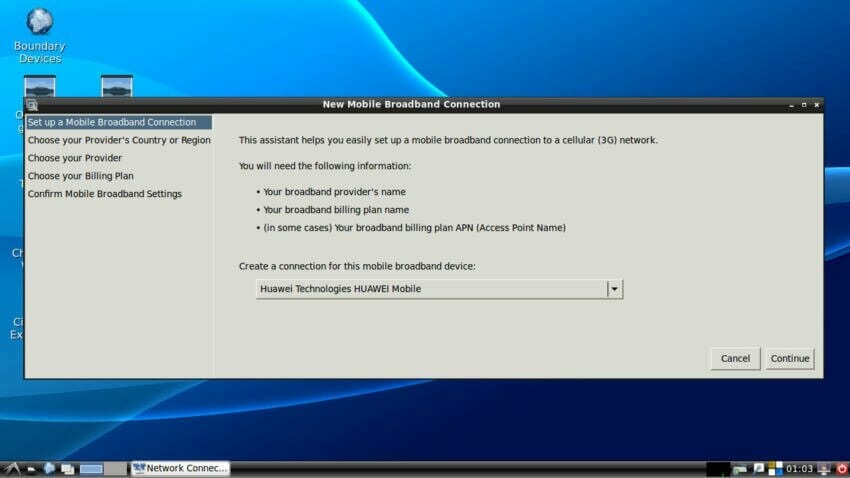
Adding Huawei Mobile broadband device Now select your country, your service provider, your billing plan, and confirm with the [Apply] button and [Save...].It's that simple. You can close the Network Connections window.Now you can click on your network icon in the task bar with right mouse button. Select Enable Mobile Broadband . A window will pop up with a message that you were registered on your network. That is not yet a connection. Now click on the network icon with left mouse button and select your Mobile Broadband connection. The name depends on your provider. It will connect to your GSM network and you can unplug your ethernet cable if you want.Of course you can use the same terminal commands on LXDE as you used in headless linux. As you like it. As always please tell us how this works for you. Contact us if you have any trouble or ask a question by posting a reply below.