This post intends to provide all the information you need to understand and use the HAB on your Ezurio (formerly Boundary Devices)' platform.For i.MX8 platforms, please see our newer post: HAB - i.MX8M EditionThe goal is also to provide an update on our older blog post on the subject as it required an old U-Boot version. Since then, HAB support has been added to mainline U-Boot and encryption is now possible on top of binary signature.For simplicity and clarity, this guide and examples have been made on i.MX6Q Nitrogen6x so it applies to most our i.MX6 platforms.However, for i.MX6SX Nit6_SoloX and i.MX7D Nitrogen7 some changes must be made because the fuse map and the RAM start address are different. Please contact us for instructions on those two platforms.Vulnerability Errata: It has been disclosed by NXP that as of today (July 2017), all our i.MX-based platforms are vulnerable:
The Boot ROM on certain affected devices has been subsequently updated to prevent these vulnerabilities.Please contact your NXP Support/ Sales representative for further information on mitigations or ordering revised silicon.
Prerequisites
- Code Signing Tools (CST)
- Account required on NXP website
- https://www.nxp.com/webapp/sps/download/license.jsp?colCode=IMX_CST_TOOL
- Provides valuable documentation
- U-Boot source code
- See latest branch from U-Boot repo
- https://github.com/boundarydevices/u-boot-imx6/tree/boundary-v2016.03
- Ezurio (formerly Boundary Devices)' platform
- Any of the platforms from our store
- Patience & focus
- If you miss a step, this can brick your platform for good
- You've been WARNED!
HAB architecture
Before getting started, let's explain a few acronyms related to this subject
- CSF: Command Sequence File
- CST: Code-Signing Tool
- DCD: Device Configuration Data
- DEK: Data Encryption Key
- HAB: High Assurance Boot
- IVT: Image Vector Table
- SRK: Super Root Key
The HAB library is a sub-component of the boot ROM on i.MX processors. It is responsible for verifying the digital signatures included as part of the product software and ensures that, when the processor is configured as a secure device, no unauthenticated code is allowed to run.On processors supporting the feature, encrypted boot may also be used to provide image cloning protection and, depending on the use case, image confidentiality. The HAB library can not only be used to authenticate the first stage of the boot chain, but the other components of the boot chain as well such as the Linux kernel.In short, enabling HAB/secure boot on your platform prevents hackers to alter the boot process, making sure only the software you have previously signed/approved can be ran. The ROM and HAB cannot be changed so they can be considered as trusted software components.

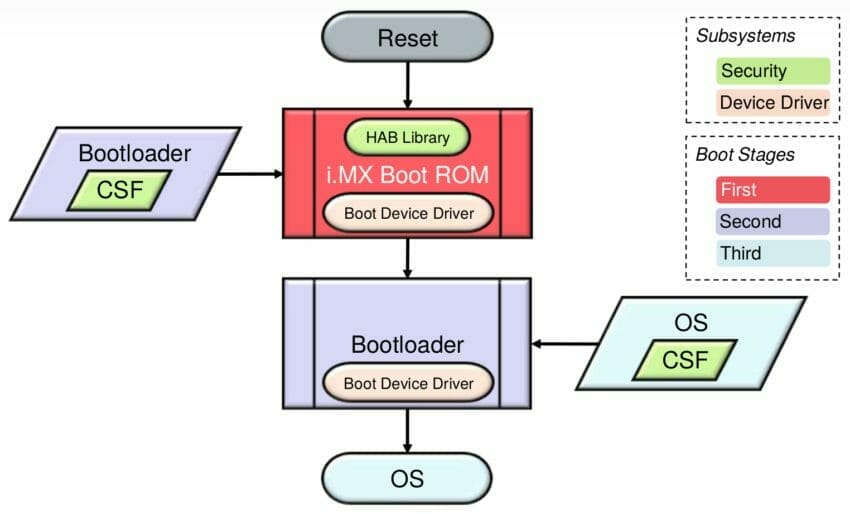
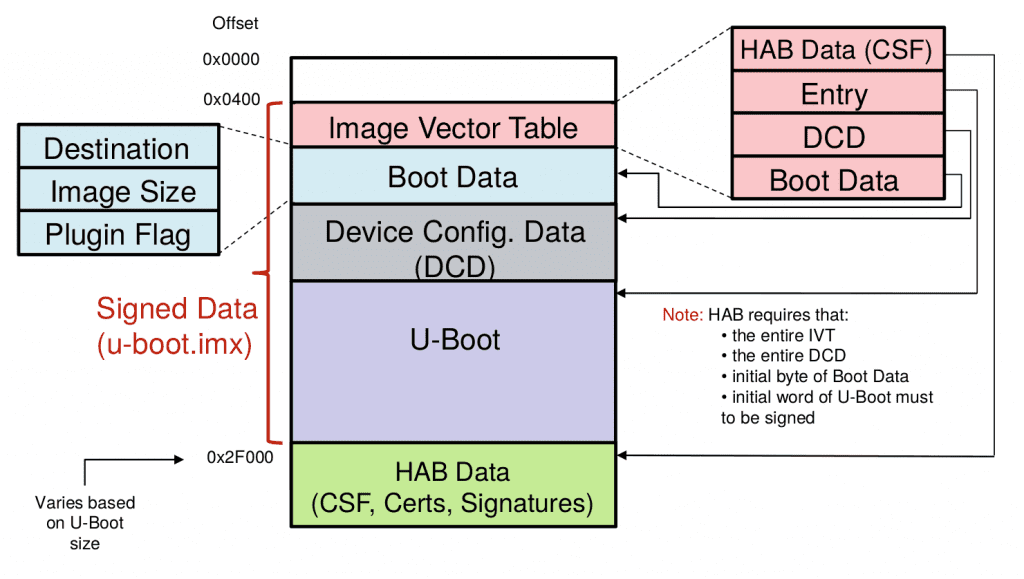
i.MX secure boot process First, i.MX Boot ROM reads the eFuses to determine the security configuration of the SoC and the type of the boot device.The ROM then loads the bootloader image to DDR memory. The image contains both the bootloader itself and digital signature data and public key certificate data which are collectively called CSF data. This latter is generated off-line using the HAB CST which is introduced in the next section.Once the bootloader is loaded, execution is then passed to the HAB library which will verify the signatures of the bootloader stage. If signature verification fails, execution is not allowed to leave the ROM for securely configured SoCs, also called "closed" devices.So as long as a device is not "closed", the ROM will execute the code loaded in RAM. However, with an "open" device, you will be able to see HAB events which will tell you if the image would pass the authentication process. This last statement is very important since this is what will allow us to make sure the security is working before "closing" the device.In order to understand the signed image generation, it is best to have a look at the final U-Boot image layout.

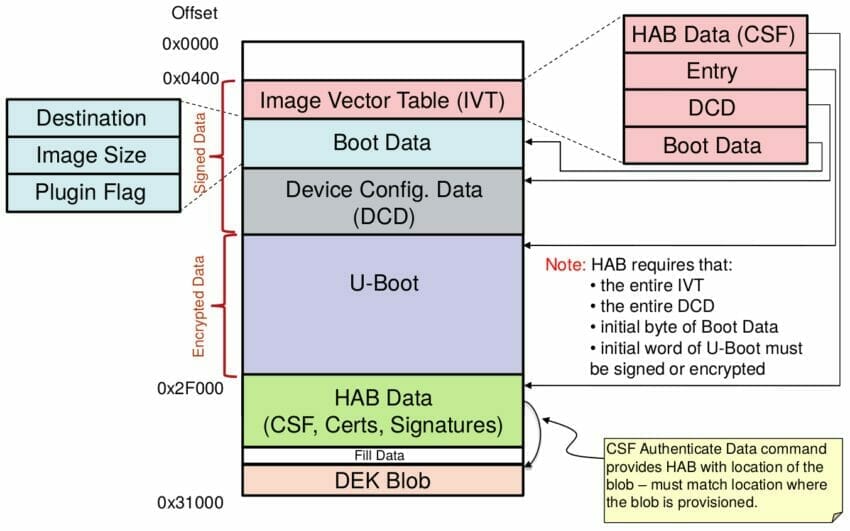
Signed U-Boot image layout In case you want to use the encryption capability, then the image would look like the following.

Encrypted U-Boot image layout Note that all the addresses in the previous diagrams are dependent on U-Boot size and therefore do not necessarily match your setup, it is more for an example.
How to enable/use it?
The below procedure will describe an example on how it has been done on one Nitrogen6x, make sure to modify the serial/password/keys values by your own!
1- Creation of the keys
First you need to unpack the Code Siging Tools package from NXP:
~$ tar xzf cst-2.3.2.tar.gz
~$ cd cst-2.3.2/keys
Then a couple of files need to be created, the first one being name 'serial' with an 8-digit content. OpenSSL uses the contents of this file for the certificate serial numbers.
~/cst-2.3.2/keys$ vi serial
42424242
Create a file called 'key_pass.txt' that contains your pass phrase that will protect the HAB code signing private keys.
The format of this file is the pass phase repeated on the first and second lines of the file.
~/cst-2.3.2/keys$ vi key_pass.txt
Boundary123!
Boundary123!
You can now create the signature keys.
~/cst-2.3.2/keys$ ./hab4_pki_tree.sh
...
Do you want to use an existing CA key (y/n)?: n
Do you want to use Elliptic Curve Cryptography (y/n)?: n
Enter key length in bits for PKI tree: 4096
Enter PKI tree duration (years): 10
How many Super Root Keys should be generated? 4
Do you want the SRK certificates to have the CA flag set? (y/n)?: y
...
Create the fuse table and binary to be flashed later.
~/cst-2.3.2/keys$ cd ../crts/
~/cst-2.3.2/crts$ ../linux64/srktool -h 4 -t SRK_1_2_3_4_table.bin -e SRK_1_2_3_4_fuse.bin -d sha256 -c
./SRK1_sha256_4096_65537_v3_ca_crt.pem,./SRK2_sha256_4096_65537_v3_ca_crt.pem,./SRK3_sha256_4096_65537_v3_ca_crt.pem,./SRK4_sha256_4096_65537_v3_ca_crt.pem -f 1
~/cst-2.3.2/crts$ hexdump -C SRK_1_2_3_4_fuse.bin
00000000 c2 64 a0 72 56 49 82 69 59 60 96 63 15 20 84 04 |.d.rVI.iY`.c. ..|
00000010 0e 88 6a 41 3b 45 33 f5 28 6c 30 23 6e 36 2c 8e |..jA;E3.(l0#n6,.|
2- Flashing the keys
The fuse table generated in the previous section is what needs to be flashed to the device. However, the hexdump command above doesn't show the values in their correct endianness, instead the command below will be more useful.
~/cst-2.3.2/crts$ hexdump -e '/4 "0x"' -e '/4 "%X""n"' < SRK_1_2_3_4_fuse.bin
0x72A064C2
0x69824956
0x63966059
0x4842015
0x416A880E
0xF533453B
0x23306C28
0x8E2C366E
The above command gives you what needs to be flashed in the proper order.The commands below are made for i.MX6QDL, not i.MX7D or i.MX6SX. Make sure to use your own values here, otherwise your board will never be able to authenticate the boot image.
=> fuse prog -y 3 0 0x72A064C2
=> fuse prog -y 3 1 0x69824956
=> fuse prog -y 3 2 0x63966059
=> fuse prog -y 3 3 0x4842015
=> fuse prog -y 3 4 0x416A880E
=> fuse prog -y 3 5 0xF533453B
=> fuse prog -y 3 6 0x23306C28
=> fuse prog -y 3 7 0x8E2C366E
If you flashed the above by mistake, without reading the note above, know that we share the set of keys used for this blog post:
As a customer pointed out, for i.MX6 CPU with the TO1.0 revision (pre-production), you also need to flash some random MasterKey (OTPMK):
=> fuse prog -y 2 0 0xdeadbeef
...
=> fuse prog -y 2 7 0xdadadada
3- Build U-Boot with security features
Build U-Boot with the CONFIG_SECURE_BOOT configuration enabled. Here is an example for Nitrogen6q/BD-SL-iMX6:
~$ git clone https://github.com/boundarydevices/u-boot-imx6
     -b boundary-v2016.03
~$ cd u-boot-imx6
~/u-boot-imx6$ export ARCH=arm
~/u-boot-imx6$ export CROSS_COMPILE=arm-linux-gnueabihf-
~/u-boot-imx6$ make nitrogen6q_defconfig
~/u-boot-imx6$ make menuconfig
~/u-boot-imx6$ make V=1
...
./tools/mkimage -n board/boundary/nitrogen6x/nitrogen6q.cfg.cfgtmp -T imximage -e 0x17800000 -d u-boot.bin u-boot.imx
Image Type: Freescale IMX Boot Image
Image Ver: 2 (i.MX53/6/7 compatible)
Data Size: 512000 Bytes = 500.00 kB = 0.49 MB
Load Address: 177ff420
Entry Point: 17800000
HAB Blocks: 177ff400 00000000 00078c00
Note that the last line "HAB Blocks" is very important when creating the .csf file later on.
4.a- Sign a U-Boot image
If you just want to sign your binary, follow this section and then go straight to section 5. Otherwise, if you want to encrypt and sign your binary, jump to next section directly.Go to the CST tools again:
~$ cd ~/cst-2.3.2/linux64/
~/cst-2.3.2/linux64$ cp ~/u-boot-imx6/u-boot.imx .
At this point you need to create a u-boot.csf file using the "HAB Blocks" information from previous section and the template provided in the HABCST_UG.pdf documentation which is provided in the CST package.For more convenience, we created a .csf file that applies to Nitrogen6x using latest U-Boot.
~/cst-2.3.2/linux64$ wget -O u-boot.csf
    https://storage.googleapis.com/boundarydevices.com/u-boot_sign.csf
... edit the size in the "Blocks = " line...
~/cst-2.3.2/linux64$ ./cst --o u-boot_csf.bin --i u-boot.csf
CSF Processed successfully and signed data available in u-boot_csf.bin
You can now generate the final binary by concatenating the u-boot.imx image with the CSF binary:
~/cst-2.3.2/linux64$ cat u-boot.imx u-boot_csf.bin > u-boot_signed.imxYou can copy this binary to the root of an SD card along with 6x_upgrade. Don't forget that the name of the binary must match the platform name (see U-Boot blog post for the explanation).
~/cst-2.3.2/linux64$ cp u-boot_signed.imx /u-boot.nitrogen6qYou can now flash this signed version of U-Boot, see section 5.
4.b- Encrypt and sign an image
First, the CST binary provided in the NXP package doesn't allow to use encryption, so you need to build a new binary yourself:
~$ cd ~/cst-2.3.2/code/back_end/src
~/cst-2.3.2/code/back_end/src$ gcc -o cst_encrypt -I ../hdr -L ../../../linux64/lib *.c -lfrontend -lcrypto
~/cst-2.3.2/code/back_end/src$ cp cst_encrypt ../../../linux64/
Then you can download the .csf we've prepared for encryption and build both the DEK blob and the CSF binary:
~$ cd ~/cst-2.3.2/linux64/
~/cst-2.3.2/linux64$ cp ~/u-boot-imx6/u-boot.imx .
~/cst-2.3.2/linux64$ wget -O u-boot.csf
https://storage.googleapis.com/boundarydevices.com/u-boot_encrypt.csf
... edit the size in the "Blocks = " line...
~/cst-2.3.2/linux64$ ./cst_encrypt --o u-boot_csf.bin --i u-boot.csf
CSF Processed successfully and signed data available in u-boot_csf.bin
At this point, make sure to modify the csf file to match your binary:
- The
[Authenticate Data]section must cover the IVT + DCD table size and NOT the padding- As an example:
Blocks = 0x177ff400 0x0 0x344 "u-boot.imx"
- As an example:
- The
[Decrypt Data]section must cover the U-Boot data (after IVT + DCD + padding)- As an example:
Blocks = 0x17800000 0x00000C00 0x00078000 "u-boot.imx"
- As an example:
The above will produce the following binaries:
u-boot.imx: encrypted version of u-bootu-boot_csf.bin: CSF binarydek.bin: DEK key that needs to be transformed into a blob- Each CPU generates a different blob!!
In order to generate the dek blob, the dek.bin must be provided to a U-Boot dek tool which will compute the blob using the secrete and unique key from the specific CPU it is running on. The easiest approach is to copy the dek.bin to the root of an sdcard and issue the following:
=> load mmc 0 10800000 dek.bin
=> dek_blob 0x10800000 0x10801000 128
Write this blob to SDCard, here is the procedure to write to a EXT4 partition:
=> ext4write mmc 0 0x10801000 /dek_blob.bin 0x48Here is the equivalent for a FAT partition:
=> fatwrite mmc 0 0x10801000 dek_blob.bin 0x48Once you've retrieved the dek_blob.bin, you can generate the final signed & encrypted image. The cst_encrypt binary tool generated earlier will sign the binary and encrypt its content in place.
~/cst-2.3.2/linux64$ objcopy -I binary -O binary --pad-to=0x1F00
  --gap-fill=0x00 u-boot_csf.bin u-boot_csf.bin
~/cst-2.3.2/linux64$ cat u-boot.imx u-boot_csf.bin dek_blob.bin > u-boot_encrypt.imx
Note that the CSF region in U-Boot header is set to 0x2000 whereas we pad it to 0x1F00. The reason is that this region also includes the dek_blob.bin, otherwise the boot ROM won't load the dek blob to memory.As a result we have encrypted boot image which can be loaded and executed by only current board since dek_blob.bin is unique per board/CPU.Finally, you can copy this binary to the root of an SD card along with 6x_upgrade. Don't forget that the name of the binary must match the platform name (see U-Boot blog post for the explanation).
~/cst-2.3.2/linux64$ cp u-boot_encrypt.imx /u-boot.nitrogen6q5- Flash and test the device
Use the our standard procedure to update U-Boot:
=> run upgradeuThe device should reboot, then check the HAB status:
=> hab_status
Secure boot disabled
HAB Configuration: 0xf0, HAB State: 0x66
No HAB Events Found!
The Secure boot disabled means that the device is open. But still the HAB engine will check the image and report errors (Events) if the signature/encryption isn't right.
6- Closing the device?
Once you are *absolutely* sure you've understood what has been done so far and that you are sure it works, you can "close" the device. Once again, this step is IRREVERSIBLE, better make sure there is no HAB Events in open configuration.Below is the procedure to "close" the device on i.MX6QDL, for other devices such as the i.MX6SoloX or i.MX7D the fuse map most likely differ and requires another command.
=> fuse prog 0 6 0x2Going further
What about imx_usb_loader?
As explained in the HAB application notes, it is possible to use the Serial Download Protocol (SDP) on close devices using the MFGTools.Thanks to Jérémie Corbier from Prove&Run, support has been added to imx_usb_loader to load a signed binary. Make sure to use the HEAD of the master branch to have the best support from the imx_usb_loader tool.As the documentation says, using SDP requires:
- Modify the .csf file in order to check the DCD tabled loaded in OCRAM
- Otherwise considered as a HAB error
- Sign the u-boot.imx binary with the DCD address set to 0 in the IVT header
- Since the SDP protocol clears the DCD table address
For the first modification to be done, simply add the following to your current
[Authenticate Data]
Verification index = 2
Blocks = 0x00910000 0x2C 0x318 "u-boot.imx"
Note that you cant' have several sets of Blocks under one Authenticate Data tag. Instead you need to declare as many Authenticate Data sections as Blocks you want to be verified.You might be wondering how to get the DCD length from the binary? It is actually given in the DCD Header (see TRM section 8.7.2). Here is a command to extract it from the u-boot.imx binary (courtesy of Eric Nelson):
$ dd if=u-boot.imx bs=1 skip=45 count=2 | od -t x2 -A none --endian=bigThen you need to get a custom script that allows to sign the binary without the DCD table address in the IVT header since it is cleared during the SDP boot process.
~/cst-2.3.2/linux64$ wget
https://storage.googleapis.com/boundarydevices.com/mod_4_mfgtool.sh
~/cst-2.3.2/linux64$ cp ~/u-boot-imx6/u-boot.imx .
~/cst-2.3.2/linux64$ ./mod_4_mfgtool.sh clear_dcd_addr u-boot.imx
~/cst-2.3.2/linux64$ ./cst --o u-boot_csf.bin --i u-boot.csf
~/cst-2.3.2/linux64$ ./mod_4_mfgtool.sh set_dcd_addr u-boot.imx
~/cst-2.3.2/linux64$ cat u-boot.imx u-boot_csf.bin > u-boot_signed.imx
~/cst-2.3.2/linux64$ /imx_usb u-boot_signed.imx
What about authenticating the kernel?
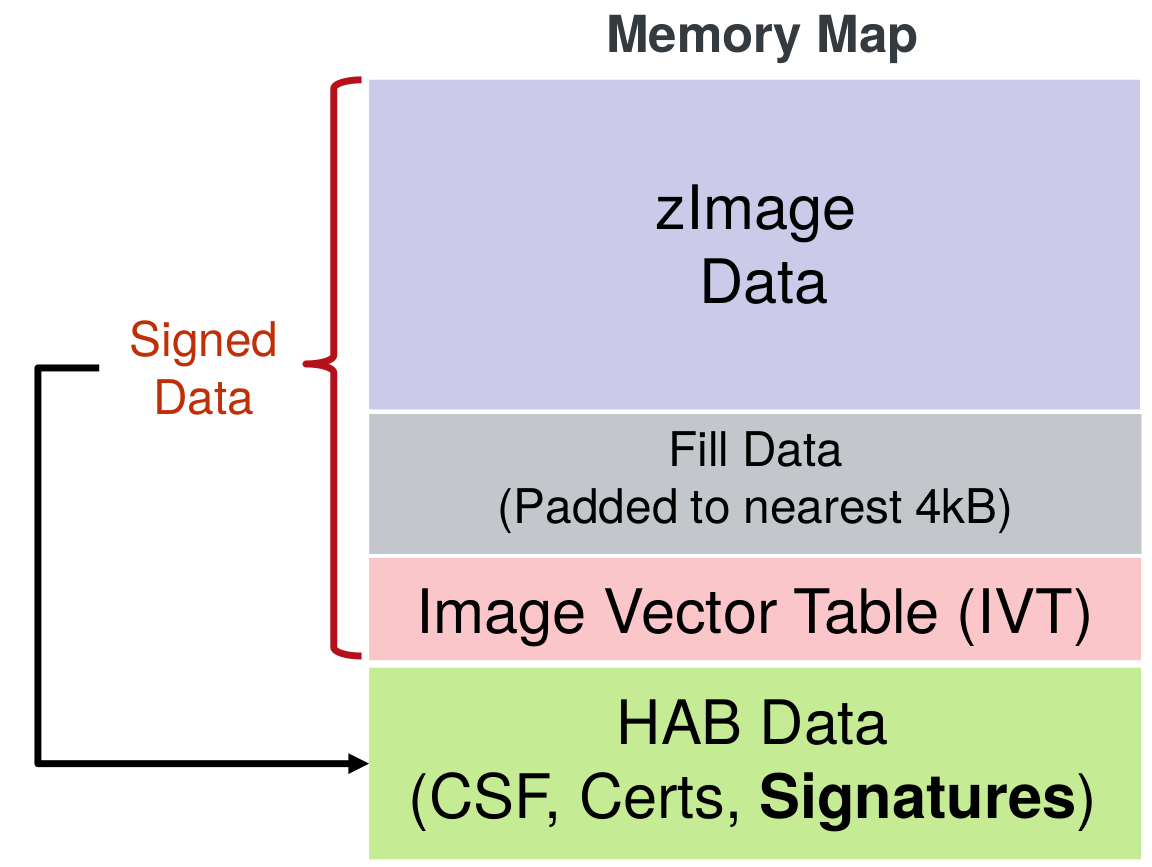
Now that your bootloader image is properly authenticated and that your device is secured, you can sign your kernel image so U-Boot ensures to load a known version. Here is a zImage layout example:

Signed zImage layout The first thing to do is to generate the IVT file. We are providing a script that allows you to do so:
~/cst-2.3.2/linux64$ wget
https://storage.googleapis.com/boundarydevices.com/genIVT
~/cst-2.3.2/linux64$ cp ~/linux-imx6/arch/arm/boot/zImage .
~/cst-2.3.2/linux64$ hexdump -C zImage | tail -n 1
~/cst-2.3.2/linux64$ vi genIVT
The hexdump command above allows to learn the zImage size. Then you can modify the genIVT to reflect the proper sizes, in our example, the size of the zImage was 0x468628 so the next 4kB boundary was 0x469000 as you can see in the genIVT.
~/cst-2.3.2/linux64$ ./genIVT
~/cst-2.3.2/linux64$ hexdump ivt.bin
00000000 d1 00 20 41 00 10 80 10 00 00 00 00 00 00 00 00
00000010 00 00 00 00 00 90 c6 10 20 90 c6 10 00 00 00 00
00000020
~/cst-2.3.2/linux64$ objcopy -I binary -O binary --pad-to=0x469000
  --gap-fill=0x00 zImage zImage-pad.bin
~/cst-2.3.2/linux64$ cat zImage-pad.bin ivt.bin > zImage-pad-ivt.bin
Then you can download the .csf file for the zImage in order to create the CSF blob and generate the signed image:
~/cst-2.3.2/linux64$ wget
https://storage.googleapis.com/boundarydevices.com/zImage.csf
... edit the size in the "Blocks = " line...
~/cst-2.3.2/linux64$ ./cst --o zImage_csf.bin --i zImage.csf
~/cst-2.3.2/linux64$ cat zImage-pad-ivt.bin zImage_csf.bin > zImage_signed
That's it, you can now modify your U-Boot bootcmd so it includes the HAB command that checks the kernel:
=> load mmc 0 10800000 zImage_signed
4630872 bytes read in 438 ms (10.1 MiB/s)
=> hab_auth_img 10800000 469000
Authenticate image from DDR location 0x10800000...
Secure boot enabled
HAB Configuration: 0xcc, HAB State: 0x99
No HAB Events Found!
Boot time impact
We have not run any test to know how much impact HAB has on boot time yet.Enabling the signature definitely increases the time it takes before U-Boot is loaded. Feel free to let us know if you have made some comparison.
References
- https://www.nxp.com/webapp/Download?colCode=IMX6DQ6SDLSRM
- https://community.nxp.com/docs/DOC-105916
- https://www.nxp.com/files/32bit/doc/app_note/AN4581.pdf
- https://www.nxp.com/files/training/doc/dwf/DWF13_AMF_IND_T0291.pdf
- https://ezurio.com/secure-boot-on-i-mx6-nitrogen6x-boards/
- https://community.nxp.com/docs/DOC-330622
- https://community.nxp.com/docs/DOC-332147