/filters:background_color(white)/2024-10/Nitrogen8M_Mini_SBC-e1550333331743.png)
/filters:background_color(white)/2024-10/Nitrogen 8M Mini SMARC1.267 without wireless.png)
/filters:background_color(white)/2024-10/Nit8M_Mini_SOM_Front.png)
/filters:background_color(white)/2024-10/Nitrogen8M_SBC-e1550277453741.png)
/filters:background_color(white)/2023-01/Nitrogen8M_SOM-e1550334029145.png.png)
We are glad to deliver the latest Android 10 1.0.0 release for all our i.MX8M-based Nitrogen platforms:
- Nitrogen8M (and SOM)
- Nitrogen8M Mini (and SOM)
- Nitrogen8M Nano (and SOM)
![]()
For the impatient
You can download the Android 10 images from here:
- For Nitrogen8M (+SoM) platforms:
- For Nitrogen8M Mini (+SoM) platforms:
- For Nitrogen8M Nano (+SoM) platforms:
Update 20200818 -> 20200825 changelog:
- Updated kernel stable release to 4.19.141
- Fixed Nitrogen8M Nano SBC support (rev1)
Update 20200512 -> 20200818 changelog:
- Updated kernel stable release to 4.19.134
- Fixed M4/M7 core boot
- Added Serial port / GPIO SELinux rules
- Fixed WiFi P2P for Nitrogen8M
- Added SD Card boot support
Flashing using fastboot
The .zip archives include all the files to be flashed using fastboot. Note that fastboot will only flash to your eMMC device, for SD card, please check next section. First you need to enter fastboot mode from U-Boot prompt:
=> fastboot 0Once the platform is in fastboot mode, you simply need to call the flashing script:
~/$ unzip q10*nitrogen8*.zip -d q10-nitrogen8
~/$ cd q10-nitrogen8
~/q10-nitrogen8$ ./device/boundary/scripts/flash_fastboot.sh
Since our i.MX8 platforms might come with different eMMC sizes, you can select which size you want to use at flashing time. If you don't provide that argument, the "default" size of 8GB will be flashed. But if you have a recent board, it will most likely include 16GB of eMMC, here is the command to use its full size:
~/q10-nitrogen8$ ./device/boundary/scripts/flash_fastboot.sh -s 16 Note that you can also use fastboot from a Windows Host PC, see following blog post to learn how:
C:q10-nitrogen8> deviceboundaryscriptsflash_fastboot.bat nitrogen8mFlashing using Etcher / dd
If you cannot use the fastboot tool, you can still flash the 16GB prebuilt image file for your platform (.img.gz). For Linux users you can simply use the following command:
~$ zcat q10*nitrogen8*.img.gz | sudo dd of=/dev/sdX bs=1MFor Windows and Linux users who would rather use a UI, we recommend using Balena Etcher tool:
NB: the first boot from SD card can be quite long as it creates and formats missing userdata partition. Please be patient, all subsequent boots will be faster.
Updating U-Boot
Once the OS is flashed, make sure to update U-Boot:
=> run upgradeuReason for that update is explained later in that article.
What's new?
This section will only describe the changes brought either by the OS update itself or modified/added features.
Android 10 OS updates
Google provides a list of notable changes for developers:
Build variant change
Although we used to provide eng(ineering) builds as our prebuilt images, Android enables too many security features by default that deprecated such approach. For that reason, all our prebuilt images are now userdebug images, and we strongly recommend our customers to only ship with user variants to avoid security issues.
SELinux
As usual, this release comes with SELinux enabled and enforced. If you are using the userdebug build, you can still switch to permissive mode by setting 1 variable in U-Boot:
=> setenv selinux permissive
=> saveenv
Note that this feature only works on userdebug builds, user builds are enforced at all time.
A/B vs. non-A/B
Considering the size of our eMMC storage (8GB for most devices, 16GB for some) we decided to focus on non-A/B partitioning. This approach allows to save some space and keep the most space for your applications. However, considering that we now support all the security features, we can easily switch to A/B scheme, let us know if you have any interest in it.
Bootloader Control Block
Another notable change in this release is with the use of the Bootloader Control Block (BCB). In previous releases, the bootloader was reading one SNVS register (non-volatile) to either execute fastboot or even go to recovery partition. We are now using the misc partition to receive messages from the OS. This approach is mandatory for A/B partitioning.
AVB2.0
For the first time, our Android release supports Android Verified Boot 2.0! That is a big deal as it makes the release more secure while getting our build process closer to standard AOSP. This news might trigger a few questions: What does that mean? It basically means that the integrity of the critical partitions is checked at boot up to make sure nobody tampered with them. Where is that integrity checked? There are two steps actually:
- The bootloader (U-Boot in our case) first checks the boot partition against the hash present inside the vbmeta partition
- If the check fails, it won't go any further
- If the check succeeds, it sets the kernel cmdline to include the necessary info for the OS
- The OS (Android) then checks the hash/integrity of all the critical partitions
- Which is composed of:
dtbo,boot,system,vendor
- Which is composed of:
So I can't make any modification now? No, there's a way to disable verity:
$ adb root
$ adb disable-verity
$ adb reboot
At this point you will be able to modify every partition (you can even use adb sync) It goes without saying that this disablement isn't possible on user builds. Do we need a special U-Boot for this? No, not really. You need an up-to-date U-Boot version (at least as new as this blog post) in order to make sure all the Android features are enabled. That is why the first section of the article asks for U-Boot update after flashing the release. But the U-Boot version being used is still compatible with our Linux images. Main reason for this compatibility is that, unlike the NXP version, we only rely the upstream U-Boot/Android features, allowing us to be more flexible and future-proof.
Preboot image
That last part about U-Boot being the same as for the Linux release might bring some questions on how it works. How can we be compatible with our Linux images that load a boot.scr script from the first partition and yet use the regular Android bootimage? Well that's where we cheat a little, we created a new preboot partition that only includes:
boot.scr: script executed by U-Boot by default- in charge of making of the OS checks (verity, BCB etc) and set up the display
u-boot.: u-boot binaries for upgrade
That approach gives us flexibility and it can easily be removed for a custom design, then the boot.scr content would become the default U-Boot environment.
dtbo image
This release also makes use of a new aspect of Android: the dtbo image. It should include overlays of a default device tree blob included in the boot image. However since dtb overlays are not supported by the kernel, NXP is using populating the dtbo image with a regular dtb file. In our case, we kept that approach but added the support for multiple dtb files inside the same dtbo image. That allows us to have one OS images (like above) that targets several hardware variants (like SBC and SOM) at once.
Are we in Treble?
Yes! This marks our first release Treble-compliant! This means that the OS is fully compliant with Android requirements, allowing for easier OS updates.
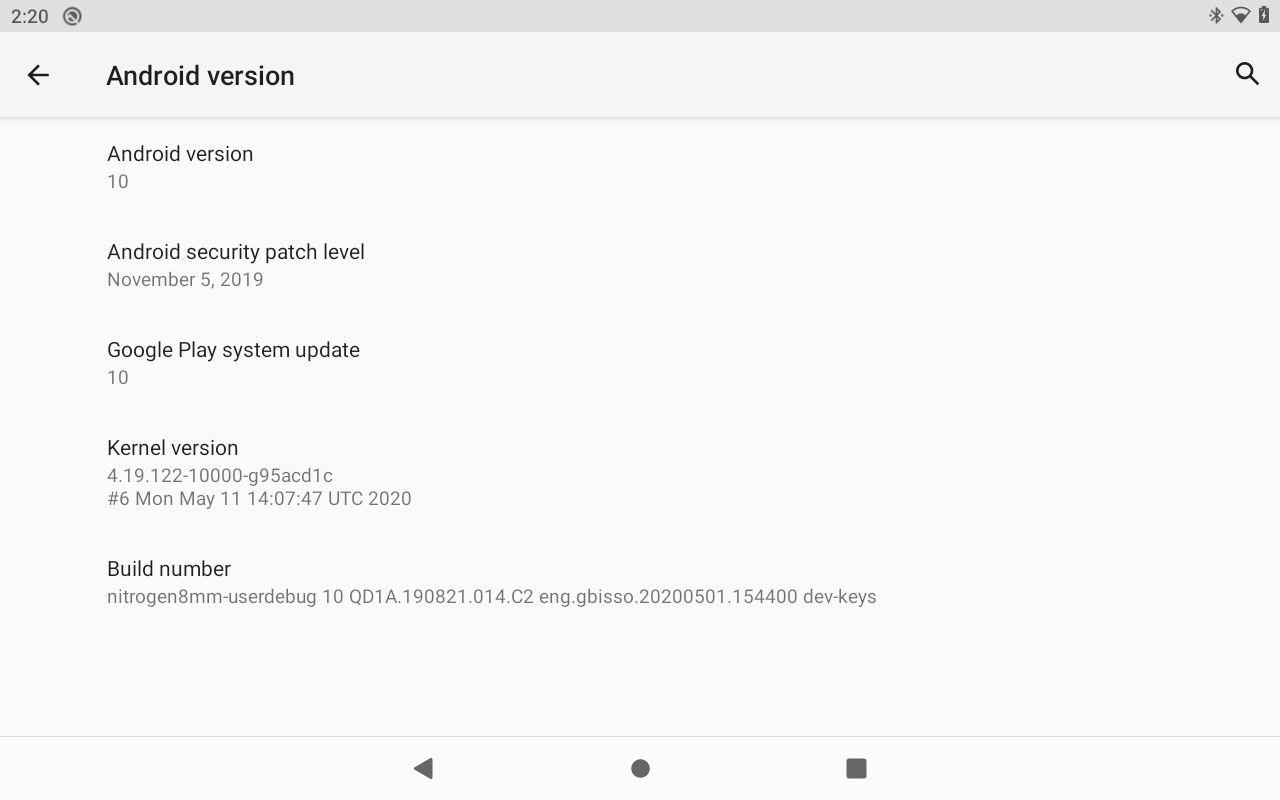
Linux Kernel 4.19.x
This Android release is based on a 4.19.x kernel. It therefore benefits from all our latest drivers/fixes as well as newest Vivante graphics libraries (v6.4.0.p2).
Ezurio (formerly Boundary Devices) additions
Just like our previous releases, this one includes unique features that only Ezurio (formerly Boundary Devices) provides:
- Dynamic display support
- Our U-Boot version still detects the connected displays automatically (MIPI-DSI + HDMI)
- You can see our list of supported MIPI-DSI displays from our website here
- Optimized Camera HALv3 version
- This releases offers continuous autofocus support for our cameras
- Support for our 802.11b/g/n/ac + BT4.1 Silex Module
- Display rotation setting from U-Boot
- Note that this doesn't work well on 8M Mini for now, see this thread to be updated
=> setenv hwrotation 270
=> saveenv
=> reset- Variety of accessories
- All our accessories like OV5640 cameras are all supported
- Up to date kernel stable release
- While NXP kernel is based upon 4.19.42 kernel, we provide latest updates up to 4.19.122
- This includes 8700+ bug/CVE fixes that makes your device much more secure
Source code access
For the newcomers, please make sure to read our "Android Getting Started Guide" since it contains all the information you need to download, build and flash an Android image.
Since AOSP requirement is still to use Ubuntu Xenial (16.04) to build the OS, many might find it useful to use Docker, we provide a dockerfile if needed:
- dockerfile_xenial_android
- A separate blog post will detail how to use that dockerfile
For those already familiar with our releases, here is a condensed version to get the Android 10 source code:
~/$ mkdir myandroid
~/$ cd myandroid
~/myandroid$ repo init -u git://github.com/boundarydevices/android-manifest.git
       -b boundary-android-10.0.0_1.0.0
~/myandroid$ repo sync
~/myandroid$ export TEMPORARY_DISABLE_PATH_RESTRICTIONS=true
~/myandroid$ source build/envsetup.sh
~/myandroid$ lunch
... choose nitrogen8m / nitrogen8mm / nitrogen8mn from the list of boards
~/myandroid$ ./imx-make.sh -j12
As you can see, we use a special make script instead of the regular make command. The reason is that in order to have as few AOSP changes as possible, NXP created a separate script in order to kernel the build dependencies that are the kernel, dtbo, u-boot images. One could also use the following approach to only build the dependencies with that script and then use standard Android build:
~/myandroid$ ./imx-make.sh kernel bootloader -j12
~/myandroid$ make -j12
There's also one variable (TEMPORARY_DISABLE_PATH_RESTRICTIONS) that needs to be set as Android build now forbids the use of mke2fs which is required for our preboot partition. We suggest setting this inside your .bashrc or .profile user file. As always, let us know your experiences (both good and bad) when you test out this image.