/filters:background_color(white)/2024-10/Nitrogen8M_Mini_SBC-e1550333331743.png)
/filters:background_color(white)/2024-10/Nitrogen 8M Mini SMARC1.267 without wireless.png)
/filters:background_color(white)/2024-10/Nit8M_Mini_SOM_Front.png)
/filters:background_color(white)/2024-10/Nitrogen8M_SBC-e1550277453741.png)
/filters:background_color(white)/2023-01/Nitrogen8M_SOM-e1550334029145.png.png)
 Ubuntu 20.04 Weston/Wayland Compositor We’re glad to release our first Ubuntu Focal image for Nitrogen8MQ and Nitrogen8M Mini board. Since this board supports only Wayland graphical backend, the system is simpler than earlier systems with i.MX6. We use Weston, the reference Wayland compositor in this system. This image is a console developer image also, it boots to the command prompt. Weston compositor could be started manually or you can set autostart the service, as per your preference. This system contains NXP/Freescale licensed content, so you will need to register on our web-site and log in before you can accept the license agreement and download the images from here: Nitrogen8M board:
- 20200806-nitrogen8mq-5.4.x_2.1.0_ga-focal-en_US-console-weston_aarch64_fastboot_8G.tgz (LABEL : sys-11h)
- ubuntu@focal-dev64:~$ sha1sum -b *img 541fa3360962a84279d684c60be25bc19cf3a217 *gpt_8G.img ee28fb325666e5b91f875946dec4af16747bcff3 *rootfs_8G.simg
- 20200806-nitrogen8mq-5.4.x_2.1.0_ga-focal-en_US-console-weston_aarch64.tar.gz (LABEL : sys-11h)
- ubuntu@focal-dev64:~$ sha1sum -b 20200806*.tar.gz cded55413283cd066f0bbb0ba742d408d6f2f8c6 *20200806-nitrogen8mq-5.4.x_2.1.0_ga-focal-en_US-console-weston_aarch64.tar.gz
Nitrogen8M Mini board:
- 20200806-nitrogen8mm-5.4.x_2.1.0_ga-focal-en_US-console-weston_aarch64_fastboot_8G.tgz (LABEL : sys-0Eh)
- ubuntu@focal-dev64:~$ sha1sum -b *img 541fa3360962a84279d684c60be25bc19cf3a217 *gpt_8G.img 69cd386ec63dcc75996941b0cd1382b42fe76a84 *rootfs_8G.simg
- 20200806-nitrogen8mm-5.4.x_2.1.0_ga-focal-en_US-console-weston_aarch64.img.gz (LABEL : sys-0Eh)
- ubuntu@focal-dev64:~$ sha1sum -b 20200806*.img.gz 58e99442e1eda4d284a926cb89b634f747ec4206 *20200806-nitrogen8mm-5.4.x_2.1.0_ga-focal-en_US-console-weston_aarch64.img.gz
Important ! Before installing this image please check your U-Boot version as it requires U-Boot version 2018.07 to be used. Make sure to visit our wiki if you need to upgrade:
You can find the bootscript in the /boot subdirectory now, its named boot.scr. The partition labels are set if you use the fastboot method. If you use your own method please check the boot partition labels, because the fstab boots by label (LABEL=sys-0Ch for example) now. You can use e2label to modify partition label.
Programming the image
Since the Nitrogen8M board has no SD card slot, you need to program this image in the same way as an Android system: by using fastboot. Please install the following packages on your desktop PC, Debian or Ubuntu :
$ sudo apt update
$ sudo apt install fastboot android-tools-fastboot
To avoid using sudo for each command, please download the following file and move it to the /lib/udev/rules.d directory, then reboot your PC:
Now connect your Nitrogen8M board's J67 USB OTG port to your PC's USB port. Use regular USB2.0 OTG cable do not use USB3.0 cable (as it seems to be problematic with U-Boot). Connect the Nitrogen board's RS232 console to your PC so you can communicate with the board. You can then power up the Nitrogen8M board, and stop the u-boot execution by pressing any key. Then type:
Hit any key to stop autoboot: 0
=> fastboot 0
Now test the USB connection on the PC, please type on the PC:
$ sudo fastboot devices -l
 fastboot usb-x:y
If you get the above response, a MAC address , the word fastboot, then the USB device:id numbers, the communication is OK. Now type on PC:
$ sudo fastboot flash gpt gpt_8G.img
$ sudo fastboot flash rootfs rootfs_8G.simg
, then wait till its completed. When its done you can disconnect USB cable, and restart your Nitrogen8M board. Note that you can also use fastboot from a Windows Host PC, see following blog post to learn how: https://ezurio.com/android-tools-windows-support-nitrogen-platforms/
Since the Nitrogen8M_Mini board has an SD card slot, not like Nitrogen8M, you can create an SD car similarly to i.MX6 boards. The image is a slightly-less-than-4GiB image file containing the partition table. Inspired by ubuntu-mate.org, I changed over from
dd to another disk copy program called ddrescue. It is a much more talkative program, although dd does do it’s job honestly. I don’t like mute programs, you never know whats happening in a given moment. For example, if you want to create an SD card for a console image, you need to do the following : $ sudo apt-get install gddrescue xz-utils util-linux
$ gunzip 20200806-nitrogen8mm-5.4.x_2.1.0_ga-focal-en_US-console-weston_aarch64.img.gz
$ sudo ddrescue -D --force 20200806-nitrogen8mm-5.4.x_2.1.0_ga-focal-en_US-console-weston_aarch64.img /dev/sdX You have to replace sdX with your actual SDHC reader/writer device. Use the lsblk command to check it. Type lsblk with unplugged SDHC reader, then insert the device, and type lsblk again. A new node will be added , that is your SDHC reader/writer device.
Usernames and passwords
Two users are defined for use on the system: ubuntu and root. The password for each is Boundary (capital B). The user ubuntu has administrator rights, but doesn't need to enter password at sudo command. We wanted to make life easier at the cost of some security. If you want to change this please type:
ubuntu@focal-dev64:~$ sudo visudo, and comment out or delete the last line with "ubuntu" and "NOPASSWD:" An ssh server is configured on the system, though it does not allow password-based authentication for user root. User ubuntu has sudo privileges, so you can place your ssh public key (normally $HOME/.ssh/id_rsa.pub) to the system like so :
ubuntu@focal-dev64:~$ sudo mkdir /root/.ssh
ubuntu@focal-dev64:~$ sudo nano /root/.ssh/authorized_keys
... paste content of $HOME/.ssh/id_rsa.pub here
ubuntu@focal-dev64:~$ sudo chmod 600 /root/.ssh/auth*
ubuntu@focal-dev64:~$ sudo chmod 600 /root/.ssh/
What's supported
Since the images above include our stable 5.4.x kernel, essentially everything is supported including :
- Vivante GPU accelerations for Wayland
- The Hantro Video Processing Unit supports the following decoders:
- video/x-h265 (8MQ + 8MM)
- video/x-vp9 (8MQ + 8MM)
- video/x-h264 (8MQ + 8MM)
- video/x-vp8 (8MQ + 8MM)
- video/x-vp6-flash (8MQ)
- video/mpeg (8MQ)
- video/x-h263 (8MQ)
- video/x-flash-video (8MQ)
- video/x-divx (8MQ)
- video/x-xvid (8MQ)
- video/x-cavs (8MQ)
- video/x-wmv (8MQ)
- video/x-pn-realvideo (8MQ)
- video/x-raw (8MQ + 8MM)
- The Hantro Video Processing Unit supports the following encoders:
- video/x-h265 (8MM)
- video/x-vp9 (8MM)
- video/x-h264 (8MM)
- video/x-vp8 (8MM)
- Wi-Fi and Bluetooth modules for the built-in Silex module
- All kind of storage devices , eMMC, SATA hdd (via USB3-SATA adapter), USB3.0/2.0 pen drives, mini PCIe devices, cell modems
- All of our supported touch panels
The packaging (inluding kernel) is done in the normal debian way, so apt-get update/dist-upgrade will keep your image up and running the latest as patches come out.
What's new in this release
The Linux kernel was upgraded to 5.4.50 ( meta-package name: linux-boundary-18f ) GPU driver was upgraded to Vivante 6.4.0p2.4 ( meta-package name: imx-gpu-viv-f17-... ). The module galcore (CONFIG_MXC_GPU_VIV) was removed from the kernel, and it's an externally built module. This change makes the graphics system modular, and more upgradeable, at the price of longer kernel upgrading time. Upgrading kernel takes about 3-4 minutes now, instead of 30 seconds, because every kernel upgrade rebuilds the galcore driver from sources, because its a DKMS module. The NXP/Vivante GPU SDK was added : imx-gpu-sdk 4.0.2 . You can get the source with the usual apt-get source command. The SDK has many new demos, for example OpenCL, OpenVG, and for OpenVX and Vulkan. The distribution is Focal 20.04 LTS . Here are some main component versions :
- Xorg server 1.20.8-2ubuntu2.2
- gstreamer1.0 1.16.2
- bluez 5.53-0ubuntu3
- qcacld-lea-2.0 Wi-Fi driver for BD-SDMAC
- VPU Hantro libraries v1.18.0
- Qt5 5.12.8
- apt 2.0.3
- dpkg 1.19.7ubuntu3.1
- gcc/g++ 9.3.0-1ubuntu2
- libwayland 1.18.0
- weston 6.0.1
- Silex WiFi / Bluetooth is supported in Focal also, as well as in Bionic and Buster.
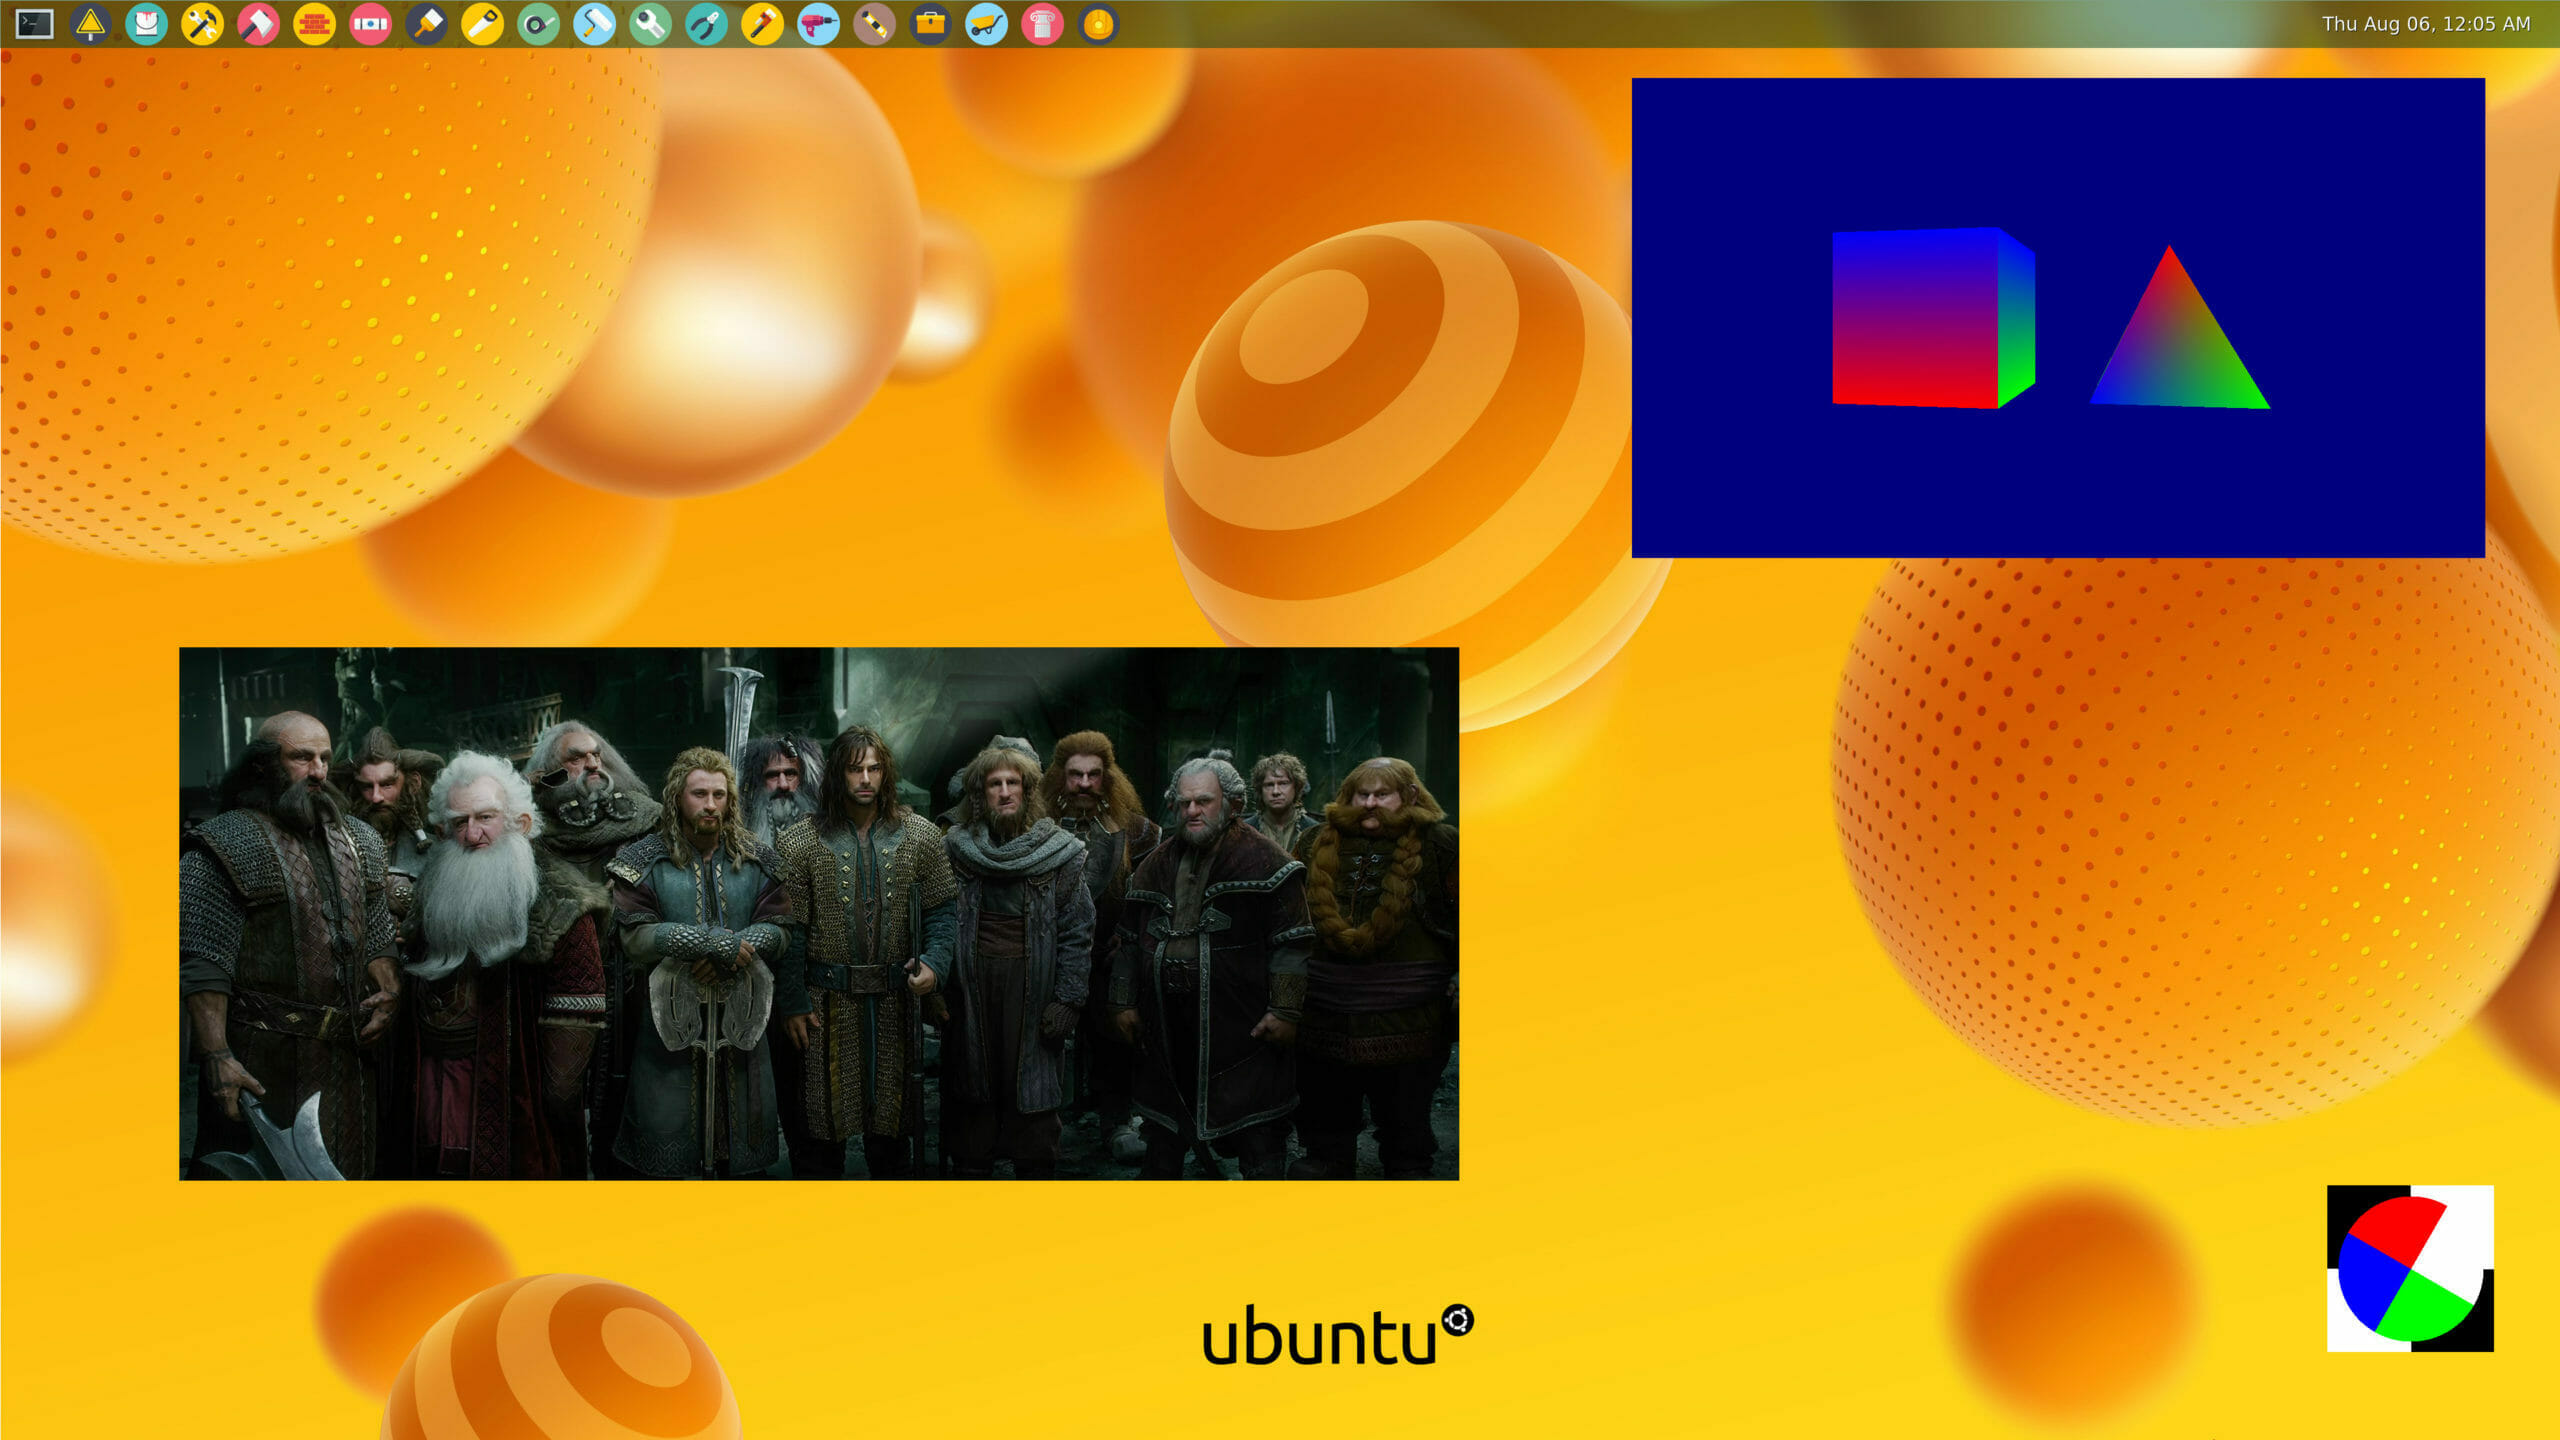 Weston playing video via gstreamer.
 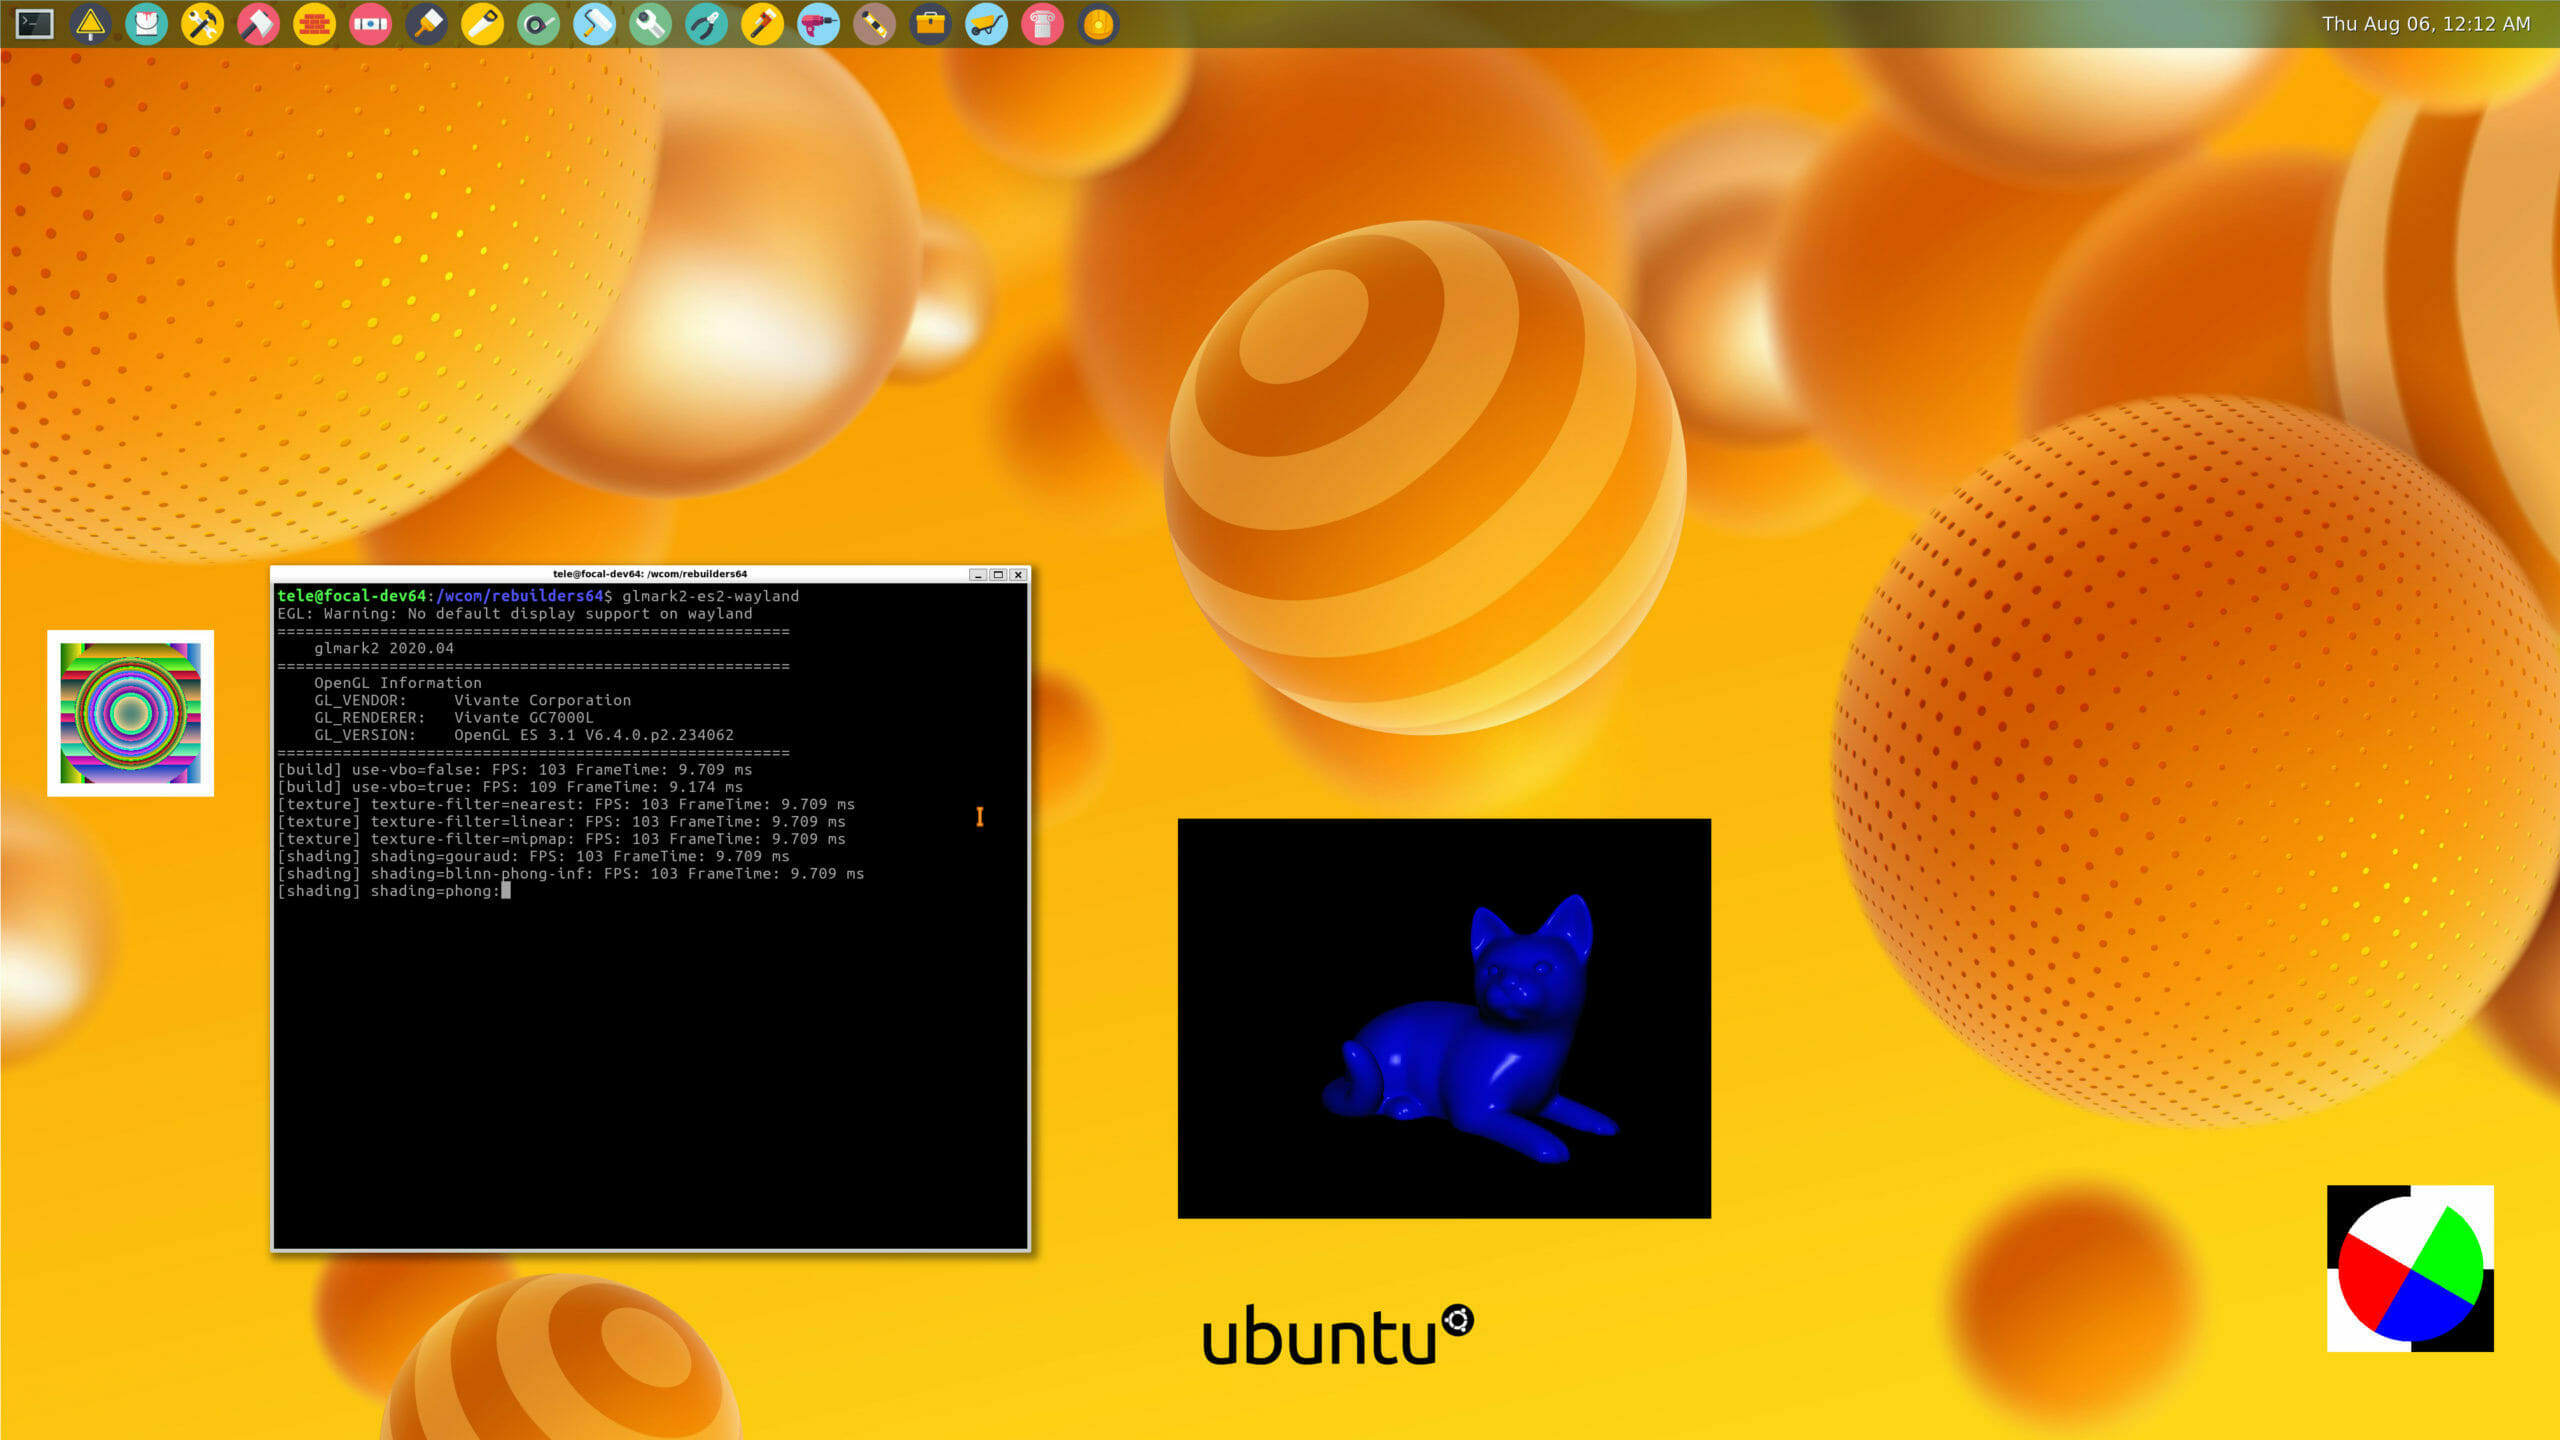 Running the glmark2 GPU Benchmark
 The system boots to the command prompt, as I mentioned before. You can start Weston compositor on any tty (not ssh, not RS232) terminal by typing:
ubuntu@focal-dev64:~$ wl
or
ubuntu@focal-dev64:~$ weston-launch
If you want to start Weston at boot automatically, you have to enable the service, you have to type the following:
ubuntu@focal-dev64:~$ sudo systemctl unmask weston.service
ubuntu@focal-dev64:~$ sudo systemctl enable weston.service
If you want to disable the autostart again you need to type:
ubuntu@focal-dev64:~$ sudo systemctl disable weston.service
ubuntu@focal-dev64:~$ sudo systemctl mask weston.service
You can find the weston.ini file in the /usr/share/weston/examples directory. Please type:
ubuntu@focal-dev64:~$ man weston.ini,to check the options, and feel free to modify it to suit your needs.
Weston keyboard bindings
The Weston desktop shell has a number of keyboard shortcuts. They are listed here. Almost all keyboard shortcuts for Weston include a specified modifier mod key which is determined in the file weston.ini (5): [shell] binding-modifier={none | ctrl | alt | super} The mod key is the same as the super key by default. The super key is in between
Weston touch / mouse bindings
There are also a number of bindings involving a mouse:
As always, please give us some feedback and let us know how things work for you.