 Laird Connectivity and Boundary Devices are now Ezurio
Using SWUpdate to upgrade your system
Published on November 11, 2016
Updating an Embedded System, whether it is locally with a USB drive or over-the-air (OTA), is a complex matter. Unfortunately there is no one size-fits-all solution although several options exist. This blog post will focus on SWUpdate which can be considered an update framework here to ease your life.
This article will be far from exhaustive, it will give pointers to how we think this framework can help you create the perfect update system. This solution has been created by Stefano Babic from Denx, it is now getting many contributors.
Overview
As the documentation says: Embedded Systems become more and more complex, and their software reflects the augmented complexity. New features and fixes make it more desirable than ever that the software on an embedded system can be updated in an absolutely reliable way.
How are Embedded Systems different than a regular PC with regard to updates? Well as part of the reliability concern raised above, it needs to be power-safe! This means that if the power is cut at any time during the update process, the device should always be able to boot. This is not the case with package-based updates which is why embedded customers often chose an atomic update.
This atomic update can either be made from the bootloader or from user-space. The SWUpdate project decided to use the latter option because updating from bootloader isn't as flexible in terms of support (missing drivers/capabilities). In other words, this article will explain how the following components can be updated atomically:
- Kernel
- Device tree
- Root file-system
The bootloader isn't part of it for the simple reason that in our platforms there's no redundant bootloader copy in NOR (not supported by the BootROM). So updating U-Boot isn't recommended since a power cycle during the NOR programming can brick the device.
The SWUpdate framework brings the following features:
- A standard update image format (
.swufile) - OTA update capabilities:
- Exposing a web interface to access the board
- Daemon connecting to HawkBit server
- Local update:
- Update from any file in file-system
- A standard parser supporting many handlers:
- Partitions (UBI volumes)
- Images to be installed; can be compressed
- Files; copied instead of images
- Scripts; shell or LUA, called pre/post install
- U-Boot; to update env variables
- Custom handlers API
- Allows to extend the support to new protocols/images
- Update images from verified source
- Update images can be signed
- One image for all: can target several platforms
- Each component can be tied to a specific hw/sw version
How does it work?
At this point you are probably asking a lot of questions about how this whole thing works, this section will answer the questions we asked ourselves.
What are the different update schemes?
There are two main different approaches to update the system from user-space.
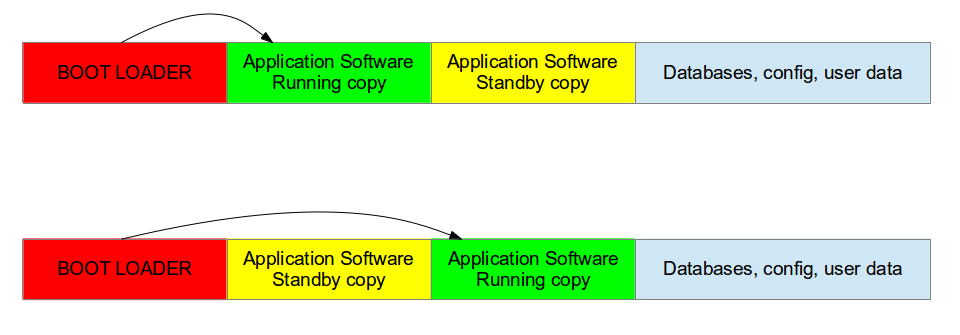
Double copy with fall-back
If there is enough space on the storage to save two copies of the whole software, it is possible to guarantee that there is always a working copy even if the software update is interrupted or a power off occurs.
Each copy must contain the kernel, the root file system, and each further component that can be updated. There also needs to be a mechanism to identify which version is running.
SWUpdate should be inserted in the application software, and the application software will trigger it when an update is required. The duty of SWUpdate is to update the stand-by copy, leaving the running copy of the software untouched.
A synergy with the boot loader is often necessary, because the boot loader must decide which copy should be started. Again, it must be possible to switch between the two copies. After a reboot, the boot loader decides which copy should run.
 Double Copy Layout
Single copy - running as standalone image
The software upgrade application consists of kernel and a small root file system, with the application and its libraries. The whole size is much less than a single copy of the system software. The system can be put in “upgrade” mode, simply signaling to the boot loader that the upgrading software must be started. There are several ways to communicate with the boot loader but the most common one is to set some variables in the boot loader environment (stored in NOR in our platforms).
The boot loader starts “SWUpdate”, booting the SWUpdate kernel and the initrd image as root file system. Because it runs in RAM, it is possible to upgrade the whole storage. Unlike the double-copy strategy, the systems must reboot to put itself in update mode.
This concept consumes less space in storage as having two copies, but it does not guarantee a fall-back without updating again the software. However, it can be guaranteed that the system goes automatically in upgrade mode when the productivity software is not found or corrupted, as well as when the upgrade process is interrupted for some reason.
 Single Copy Layout
Note that is it the same mechanism as used by Android (and its recovery system).
What does an update image look like?
The main concept is that the manufacturer delivers a single big image. All single images are packed together (cpio was chosen for its simplicity and because can be streamed) together with an additional file (sw-description), that contains meta information about each single image.
The format of sw-description can be customized: SWUpdate can be configured to use its internal parser (based on libconfig), or calling an external parser in LUA.
 SWU image format
The sw-description file, as its name suggests, describe all the components present in the image. Here is a sample that includes a rootfs for Nitrogen6x REV4 as well as a script.
software =
{
version = "1.0.1";
nitrogen6x = {
hardware-compatibility: [ "REV4" ];
images: (
{
filename = "rootfs.ext2.gz";
device = "/dev/update";
type = "raw";
sha256 = "ac802fd79e821ad0b562379e5e101ad67080986c3749a3fe8bb74230cb90ef3f";
compressed = true;
}
);
scripts: (
{
filename = "update.sh";
type = "shellscript";
sha256 = "faaaa3096b01c196d20903e21ec88757834e68f09de4c2edd721ad8b83a9628e";
 }
);
};
}
How does authentication work?
As you can see in the sample above, the first step towards image verification is to have the sha256 sum for each component. Then in order to make sure no one can modify the sw-description you need to sign it. Here are the steps to sign that file:
- Create the private key
$ openssl genrsa -out swupdate-priv.pem
- Create the public key
$ openssl rsa -in swupdate-priv.pem -out swupdate-public.pem
  -outform PEM -pubout
- Sign the image description file
$ openssl dgst -sha256 -sign swupdate-priv.pem
  sw-description > sw-description.sig
Once signed, you can ensure that nobody can temper with your update image to include malicious firmware.
If you built the swupdate binary with CONFIG_SIGNED_IMAGE, it is not possible to disable the check at runtime for obvious security reasons.
How can I target a specific hw/sw version?
For hardware targeting, you can enable the CONFIG_HW_COMPATIBILITY option. It will read the current platform hardware version from /etc/hwrevision. This means you update image can target several revisions/platforms at once.
software =
{
version = "1.0.1";
target1 = {
hardware-compatibility: [ "1.0", "1.2", "1.3" ];
...
};
target1 = {
hardware-compatibility: [ "1.1" ];
...
};
target2 = {
...
};
}
Same goes for software, you can add some "name" and "version" fields for each components that will be checked against /etc/sw-versions. This will only be used if your component has the install-if different field set.
What media/method can be used to update?
As stated in the overview, SWUpdate supports both OTA and local updates. We'll detail some possible implementations here.
Local update: USB drive example
Once the drive is mounted and the update located, you can start swupdate with the -i option.
# swupdate -i
If you enabled the signed image capability, you also need to provide the public key.
# swupdate -i -k
In order to automate this procedure, you can create a udev/mdev rule that executes a script every time a USB driver is plugged.
Finally, it is worth noting that it is useful to add the -v option in order for the tool to give more details on its progress.
OTA update: target as a web server
The tool includes a web server capability thanks to Mongoose. Therefore the CONFIG_MONGOOSE must be enabled via the menuconfig. Then you can start the swupdate tool as follows:
# swupdate -k -w "-document_root /var/www/swupdate/"
Then you can connect to your board to the port 8080 and see the update interface.
 SWUpdate web server
From the interface you can select and apply an update as well as rebooting the target.
OTA update: downloading from HTTP server
SWUpdate also offers to download the update file from an HTTP server with the -d option.
# swupdate -k -d
OTA update: Suricatta daemon
Finally, the tool offers a daemon named Suricatta which allows to connect to a HawkBit server. HawkBit offers a mechanism and an interface to manage software updates.
Its installation is not trivial so it won't be covered in this post. If you wish to test this feature, make sure to read the documentation. But here is a screenshot of what a HawkBit manager looks like.
 HawkBit manager
On the target, you simply need to pass the server information with the -u option.
# swupdate -k -u ""
How to configure SWUpdate?
Just like many open-source projects, SWUpdate relies on Kconfig so you can browse through the options using menuconfig.
$ make menuconfig
 SWUpdate menuconfig
Where can I find more information?
The documentation is very well written, exhaustive, easy to read and understand so we invite everyone to have a look:
Also, as usual, the source code can also shed some lights on some details:
Finally, Stefano made a presentation some time ago presenting the project which you can find here:
What about build systems integration?
The project is getting more and more traction from the community, hence it is present in several build systems already.
Yocto
A meta-swupdate layer is provided. It contains the required changes for mtd-utils and for generating LUA.
The recipes for Yocto are meant for single-copy scheme. Therefore it generates an initrd image containing the SWUpdate application, that is automatically started after mounting the root file system.
In order to generate the udpate initrd:
- Clone the repository:
~/yocto/sources$ git clone https://github.com/sbabic/meta-swupdate.git
- Add meta-swupdate to you
bblayers.conf - Generate the initrd image:
~/yocto/build$ MACHINE= bitbake swupdate-image
You will find the result in your tmp/deploy/ directory.
If you plan on using a double-copy scheme, the tool needs to be added to your custom image.
Buildroot
Buildroot also includes the swupdate package:
You need select the BR2_PACKAGE_SWUPDATE option to have the package in your image.
Then you can specify the SWUpdate configuration to use via the BR2_PACKAGE_SWUPDATE_CONFIG option. By default it uses the package config.
Also, an interesting feature is that you can configure SWUpdate from your Buildroot build folder with the following command:
~/buildroot$ make swupdate-menuconfig
~/buildroot$ make
This will modify the output/build/swupdate-xxx/.config file locally.
Any image to play with?
We figured the best way for people to fully understand SWUpdate would be to create a demo image.
So here are some very simple images/binaries you can use to get started:
- 20161107-buildroot-nitrogen6x-swupdate-demo.img.gz: Buildroot image to flash to your SD card
- Using
ddis the preferred option - This image will work on all our i.MX6Q/DL platforms
- Signature check is enabled: swupdate-public.pem
- Contains 2 identical partitions (minimalistic rootfs, double-copy)
- Here is the Buildroot config
- Here is the SWupdate config
- Init script that start the web server at bootup
- Using
- nitrogen6x_1.0.1.swu: update file which includes an updated rootfs
- New version of the software (1.0.1 instead of 1.0.0)
- sw-description is signed with this private key: swupdate-priv.pem
- To generate the update, use this script
- Shell script to compute the bootpart: update.sh
Once booted up, you can check the current software version.
# cat /etc/sw-versions
rootfs 1.0.0
kernel 4.1.15-g207addb
From there you can try several ways to update the platform:
- Using a USB drive (copying nitrogen6x_1.0.1.swu to it first)
# mount /dev/sda1 /mnt
# swupdate -i /mnt/nitrogen6x_1.0.1.swu -k /etc/swupdate/swupdate-public.pem
- Using the target web server
- Once the target gets an IP, you can access it from your PC
- https://:8080
- Download the image directly from our HTTP linode server
# swupdate -k /etc/swupdate/swupdate-public.pem
  -d http://linode.boundarydevices.com/nitrogen6x_1.0.1.swu
Once the update has been applied, you can see that U-Boot environment has been updated to boot from a different partition.
# fw_printenv bootpart
bootpart=2
The only thing left to do is to reboot using the newly flashed rootfs and check the software version.
# cat /etc/sw-versions
rootfs 1.0.1
kernel 4.1.15-g207addb
In the overview section, it is said that updating U-Boot isn't power-safe. However you might wonder about the U-Boot environment which is modified in this example? Well to be honest this example is not completely safe since a power cycle can happen during flash operations.
However note that it can be safe, but U-Boot must be configured correctly. Indeed it supports two copies of the environment to be power-safe during a an environment update. The board’s configuration file must have defined CONFIG_ENV_OFFSET_REDUND.
As usual, let us know your thoughts on this article.