/filters:background_color(white)/2024-10/BL652-SA-RightLabel_0.png)
/filters:background_color(white)/2024-10/BL653µ-SA-angle.png)
/filters:background_color(white)/2024-10/BL654-Series.png)
/filters:background_color(white)/2024-10/bl654pa-both_0.png)
Introduction
The goal of this document is to demonstrate the use of the smartBASIC AT.Interface.BL65x.sb application to pair two devices (encrypt the connection between the devices) and enable MITM protection (if required), using a few simple AT commands and S-Register configurations. Once the devices have paired, the encryption keys will be stored in the Bonded Device Database for future connections.
Overview
AT Interface supports two modes of operation: vSP (Virtual Serial Port) Mode (default), which enables our custom Virtual Serial Port service and non-vSP mode for setting up or connecting to other Bluetooth LE services. For more information on these two modes see section 3.1 of the User Guide - BL65x AT Interface Application.
It is recommended that users reference the User Guide - BL65x AT Interface Application along with this user guide. All commands mentioned in this application note are fully defined in the User Guide - BL65x AT Interface Application. Section two of the User Guide also contains instructions for loading the AT.Interface.bl65x.sb smartBASIC application to the module.
Requirements
- Two BL65x Development Kits (BL652, BL653, BL654, BL654PA), or two smartBASIC-BL654 dongles [451-00003]), each loaded with $autorun$.AT.interface.BL65x.sb. (v5.04 or later)
- One to act as Central Role Device (GATT Client)
- One to act as Peripheral Role Device (GATT Server)
- UwTerminalX
- User Guide - BL65x AT Interface Application
Preparation
This application note assumes you have already loaded the most current version of the at.interface.bl65x.sb sample application available from the BL65x GitHub repository to both the Central Role and Peripheral Role devices and are getting the OK response in UwTerminalX after pressing Enter. For instructions on how to load the application to the module please reference section 2 of User Guide - BL65x AT Interface Application.
Connect both DVKs (or USB dongles) to the PC via the UART Interface and verify the COM ports. Connect each device to a separate instance of UwTerminalX. Press Enter to confirm the AT Interface application is running – you should receive an OK response. If you receive 00 as a response, the AT Interface application is not running; to run the AT Interface application enter $autorun$ and press Enter. Verify the version of the AT Interface application is 5.04 or later, and the AT Interface Library version is 4.05 or later using the following commands:
ATI 33   		// Calls the version number of the AT Interface Application
ATI 23    		// Calls the version number of the AT Interface Library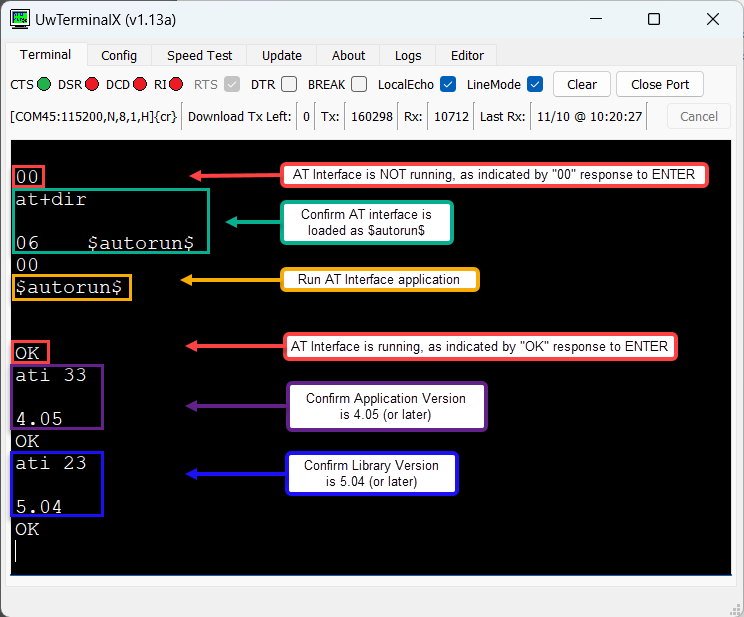
Set Up Central Role Device
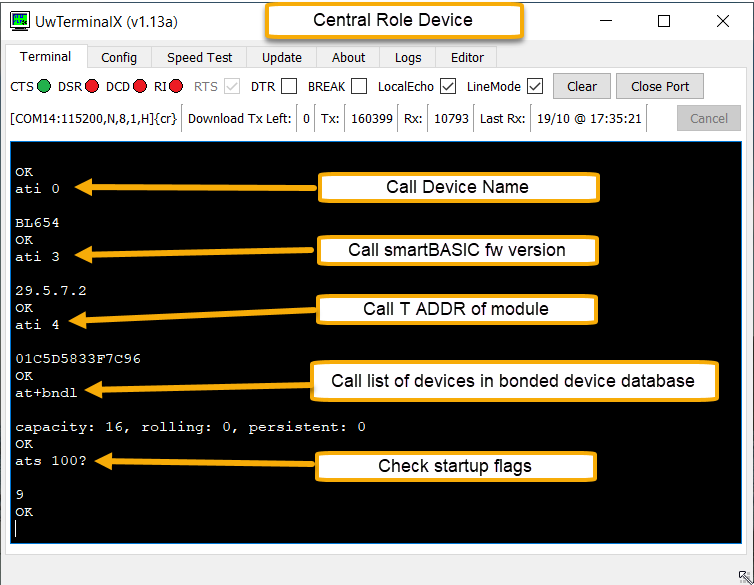
On the device acting in the Central role, send the following commands:
ati 0 		// Calls device name
ati 3 		// Calls smartBASIC firmware version
ati 4 		// Calls the BT ADDR of the module
at+bndl		// Calls list of devices in the bonded device database
ats 100? 	// Check Start-up Flags (see Figure 1)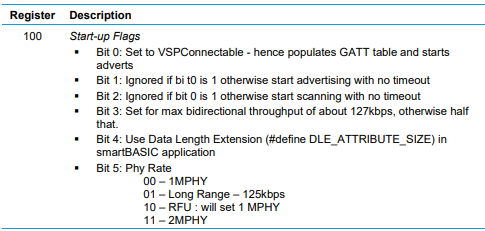
Start-up flags by default have bits 0 and 3 set, which means the device will advertise for a vSP connection on startup/reset and will be configured for maximum bidirectional throughput, which only allows one connection.
Set Up Peripheral Role Device
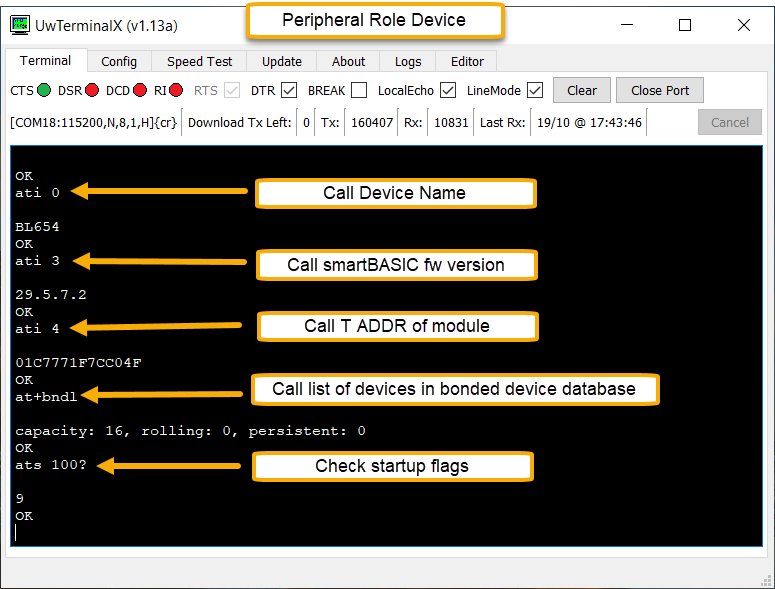
On the Device acting in the Peripheral role, ensure the AT Interface application is loaded and running on the module by pressing Enter and looking for the OK response. Then send the following commands:
ATI 0 		// Calls device name
ATI 3 		// Calls the firmware version on the module
ATI 4 		// Calls the BT ADDR of the module
AT+BNDL		// Calls list of devices in the bonded device database (EMPTY)
ATS 100?	// Check Start-up flags
Start-up flags by default have bits 0 and 3 set which means the device will advertise for a vSP connection on startup and is configured for Max bidirectional throughput.
vSP Pairing (Encryption Only – no MITM)
Step 1: Configure S Registers
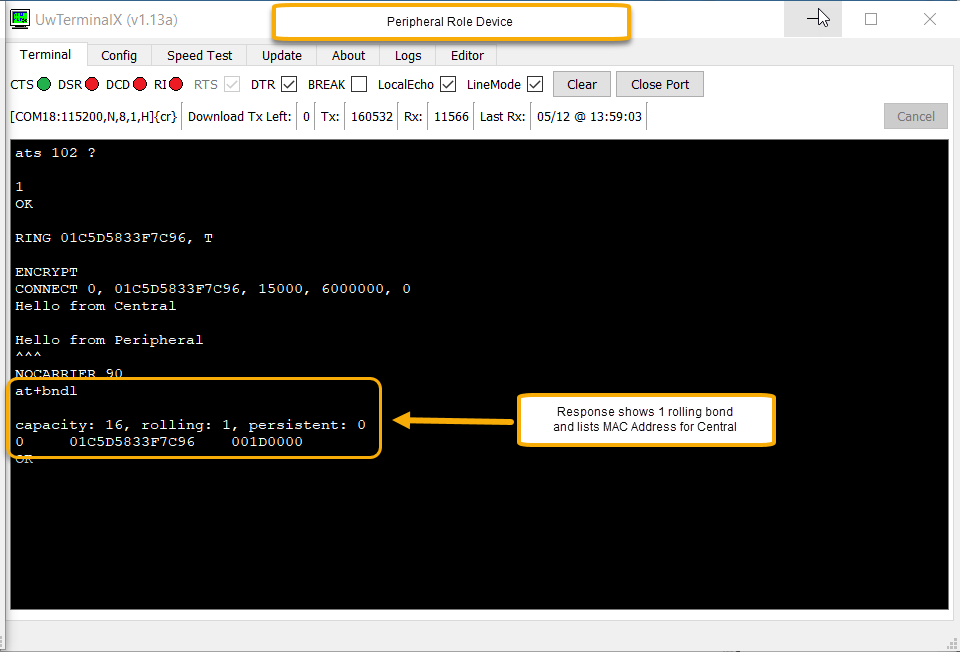
In the AT Interface Application, S Register 102 is used to set the Encryption Requirement for incoming vSP connections. When set to 1, encryption is required for vSP connections. To configure the Peripheral device to require encrypted vSP Connections enter the following commands to set S Register 102 and save the changes:
Peripheral Role Device:
ATS 102=1		// Set S Register 102 to 1 to require encryption.
AT&W			// Save the S Register setting.
ATZ			// Soft Reset.
ATS 102?		// Verify new setting for S Reg 102.
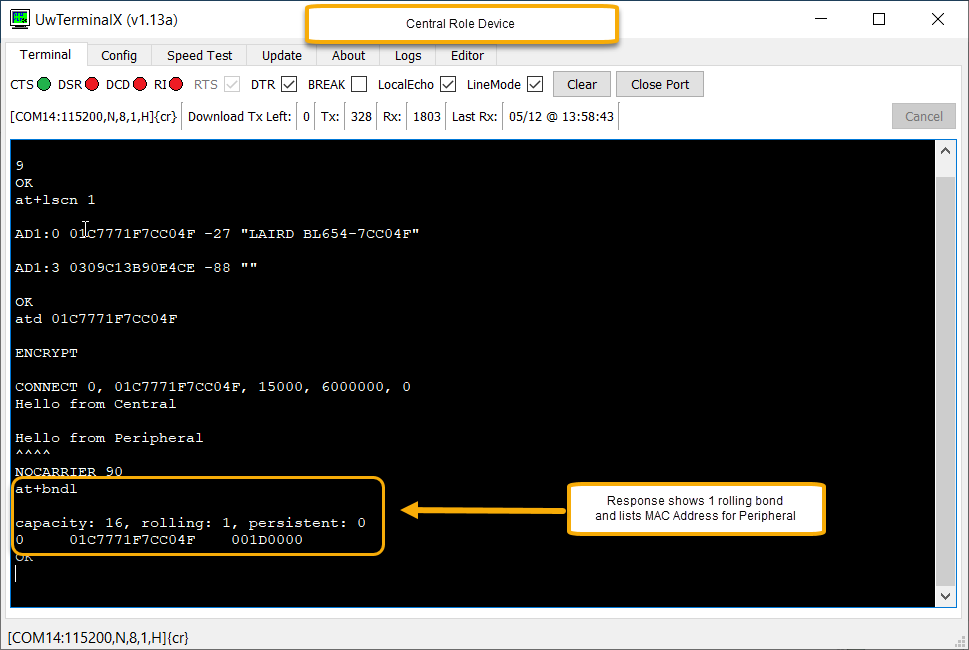
Step 2: Connect from Central Device
Enter the following commands to connect from the Central device:
AT+LSCN 1			// Scan for 1 second (scan time can be adjusted)
ATD [BTADDR-Peripheral]		// Connect to Peripheral device in vSP mode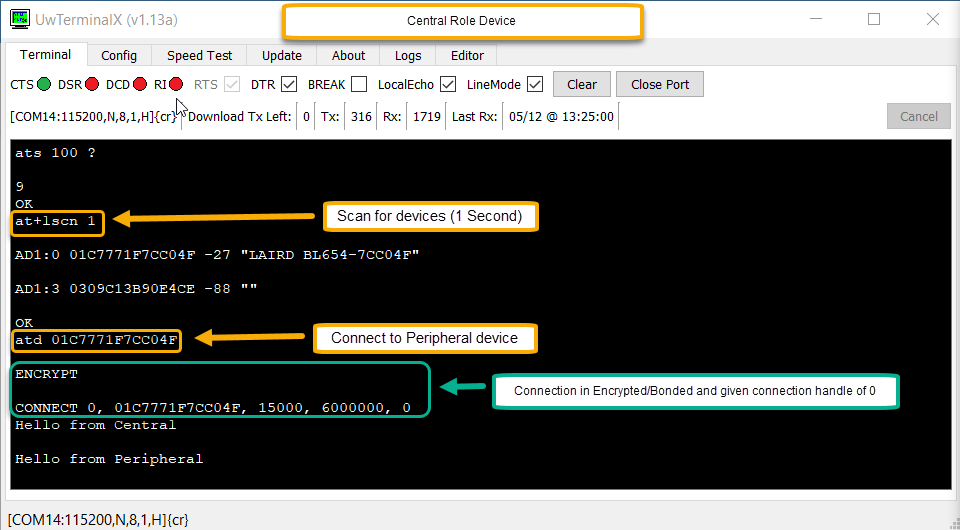
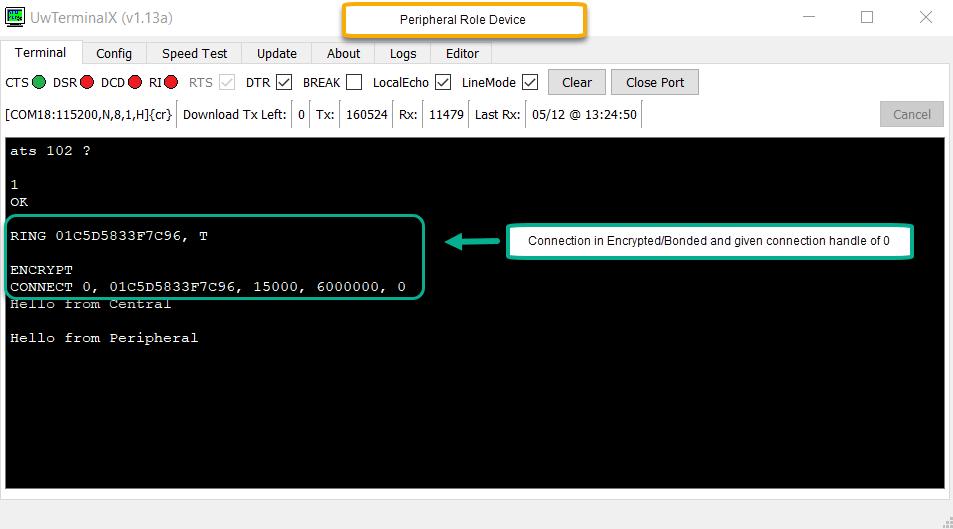
Note: For an explanation of the connection response see section 3.4.1.1 of the AT Interface User Guide. The number following “CONNECT” is the connection handle.
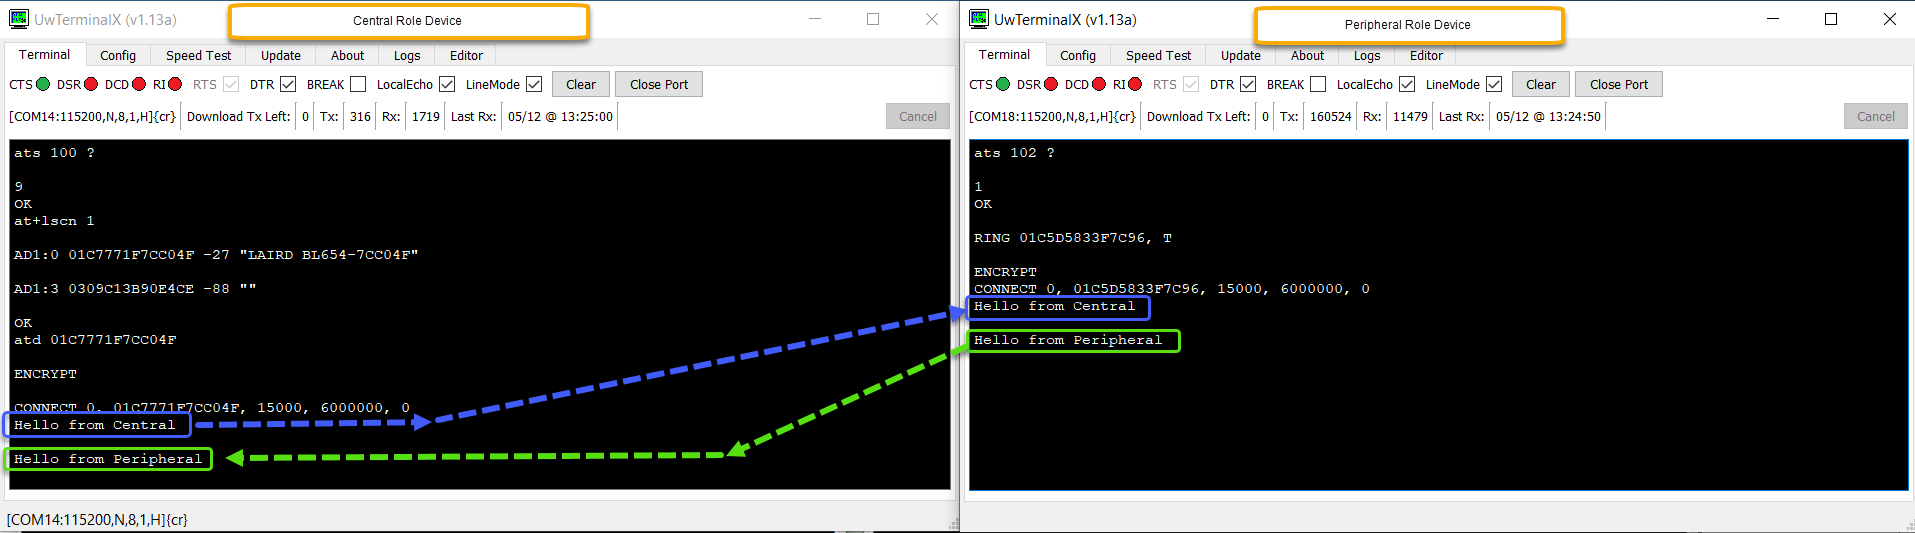
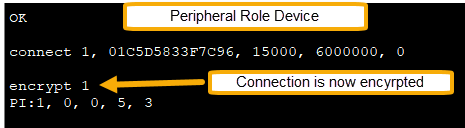
Step 3: Send Data over vSP Connection
The devices are now connected in vSP bridge mode with an encrypted connection and any data sent over the UART will be bridged via the vSP connection and sent to the connected device.
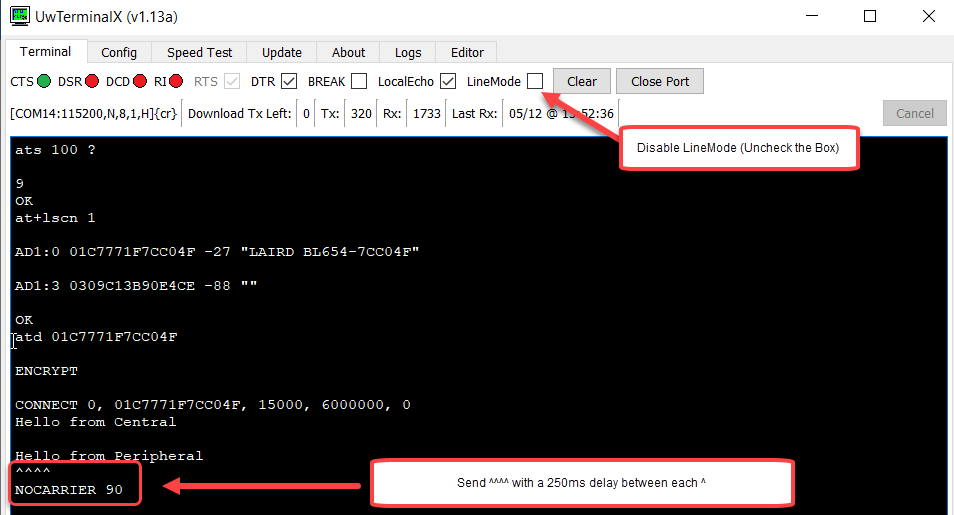
Step 4: Exit vSP Bridge Mode
To exit vSP bridge mode, complete the following:
- Disable LineMode in UwTerminalX on either Device.
- Send the escape characters ^^^^ with a 250ms delay between each character.
- The connection will terminate.
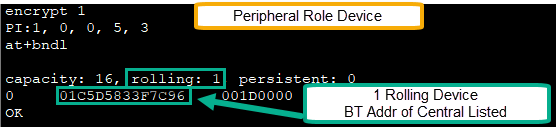
Check Bonded Device Database
Once the vSP connection is terminated, re-enable LineMode and then verify the devices are bonded by entering the command to check the Bonded Device Database: AT+BNDL
Reconnect in vSP Mode (Encrypted by default)
When reconnecting in vSP mode using the ATD command, after the devices have been paired & bonded, future connections will automatically be encrypted.
Central Role Device:
ATD[BTADDR-Peripheral]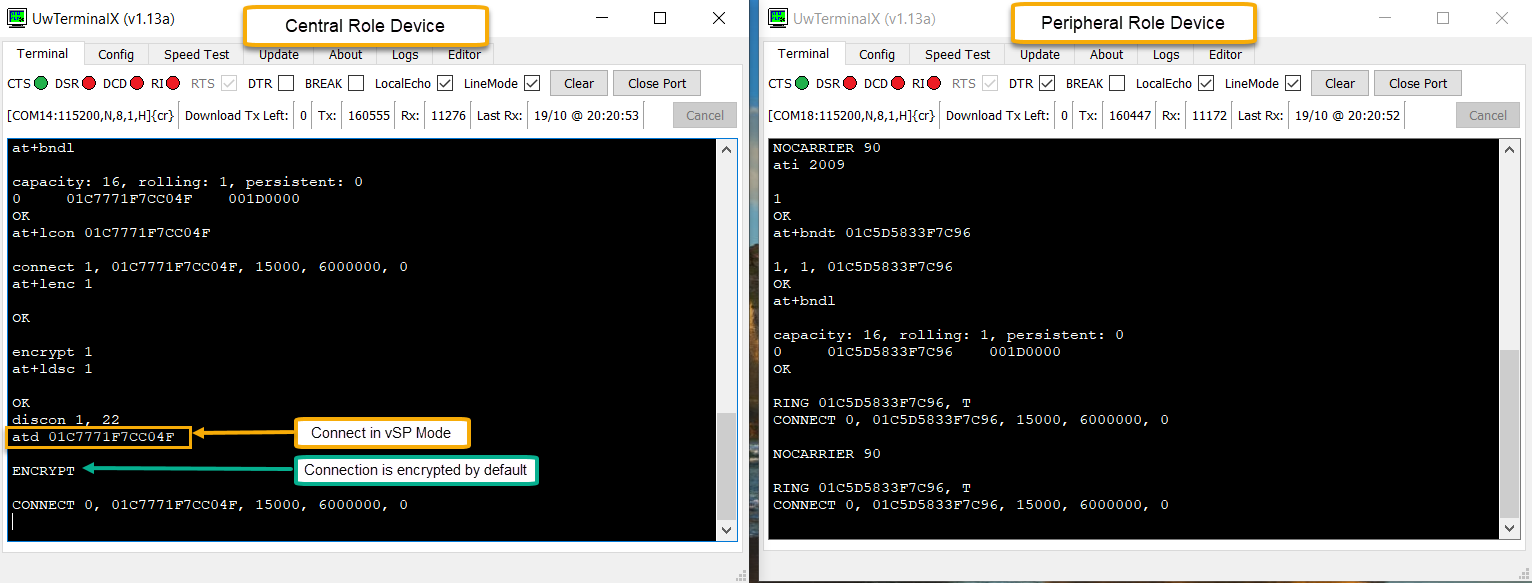
Note: When encryption with MITM protection (ATS 102 =3) is required between two devices for vSP mode, it is necessary to initially use non-vSP mode to connect and pair the devices as explained in 9 vSP & non-vSP mode Pairing (Encryption with MITM). Once the devices are paired, the encryption keys will be stored in the bonded device database, and subsequent connections whether in vSP mode or non-VSP mode will be encrypted.
non-vSP mode Pairing (Encryption only No MITM)
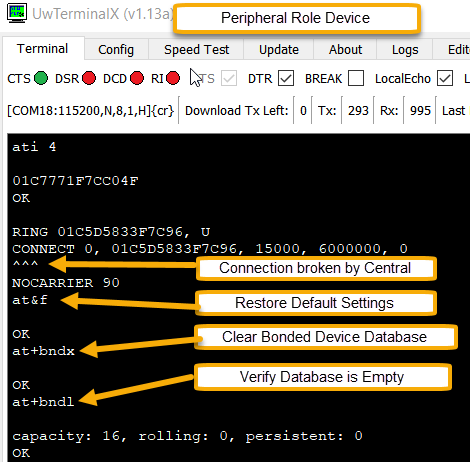
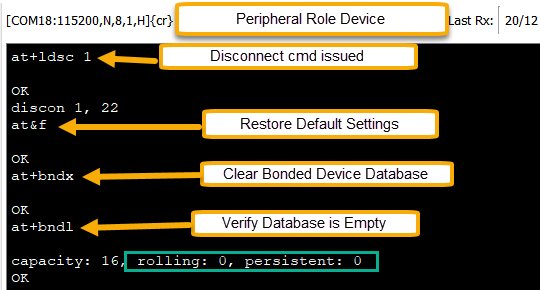
Restore Default Settings and Clear Bonded Device Database
If the devices have been paired previously, it is recommended to restore the default settings and clear the Bonded Device Databases on BOTH devices using AT&F to restore default settings and AT+BNDX to clear the Bonded Device Database:
- Break any existing vSP Bride connection using the escape characters ^^^^ as explained in 7.4 Step 4: Exit vSP Bridge Mode on either device.
- Enter AT&F on each device to restore default settings.
- Enter AT+BNDX to clear the bonded device database.
- Verify the database has been cleared using AT+BNDL command.
Central Role Device
AT&F		// Reset Default Settings
AT+BNDX		// Clear Bonded Device Database
AT+BNDL		// Verify Database is empty
Peripheral Role Device
AT&F		// Reset Default Settings
AT+BNDX		// Clear Bonded Device Database
AT+BNDL		// Verify Database is empty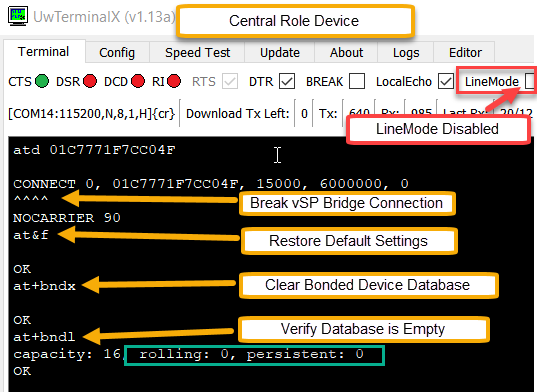
Configure Peripheral Device to use non-vSP Advert
On the Peripheral Role Device enter AT+LADV to start non-vSP adverts.
Peripheral Role Device
AT+LADV //Start non-vSP Adverts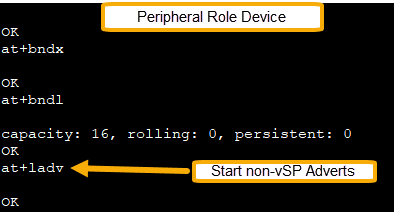
Scan for Devices (Optional) & Connect:
On Central role device enter the following commands to scan(optional) for Peripheral devices and then connect:
Central Role Device:
AT+LSCN 1					// Scan for 1 second (scan time can be adjusted)
AT+LCON [BTADDR-Peripheral]		// Connect in non-vSP mode to peripheral device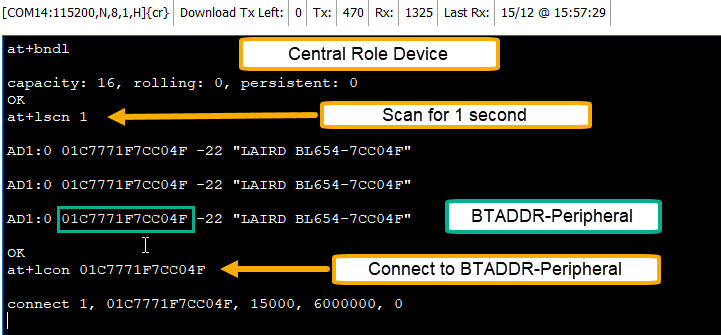
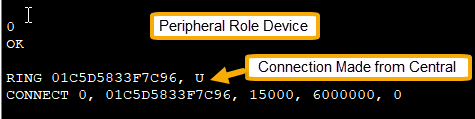
For an explanation of the connection response see section 3.4.1.1 of the AT Interface User Guide. The number following “CONNECT” is the connection handle.
Pair and Bond Devices
Once connected send the AT+PAIR[hIdx]command to pair and bond with the connection handle returned in the connection response:
Central Role Device
AT+PAIR 1 // Pair with device – connection handle 1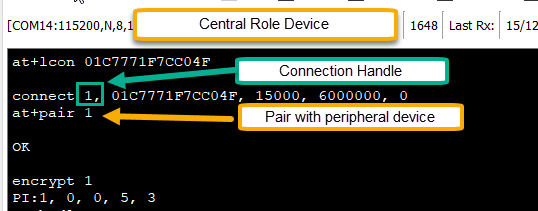
Note: For explanation of response to pairing see section 3.4.3.30 of the AT Interface User Guide.
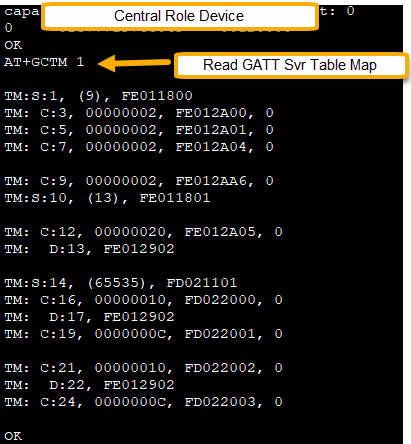
Read GATT Server Table Map
Confirm connection by reading GATT Server Table Map using AT+GCTM [Hdlx] command.
Central Role Device (GATT Client)
AT+GCTM 1 // Read GATT SvrTable Map – Connection Handle 1
Check Bonded Device Databases on both devices
After Pairing check the Bonded Device Database using AT+BNDL command:
AT+BNDL // Check Bonded Devices Database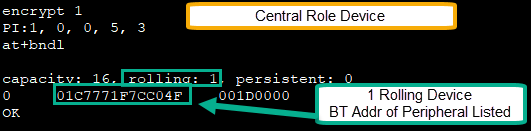
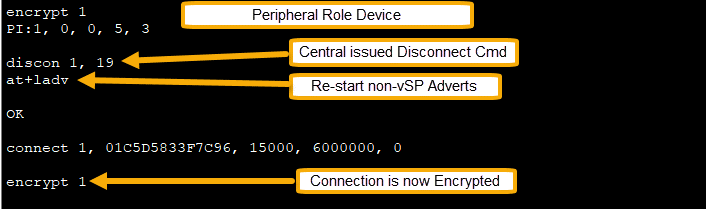
Reconnect with Encryption – Non-vSP Mode
When reconnecting in non-vSP mode, even though the devices have been previously paired/bonded, the future connections will not automatically be encrypted. This is because characteristics can have different levels of security, therefore, to encrypt the connection using the stored keys it is necessary to send the AT+LENC hdIx command following the connection command as shown below:
Either Device
AT+LDSC 1 // Disconnect from connection handle 1Peripheral Role Device
AT+LADV // Restart non-vSP AdvertsCentral Role Device
AT+LCON [BTADDR-Peripheral]	// Reconnect with peripheral device
AT+LENC 1			// Encrypt connection handle 1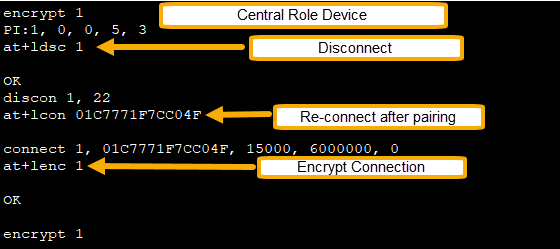
vSP & non-vSP mode Pairing (Encryption with MITM)
Restore Default Settings and Clear Bonded Device Database
If the devices have been paired previously, it is recommended you restore the default settings and clear the Bonded Device Databases on BOTH devices:
AT+LDSC 1	// Disconnect from Handle 1 (from either Device)
AT&F		// Restore Default Settings (both devices)
AT+BNDX		// Clear Bonded Device Database (both devices)
AT+BNDL		// Verify Database is empty (both devices)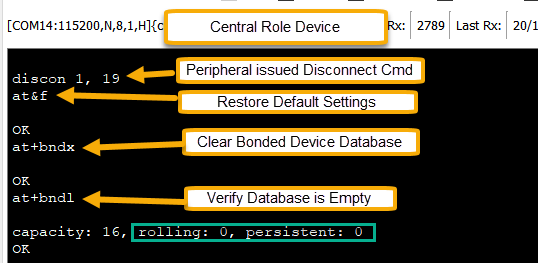
Configure S Registers on Central Role Device
S Regiser 107 is used to set the I/O Capability used during the initial negotiation when pairing. This specifies the user interface that is available to expedite a pairing. ‘Just Works’ pairing implies there is no user interface therefore, the resulting encryption key will not be authenticated and so not immune to MITM (man-in-the-middle) attack. Valid values are as follows:
- 0 = Just Works
- 1 = Display with Y/N
- 2 = Keyboard only
- 3 = Display Only
- 4 = Keyboard + Display
For the purposes of this demonstration, we will be setting S Reg 107 on both devices to 4.
Central Role Device
ATS 107=4		// Configure S Reg 107 to 4
AT&W 			// Save the changes
ATZ			// Soft Reset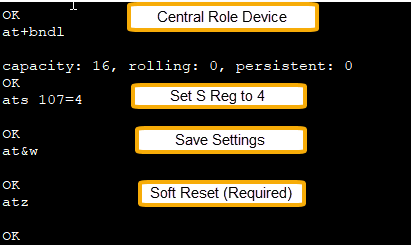
Configure S Registers on Peripheral Role Device and start non-vSP Adverts
On the Peripheral Role Device, in addition to setting the I/O Cap setting via S Reg 107 to 4, we will also be setting the Encryption Requirements for vSP connections via S Reg 102 to 3, which will require both Encryption and MITM (Authentication) for incoming vSP Connections. This will have no impact on non-vSP connections; however, it will require making the initial vSP connection in non-vSP mode to allow for authentication to occur. After pairing/authenticating in non-vSP Modes subsequent vSP connections will meet these requirements.
Note: If you will not be using vSP mode, setting S Reg 102 is optional.
Peripheral Role Device
ATS 107=4		// Set S Reg 107 to 4
ATS 102=3		// Set S Reg 102 to 3 (Optional – Only required for vSP)
AT&W			// Save Settings
ATZ			// Soft Reset (required)
AT+LADV			// Start non-vSP Adverts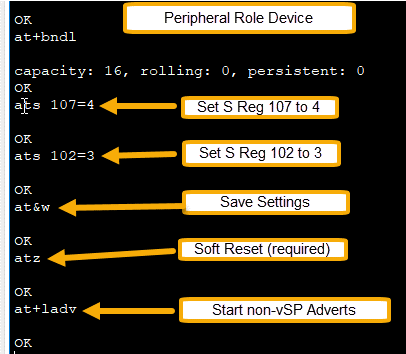
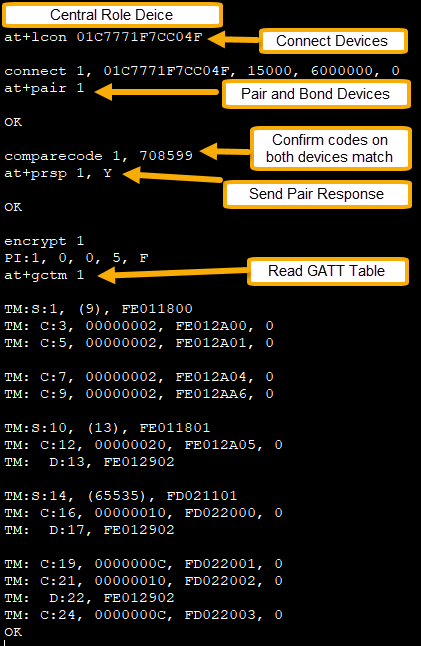
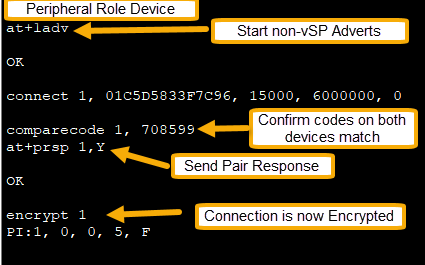
Connect, Pair & Authenticate Connection in non-vSP Mode
Issue the following commands to connect, pair and authenticate the connection.
Central Role Device:
AT+LCON [BTADDR-Peripheral]	// Initiate Connection
AT+PAIR  1			// Initiate Pairing connect handle 1
AT+PRSP  1,Y			// Respond to authentication  comparecode request – connect handle 1
Peripheral Role Device:
AT+PRSP 1,Y // Respond to authentication comparecode requestConnection is now encrypted and authenticated.
Enter AT+GCTM [Hdlx] on the Central Role device/GATT Client to read the GATT Table map of the Peripheral role device/GATT Server.
Central Role Device:
AT+GCTM 1 // Confirm connection by reading GATT ServerTable Map - Connection 1:
Check Bonded Device Database on Both Devices
After pairing, check the bonded device database using AT+BNDL command:
AT+BNDL // Check Bonded Devices Database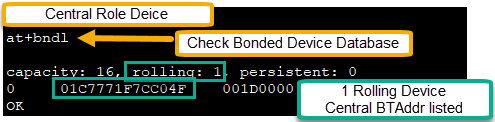

Verify vSP Connections meet Encryption Requirements Setting by S Reg 102 (Optional)
Disconnect the devices by issuing AT+LDSC [Hdlx] command from either device:
AT+LDSC [Hdlx] // Disconnect DevicesNow that the devices have been paired and bonded with MITM protection all subsequent vSP connections will use the keys stored in the Bonded Device Database to encrypt future connections. To verify send the ATD [Peripheral-BTAddr] command to connect in vSP Bridge Mode.
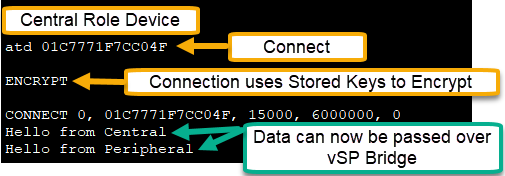
Peripheral Role Device:
ATZ // Soft Reset to start vSP Adverts again (required)Central Role Device:
ATD [Peripheral-BTAddr] // Connect in vSP Bridge Mode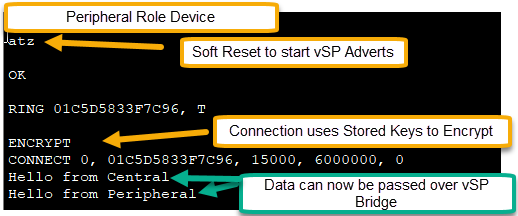
Checking Bonded Device Database Options
There are a few commands which can be entered to check the status of bonded devices:
ATI 2009			// Returns the # of devices in bonded device database
AT+BNDT [BTADDR-Peripheral]	// Checks if specific BTADDR is listed in bonded device database
AT+BNDL				// Lists ALL devices in the bonded device database
Note: See sections 3.3.14 and 3.3.15 of AT Interface User Guide for explanations of these command responses.
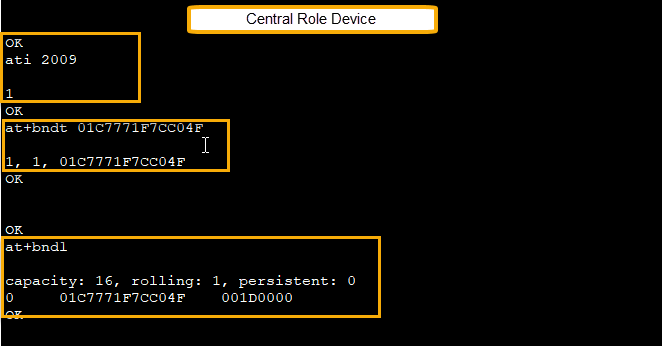
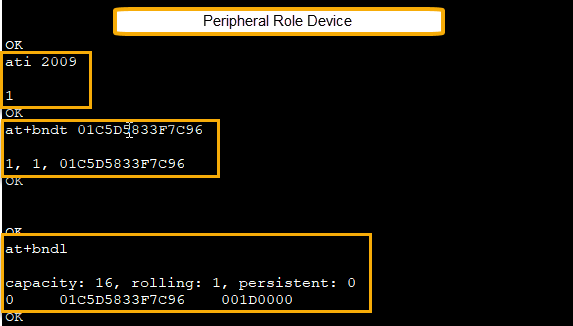
Note: If the bonded device is removed from the Bonded Device Database from either the Central or Peripheral device, it must also be removed from the other device, or the devices will not be able to connect. Once both sides have been deleted their keys from the database, a new connection and pairing can be completed.
| Version | Date | Notes | Contributors | Approver |
|---|---|---|---|---|
| 1.0 | 9 Jan 2023 | Initial Release | Rikki Horrigan | Jonathan Kaye |
| 2.0 | 27 Feb 2025 | Converted to Ezurio template. | Sue White | Dave Drogowski |
.