/filters:background_color(white)/2025-03/60_2230C_straight.png)
/filters:background_color(white)/s3fs-public/2018-10/60_SiP_straight.png)
Introduction
Ezurio provides support for Yocto with a full external layer called meta-laird-cp. This layer contains all necessary recipes to integrate software from our official GitHub repository. These components include backports (driver and Wi-Fi/BT subsystems), Sterling/Summit supplicants, radio firmware, Summit AWM daemon and Laird NetworkManager. The open-source Sterling supplicant is based on the open-source wpa-supplicant and is updated as necessary with each release. The closed-source Summit supplicant includes enhanced features, for more information about Summit please see the product page. Laird NetworkManager is based on the open-source GNOME NetworkManager project and is updated with Summit-specific features. This guide covers a Sterling integration, please contact our technical support for Summit-specific instructions.
This application note only covers integrating the meta-laird-cp layer into Yocto, please visit the product pages and download the documentation archive located on GitHub for more information:
Linux Set Up
To set up the Yocto build environment in Linux, follow these steps:
Set up the Yocto build environment
This step is platform dependent. You must follow the platform provider’s instructions (e.g., NXPs linux-imx, nVidias linux-tegra).
Navigate to the project root “sources” directory and either clone into the layer using git or extract the downloaded archive
git clone https://github.com/ezurio/meta-summit-radio.gitAlternatively, you can download the ZIP file from https://github.com/ezurio/meta-summit-radio
Extract contents and rename the version-specific directory to the generic name “meta-laird-cp" like in the following example
imx-yocto-bsp/sources/meta-laird-cpModify the following in the project’s build directory
conf/bblayers.conf
(For example, in iMX8, bblayers.conf is located under imx-yocto-bsp/build/conf after the build environment setup in step 1.)
Add the following line highlighted in yellow in bblayers.conf.
BBLAYERS = " \
  ${BSPDIR}/sources/poky/meta \
  ${BSPDIR}/sources/poky/meta-poky \
  \
  ${BSPDIR}/sources/meta-openembedded/meta-oe \
  ${BSPDIR}/sources/meta-openembedded/meta-multimedia \
  \
  ${BSPDIR}/sources/meta-freescale \
  ${BSPDIR}/sources/meta-freescale-3rdparty \
  ${BSPDIR}/sources/meta-freescale-distro \
  ${BSPDIR}/sources/meta-laird-cp \
conf/local.conf
Add the following lines:
PREFERRED_RPROVIDER_wpa-supplicant = "sterling-supplicant"
PREFERRED_RPROVIDER_wpa-supplicant-cli = "sterling-supplicant-cli"
PREFERRED_RPROVIDER_wpa-supplicant-passphrase = "sterling-supplicant-passphrase"
PREFERRED_RPROVIDER_wireless-regdb = "sterling60-firmware-sdio-uart"
The firmware recipe referenced should reflect the interface combo required for the integration using the naming convention of Wi-Fi interface, followed by a minus sign, followed by the BT interface. Valid options are: sdio-uart, sdio-sdio, pcie-uart, pcie-usb, usb-usb and usb-uart.
The provider of the wireless regdb should be the same as the firmware provider. E.g. "sterling60-firmware-sdio-uart"
Older versions of Yocto use “PREFERRED_PROVIDER_” instead of “PREFERRED_RPROVIDER_”
Add the following to your custom image recipe
This is the recipe you use to generate your final image and is unique per build. An example of this is the included core-image-base recipe located in sources/poky/meta/recipes-core/images/core-image-base.bb. This section is likely already in your image recipe and it is safe to add the following recipes to the existing list. Please take care to choose the relevant interface combo firmware recipe.
IMAGE_INSTALL += "\
sterling-backports-laird \
sterling60-firmware-sdio-uart \
sterling-supplicant \
laird-networkmanager \
"
Modify Kernel
The following will cover steps that are necessary to integrate backports. Backports will replace the existing kernel’s Wireless and Bluetooth subsystems. This will also require you to rebuild and redeploy the kernel after modification. Backports covers a wide range of kernels, please reference the release notes on the Sterling-60-Release-Packages GitHub repository for the most up to date information.
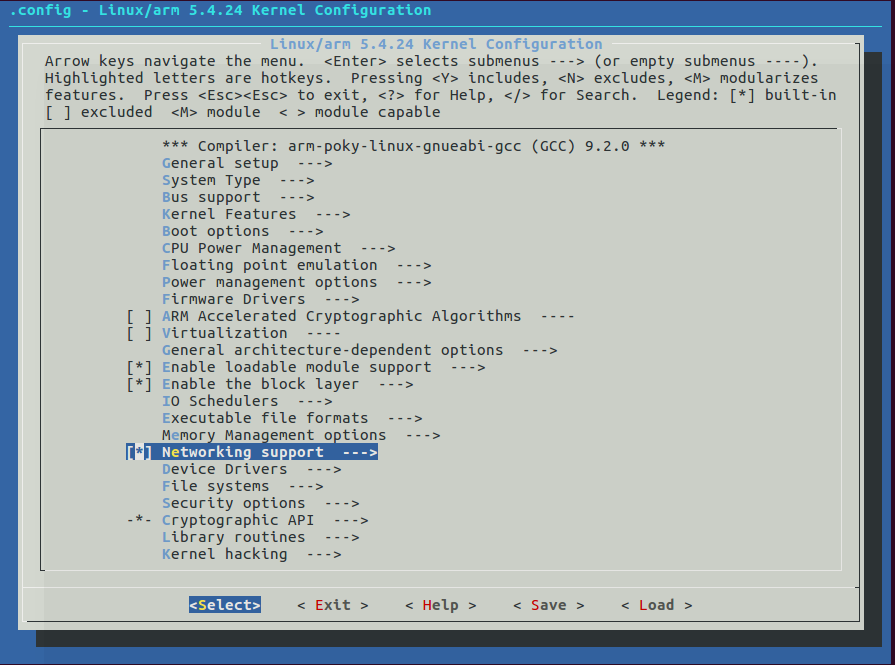
Navigate to the project root, source the environment setup script and use bitbake to start the interactive kernel menuconfig system.
source setup-environment build
bitbake –c menuconfig virtual/kernel
Modify the kernel by first removing the in-tree WLAN drivers

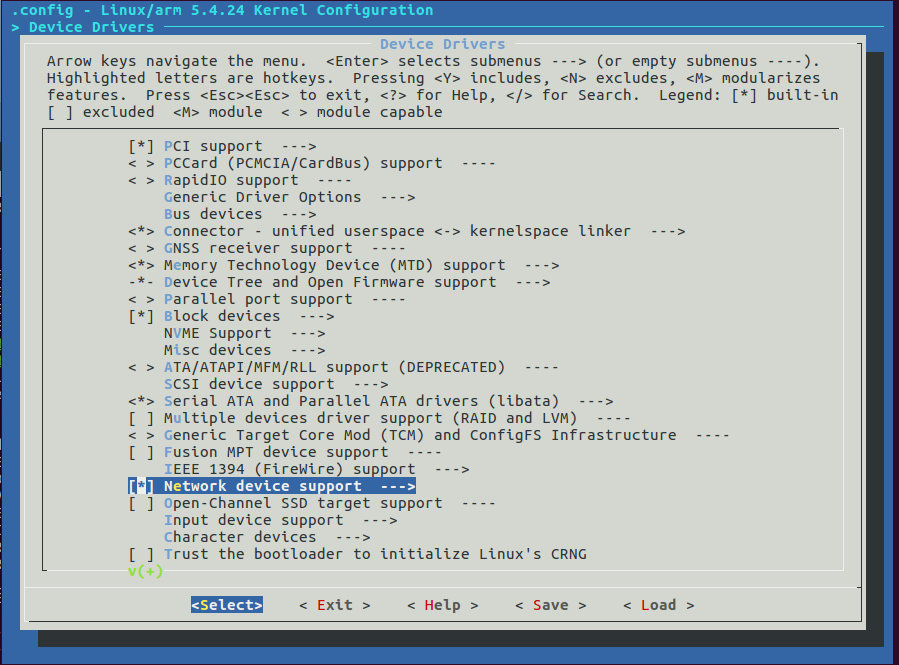
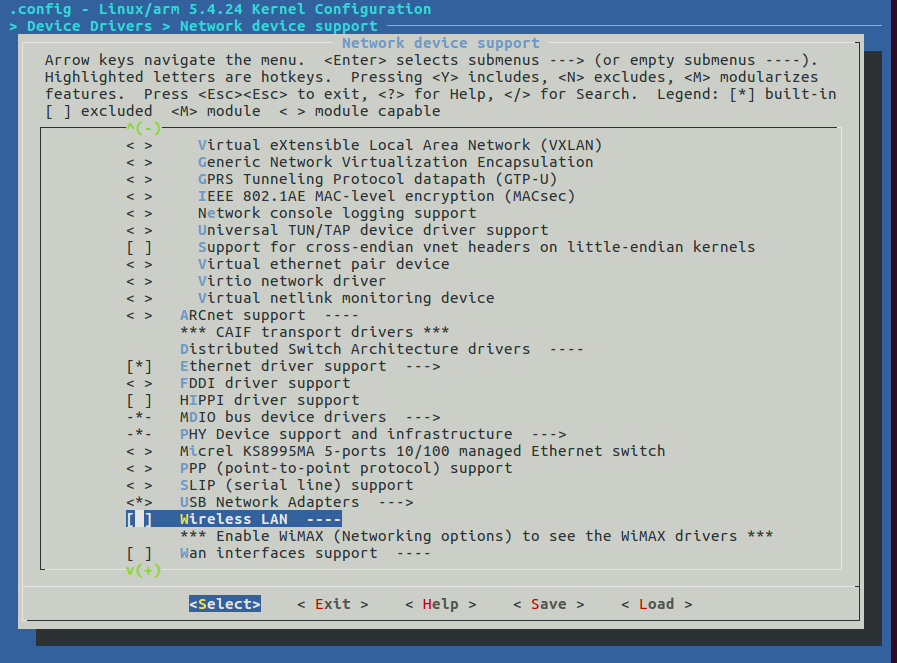
Return to the root menu and then remove the in-tree Wireless and Bluetooth subsystems

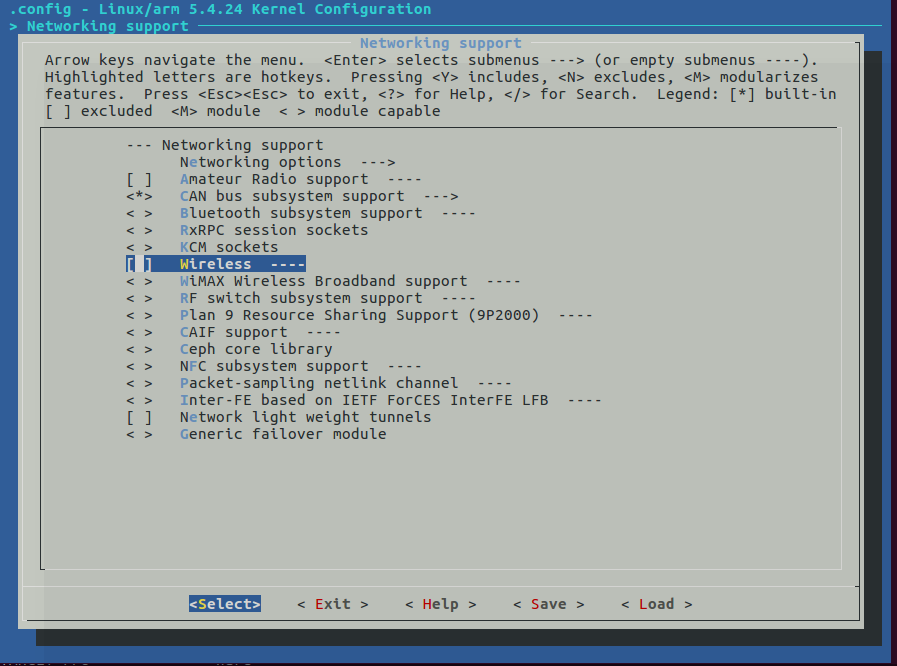
Exit and save
Rebuild and redeploy the kernel
bitbake –c compile virtual/kernel -f
bitbake –c deploy virtual/kernel
Build by Image Recipe
The final step is to build your image. If an older version of anything provided in our recipes was previously built, for instance wpa-supplicant, you will have to clean the shared state of that package using bitbake –c cleansstate package-name.
Set up the build environment.
source setup-environment build/Use bitbake to build the final image (this example is core-image-base).
bitbake core-image-baseOnce complete, the build result will be a complete image deployed in tmp/deploy/images/machine_name/. When you boot the image, the drivers will load automatically.