/filters:background_color(white)/2024-10/Sona%20IF573%20-%20Family.png)
Introduction
This guide covers hardware and software setup for implementing our Sona IF573 Series Wi-Fi 6 module in Yocto Linux. The Sona IF573 is offered in two form factors: the M.2 1318 module and the M.2 2230 module. Since the M.2 2230 is a pluggable edge-connector module, it’s easier to integrate for evaluation, and is recommended. This guide assumes integration of the M.2 2230 module, in either the SDIO/UART or PCIE/UART variant.
Sona IF573 Variants
| Form Factor | Wi-Fi | BT | Part Number |
|---|---|---|---|
| M.2 2230 | SDIO | UART | 453-00119 |
| M.2 2230 | PCIE | UART | 453-00120 |
| M.2 1318 | SDIO/PCIE | UART | 453-00117 (connector) 453-00118 (trace pin) |
In the case of the M.2 1318, it is controlled by two pins: GPIO1 (pin 24) and LED_1 (pin 65). For those integrating the M.2 1318 module, the following details whether these pins are held high or low in each of the M.2 1318 modules:
| Interface | GPIO1 (pin 24) | LED_1 (pin 65) |
|---|---|---|
| SDIO/UART | H | H |
| PCIE/UART | L | H |
Requirements
- iMX8MP EVK (or any platform which has an M.2 interface with SDIO or PCIE)
- Sona IF573 SDIO or PCIE M.2 card
- Sona IF573 Release package
- Development PC with Yocto build environment
- Terminal software for console message dump
- AP/Router which can support 6GHz band, such as Netgear Nighthawk AC2300 Model: R7000P for reference.
Note: Some APs may exhibit compatibility problems in the 6 GHz band with the Sona IF573 which can cause intermittent connectivity, such as the TP-Link AXE5400/Archer AXE75. An intermittent issue with this particular AP is presently under investigation.
Yocto Integration: Build Environment Setup
Modify the bblayers.conf under imx-yocto-bsp/build/conf as below:
BBLAYERS = " \
  ${BSPDIR}/sources/poky/meta \
  ${BSPDIR}/sources/poky/meta-yocto \
  \
  ${BSPDIR}/sources/meta-openembedded/meta-oe \
  ${BSPDIR}/sources/meta-openembedded/meta-multimedia \
  \
  ${BSPDIR}/sources/meta-fsl-arm \
  ${BSPDIR}/sources/meta-fsl-arm-extra \
  ${BSPDIR}/sources/meta-fsl-demos \
  ${BSPDIR}/sources/meta-summit-radio-lrd-11.171.0.x\
If you need to build MFG package into your image, need to create a folder "release” under ${BSPDIR}:
mkdir ~/imx-yocto-bsp/releaseAnd then copy the MFG package, which need to get from your contact FAE from Ezurio according to your build platform. For example, in iMX8MP process, you need to get the package as below,
regIF573-aarch64-11.171.0.24.tar.bz2You may need to add checksum as below in reg-if573.bb if your build environment requests.
SRC_URI[regIF573-aarch64.sha256sum] = "608493086fefcd98cc21a2b312d93b17fd4791ea005ca7b443395ba6ba3ff526"Change kernel config and rebuild kernel:
cd ~/imx-yocto-bsp/
source setup-environment build/
bitbake -c menuconfig virtual/kernel
Kernel Config Modification:
Wi-Fi:
Set cfg80211 to ‘m’ instead of build-in.
Networking support --> Wireless
<m> cfg80211
Disable the firmware sysfs fallback mechanism.
Device drivers --> Generic Driver options --> Firmware loader -->
[ ] Enable the firmware sysfs fallback mechanism
BT:
Disable networking support for Bluetooth:
Networking support -->
 < > Bluetooth
In iMX8M platform, to integrate BT via UART, you may need to set “i.MX SDMA support” to M as kernel module instead of built-in. In newer i.MX BSP, the built-in module may be initialized before root file system loading and cause SDMA initialization failure.
Device drivers --> DMA Engine support -->
[M] i.MX SDMA support
To integrate Wi-Fi functionality, add the following packages in IMAGE_INSTALL in local.conf under imx-yocto-bsp/build/conf.
Be sure to select the correct firmware recipe:
IMAGE_INSTALL:append = “ kernel-module-lwb-if-backports \
      summit-supplicant-lwb-if \
      summit-networkmanager-lwb-if \
      summit-networkmanager-lwb-if-nmcli"

# Choose one of the following depending on module in use
IMAGE_INSTALL:append = “ if573-pcie-firmware"
#IMAGE_INSTALL:append = “ if573-sdio-firmware"
If you want to add MFG package into your image, need to add one more package as below.
IMAGE_INSTALL:append = “reg-if573.bb"Dowloading Bluetooth firmware requires host control over the Bluetooth reset signal BT_REG_ON (W_DISABLE2# on the M.2 interface).
This is implemented with serdev and proper device tree configuration on hosts with kernel version 4.12 and higher.
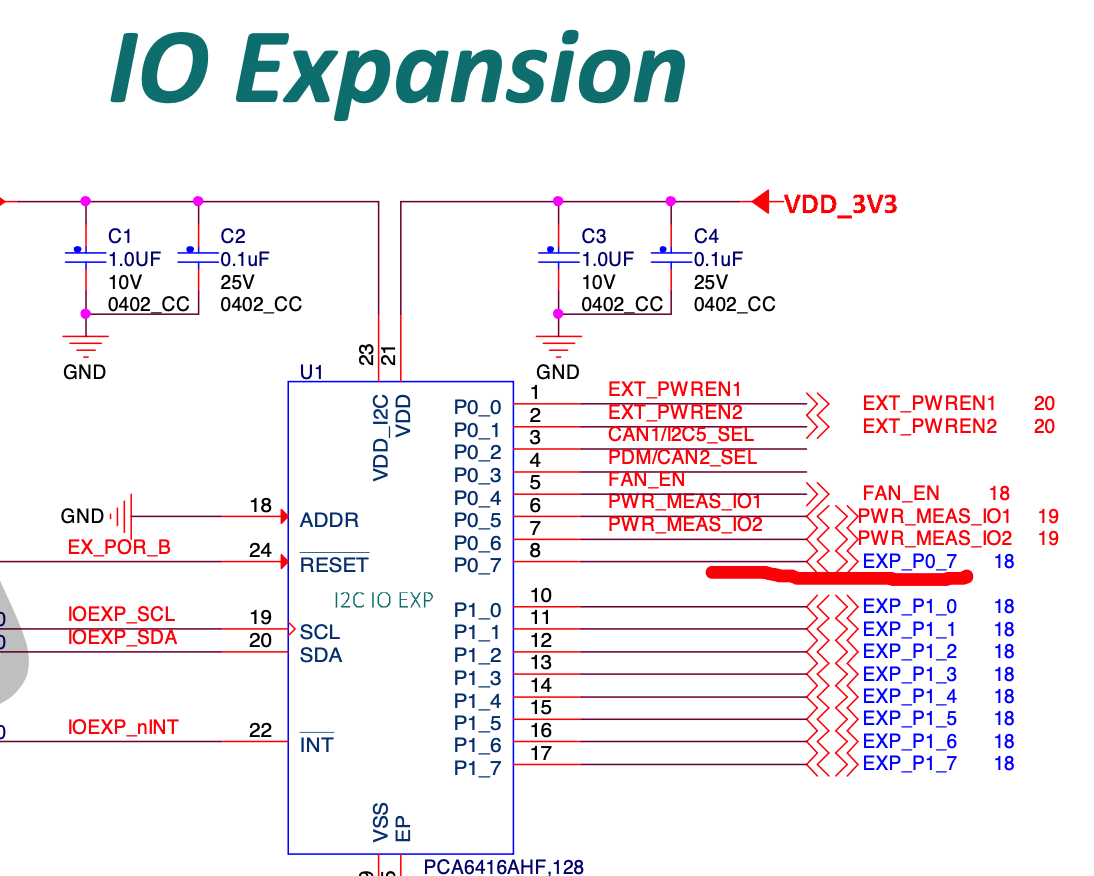
Here is a sample device tree snippet configuring the M.2 serial port and GPIO pin for use with the IF573 radio on the iMX8MP EVK evaluation board using P0_7 on the I2C GPIO expander to control BT_REG_ON/W_DISABLE2#:
&uart1 {
    bluetooth {
            compatible = "infineon,cyw55572-bt";
            brcm,requires-autobaud-mode;
            max-speed = <921600>;
            # shutdown-gpios defines the pin that controls BT_REG_ON
            # A logical 1 is used to power on the radio
            shutdown-gpios = <&pca6416 7 GPIO_ACTIVE_HIGH>;
        };
};
Serdev is not available prior to kernel version 4.12. The user space utility brcm_patchram_plus can be used with old kernels in a platform script with additional GPIO control to download the firmware from user space.
One more package must be added: brcm-patchram-plus.
IMAGE_INSTALL:append = “ brcm-patchram-plus“Here is an example using P0_7 on the I2C GPIO expander to control W_DISABLE2# using libgpiod v2.x on mickledore:
#!/bin/sh

# Radio must be placed into "autobaud" mode to allow it to accept
# firmware download.  Autobaud mode is entered when BT_REG_ON is
# enabled with CTS input already asserted.

# de-assert BT_REG_ON (assert W_DISABLE2# on M.2 interface)
# This will de-assert radio RTS output, blocking host
gpioset --hold-period=100ms -t0 EXP_P0_7=0
sleep 0.1

# Start firmware download in background
# This will assert radio CTS with BT_REG_ON still de-asserted
# TX remains blocked since radio RTS output is still de-asserted
brcm_patchram_plus --no2bytes --autobaud_mode --baudrate 921600 \
                   --use_baudrate_for_download --enable_hci \
                   --patchram /lib/firmware/cypress/CYW55560A1_v001.002.087.0225.0065.hcd /dev/ttymxc0 &

# assert BT_REG_ON (de-assert W_DISABLE2# on M.2 interface)
# This brings radio out of reset with radio CTS input asserted putting
# radio into autobaud mode.
sleep 0.1
gpioset -t0 EXP_P0_7=1
Additional packages may be needed to add imx-sdma kernel module/firmware and packagegroup-tools-bluetooth in IMAGE_INSTALL in local.conf under imx-yocto-bsp/build:
IMAGE_INSTALL:append = “ packagegroup-tools-bluetooth \
                         kernel-modules-imx-sdma \
                         firmare-imx-sdma-imx7d“
Several device tree changes are required on the iMX8MP EVK for compatibility with the IF573 SDIO interface.
The SDIO bus signal strength must be reduced from the default to improve signal integrity. The pwrseq reset signal controls both W_DISABLE1# and the M.2 3.3V power rail. Therefore, the pwrseq reset de-assert will enable the rail and the radio simultaneously. A powerup delay is needed to ensure time for the rail to stabilize before the drivers are accessed.
The following is an example of device tree modification in the iMX8MP EVK: imx8mp-evk-usdhc1-m2.dts.
&usdhc1_pwrseq {
	post-power-on-delay-ms = <200>;
};

&iomuxc {
	pinctrl_usdhc1: usdhc1grp {
		fsl,pins = <
			MX8MP_IOMUXC_SD1_CLK__USDHC1_CLK	0x190
			MX8MP_IOMUXC_SD1_CMD__USDHC1_CMD	0x1d0
			MX8MP_IOMUXC_SD1_DATA0__USDHC1_DATA0	0x1d0
			MX8MP_IOMUXC_SD1_DATA1__USDHC1_DATA1	0x1d0
			MX8MP_IOMUXC_SD1_DATA2__USDHC1_DATA2	0x1d0
			MX8MP_IOMUXC_SD1_DATA3__USDHC1_DATA3	0x1d0
			MX8MP_IOMUXC_SD1_DATA4__GPIO2_IO06	0x10
		>;
	};

	pinctrl_usdhc1_100mhz: usdhc1-100mhzgrp {
		fsl,pins = <
			MX8MP_IOMUXC_SD1_CLK__USDHC1_CLK	0x190
			MX8MP_IOMUXC_SD1_CMD__USDHC1_CMD	0x1d0
			MX8MP_IOMUXC_SD1_DATA0__USDHC1_DATA0	0x1d0
			MX8MP_IOMUXC_SD1_DATA1__USDHC1_DATA1	0x1d0
			MX8MP_IOMUXC_SD1_DATA2__USDHC1_DATA2	0x1d0
			MX8MP_IOMUXC_SD1_DATA3__USDHC1_DATA3	0x1d0
			MX8MP_IOMUXC_SD1_DATA4__GPIO2_IO06	0x10
		>;
	};

	pinctrl_usdhc1_200mhz: usdhc1-200mhzgrp {
		fsl,pins = <
			MX8MP_IOMUXC_SD1_CLK__USDHC1_CLK	0x190
			MX8MP_IOMUXC_SD1_CMD__USDHC1_CMD	0x1d0
			MX8MP_IOMUXC_SD1_DATA0__USDHC1_DATA0	0x1d0
			MX8MP_IOMUXC_SD1_DATA1__USDHC1_DATA1	0x1d0
			MX8MP_IOMUXC_SD1_DATA2__USDHC1_DATA2	0x1d0
			MX8MP_IOMUXC_SD1_DATA3__USDHC1_DATA3	0x1d0
			MX8MP_IOMUXC_SD1_DATA4__GPIO2_IO06	0x10
		>;
	};
};
By default, the dtb file, imx8mp-evk.dtb, is for the PCIE option (453-00120 module). If you want to run with the SDIO option (453-000119 module), you need to use imx8mp-evk-usdhc-m2.dtb.
Build core-image-minimal image:
bitbake core-image-minimalProgram the SD card with the whole image including kernel and root file system:
sudo dd if=xxxx.wic of=/dev/mmcblk0 bs=1MHW Wiring: Module Power Control
The host platform should control the W_DISABLE1 signal (Wi-Fi reset) and must control the W_DISABLE2 signal (Bluetooth reset).
In many platforms, W_DISABLE1 is controlled by GPIO. However, this is typically not the case for W_DISABLE2. Bluetooth firmware cannot be downloaded unless this signal is controlled on the host platform.
Running IF573 BT via M.2 slot in iMX8MP EVK
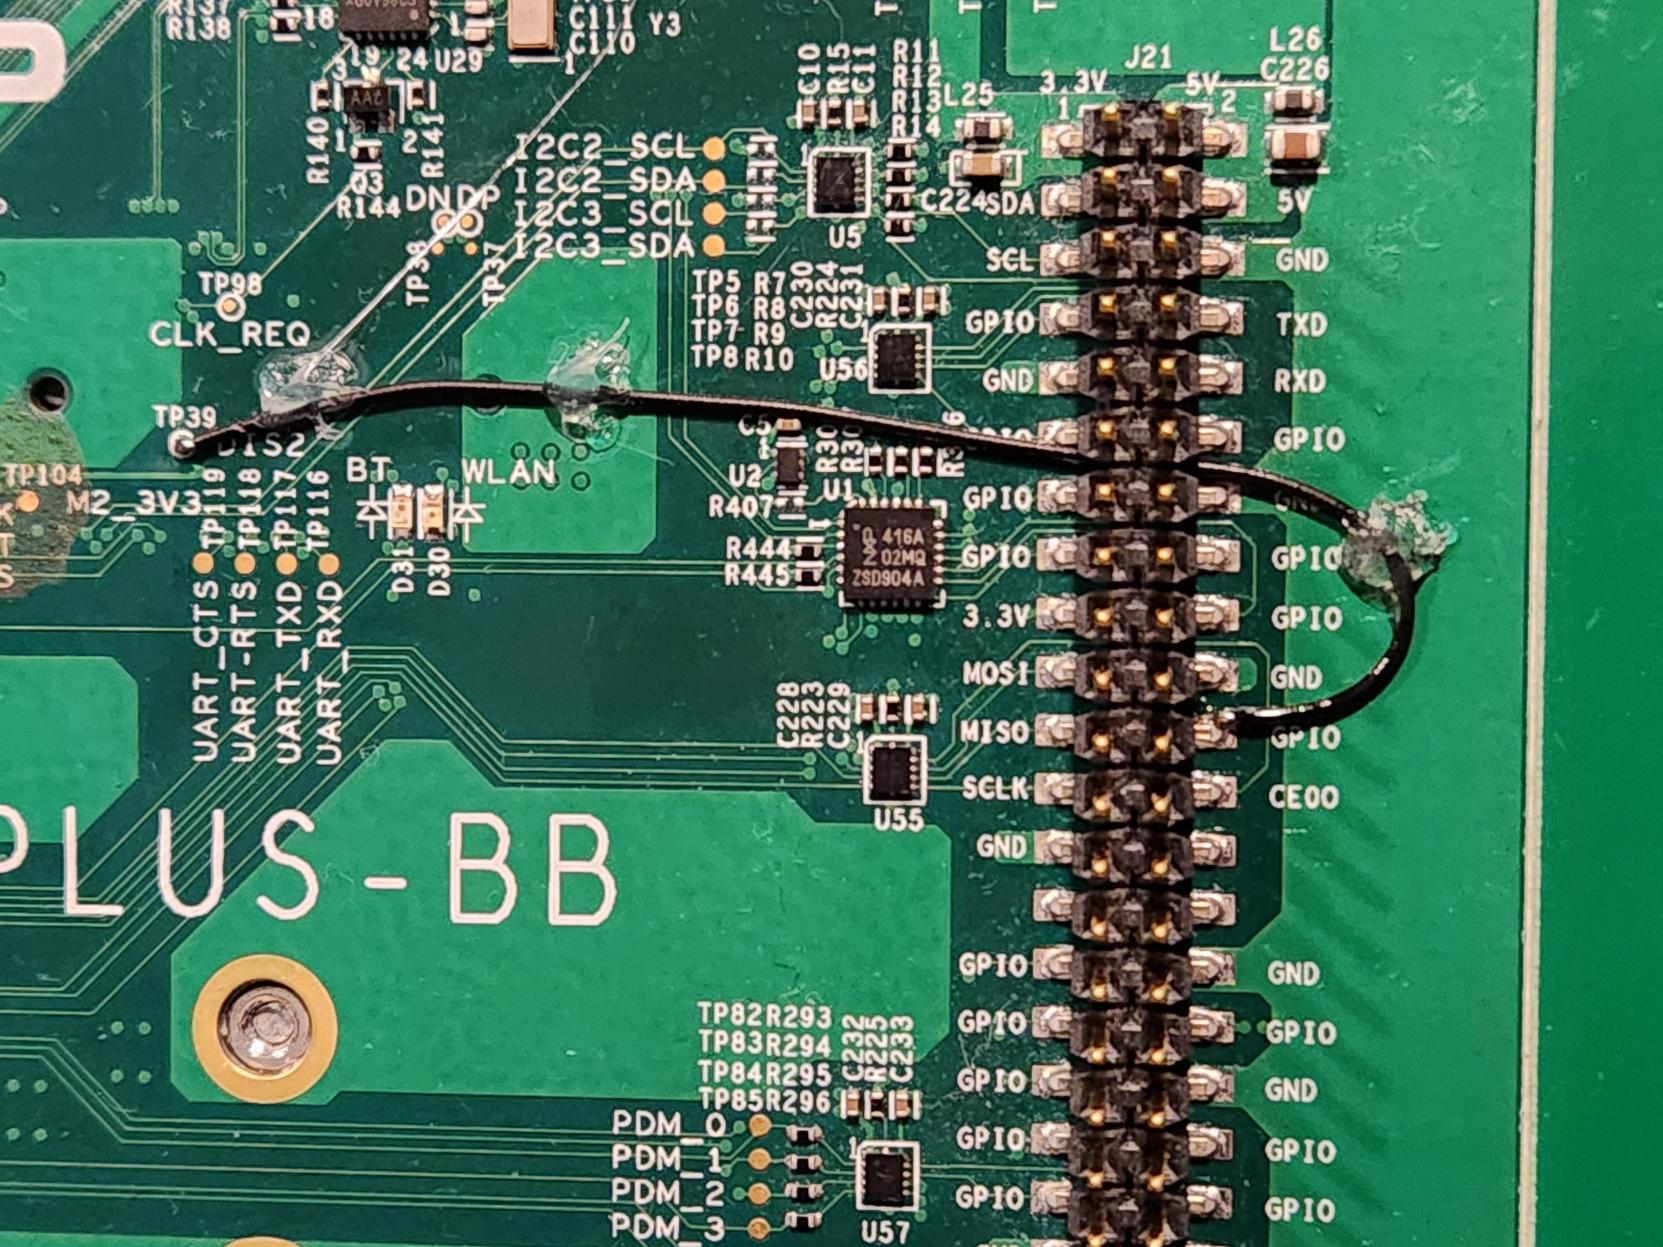
The iMX8MP EVK board does not control the W_DISABLE2 signal by default. Hardware revision A exposes the signal at TP39. Revision B has a resistor strapping option (R142, not populated by default) to connect it to an available pin on the I2C GPIO expander at P0_7. The example device tree setting and scripts in the previous section assume this signal is controlled by this GPIO signal. If using this configuration, populate the resistor on Revision B, or connect TP39 to EXP_P0_7 (available at J21 pin 22) on Revision A.

The wiring on iMX8MP EVK board is as shown in Figure 2.
Bluetooth firmware will be loaded automatically if managed by serdev with appropriate device tree configuration. If a user space script is used to download firmware with brcm_patchram_plus instead, the script will print a message indicating the line discipline was successfully changed. The BlueZ userspace utility bluetoothctl can be used to control the BlueZ stack once firmware is successfully downloaded.
root@imx8mp-lpddr4-evk:~# Done setting line discpline
root@imx8mp-lpddr4-evk:~# bluetoothctl
Agent registered
[CHG] Controller C0:EE:40:D8:55:AF Pairable: yes
[bluetooth]#
Hardware handshaking is required on the Bluetooth UART. Check if the UART port in use is configured with CTS/RTS handshaking enabled. The UART interface on the M.2 slot is uart1 (ttymxc0) on the iMX8MP EVK. The iMX8MP EVK device tree enables handshaking by default on uart1.
Imx8mp-evk.dts

&uart1 	{  /*BT*/
	pinctrl-names = “default”;
	…
      fsl,uart-has-ctsrts;
      status = “okay”;
};
Running IF573 BT via USB port in iMX8MP EVK with IF573 EVK board
The IF573 Bluetooth UART interface is available in two locations on the IF573 EVK board – the board-to-board connector CON1 and USB port USB1 (via FTDI chip). Typically, the UART would be used with the board-to-board connector along with the SDIO/PCIE signals to connect to a host platform M.2 interface. But the Bluetooth port can also be accessed directly via the USB interface as documented in this section.
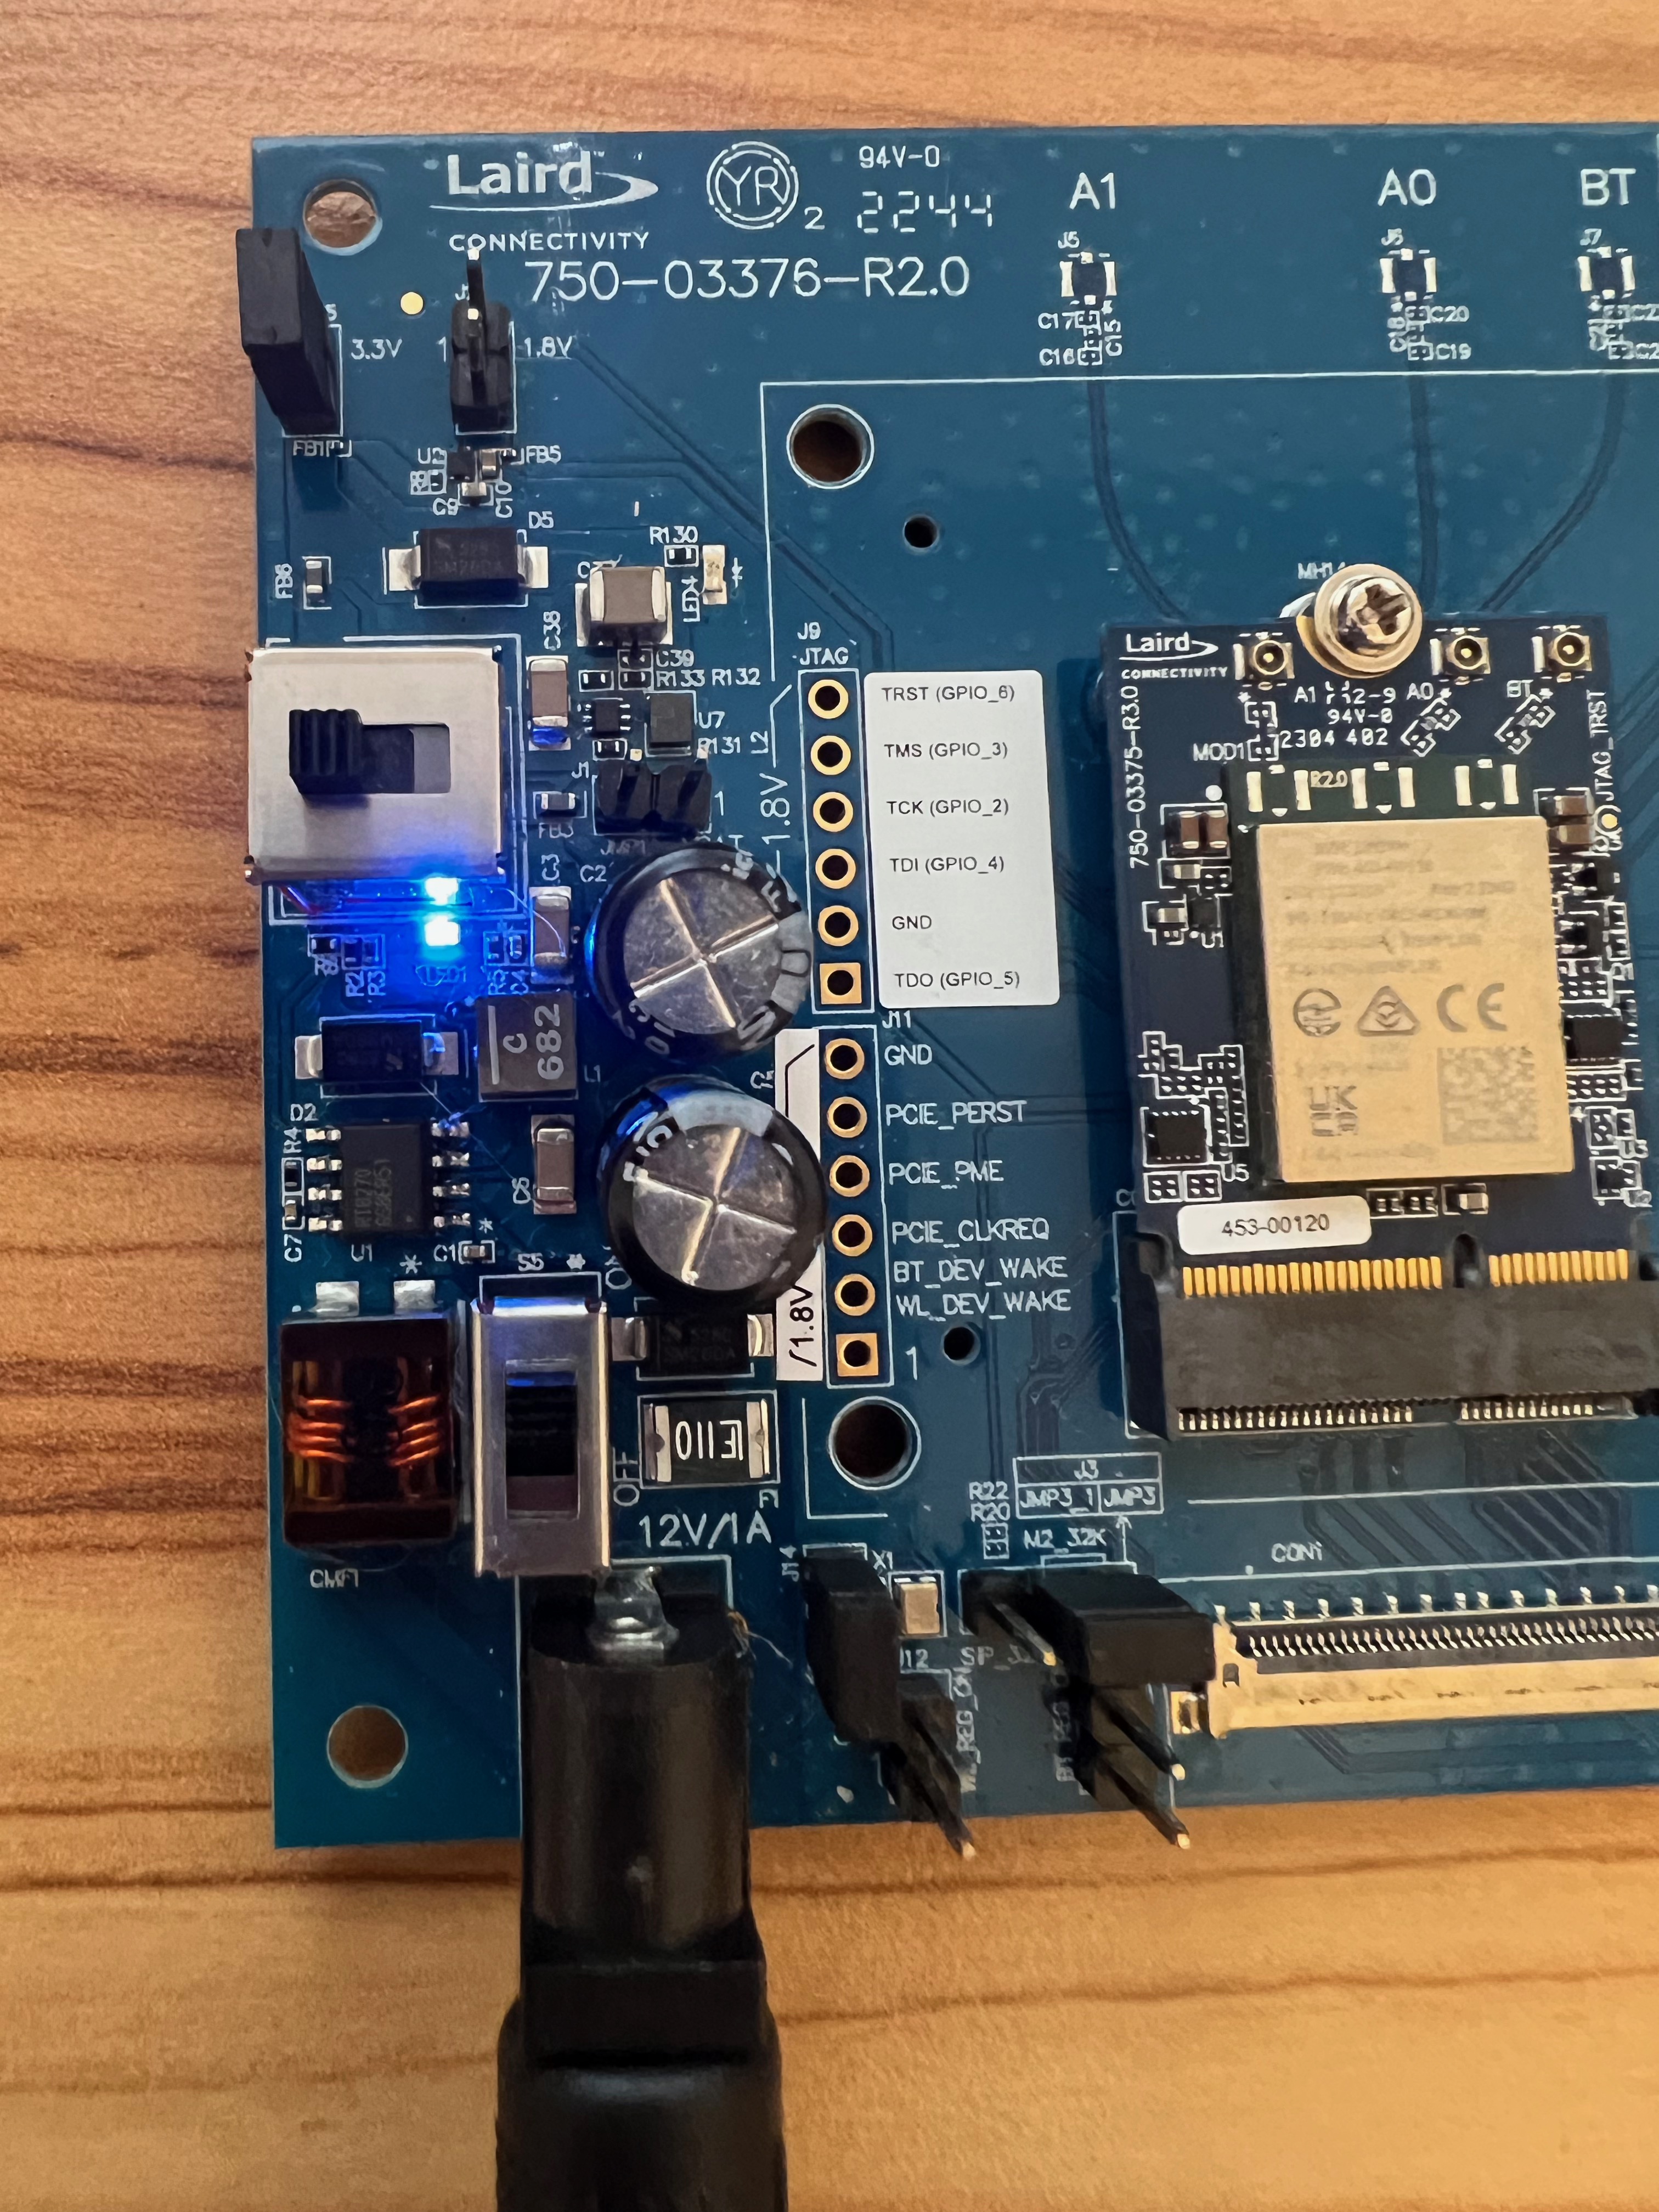
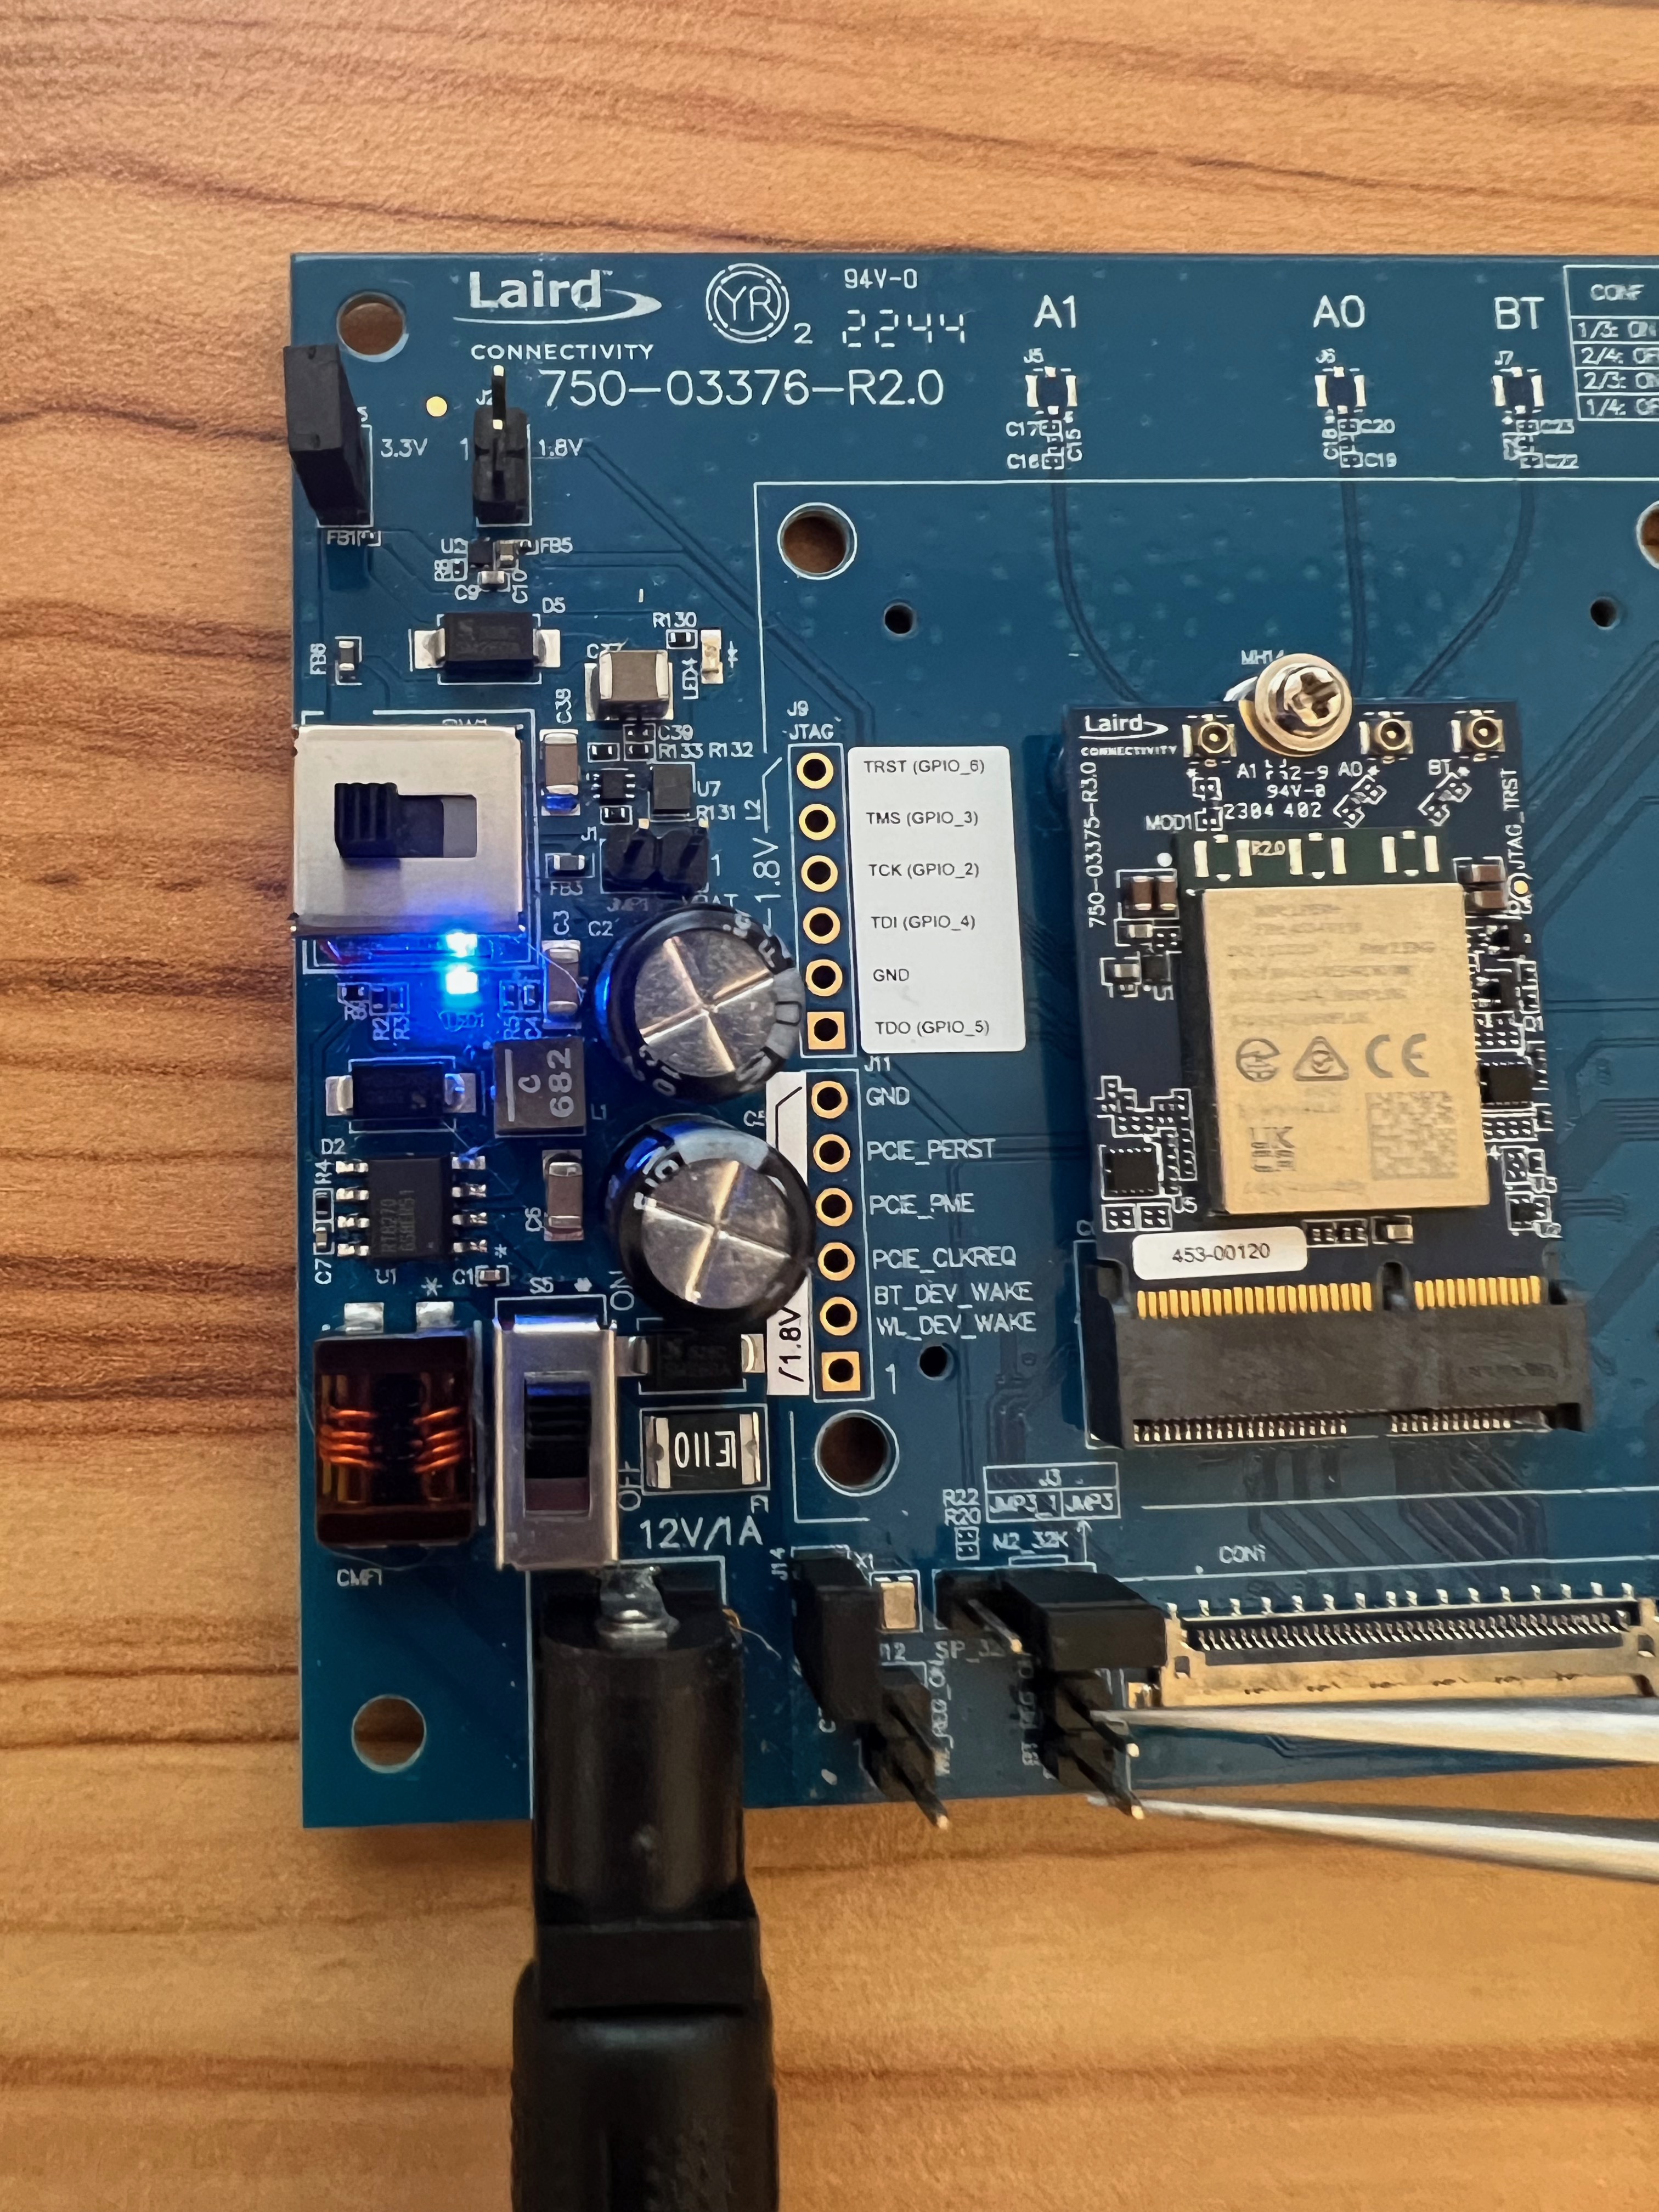
To power on the IF573 EVK with the power adapter, you need to set SW1 to 3.3V (left).
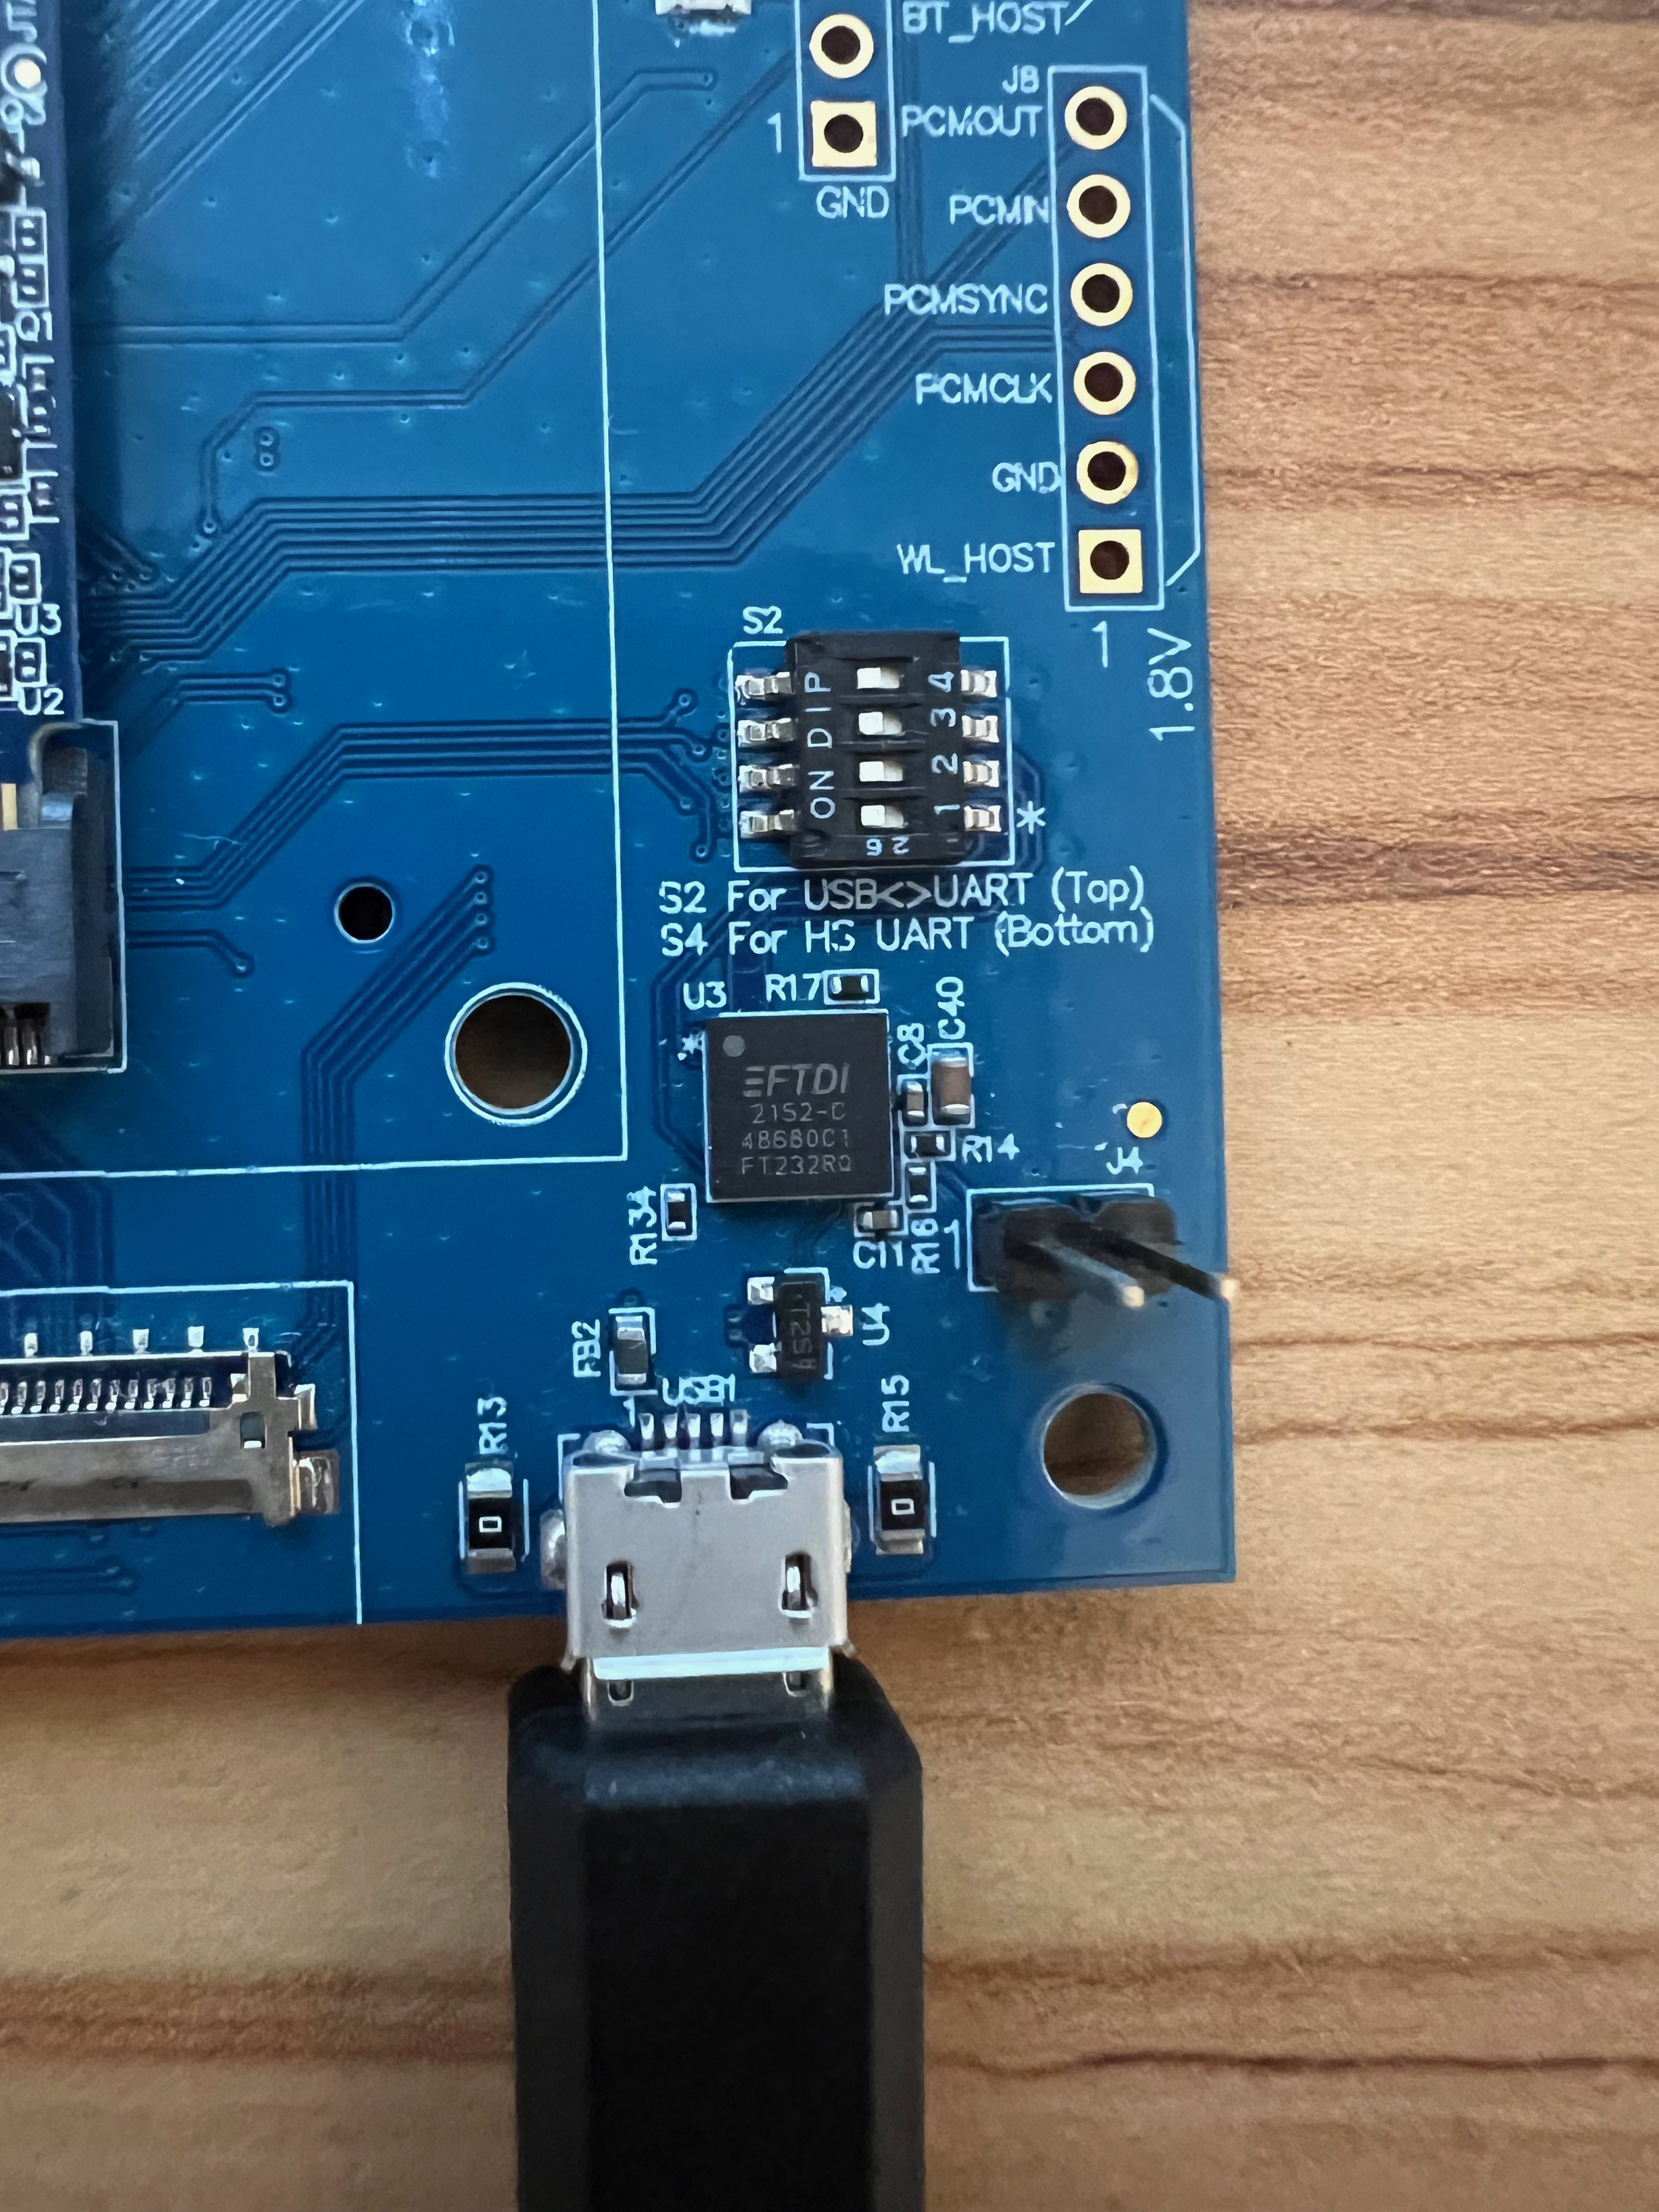
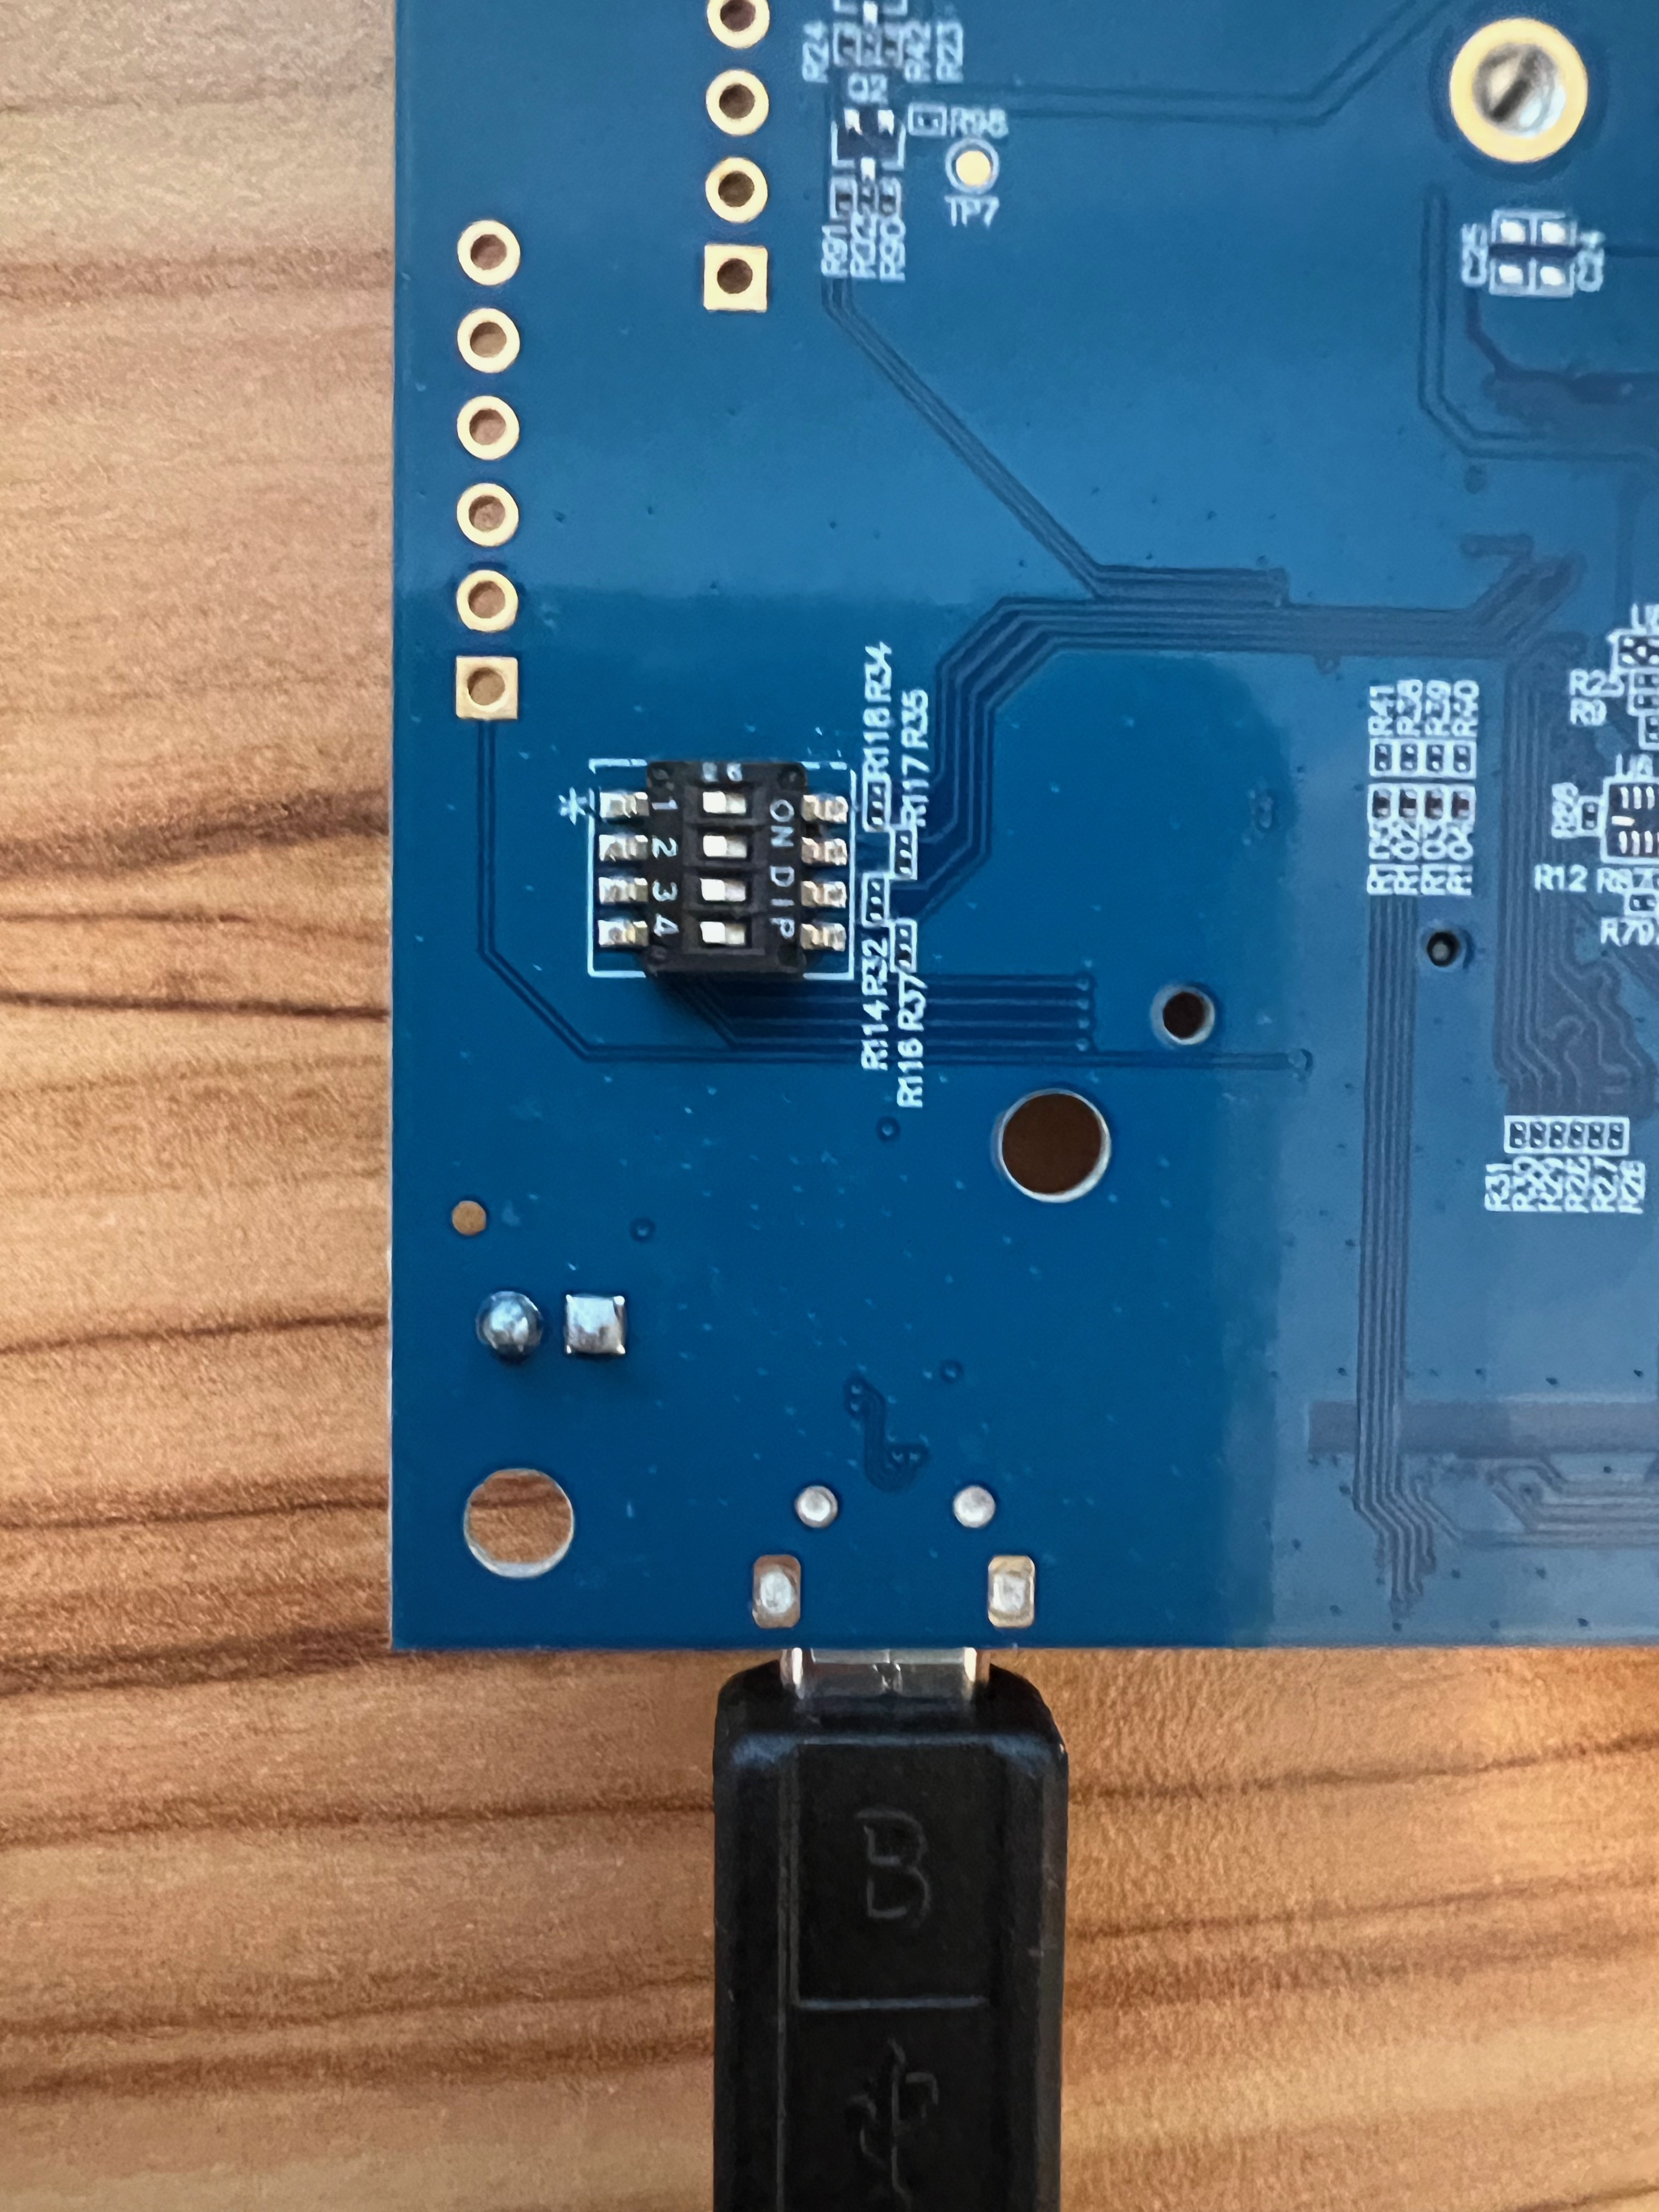
To use the USB-UART port, you need to set all bits to the TOP in S2 and all bits to BOTTOM in S4 on the other side of the PCB as shown in Figure 4.
After connecting the IF573 EVK to the iMX8MP EVK USB port, the following message indicates the FTDI chipset is detected and available at ttyUSB0:
root@imx8mp-lpddr4-evk:~# [   16.664443] usb 1-1: new full-speed USB device number 2 using xhci-hcd
[   16.830214] ftdi_sio 1-1:1.0: FTDI USB Serial Device converter detected
[   16.837217] usb 1-1: Detected FT232RL
[   16.842662] usb 1-1: FTDI USB Serial Device converter now attached to ttyUSB0
Next, execute brcm_patchram_plus commands as shown below to initialize BT.
Note: Without GPIO control over BT_REG_ON/W_DISABLE2# to manage the reset, the firmware download will not be able to complete. The firmware download step will remain pending until the reset occurs. However, the download step must still be started prior to the reset.
root@imx8mp-lpddr4-evk:~# brcm_patchram_plus  --no2bytes --autobaud_mode --baudrate 921600 --use_baudrate_for_download --enable_hci  --patchram /lib/firmware/cypress/CYW55560A1.v001.002.087.0225.0065.hcd /dev/ttyUSB0 &
[1] 310
The BT_REG_ON reset can be performed manually using tweezers or a jumper to briefly short the pins on J13 as shown in Figure 5.
After a few seconds, the firmware download should complete and show the message below. Bluetoothctl can then be used to manage the BlueZ stack.
root@imx8mp-lpddr4-evk:~# Done setting line discpline
root@imx8mp-lpddr4-evk:~# bluetoothctl
Agent registered
[CHG] Controller C0:EE:40:D8:55:AF Pairable: yes
[bluetooth]#
Regulatory Domain Configuration
The driver will fail to load unless the regulatory domain is configured properly. In a production system this must be configured at design time.
It can be implemented by setting the LWB_REGDOMAIN variable to the required country code listed as a Country Code in the per-radio regulatory release notes for the radio in the build’s conf/local.conf file as shown below.
LWB_REGDOMAIN = "US"This will create a brcmfmac.conf file in /etc/modprobe.d containing the specified country code in the regdomain module parameter.
/etc/modprobe.d/brcmfmac.conf
options brcmfmac regdomain=US
The initial list of supported regulatory domains includes US, CA, AU, NZ, JP, ETSI
Configuring the Supplicant or NetworkManager
The Wi-Fi connection can be configured either by NetworkManager or supplicant.
Configuration with NetworkManager
Here is an example to setup a connection with a WPA3-SAE network using NetworkManager.
nmcli conn add con-name NETGEAR84-6G ifname wlan0 type wifi ssid NETGEAR22-6G wifi.powersave 2 802-11-wireless-security.key-mgmt sae 802-11-wireless-security.psk miles123Configuration with sdcsupp
You can also use the supplicant (sdcsupp) directly with a configuration file.
sdcsupp -Dnl80211 -c /etc/wpa_supplicant.conf -i wlan0 -B -ddd

/etc/wpa_supplicant.conf
ctrl_interface=/var/run/wpa_supplicant
update_config=1
sae_groups=19
sae_pwe=2

network={
ssid="NETGEAR84-6G"
key_mgmt=SAE
sae_password="miles123"
ieee80211w=2
}
MFG Mode
Once you build the MFG package, “reg-if573.bb", the MFG tool i.e. lru, and related libraries will be included in your image.
To activate test mode, you will need to add the following link file under /lib/firmware/cypress in your device. (you may need to delete the original cyfmac55572-pcie.trxse file)
ln -s cyfmac55572-pci-mfg_v18.53.284.17trxse cyfmac55572-pcie.trxse If you use SDIO interface option, then change pcie to sdio in the command above.
During the driver initialization, once the test firmware is downloaded, It will show the firmware information as below which indicates driver is running in test mode.
brcmfmac: brcmf_c_preinit_dcmds: Firmware: BCM55560/1 wl0: Nov 24 2023 02:16:18 version 18.53.284.17 (92de749 WLTEST) FWID 01-6cdb62ea| Version | Date | Notes | Contributor(s) | Approver |
|---|---|---|---|---|
| 1.0 | 30 Oct 2023 | Initial Release | Miles Chung | Andy Ross |
| 1.1 | 25 Mar 2024 | Update according to the formal release. Updates to Regulatory Domain Configuration | Miles Chung | Dave Drogowski |
| 2.0 | 24 Feb 2025 | Updated to Ezurio branding. | Sue White | Dave Drogowski |