/filters:background_color(white)/2024-10/IG60-BL654 and BT610 - Kit.png)
Overview
This quick start guide is meant to be used with Laird Connectivity's Sentrius™ IG60-BL654 + BT610 IoT Starter Kit or the hardware therein. This kit is useful for prototyping IoT applications such as such as HVAC monitoring, three-phase AC current sensing, tank monitoring solutions, and more. Gather data from the BT610 sensors and aggreate it with the IG60-BL654 before sending it up to the cloud via Amazon IoT Greengrass.
This demo kit contains the following hardware
- 1x Sentrius IG60-BL654 Wireless IoT Gateway with global power supplies
- 1x Sentrius BT610
- Global AC and DC power adapters
This demo kit will be used with the following software
- Laird Connectivity’s free AWS-based IoT monitoring platform called Bluegrass.
- Sentrius IG Connect app - iOS and Android mobile app for fast, in-field provisioning.
- BT610 app - iOS and Android mobile app for configuration and updating.
This quick start guide will help you do the following
- Create a Bluegrass demo account.
- Register and provision your IG60-BL654 gateway to your Bluegrass account.
- Visualize your BT610 sensor data in the cloud.
Product Pages
On the next page of this guide we will go over the hardware and software required to complete this quick start demo.
Requirements
IG60
- A Sentrius™ IG60-BL654 - Greengrass Build
- 3x dipole antennas (comes with IG60-BL654)
- AC Power supply (comes with IG60-BL654)
BT610
- One or more BT610 sensors.
- Some type of sensor/cable assembly to plug into the BT610.
Mobile App
You'll need the following apps on your mobile device.
- IG Connect app
- BT610 app
Network Ports
It is possible that your network and firewall may prevent some outgoing connections to AWS IoT Greengrass and subsequently Laird's Bluegrass Demo instance. Please make sure these ports are open for outgoing connections.
- 443
- 8443 (outbound, HTTPS)
- 8883 (outbound, MQTT)
You an use a website called Port Quiz to test if these ports are open. If the page does not open or fails to load then you'll need to open these ports yourself or request your IT department to open them for you.
Bluegrass account
For this demo you'll be using Laird's Bluegrass demo platform which is built on top of AWS. This Bluegrass platform provides a web interface to manage your devices and to visualize your sensor data that is being sent up to the cloud via the gateway.
In the next page of this guide you'll create a Bluegrass account and register your gateway device.
Bluegrass
What is Bluegrass?
Bluegrass is Laird's demo platform which is built on top of AWS. This Bluegrass platform provides a web interface to manage your devices and to visualize your sensor data that is being sent up to the cloud via the gateway.
Bluegrass Account Creation
In order to use the Bluegress platform you'll need to create an account which you can do by completing the following steps.
-
Click the following link to navigate to the Bluegrass home page https://demo.lairdconnect.com
-
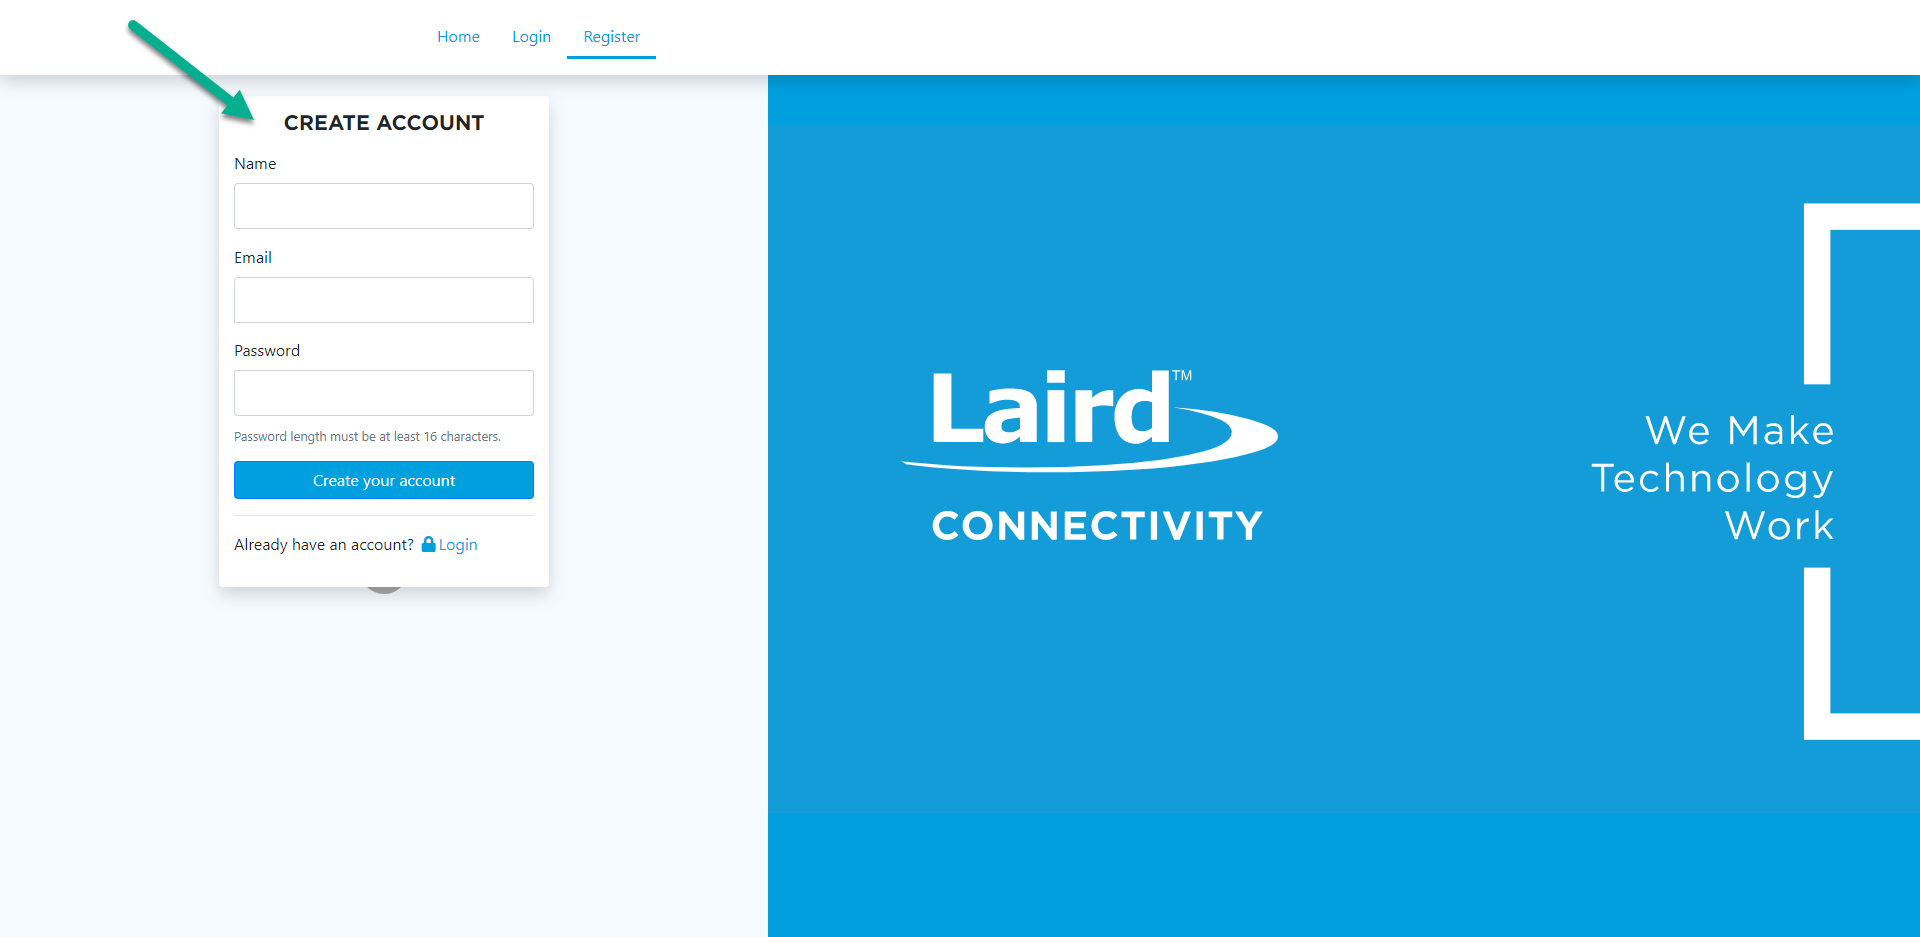
Once you're on the page you'll need to click the "Register" tab at the top of the page.

-
Enter your name, an email, and a password.
Note: The password must be at least 16 characters.
-
Click the "Create your account" button.
-
The system will send a confirmation code to your email address. Retrieve the confirmation code.
Note: If the confirmation code doesn't arrive within a few minutes, check your account's spam folder.
-
Enter the code in the confirmation code field. Click Confirm.
-
If successful, you'll be brought to the "Login" tab where you can now enter your credentials to log in.
-
Upon log in you'll be presented with your device dashboard which lists the devices associated with your account and allows you to register a new device, which we will do in the next section of this guide.
Bluegrass Device Registration
The Bluegrass platform allows you to register gateway devices (not sensors) which will then collect and aggregate sensor data to be visualized. Let's register an IG60-BL654 now.
To register your gateway on the Bluegrass platform complete the following steps.
-
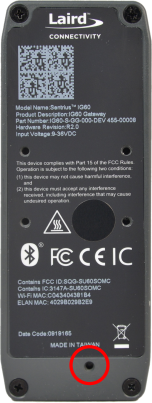
Locate the Ethernet MAC or ELAN MAC address located on the back of your IG60-BL654 gateway. It is a 12 digit hexadecimal number.

-
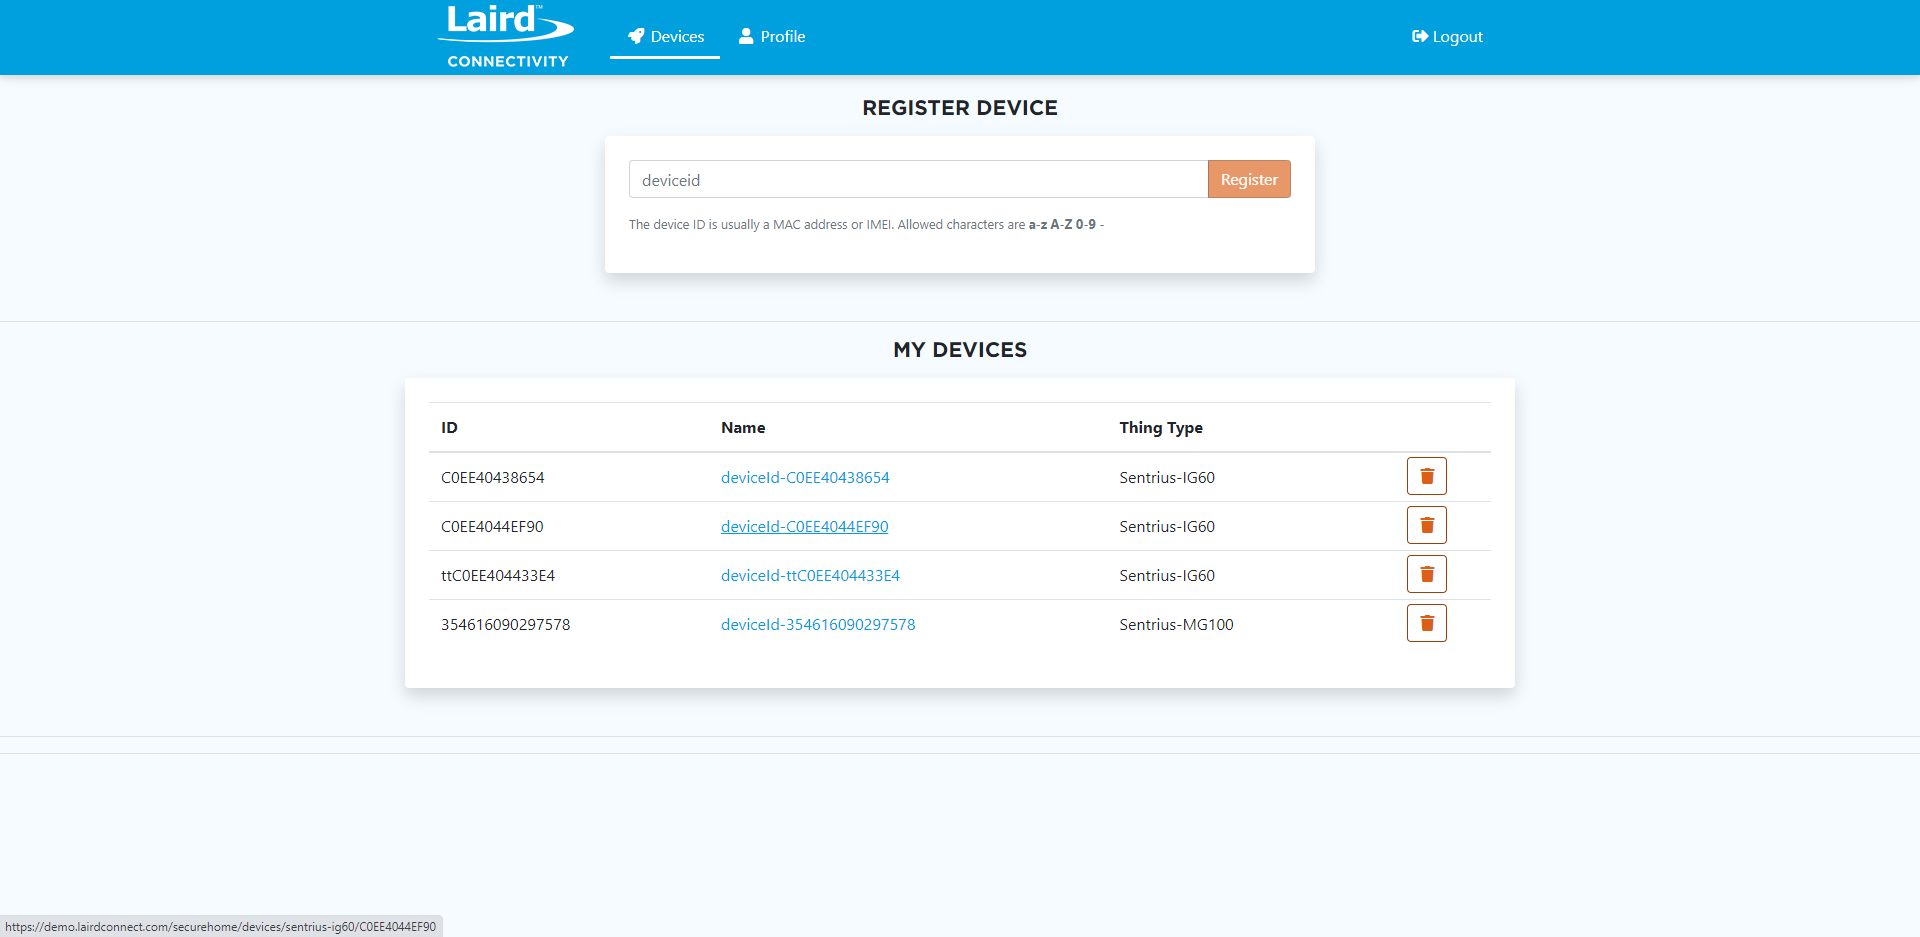
Enter that MAC address as your "deviceid" and click "Register".
Note: You do not specifically have to use that MAC address, but it is the best way to identify your device. If you delete this device in the future, it is recommended to re-register it with the same MAC address and additional character or two such as "zz", for example because there cannot be duplicate device IDs in the system.
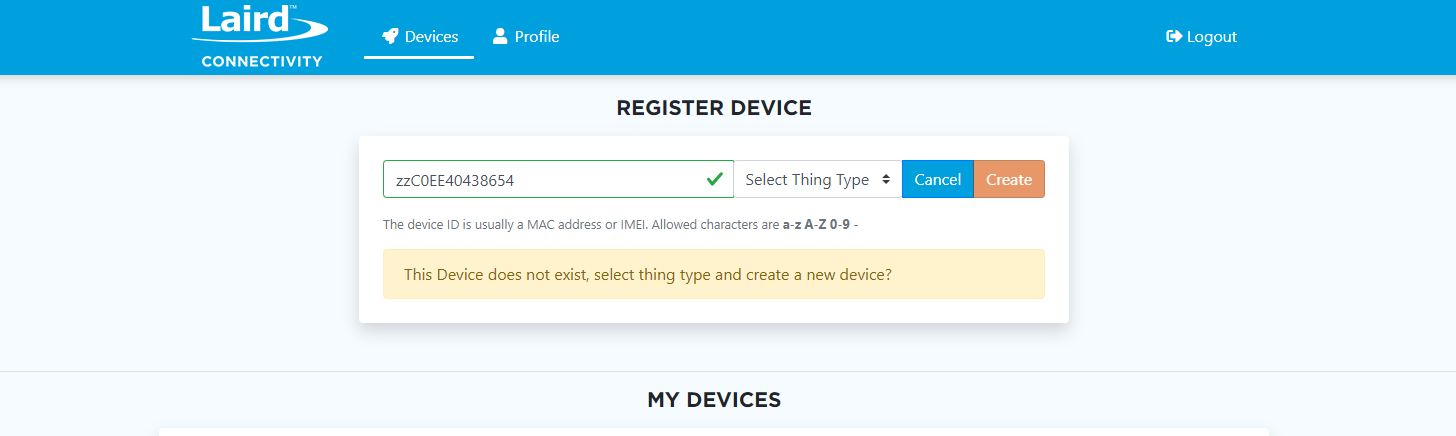
-
If the device ID you entered is unique you will get a yellow prompt asking if you would like to select a type and create a new device. Select the thing type that is appropriate for your gateway device. In this case it is "Sentrius-IG60".
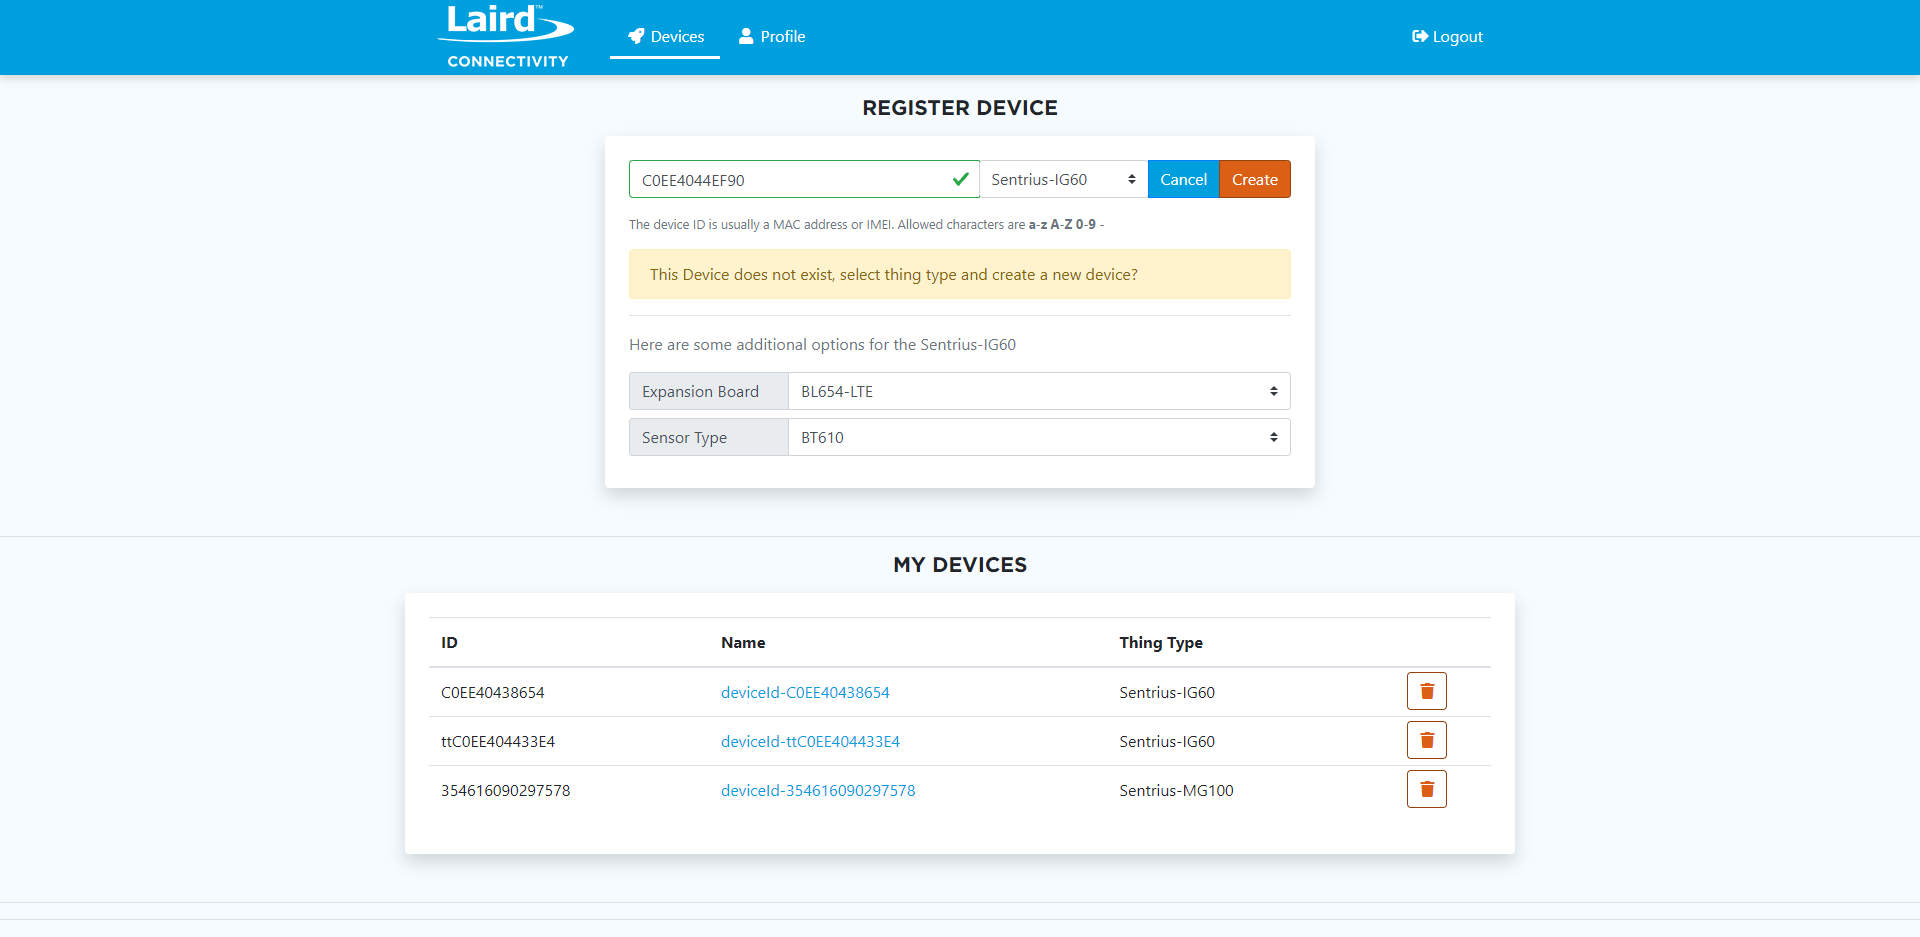
-
An additional options appears to select the Expansion Board and the Sensor Type. In this case we will use BL654 for the Expansion Board and BT610 for the Sensor Type.
-
Click "Create".
-
Upon success you should see your device appear in your devices list in the bottom half of the page.
Now we can continue on to setting up the physical hardware in the next page of this guide.
Hardware Setup
To set up your IG60-BL654, complete the following steps.
- Connect the two dipole antennas included with the IG60-BL654 to the WLAN1 and WLAN2 ports.
- Connect the third included dipole antenna to the BT port.
- If you're connecting over ethernet, connect the ethernet cable to the LAN1 port.
- Connect your regional power plug adapter to the DC adapter included with the IG60-BL654.
- The plug adapter slides into the back of the DC adapter over the two exposed spring pins, and the plastic tabs at the bottom of the adapter slide into the housing of the DC adapter box.
- Plug the DC adapter into your DC outlet, and the other end of the DC adapter into the DC power port of the IG60-BL654.
As the IG60-BL654 boots, the LEDs go through several stages. The IG60-BL654 is discoverable by the Sentrius Connect app when the Wi-Fi or Bluetooth LED (depending on your hardware model) begins alternating green and yellow. This is an indication that the device is in Bluetooth configuration mode.
If your signal LED does not alternate green and yellow, you may need to place the device into configuration mode. To do so, use a paperclip or similar small instrument to depress the Reset button on the back (mounting side) of the IG60-BL654, shown below for less than 5 seconds. If you depress the button for longer than 5 seconds it will factory reset the device.
The next page in this guide will explain how to use the mobile app to provision your gateway device, in this case an IG60-BL654.
Using the Mobile App to Provision your Gateway Device
In this section we will use the IG Connect app to connect to and provision your IG60-BL654 gateway to work with the Bluegrass platform under your user account. Please follow the steps below.
-
Ensure Bluetooth is enabled on your mobile device and open the IG Connect app.
-
The app will automatically start searching for gateways. If it does not you can hit "Find Nearby Gateways" to start a search.
-
It is possible that the search will timeout if your gateway device is not ready. You can restart the search in that case.
-
Your gateway device should appear in the list as "Laird IG60 (XX:YY:ZZ) where the XX:YY:ZZ is equivalent to the last 6 digits of the MAC address. Tap on that address in order to connect to the device and continue the provisioning process.
Note: Sometimes, particularly on iPhones, your device may not appear in the list, or the app will hang. If this occurs, please kill your app and restart it. This is a known bug and is being addressed.
-
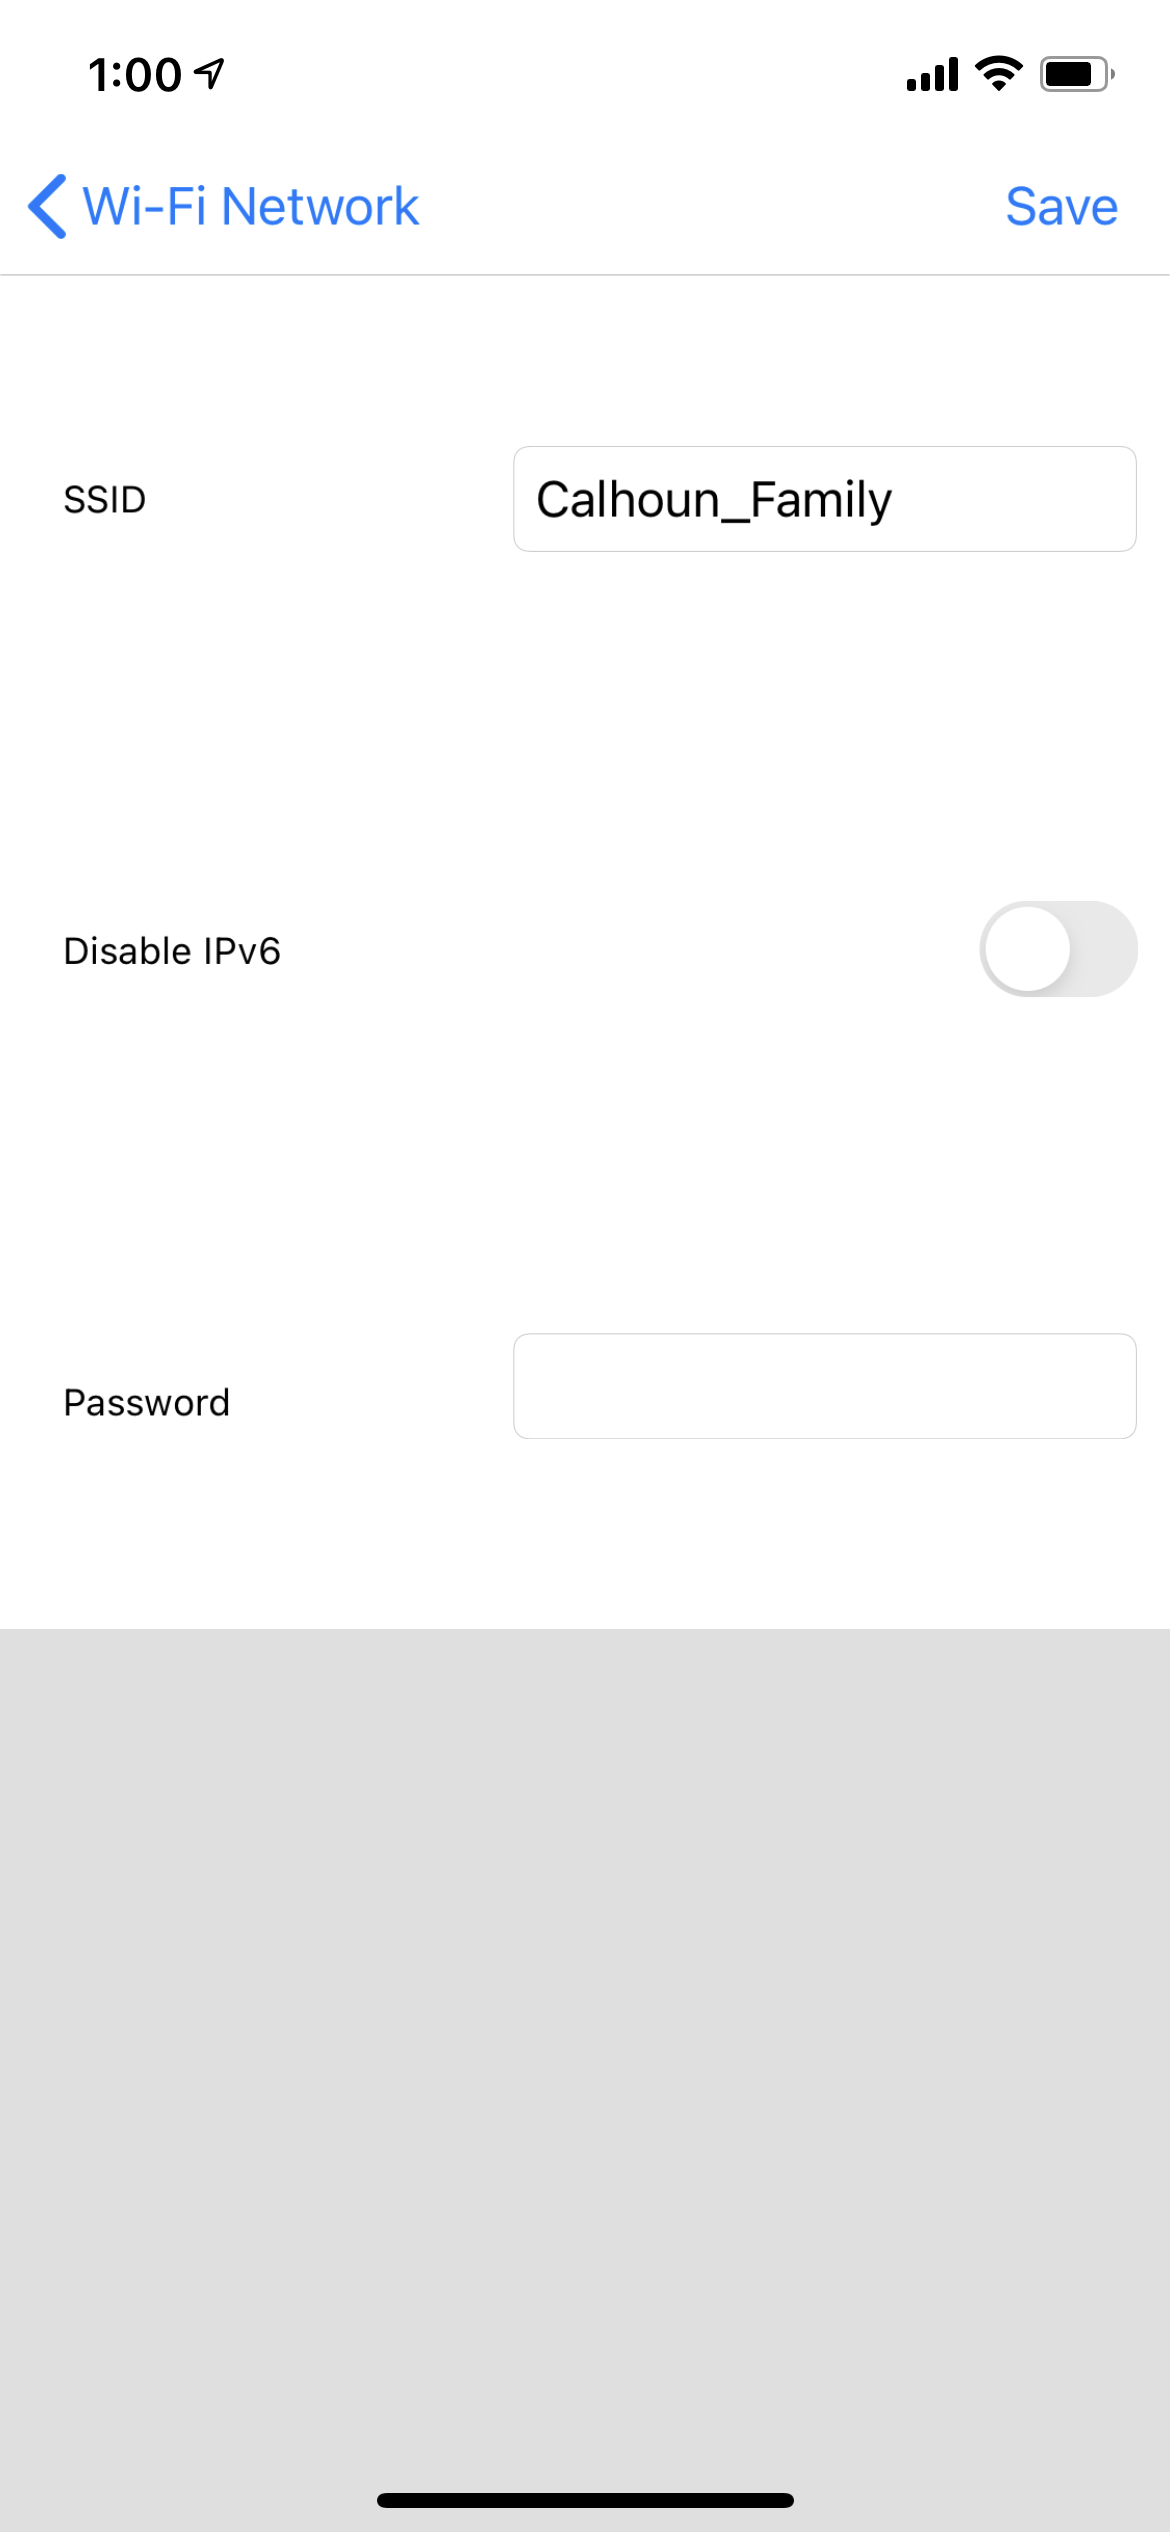
The app will begin reporting nearby wireless networks. When a list appears, select the Wi-Fi network you wish to connect to. Or, if you prefer to use LAN instead, you can toggle off the switch for Enable Gateway Wi-Fi and then tap "Next" in the top right corner.

Note: If you previously tried to connect to a Wi-Fi network, but the process failed, you may not see new networks in the scan list. This is a known bug in the IG60-BL654. To resolve this issue, you’ll need to cycle power to the IG60-BL654 by unplugging the power supply and reconnecting it.
-
Enter your credentials for your chosen network, then press "Next" in the top right corner.
-
Enter the Provisioning URL (or copy and paste it from the confirmation email you received), as well as your email address and password you used to sign up at https://demo.lairdconnect.com/ in the "Bluegrass Account Creation" step of this guide.
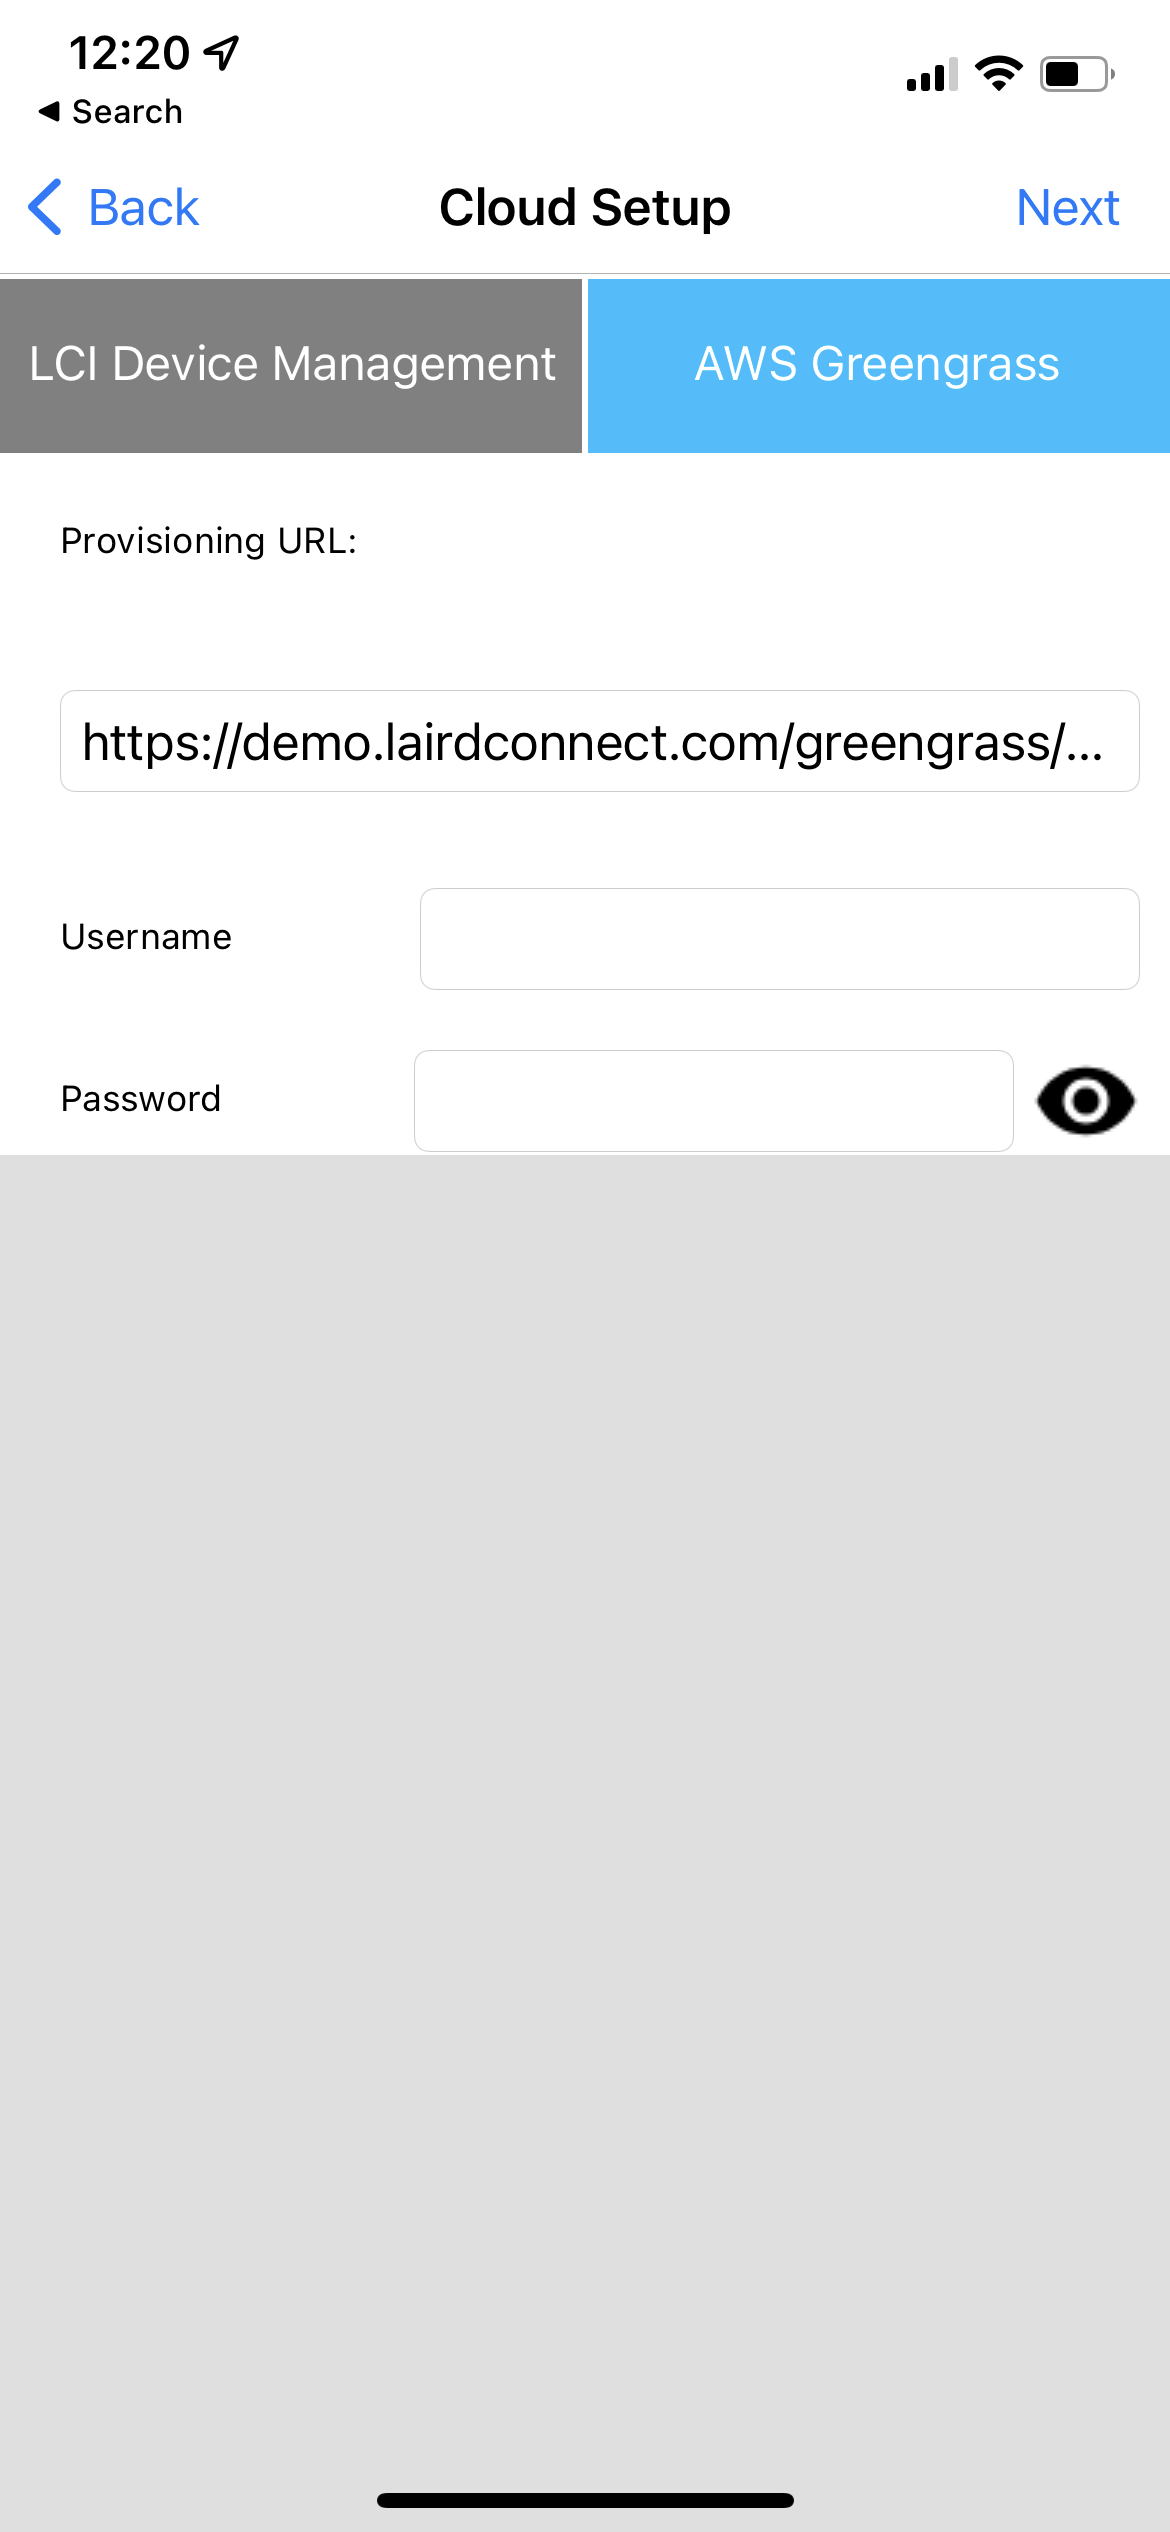 Click "Next" in the top right corner.
 -
The app will change status from downloading to applying. Setup is complete when the app presents the message "Success - Device Provisioned".
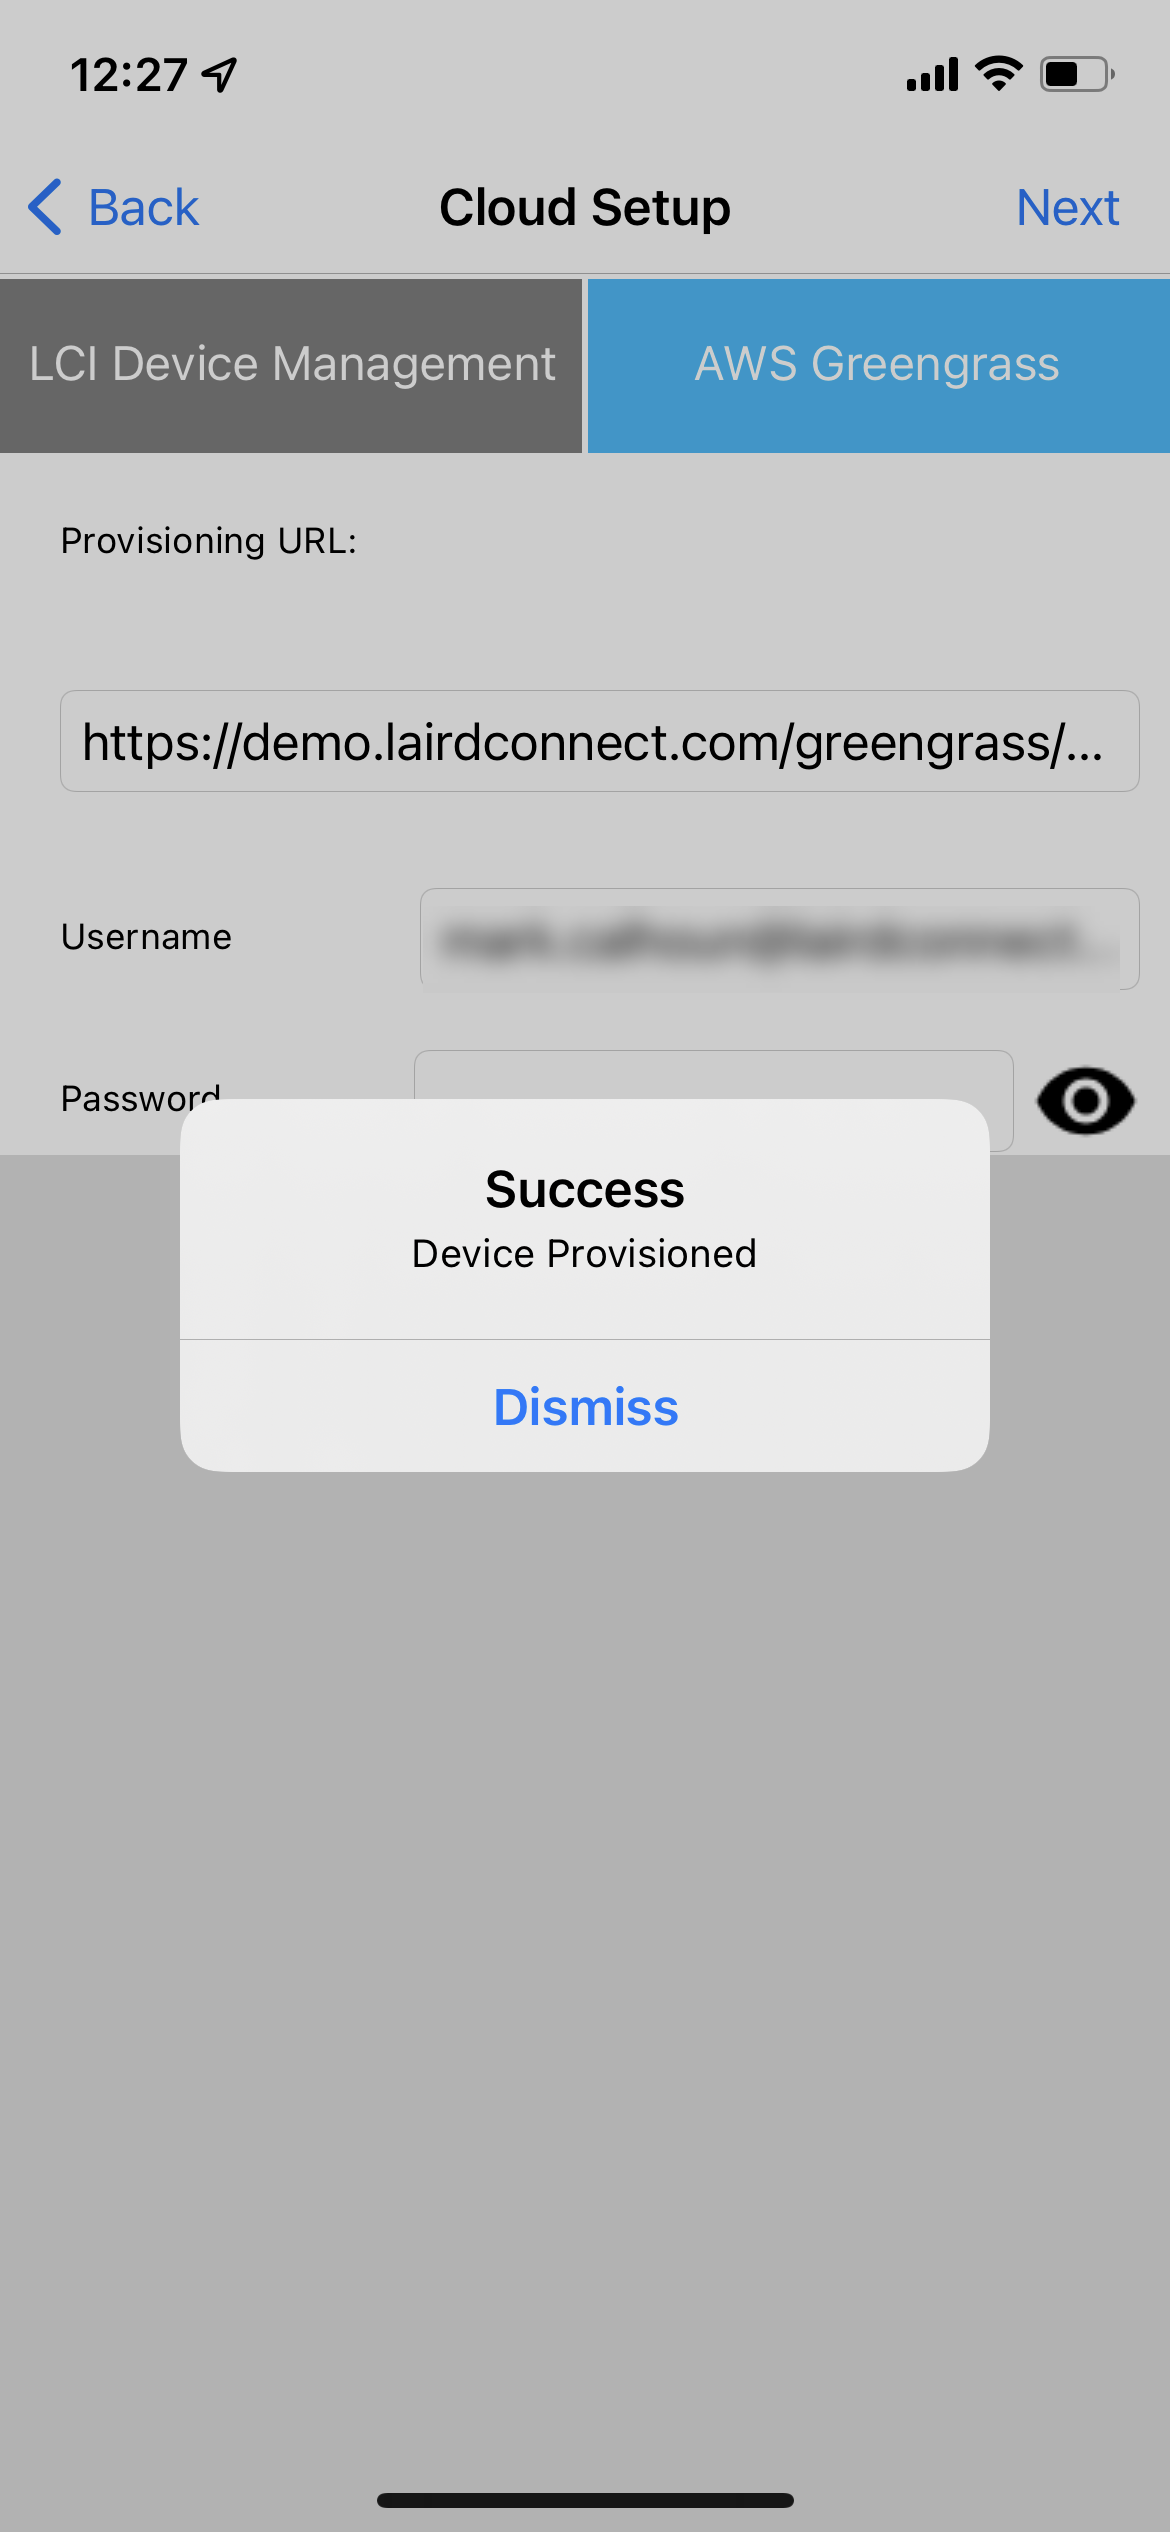
Note: This step can take a few minutes depending on your network connection. The IG60-BL654 is downloading provisioning files. Please be patient. You will be returned to the home page of the app. It will prompt you to "FIND NEARBY GATEWAYS". This is unecessary. You may now close the app and proceed with this guide.
Now that the gateway is provisioned we will move onto visualzing your sensor data on the Bluegrass platform in the next section of this document.
Visualizing your Sensor Data
In this section we will confirm that our gateway has deployed, observe that it detects a BT610, configure that BT610, and finally visualize the sensor data coming from that BT610. Please follow the steps below.
Laird's Bluegrass Platform
We will be using Bluegrass for visualizing our data. You should already have a Bluegrass account with a gateway device registered on it as established in the Bluegrass section. Navigate to the Bluegrass site now and click on the name (Device ID) of your gateway to start configuring the gateway to interact with your BT610(s).
Deployment in Progress
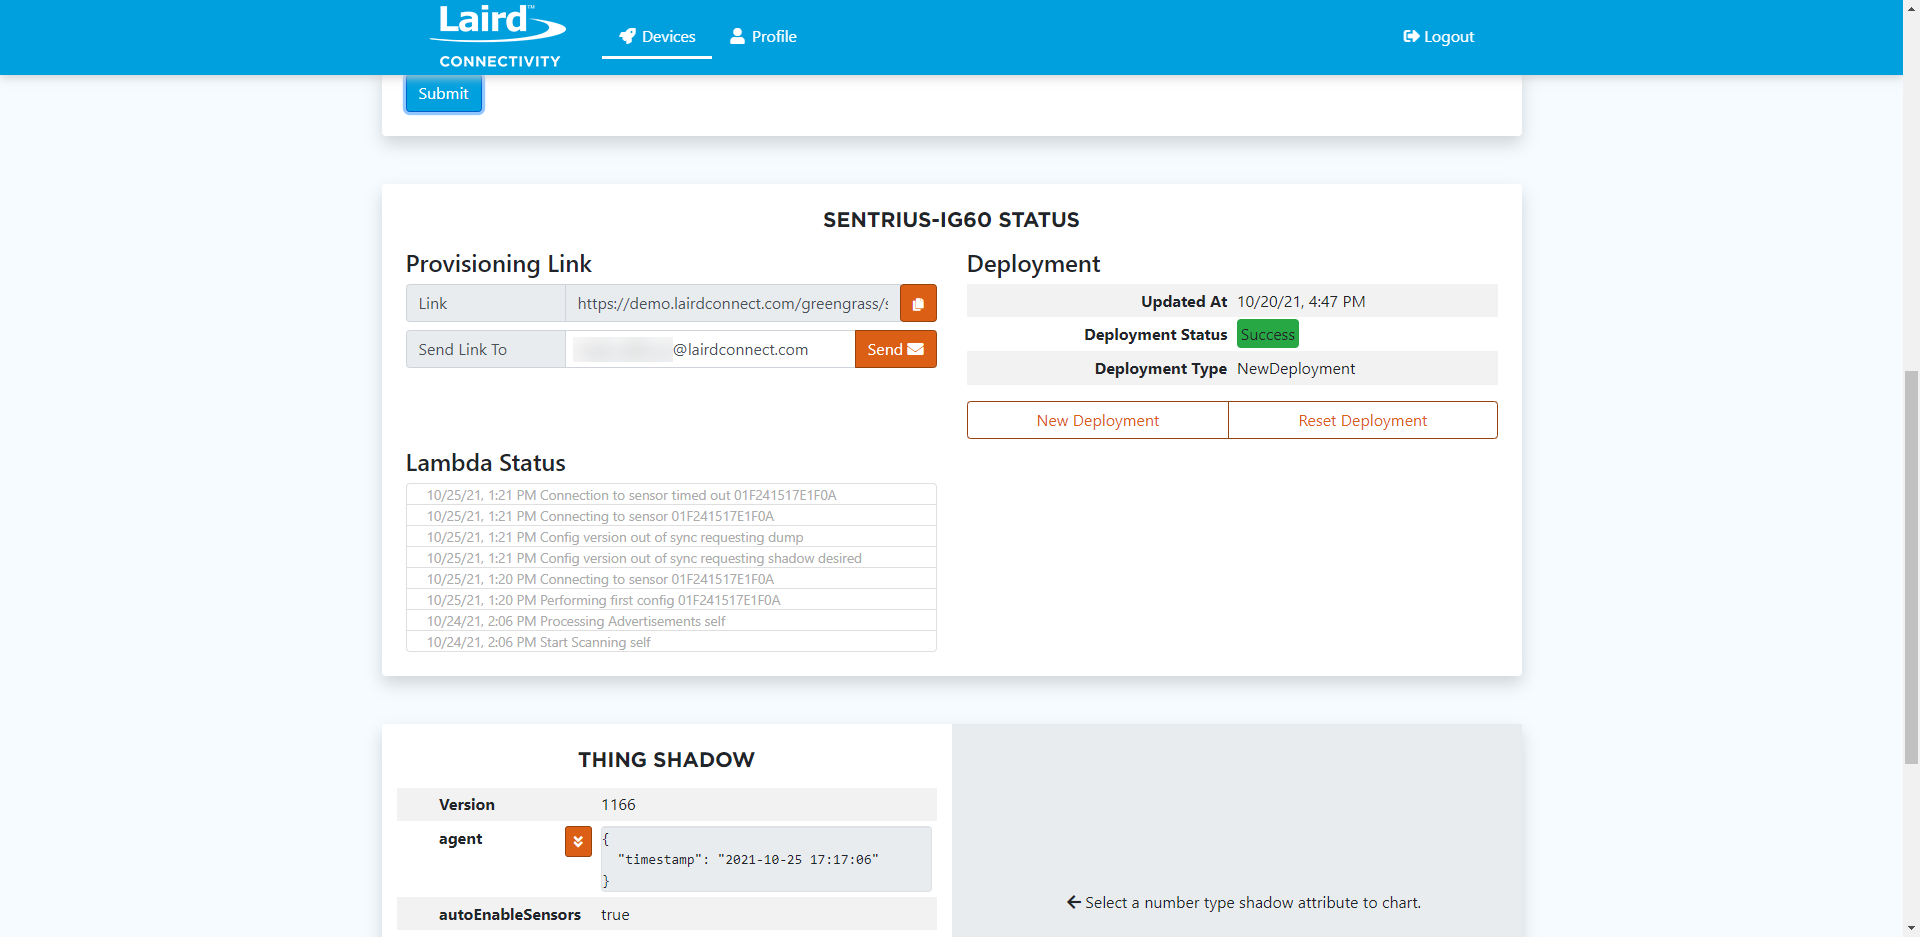
When you first provision your IG60 gateway to Bluegrass via the mobile app (in the Provisioning section of this guide) it can take up to a few minutes to complete. On your gateway page in Bluegrass you may see, in the section Sentrius-IG60 Status, that the Deployment Status is highlighted yellow and says In Progress. In this case the gateway is still downloading resources such as a lambda in order to interact fully with Bluegrass and your BT610 device(s). Please wait a few minutes and then refresh the page. Upon success you will see green highlighted text that states Success.
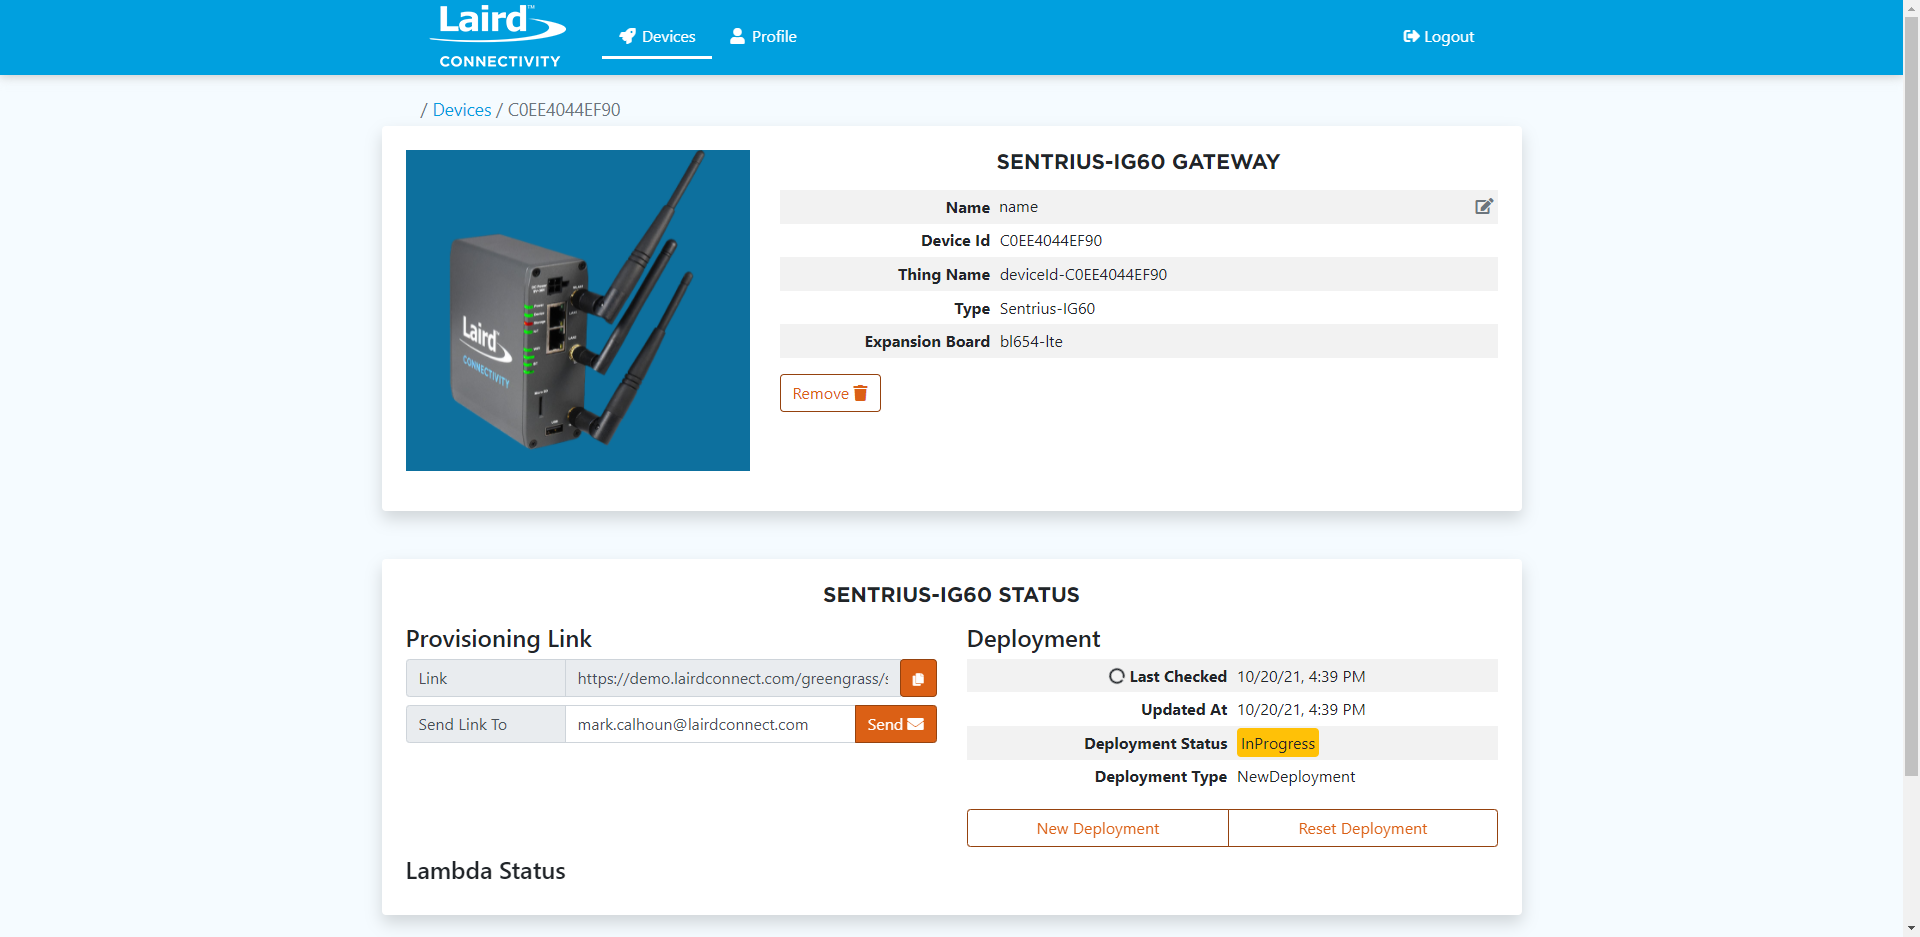
Provisioning Link
If you need the provisioning link sent to your email again, you can do so here. Enter your email and click send. This is the provisioning link you would use in the mobile app (IG Connect) when connected to your IG60 Gateway.
Deployment Debug
Above your deployment status you will find Last Checked and Updated At values. Last Checked will indicate the last time your IG60 has checked in. This may be useful for debugging connection issues. Updated At will indicate the last time the gateway software (such as the Greengrass Lambda) was updated.
Lambda Status
Once your gateway is online and fully provisioned, you'll also see a Lambda Status, such as the one shown below. This is useful debug information about what the lambda code is currently doing on your gateway. Most of the time you will see it scanning, processing advertisements, and then parsing BT610 data from your sensor. Those will be denoted by the MAC address of the sensor.
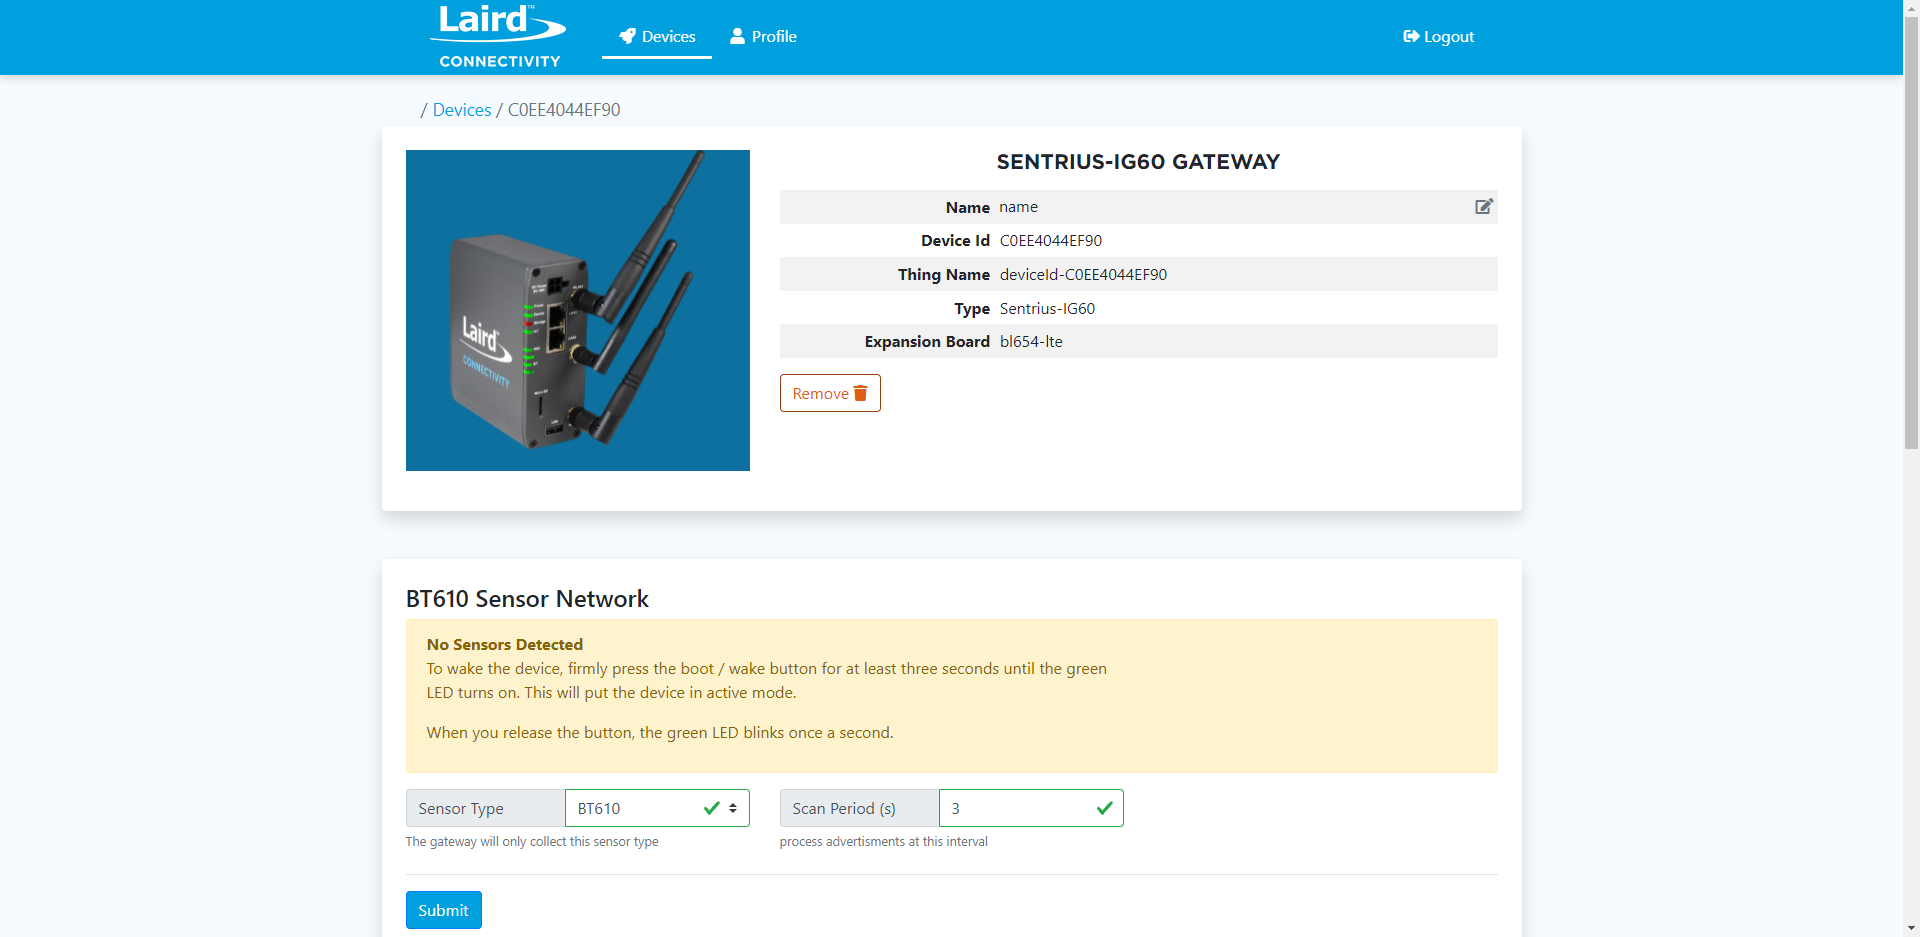
BT610 Sensor Network
No Sensor(s) Detected
Once your gateway is fully provisioned and running its lambda, you should see a BT610 Sensor Network section populate. At first, this section may show No Sensors Detected, which is normal. The lambda needs to spin up and start scanning for sensors. Additionally, you must make sure your BT610 sensor is advertising. The web page will display instructions on how to get your device advertising if it detects no BT610 sensors.
You'll also want to be sure your Sensor Type is set to BT610 in this case. Your Scan Period (s) is how often, in seconds, the gateway will process advertisements. Around 3 seconds is a decent interval to start at, but feel free to tweak this as you see fit.
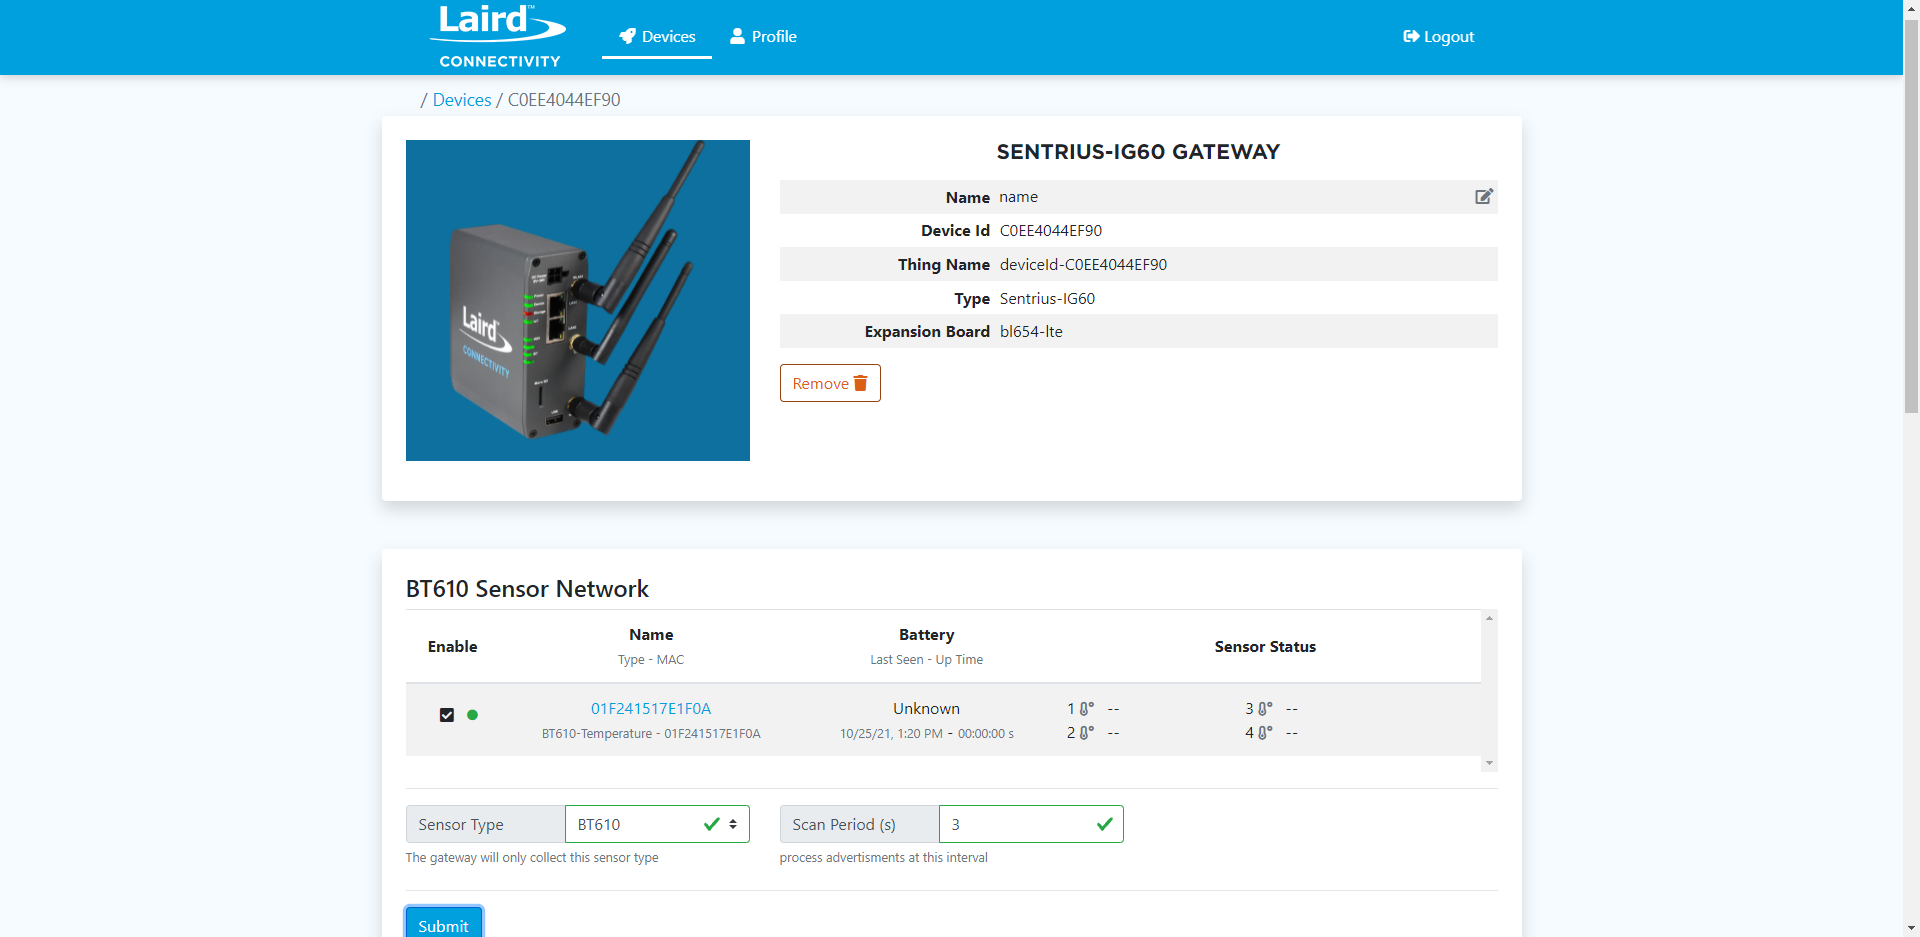
Sensor(s) Detected
Once your gateway has detected one or more BT610 sensors, they will be displayed in the BT610 Sensor Network section. Each sensor will have a checkbox, a name/MAC, battery level, and sensor status. It is IMPORTANT that we click the check box if it is just black with no check mark. This will tell our gateway and Bluegrass that we want to subscribe to this BT610, its data, and its alerts.
If you have not interfaced with this sensor before you will likely see the name/MAC, but not a battery level or sensor status. Instead you will see unknown or a message saying that the BT610 has not been configured yet.
You may configure the BT610 by connecting to it with the BT610 mobile app, and you can also configure it using the Bluegrass web page. To do so, click on the name/MAC which has blue text to indicate that it is a link.
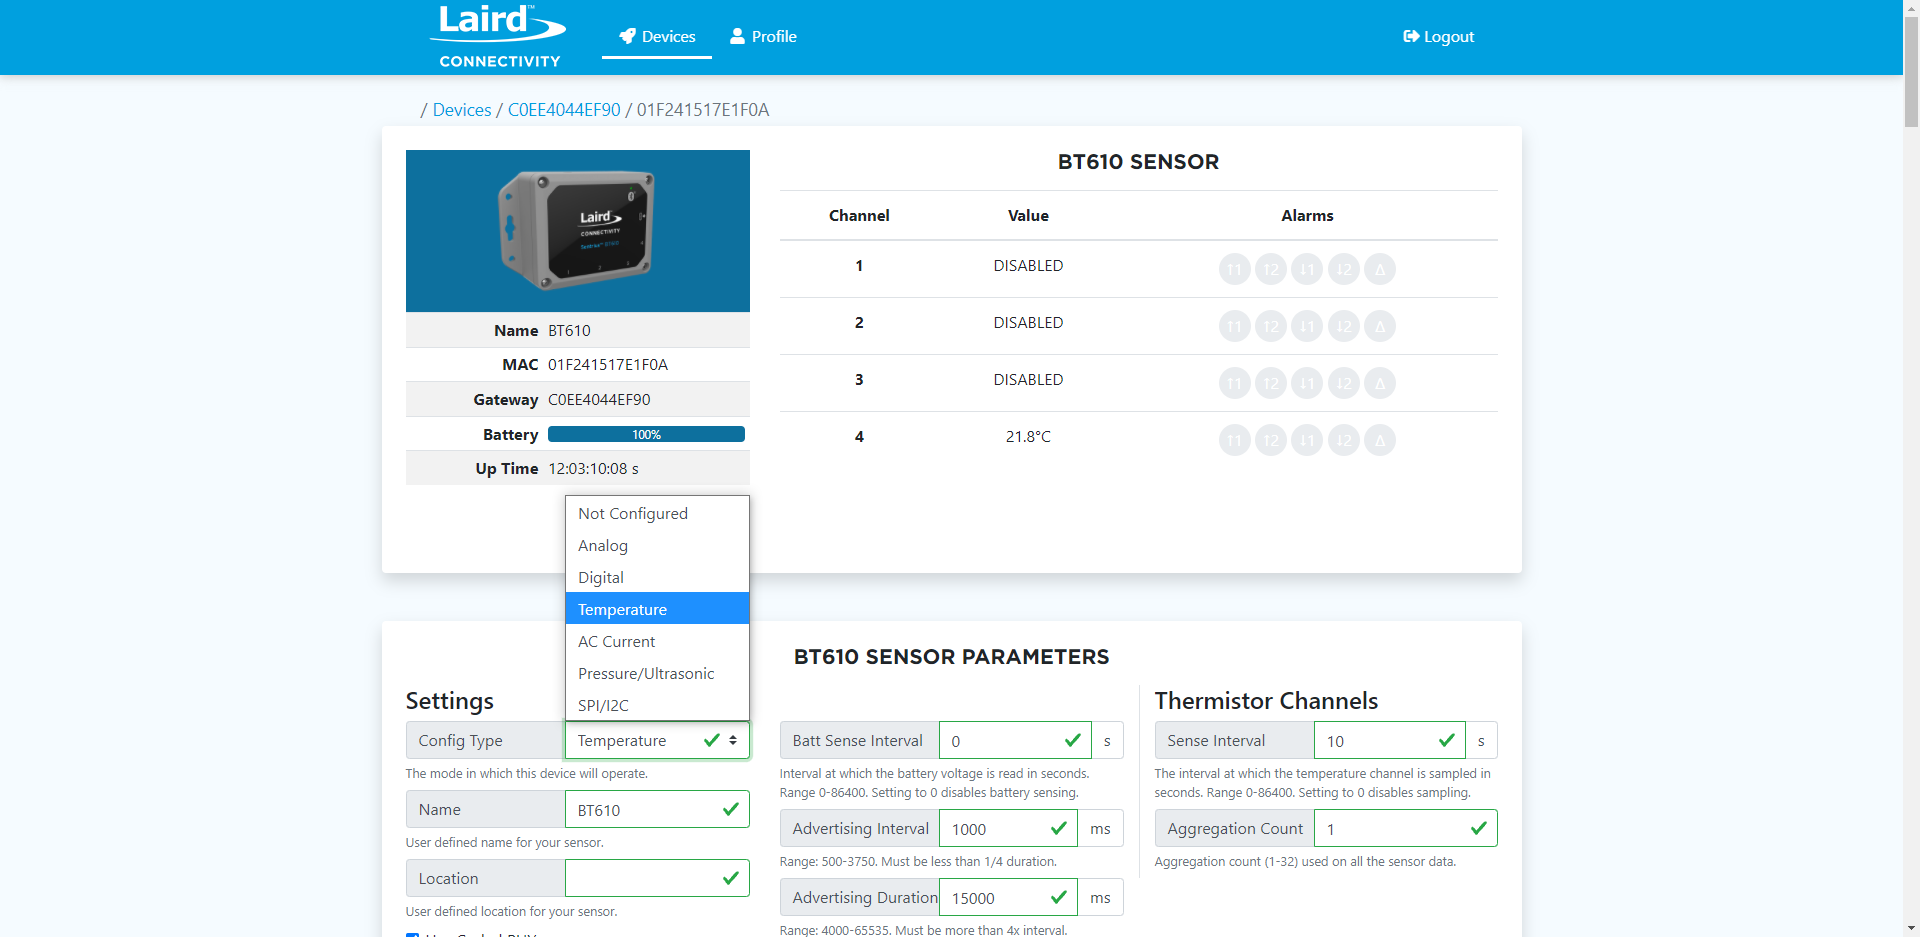
Configuring the BT610 through Bluegrass
When you first click on the specific BT610 you want to configure, you should see a window resembling the image below: a provisional configuration with a Config Type of Not Configured. Let's select Temperature for that value and click Update Shadow.
We assume you'll be using a thermistor throughout this guide, which is included with the BT610 IoT Starter Kit. Other sensor cable types will be documented in the near future.
Config Type (Temperature/Thermistor)
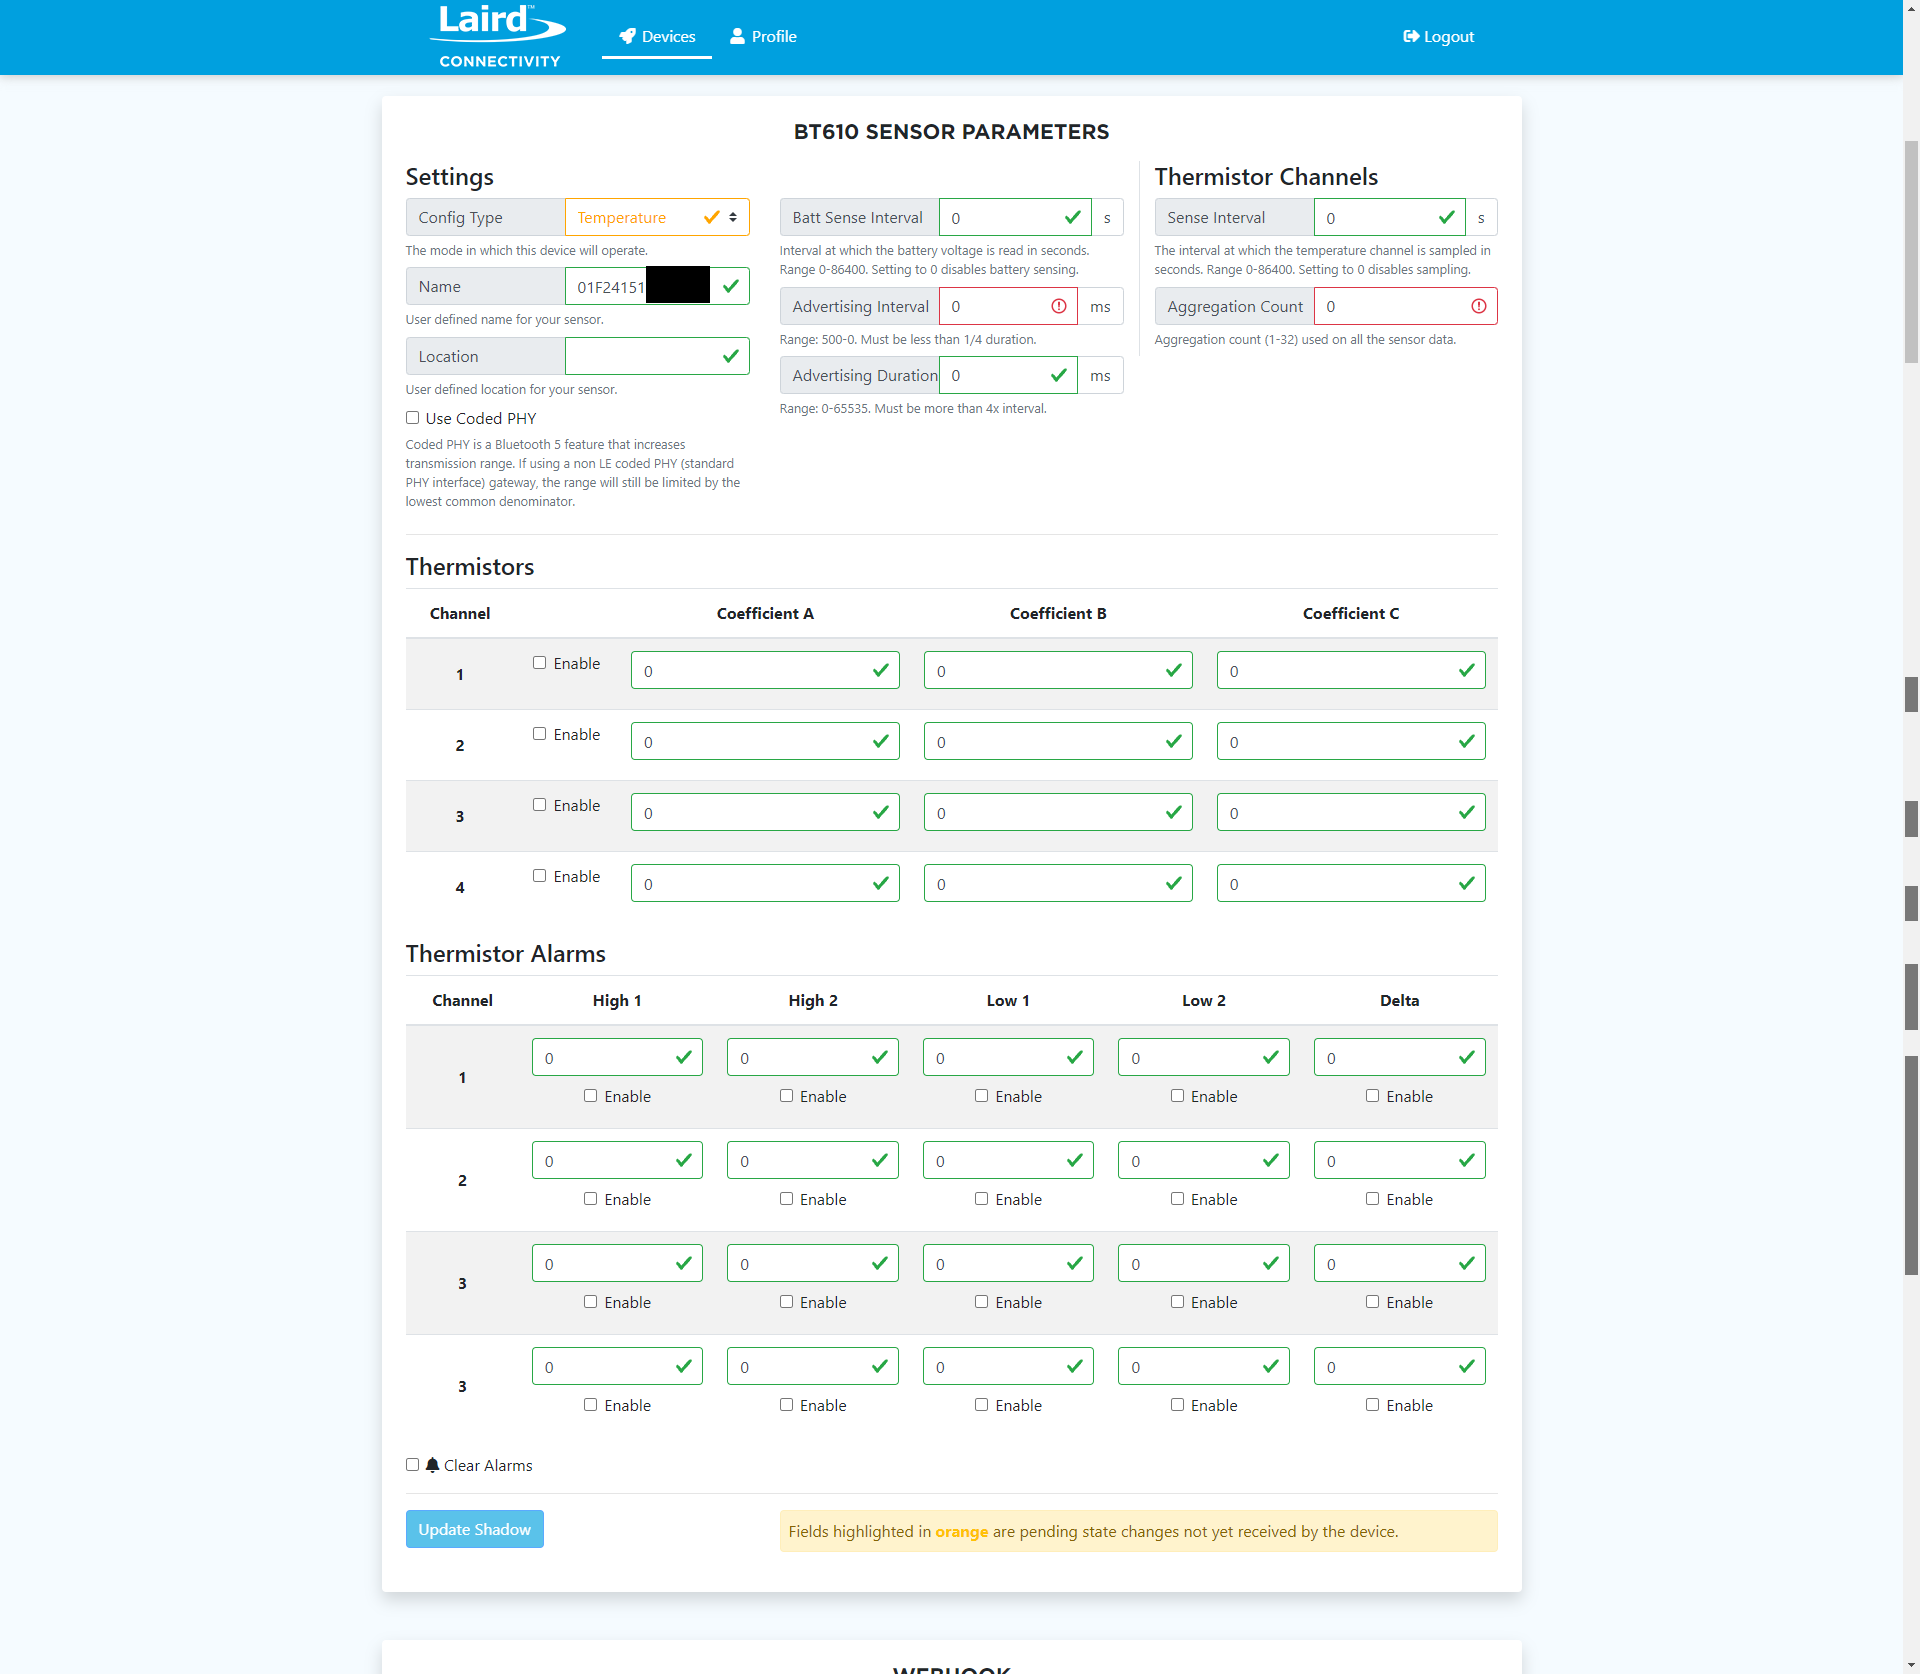
Once you have updated the shadow for your BT610 you should be presented with all the possible values you can change in a section called BT610 Sensor Parameters. It is normal for many of these to be 0 or blank if the device has not been configured yet, as seen in the image below. Please review the quick notes below and then we'll explore the three groups of values you can change: Settings, Thermistors, and Thermistor Alarms.
Color Definitions:
- Green with a checkmark - This setting is up to date with the shadow of the sensor and is acceptable.
- Yellow with a checkmark - This is a pending change that has not gone through yet to the shadow and sensor.
- Red with a checkmark - This is an unacceptable value and must be changed prior to submitting any changes.
NOTE: All values are submitted at once when you update the shadow.
Settings
In this group you will find general settings related to the BT610 itself as well as the thermistor. Please see below for more details.
- Config Type - This is the value we set previously to Temperature. You would change this if you had a different type of sensor, such as a pressure sensor.
- Name - The display name of the BT610.
- Location - The physical location of the device. This value can be whatever you would like.
- Use Coded PHY - Enable/disable BT5 Coded PHY transmissions. It is recommended to have this feature enabled in most cases.
- Batt Sense Interval - This is the interval at which the battery voltage is read in seconds.
- Advertising Interval - This value represents how often the BT610 advertises, in milliseconds.
- Advertising Duration - This value works in conjunction with advertising interval. When it is time to advertise this specifies for how long, in milliseconds.
- Sense Interval - This allows you to set how often the actual temperature is sampled with the thermistor.
- Aggregation Count - This value will specify how many temperature readings to bundle together before transmitting them over Bluetooth.
Thermistors
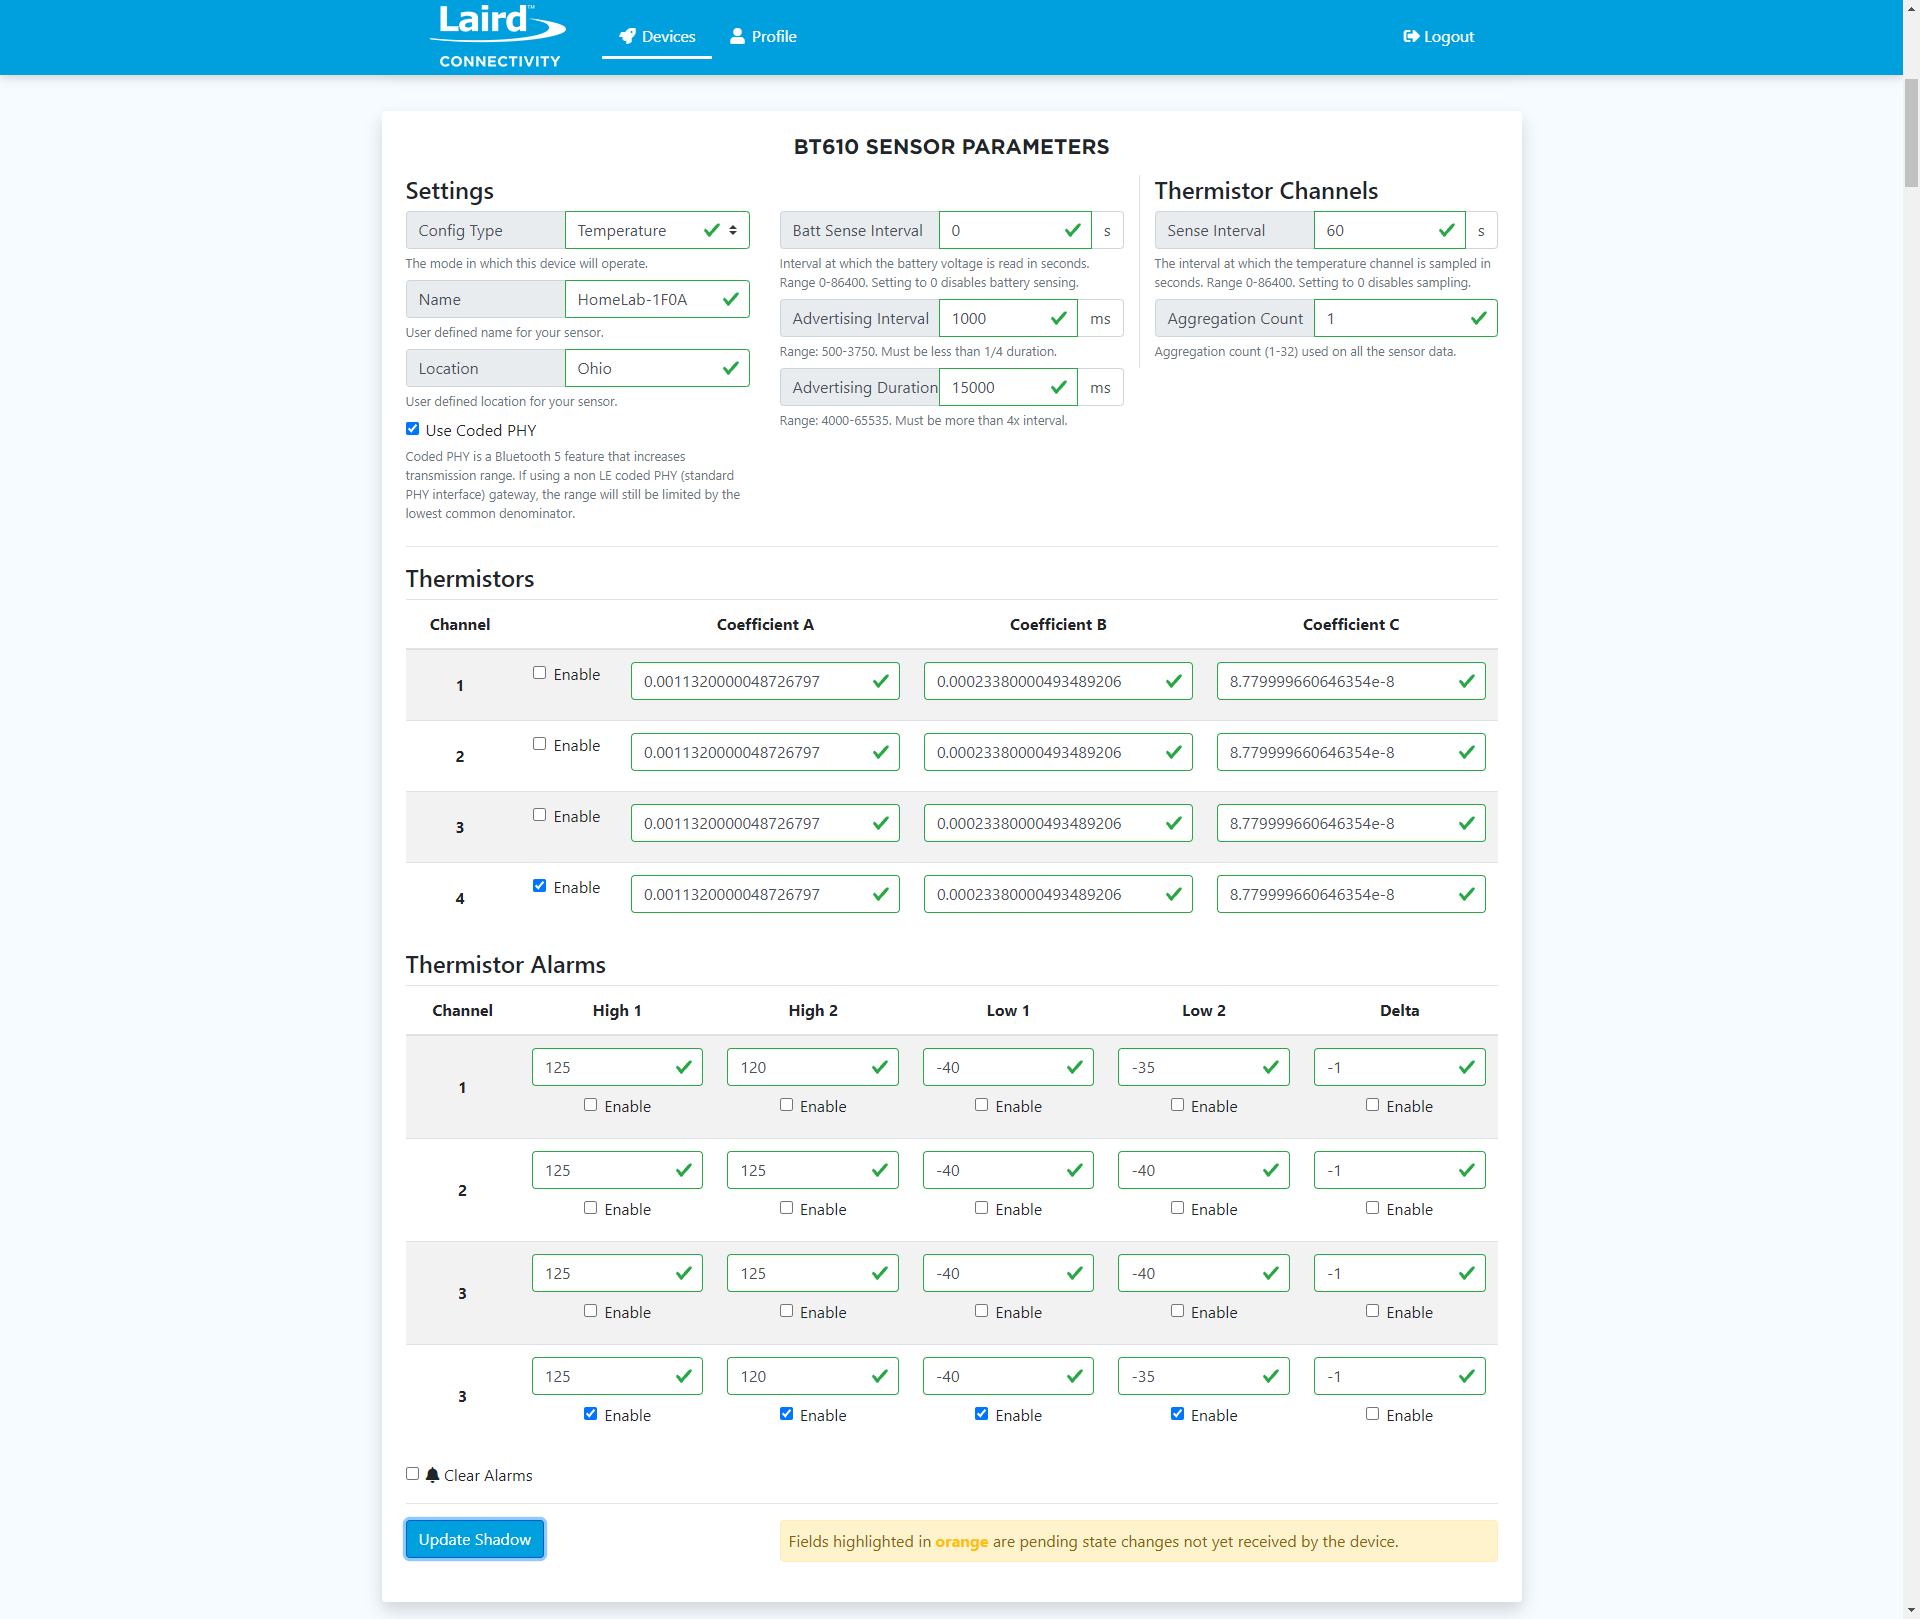
Here you can enable the specific channel(s) you are using for your thermistor(s). In this example, we have set our physical wires up in the BT610 to use TH4 or channel 4, so we will select the "Enable" checkbox for channel 4. Your coefficient values depend on your thermistor and calibration. Please refer to our app note for guidance on how to properly calibrate your thermistor.
Thermistor Calibration App Note
Laird Connectivity also offers a coefficient calculator for you to use.
Thermistor Coefficient Calculator
Thermistor Alarms
This group of parameters allows you to set two high values, two low values, and one delta value to act as alarms. These alarms will trigger an alert if your specified values are reached. You'll need to change the values to an acceptable number and then check Enable. Feel free to experiment with these as you see fit for your use case.
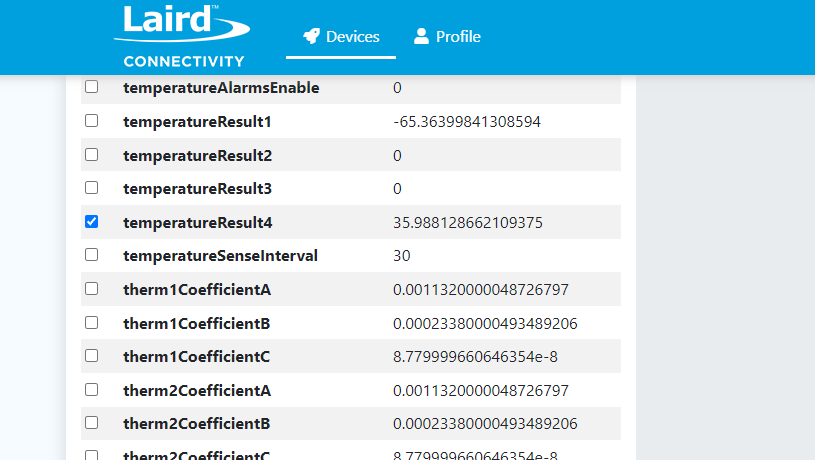
See below for an example of a fully-configured BT610 sensor using TH4 or Channel 4.
Webhook
The webhook section provides you the ability to pipe this sensor data out to a third-party service using webhooks. Please follow the instructions on the web page in the blue section in order to set up a webhook.
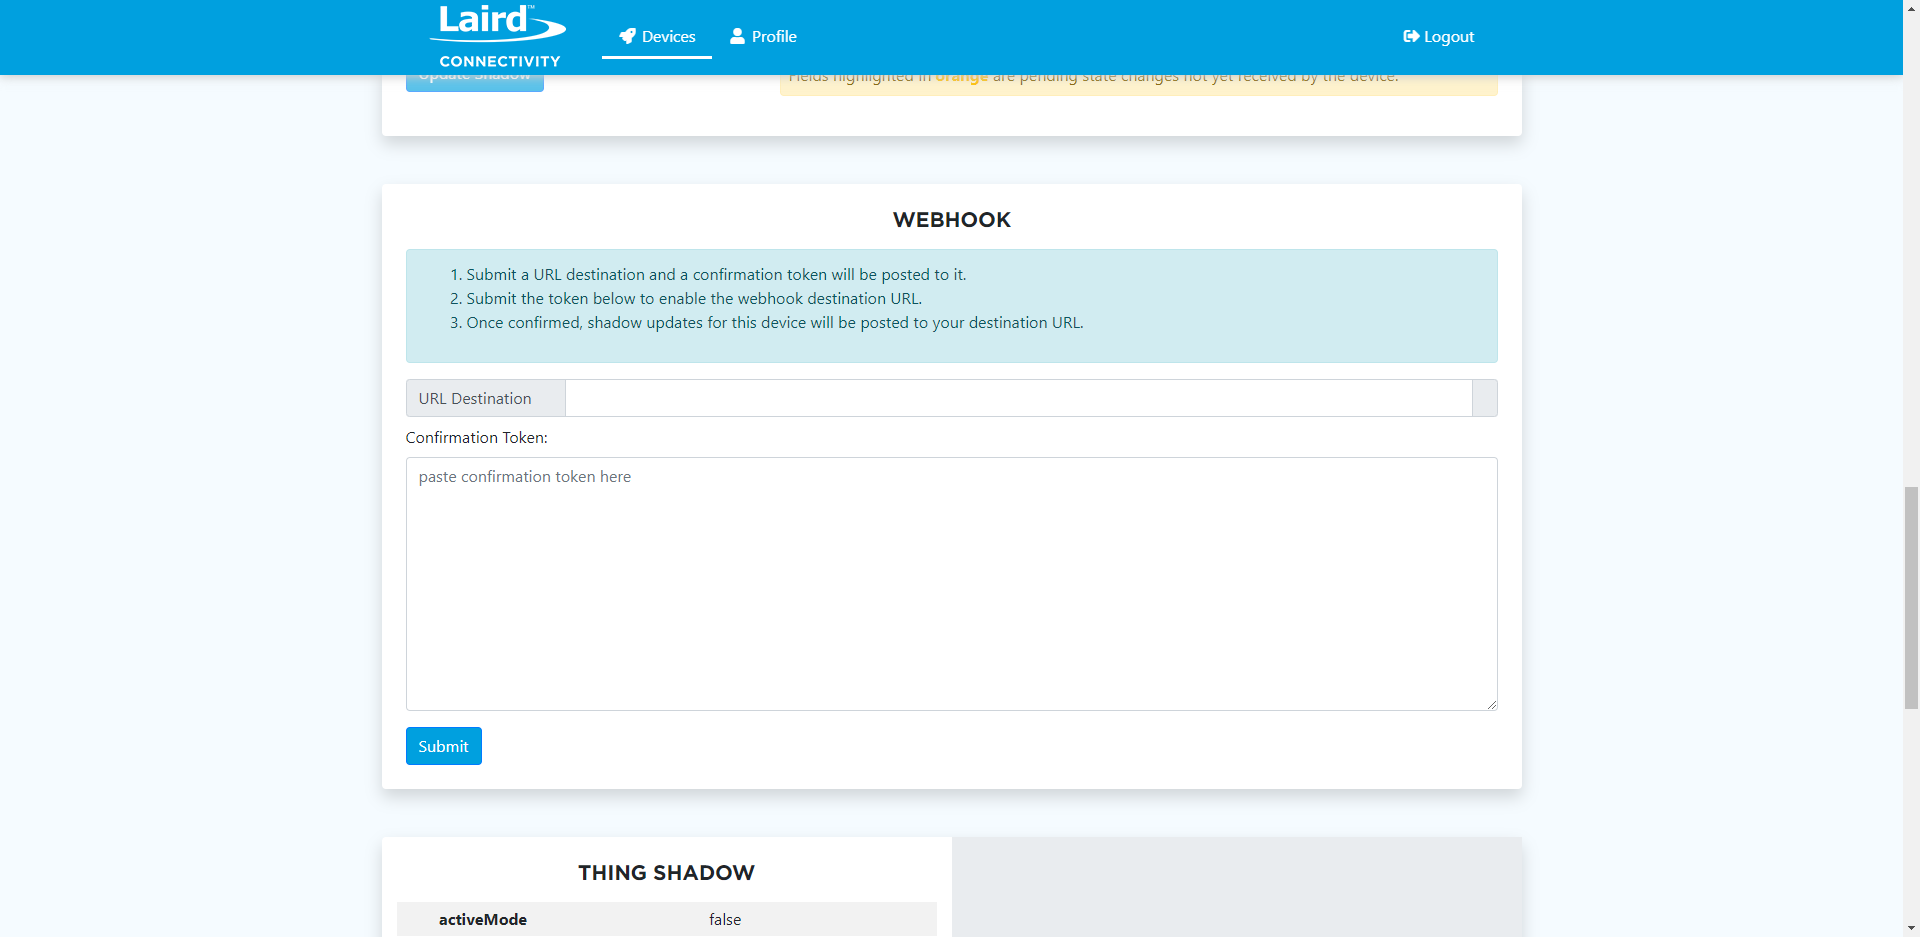
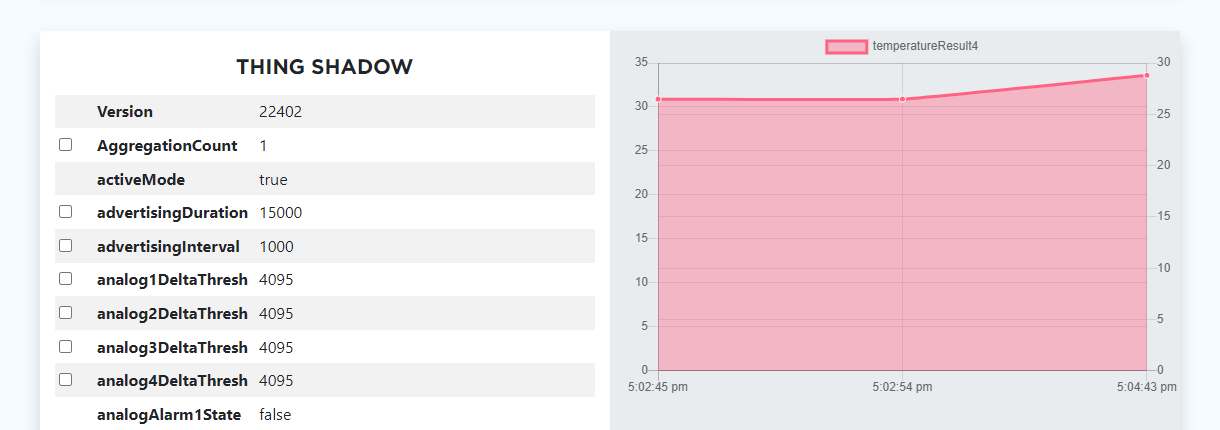
Thing Shadow
The Thing Shadow is a concept coined by AWS Greengrass. This contains all the latest information about your BT610 sensor. On the Bluegrass web page you are able to select a number of these different bits of information and see them charted over time.
Try selecting temperatureResultX where X is equal to the thermistor channel you are using. In our example we will use temperatureResult4.
If you scroll back up to the top of the Thing Shadow you will start to see that temperature value plotted out over time. Congratulations, you've started visualizing your sensor data!
Wrapping Up
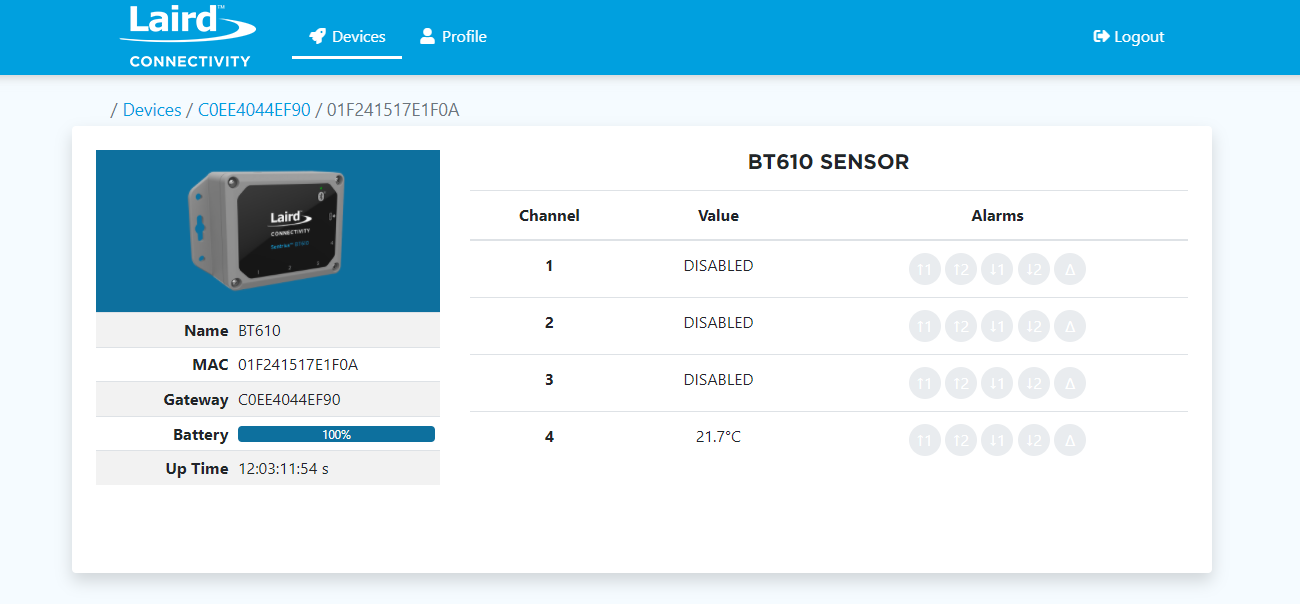
You'll now be able to have an overview of your data in two spots. The first is at the top of the BT610 sensor page itself. The second is a snapshot overview from the gateway page. Please see the two images below as a reference.
For any questions or support inquiries, feel free to contact Laird Connectivity support

Next Steps
Now, that you have your IG60-BL654 and BT610 demo up and running on the Bluegrass platform you can continue to test your use case and collect data.
From this point on consider some of these next steps.
- Migrate to your own AWS instance and provisioning server to prepare for a production scale roll out.
- Explore Laird Connectivity partners to help accelerate your time to market.
- Talk to a Laird representative about our Engineering Services offerings.
- Consider getting another sensor from the Laird portfoilio, such as the BT510.