 Laird Connectivity and Boundary Devices are now Ezurio
Using a b2qt embedded QBSP in Qt Creator
Published on April 17, 2020
This guide will provide the steps to use a Yocto generated b2qt embedded QBSP within Qt Creator to simplify application development with Qt. More information on QBSPs can be found here. Qt defines a QBSP as follows: "A QBSP contains a cross-compilation toolchain that gets integrated into Qt Creator, and a device image that can be used to boot your device using Boot to Qt software stack." So essentially, when developing an application with Qt Creator using a QBSP, you will be able to run your app on the target hardware, which has the required BSP components + Qt libraries to support the application. Lets dive in!
Using b2qt embedded QBSP in Qt Creator
Please follow the steps below in order to get up and running using a b2qt embedded QBSP in Qt Creator for application development.1- Try or Buy Qt
Follow the below URL to Try or Buy Qt. Qt offers a 10 day evaluation license to get you started. https://www.qt.io/download After filling out the form, you will be emailed credentials and instructions on setting up your account and activating your license.2- Download Qt via online installer
The Qt online installer can be found via the downloads page in your account. The online installer provides everything you need to start Qt development:- Qt framework sources (all essential and add-on modules)
- Qt framework prebuilt binaries (for host platform and multiple target platforms)
- Commercial Qt add-ons for Qt framework
- Qt Creator IDE for host operating system
- Qt documentation
- Other useful tools & utilities (for example for easy deployment)
3- Run Online Installer
Run the online installer. After running, you should see the following window. Go through the steps until you are prompted to select the Installation Folder. The default on Linux distributions will be /home/<user>/Qt. You can make this path whatever you wish.

4- Select Components
After specifying the path, you will be taken to a window where you can select the components to install. It is here where you will select the Qt version to install and provide a pre-generated QBSP file. In this example, we will be using Qt version 5.15 for i.MX8MM Qt 5.15 is part of the preview release, so click the "Preview" Package Category and hit filter, then find Qt 5.15.0-beta3 under the Preview tab and select it Note: You may notice this is the beta3 version of 5.15.0. The QBSP we will be using was built using 5.15.0. You can use whatever Qt version that matches the version used in your QBSP.
Now we will select a Linux System and Toolchain to install i.e. a QBSP. In this example we will use the latest 5.15.0 QBSP for Nitrogen8M Mini.
Click Browse QBSP files and select the QBSP. After selecting the QBSP file, a Boundary Devices i.MX8MM Linux System and Linux Toolchain will already be selected as components under "Qt for Device Creation". Also make sure Qt 5.15.0-beta3 is still selected under the Preview tab.
Note: You may notice this is the beta3 version of 5.15.0. The QBSP we will be using was built using 5.15.0. You can use whatever Qt version that matches the version used in your QBSP.
Now we will select a Linux System and Toolchain to install i.e. a QBSP. In this example we will use the latest 5.15.0 QBSP for Nitrogen8M Mini.
Click Browse QBSP files and select the QBSP. After selecting the QBSP file, a Boundary Devices i.MX8MM Linux System and Linux Toolchain will already be selected as components under "Qt for Device Creation". Also make sure Qt 5.15.0-beta3 is still selected under the Preview tab.
 Click Next
5- Install Components
Agree to the License Agreement and Click Next again, then Click Install. The selected components will then install. When installation is complete, Finish the Qt Wizard and launch Qt Creator.

6- Flash Target Hardware
Qt Creator will launch, but before we do anything here, we must flash the target hardware with a Boot to Qt image. The latest 5.15.0 b2qt image and flashing instructions can be found here: https://boundarydevices.com/boot2qt-embedded-qt5-image-and-toolchain-zeus-release7- Configure a Device Kit
Before we can start developing and deploying applications, we must configure a device kit so you can deploy the application on the target hardware via Qt Creator. We will be doing this via ssh, so it is required that you connect the device to the same network as the PC that is running Qt Creator and obtain its IP address. After Qt Creator launches, navigate to Tools > Options > Kits. Select the Auto-detected Boot2Qt 5.15.0 Boundary Devices Kit.
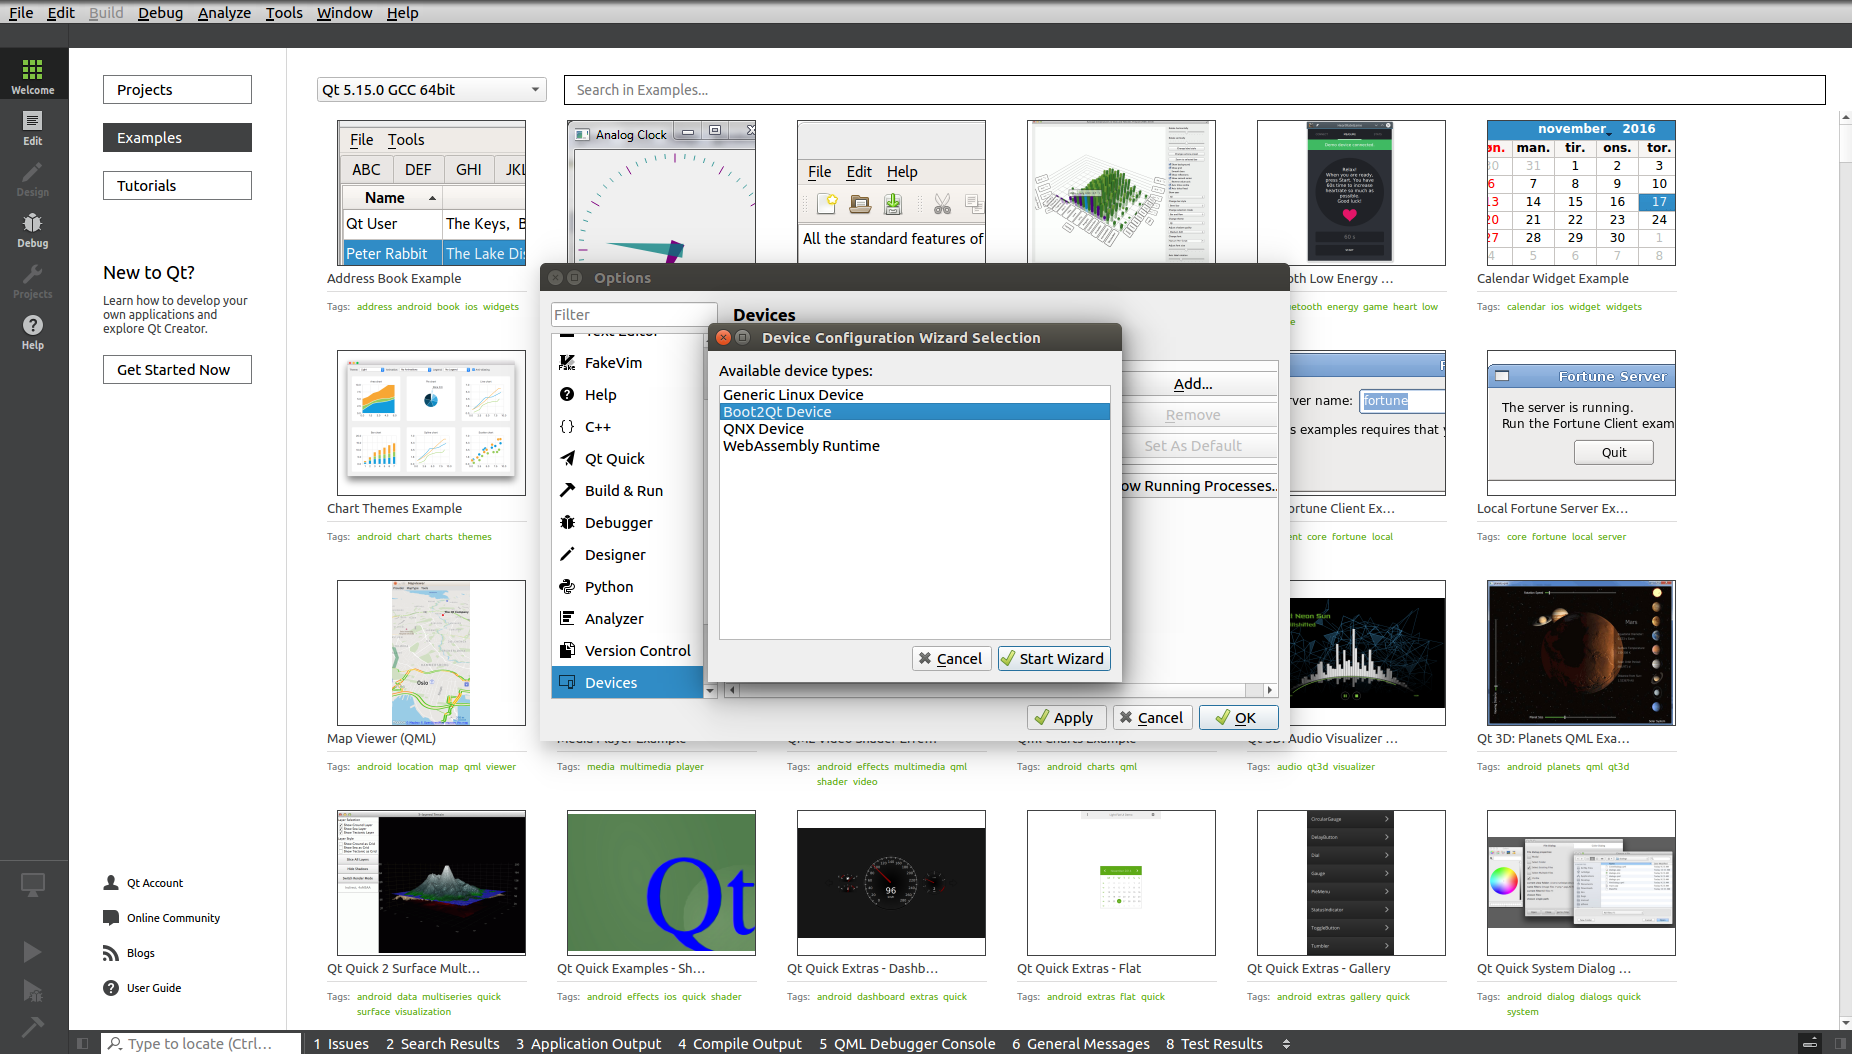
 Click the Manage button next to Device. You will then be taken to the Devices tab.
 Click Add and select Boot2Qt device and then click Start Wizard.
 Provide a device name and IP address.
 Click Finish. If Qt Creator successfully connected to and added the device, you should see the following.
 Click Apply and OK and we are now ready to deploy our first demo application!
You can also configure a device to use a USB connection instead. On Ubuntu Linux, the user must have access to plugged in devices. To allow the development user access to the device via USB, create a new udev rule. Run the following command in a shell terminal:
Click Apply and OK and we are now ready to deploy our first demo application!
You can also configure a device to use a USB connection instead. On Ubuntu Linux, the user must have access to plugged in devices. To allow the development user access to the device via USB, create a new udev rule. Run the following command in a shell terminal:
~$ echo 'SUBSYSTEM=="usb", ATTRS{idVendor}=="dbdb", TAG+="udev-acl", TAG+="uaccess"' | sudo tee -a /etc/udev/rules.d/70-boot2qt.rules
Then, you can obtain the IP address as per the usb0 interface on the target hardware.
8- Compiling and Launching first Demo Application
In this example, we are going to be using the Basic Layouts Example, so search Basic Layouts in search bar. Select Basic Layouts example. You then will be prompted to select a Kit. Select the Boot2Qt 5.15.0 Boundary Devices i.MX8MM kit and click Configure Project.
 You can now build and run example by clicking the green play button "run"
 You should now see the Basic Layout Example come up on your display.
 There you have it! You are now up and running for Qt development using a Boundary Devices QBSP in Qt Creator.
If you have any issues, please email support@boundarydevices.com
There you have it! You are now up and running for Qt development using a Boundary Devices QBSP in Qt Creator.
If you have any issues, please email support@boundarydevices.com