/filters:background_color(white)/2024-03/LWB5-Plus-Modules-And-USB1.png)
Introduction
This tutorial will show you how to integrate the LWB5+ Dongle on an i.MX 8M Plus Yocto platform. To watch video tutorial, click here.
Required Tools
- LWB5+ Dongle (Part No. 450-00137)
- i.MX 8M Plus EVK (Part No. 8MPLUSLPD4-EVK)
- Linux PC with a Yocto Build Environment.
As a prerequisite for this tutorial, we are going to assume that you know how to setup a Yocto build environment. This is covered very well in NXP’s documentation ( i.e. see i.MX_Yocto_Project_User’s_Guide.pdf, Rev. L5.4.70_2.3.0 — 31 December 2020 or newer for details on how to install the required host packages and the repo utility, and how to setup git); so we will not cover it here. We will focus on how to add Ezurio’s external layer into a Yocto build.
Setup
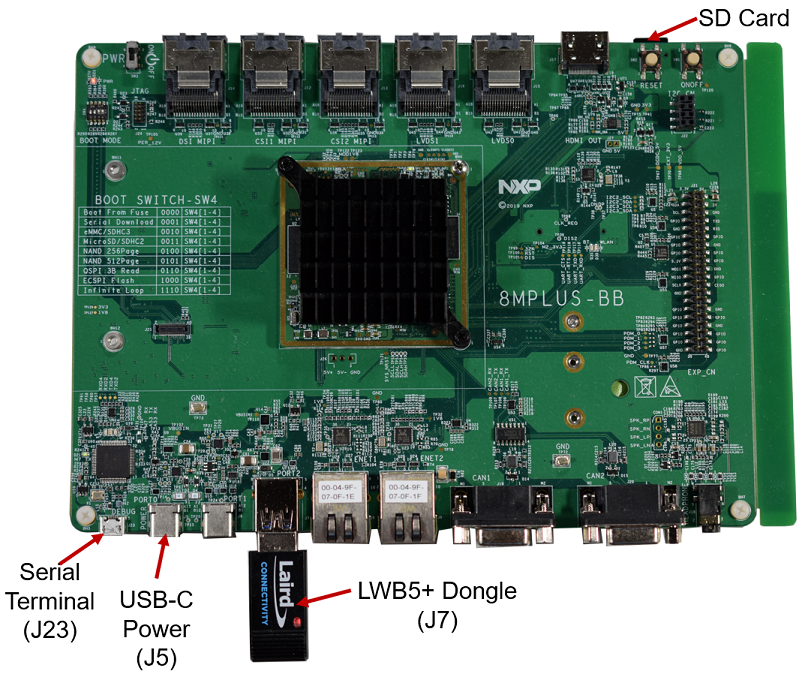
We will flash our image into a micro SD card. If you prefer, you can use the onboard eMMC, but for this tutorial we will boot from a micro SD card. The LWB5+ Dongle will plug into J7. Power will be applied via J5, and J23 will be used to connect to a serial terminal (115200, N, 8, 1). If the build works, the drivers will automatically load on power up. We will then connect to an AP and do a ping to demonstrate that Wi-Fi works. For Bluetooth, we will do a scan to show that the module can detect devices that are discoverable or advertising.
Yocto setup and Build
Create your project folders
mkdir -p ~/yocto/NXP/imx8mpevk/walnascar/LWBx/lrd-13.24.0.x
cd ~/yocto/NXP/imx8mpevk/walnascar/LWBx/lrd-13.24.0.x
Download the Yocto release and setup the build environment
repo init -u https://github.com/nxp-imx/imx-manifest -b imx-linux-walnascar -m imx-6.12.34-2.1.0.xml
repo sync
DISTRO=fsl-imx-wayland MACHINE=imx8mpevk source imx-setup-release.sh -b build-imx8mpevk-wal-lwbp
Note: This guide uses the walnascar release which was the latest yocto release at the time of writing. Please check https://github.com/nxp-imx/imx-manifest for the latest release version or the version you prefer to use.
Download the meta-summit-radio layer
cd ~/yocto/NXP/imx8mpevk/walnascar/LWBx/lrd-13.24.0.x/sources
git clone -b lrd-13.24.0.x https://github.com/Ezurio/meta-summit-radio
Note: As of this writing, the latest version is lrd-13.24.0.x. It is recommended that you use the latest version. Please check GitHub - Ezurio/meta-summit-radio for the latest release.
Edit the bblayers.conf file
cd ~/yocto/NXP/imx8mpevk/walnascar/LWBx/lrd-13.24.0.x/build-imx8mpevk-wal-lwbp/conf
vi bblayers.conf
Add the meta-summit-radio layer to the bottom of the file.
LCONF_VERSION = "6"
BBPATH = "${TOPDIR}"
BSPDIR := "${@os.path.abspath(os.path.dirname(d.getVar('FILE', True)) + '/../..')}"
BBFILES ?= ""
BBLAYERS = " \
  ${BSPDIR}/sources/poky/meta \
  ${BSPDIR}/sources/poky/meta-poky \
  \
  ${BSPDIR}/sources/meta-openembedded/meta-oe \
  ${BSPDIR}/sources/meta-openembedded/meta-multimedia \
  ${BSPDIR}/sources/meta-openembedded/meta-python \
  \
  ${BSPDIR}/sources/meta-freescale \
  ${BSPDIR}/sources/meta-freescale-3rdparty \
  ${BSPDIR}/sources/meta-freescale-distro \
"
# i.MX Yocto Project Release layers
BBLAYERS += "${BSPDIR}/sources/meta-imx/meta-imx-bsp"
BBLAYERS += "${BSPDIR}/sources/meta-imx/meta-imx-sdk"
BBLAYERS += "${BSPDIR}/sources/meta-imx/meta-imx-ml"
BBLAYERS += "${BSPDIR}/sources/meta-imx/meta-imx-v2x"
BBLAYERS += "${BSPDIR}/sources/meta-nxp-demo-experience"
BBLAYERS += "${BSPDIR}/sources/meta-nxp-connectivity/meta-nxp-matter-baseline"
BBLAYERS += "${BSPDIR}/sources/meta-nxp-connectivity/meta-nxp-openthread"
BBLAYERS += "${BSPDIR}/sources/meta-arm/meta-arm"
BBLAYERS += "${BSPDIR}/sources/meta-arm/meta-arm-toolchain"
BBLAYERS += "${BSPDIR}/sources/meta-clang"
BBLAYERS += "${BSPDIR}/sources/meta-openembedded/meta-gnome"
BBLAYERS += "${BSPDIR}/sources/meta-openembedded/meta-networking"
BBLAYERS += "${BSPDIR}/sources/meta-openembedded/meta-filesystems"
BBLAYERS += "${BSPDIR}/sources/meta-openembedded/meta-perl"
BBLAYERS += "${BSPDIR}/sources/meta-qt6"
BBLAYERS += "${BSPDIR}/sources/meta-security/meta-parsec"
BBLAYERS += "${BSPDIR}/sources/meta-security/meta-tpm"
BBLAYERS += "${BSPDIR}/sources/meta-virtualization"
BBLAYERS += "${BSPDIR}/sources/meta-summit-radio/meta-summit-radio"
Edit the local.conf file
Edit your local.conf file and add the following to the bottom.
vi local.confConfirm that the correct machine is configured
MACHINE ??= 'imx8mpevk'Add these commands to the end of the file.
MACHINE_FEATURES:remove = "nxp8987 nxp8997 nxp8997-pcie nxp8997-sdio nxp9098-pcie nxp9098-sdio iw612 nxpwifi-all-pcie nxpwifi-all-sdio nxpwifi-all-usb nxpaw693-pcie mrvl8997"
MACHINE_FIRMWARE:remove = "linux-firmware-ath10k"
PREFERRED_PROVIDER_wpa-supplicant = "summit-supplicant"
PREFERRED_PROVIDER_wpa-supplicant-cli = "summit-supplicant-cli"
PREFERRED_PROVIDER_wpa-supplicant-passphrase = "summit-supplicant-passphrase"
PREFERRED_PROVIDER_hostapd = "summit-hostapd"
PREFERRED_PROVIDER_networkmanager = "summit-networkmanager"
PREFERRED_PROVIDER_networkmanager-cli = "summit-networkmanager-cli"
PREFERRED_RPROVIDER_wireless-regdb-static = "wireless-regdb"
LWB_REGDOMAIN = "US"
IMAGE_FSTYPES:append = " wic.gz"
Copy sample image recipe and edit it
Copy a sample image recipe and rename the recipe to something memorable. Here I’ve used my name, the EVK processor, a shortened kernel name, the radio and the meta-layer version. This gives a nice understanding of what kernel, Wi-Fi module and version are used and what EVK the image is for and who built it.
cd ~/yocto/NXP/imx8mpevk/walnascar/LWBx/lrd-13.24.0.x/sources/meta-summit-radio/meta-summit-radio/recipes-packages/images
#copy the bitbake recipe example
cp sample-image-lwb5plus.bb bob-imx8mp-wal-lwb5pdongle-lrd13.bb
Edit the recipe that you just created and confirm that the IMAGE_INSTALL section looks like below:
vi bob-imx8mp-wal-lwb5pdongle-lrd13.bbIMAGE_INSTALL += "\
iproute2 \
rng-tools \
ca-certificates \
tzdata \
htop \
ethtool \
iperf3 \
tcpdump \
iw \
kernel-module-lwb-if-backports \
lwb5plus-usb-sa-firmware \
summit-supplicant \
summit-networkmanager \
summit-networkmanager-nmcli \
libedit \
"Configure the kernel
Run the following command to launch the kernel menuconfig.
bitbake -c menuconfig virtual/kernelBackports will replace the wireless and Bluetooth stack. The CONFIG_FW_LOADER_USER_HELPER_FALLBACK needs removed to allow for faster loading of the firmware at boot. Make the following modifications:
In the menuconfig use / to search for each of the below configuration parameters in caps.
WLAN
- deselect Device Drivers -> Network device support -> Wireless LAN

CONFIG_FW_LOADER_USER_HELPER_FALLBACK
- deselect Device Drivers -> Generic Driver Options -> Firmware Loader
    -> Firmware loading Facility ->Force the firmware sysfs fallback mechanism when possible

CONFIG_IMX_SDMA
- set to module (M) Device Drivers -> DMA Engine support -> i.MX SDMA support

CONFIG_BT
- deselect Networking support -> Bluetooth subsystem support

CFG80211
- set to module (M) Networking support -> Wireless -> cfg80211 - wireless configuration API
Save your changes and exit menuconfig.
Patches
Currently there are no patches that need to be installed.
Build image
Depending on the CPU, hard drive, and internet connection this can take a while to run. We recommend running the build overnight if a slower PC is used.
bitbake bob-imx8mp-wal-lwb5pdongle-lrd13When the build is finished it will create an image that can be flashed to an SD card.
cd ~/yocto/NXP/imx8mpevk/walnascar/LWBx/lrd-13.24.0.x/build-imx8mpevk-wal-lwbp/tmp/deploy/images/imx8mpevk
ls -lah *.wic.gz
Note: Make sure to use the actual file and not the linked file. It should be the one with the timestamp in the filename.

Flashing to an SD Card
Flash the image into SD card.
Note: for this particular tutorial the SD card is on /dev/mmcblk0. It may be different for your setup; so make sure you change the command below per your setup.
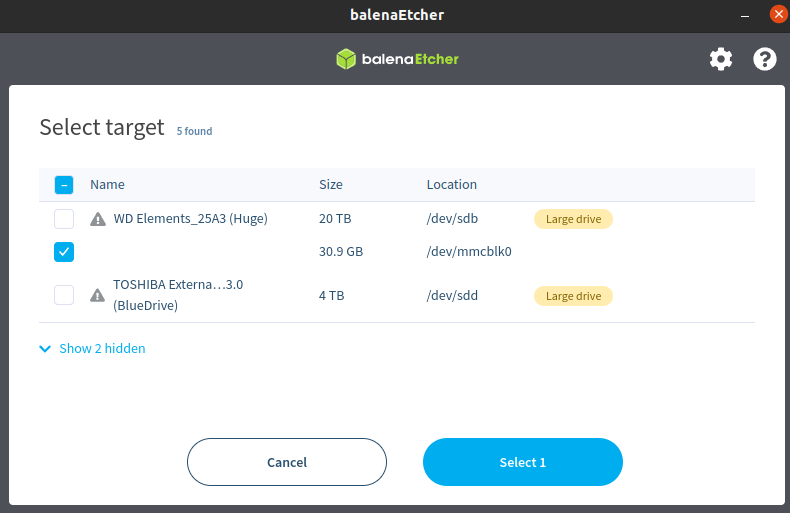
It is recommend to use either dd from the Linux prompt or to use balenaEtcher to flash the image. The is an example using balenaEtcher.
Test the build
Insert the SD card into the SD card slot on the EVK
Connect the EVK Serial Terminal via J23 (115200, N, 8, 1) to your PC. The EVK will attach to 4 different ports on your PC. You will want to use the 3rd one listed. In our case it will be /dev/ttyUSB8. Your Linux PC might use a different port.
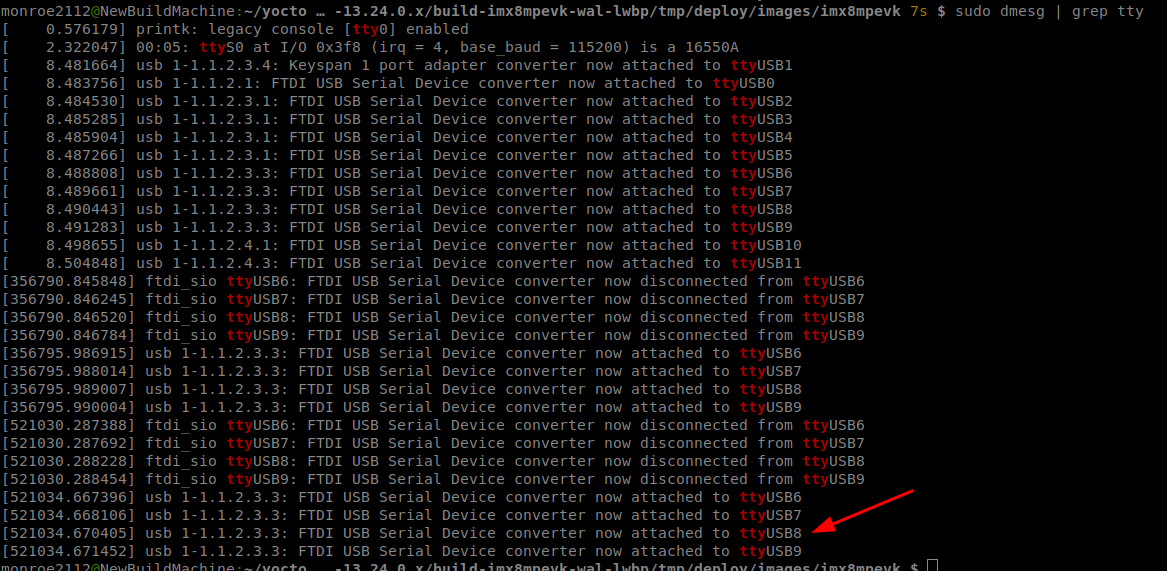
Note for this tutorial we use /dev/ttyUSB2 port to connect. Your Linux PC might use a different port.
Boot device and login as root.
Test Wi-Fi
Entering anip a should display a wlan0 this will confirm that the dongle is seen by the OS. Entering dmesg |grep -i backport will display the version of Ezuiro’s Backports package installed.
Create a connection profile with nmcli. Then connect to the AP and ping a website.
nmcli con add con-name "YourProfile" ifname wlan0 type wifi ssid "YourAP" wifi-sec.key-mgmt wpa-psk wifi-sec.psk "YourPassword"
nmcli c u "YourProfile"
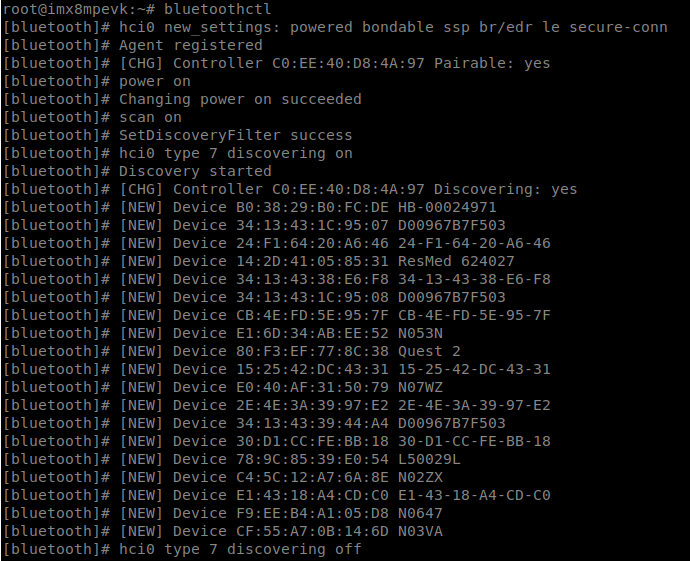
ping www.google.comTest Bluetooth
Launch bluetoothctl. Then on the bluetoothctl prompt, type power on and then scan on.