/filters:background_color(white)/2024-03/canvas-software-suite-red.png)
Introduction
The BL5340 DVK is supported by Canvas Platform Firmware as part of the Canvas Software Suite. This firmware provides developers a path to quickly design and build applications using the Python language and leverage Python-based APIs for access to the underlying hardware and radio feature set. This guide focuses on developing software for the BL5340 DVK, though the principles described apply to any PCB on which the BL5340 module is placed as long as the appropriate SWD and serial port access is provided by the PCB to use with Canvas Tools for programming.
Getting Started
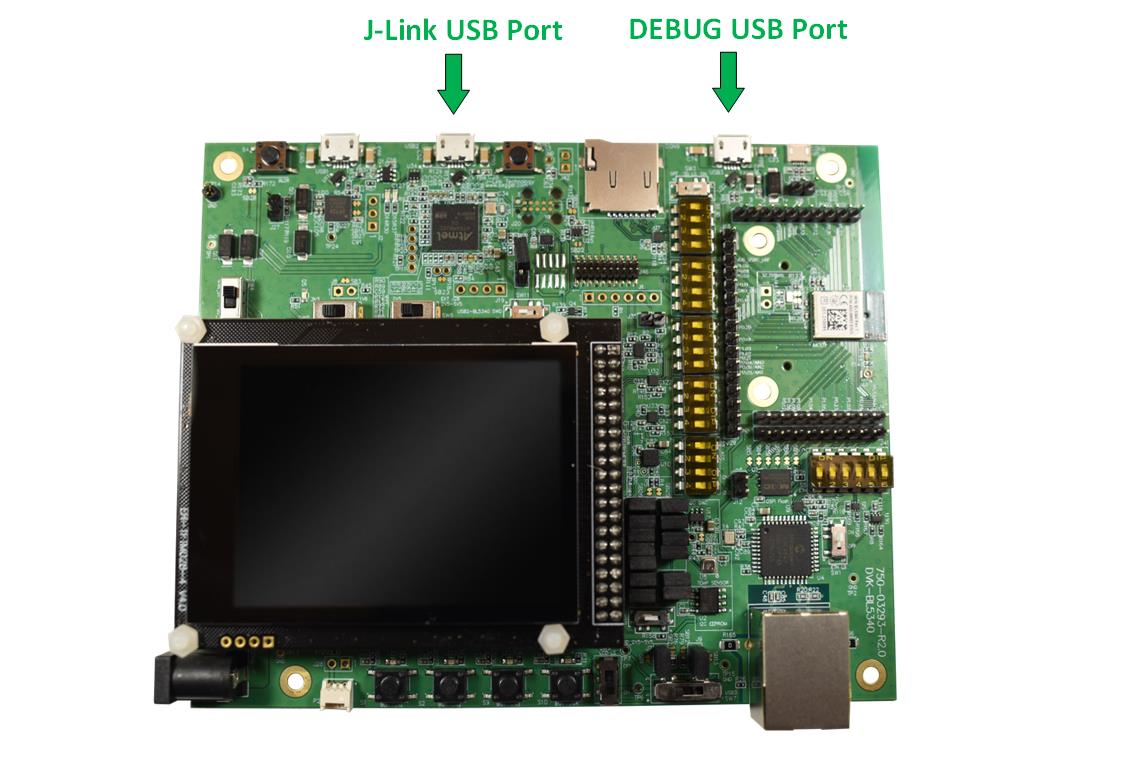
The BL5340 DVK is equipped with a debug USB port (the closest USB port to the module, silk screen label USB3) that is used to provide two USB-to-UART interfaces to the BL5340 DVK. This is the primary interface you will use when developing software for the BL5340 DVK.
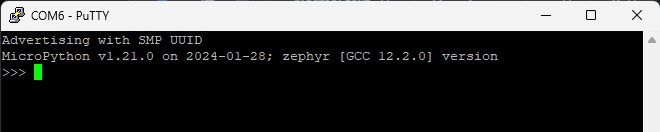
This USB port connects to the BL5340 USB interface where two USB serial ports are implemented. One serial port will provide access to the Zephyr RTOS shell (uart:~$) and the other to the Python REPL prompt (>>>). You can attach to each serial port with 115200 baud, 8N1 to verify your DVK is running Canvas Firmware.
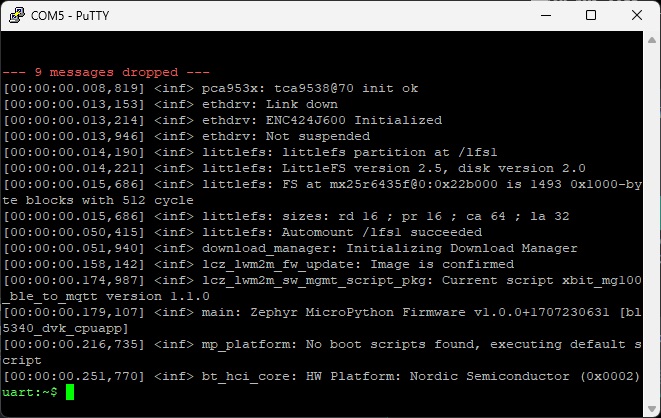
If you do not see this output, you can press the RESET button (S3, near the J-Link USB connector) to reset the firmware and something similar to the output above will appear in a serial terminal.
If you do not see any output similar to above, you may need to load Canvas Firmware onto your DVK board. To do so, follow the steps in the next section to update your Canvas Firmware.
Updating Canvas Firmware
Downloading the Latest Firmware Image
The latest version of Canvas Firmware for the BL5340 DVK can be found here:
https://github.com/LairdCP/Canvas_Gateway_Firmware/releases
Download the latest version of the .zip file (name starting with bl5340_dvk). It contains a .hex file starting with bl5340_dvk. The hex file is used to program a complete firmware image onto the BL5340 DVK.
Programming the Firmware onto the DVK
The BL5340 DVK has an integrated J-Jlink JTAG adapter, so no additional hardware is required. You will need the nrfjprog utility in order to program the BL5340. With nrfjprog installed, you can use it from a command line to program the DVK board as follows:
nrfjprog -f NRF53 --program bl5340_dvk_1.0.0.1707230624.hex --recover --verifyInteracting with the BL5340 DVK via Python REPL
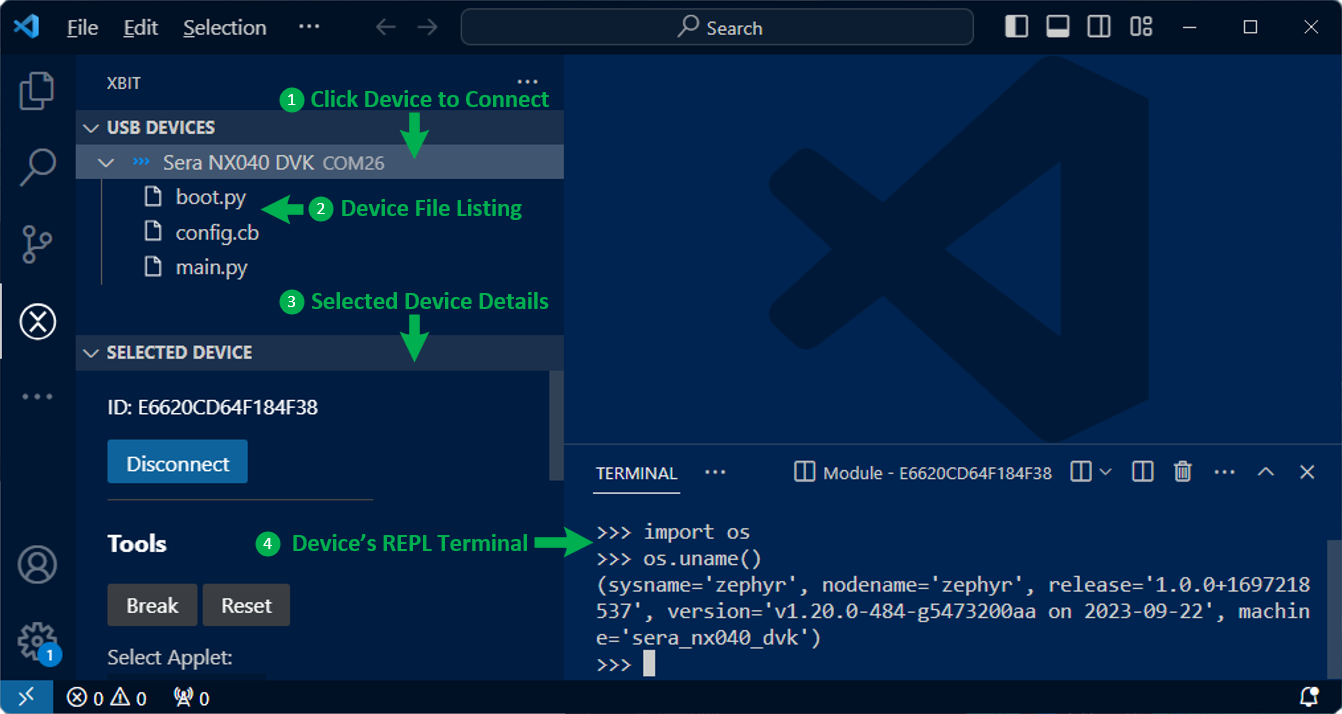
The Canvas Firmware provides a Python execution environment right on the BL5340 DVK. This environment can be interacted with through the Python REPL serial port. The Xbit VS Code extension will automatically detect this serial port and provide easy access to the REPL terminal.
To access the Python REPL, ensure your DVK’s USB debug port is attached to your workstation and open the Xbit VS Code extension. Navigate to the USB DEVICES panel and locate the serial port associated with your DVK board. Click the board name (e.g. ‘Module COM6' or similar) to connect to the board and expand a listing of its filesystem. In the lower right, you’ll find a tab labeled TERMINAL. If you press the ENTER key in the TERMINAL panel, you’ll see the REPL prompt for the device (>>>). From here, you can type Python commands interactively with the DVK board.
One common set of commands provides an easy way to find the Canvas Firmware version running on your device. Type the following lines, pressing ENTER after each one into the REPL terminal to display the system version information. The Canvas Firmware version is the string value for the property named release.
>>> import os
>>> os.uname()
If the commands were issued properly, you should see a Python tuple displayed similar to the following:
(sysname='zephyr', nodename='zephyr', release='1.0.0+1707230624',
version='v1.21.0 on 2024-01-28', machine='bl5340_dvk_cpuapp')
Creating a Python File
The Python interpreter built into the Canvas Firmware running on the BL5340 DVK is designed to look for two specially named Python files in its filesystem at system boot. These files are named boot.py and main.py. If a file named boot.py exists in the filesystem, the Python code in that file will be executed automatically on boot, allowing you to easily configure the hardware for your preferred startup conditions. After executing the boot.py script, the interpreter looks for a main.py and if it exists, executes it. This allows you to automatically launch a Python script application after system boot.
To create a Python file on the device, right-click the device name in the USB DEVICES panel in the Xbit VS Code extension and select Create File. This will bring up a field where you can specify the name of the file (e.g., ‘main.py’).

The new file will now appear in the file listing under the device in the USB DEVICES panel. To edit the file, click on the file in the panel and a new editor tab will display. You can now type in this editor and save using FILE → SAVE or the hotkey for saving a file on your platform to save the updated file back to the device. To edit a file already on the device, just click the name of the file and an editor tab will open where you can modify and save the file like you usually would any text file within VS Code.
Next Steps
Now that you have your DVK connected to your workstation and have the Xbit VS Code extension up and running and interacting with the board, you are ready to try out some sample Python applications or develop your own. Note that sample applications may not be named main.py, in which case in order for the script to run on startup, simply rename the script to main.py before loading to the board or use the Right-click context menu within Xbit VS Code extension to rename the file to main.py in order for the device to automatically run the script after a reset.
Python Sample Applications
We’ve provided a set of simple Python applications for you to get started with some simple examples and test out the hardware. These samples are hosted in a public GitHub repository and will evolve over time to include more examples of exciting things you can do with Python on the Canvas Firmware with your DVK board. Please check this GitHub repository for a list of sample applications:https://github.com/LairdCP/canvas_python_samples
NOTE: Not all sample applications work properly with all Canvas Firmware supported hardware. Please take note of the requirements described in each sample application to ensure it is compatible with your hardware. The Canvas API Compatibility Table is a useful resource for determining which Python APIs are available on each Canvas-enabled hardware product.
Python API Documentation
Once you’ve taken a look at some sample applications and start to become familiar with how Python can be used to develop applications on the device, you can check out our detailed Python API documentation for more details on what hardware is accessible from Python and how to use it.
Canvas Python API Documentation on GitHub
Canvas API Compatibility Table - BL5340 DVK
The following table lists the specific Python APIs available on the BL5340 DVK.
Python API Compatibility | ||||||||||||||||
machine. | machine. | machine. | machine. | canvas_ble. | canvas_ble. | canvas_ble. | canvas_ble. | canvas_ble. | canvas. | canvas_ble | Floating | canvas. | network | socket | ssl | |
| BL5340 DVK |  | | | | | | | | | | | | | | | |
Canvas Firmware Feature Support | ||||||||||||
OTA FW Update | MicroPython Engine | Filesystem | RTOS Shell | Xbit VS Code | AT Command Set | Host Driver | DAPLink | Xbit Desktop | Xbit Mobile | |||
| BL5340 DVK |  | | | | | | | | | | ||
BL5340 DVK Features
The BL5340 DVK has four LEDs that can be controlled through Python.
from machine import Pin

# Create four Pin objects for LEDs
leds = [Pin("LED" + str(x), Pin.OUT, 0) for x in range(1,5)]

# Polarity of the GPIO is opposite from the polarity of the LED
leds[0].off() # Turn LED1 on
leds[2].on() # Turn LED3 off
The BL5340 DVK has four buttons that can be accessed through Python.
from machine import Pin

# Button callback
def cb_factory(n):
    def cb(e):
        print("Button {} state {}".format(n, e))
        # Turn on LED if button is pressed
        if e:
            leds[n].on()
        else:
            leds[n].off()
    return cb

# Create four Pin objects for buttons
buttons = [Pin("BUTTON" + str(x), Pin.IN, Pin.PULL_NONE) for x in range(1,5)]

# Create four Pin objects for LEDs
leds = [Pin("LED" + str(x), Pin.OUT, 0) for x in range(1,5)]

# Register event handlers
for x in range(0,4):
    buttons[x].configure_event(cb_factory(x), Pin.EVENT_BOTH)
More Resources
To continue learning more about how to use your BL5340 DVK for networking applications such as a BLE to MQTT gateway, see the networking sample repository for samples and notes.