/filters:background_color(white)/2024-03/LWB5-Plus-Modules-And-USB1.png)
Introduction
This guide covers tutorials for specific applications with the Sterling-LWB5+ module.
More documentation, ordering information, and resources related to the Sterling-LWB5+ can be found on our website:
https://ezurio.com/sterling-lwb5-plus
LWB5+ Dongle i.MX 8M Plus Yocto Integration
This tutorial will show you how to integrate the LWB5+ Dongle on an i.MX 8M Plus Yocto platform. To watch video tutorial, click here.
Required Tools
- LWB5+ Dongle (Part No. 450-00137)
- i.MX 8M Plus EVK (Part No. 8MPLUSLPD4-EVK)
- Linux PC with a Yocto Build Environment. As a prerequisite for this tutorial, we are going to assume that you know how to setup a Yocto build environment. This is covered very well in NXP's documentation ( i.e. see i.MX_Yocto_Project_User's_Guide.pdf, Rev. L5.4.70_2.3.0 — 31 December 2020 for details on how to install the required host packages and the repo utility, and how to setup git); so we will not cover it here. We will focus on how to add Ezurio's external layer into a Yocto build.
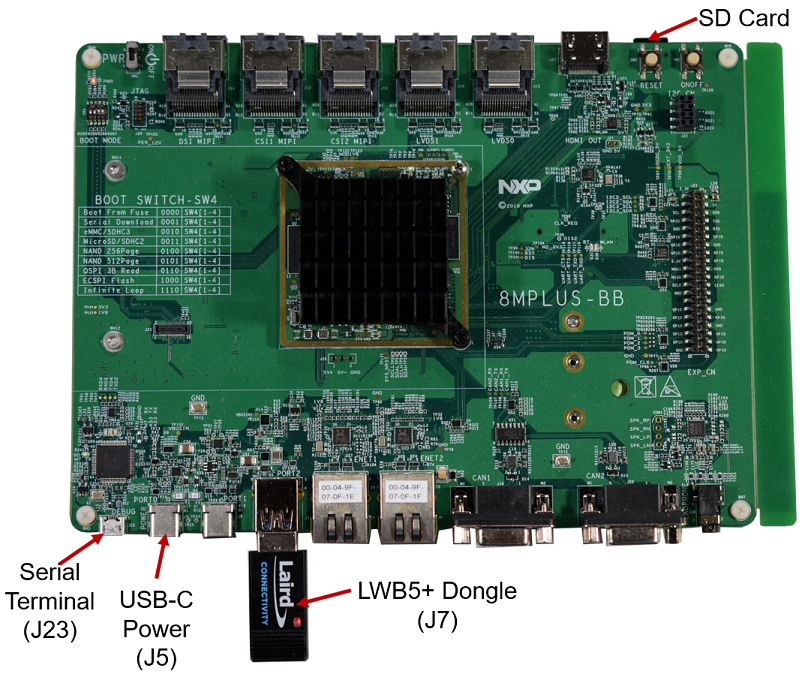
Setup
We will flash our image into a micro SD card. If you prefer, you can use the onboard eMMC, but for this tutorial. we will boot from a micro SD card. The LWB5+ Dongle will plug into J7. Power will be applied via J5, and J23 will be used to connect to a serial terminal (115200, N, 8, 1). If the build works, the drivers will automatically load on power up. We will then connect to an AP and do a ping to demonstrate that Wi-Fi works. For Bluetooth, we will do a scan to show that the module can detect devices that are discoverable or advertising.
-
Download the i.MX Yocto Project Community BSP recipe layers
Reminder: Prior to proceeding, make sure the required host packages and repo utility are installed. Git must also be configured properly. Refer to i.MX_Yocto_Project_User's_Guide.pdf, Rev. L5.4.70_2.3.0 — 31 December 2020 for details.
mkdir ~/projects/imx8mp cd ~/projects/imx8mp repo init -u https://source.codeaurora.org/external/imx/imx-manifest -b imx-linux-kirkstone -m imx-5.15.32-2.0.0.xml && repo sync -
Setup build configuration
DISTRO=fsl-imx-wayland MACHINE=imx8mpevk source imx-setup-release.sh -b build-imx8p-wayland -
Modify the ~/projects/imx8mp/build-imx8p-wayland/conf/bblayers.conf file. Add the line below to the file.
BBLAYERS += "${BSPDIR}/sources/meta-summit-radio/meta-summit-radio"Note: for Yocto projects 3.3 (Hardknott) and earlier the line you add would be
BBLAYERS += "${BSPDIR}/sources/meta-summit-radio/meta-summit-radio-pre-3.4" -
Modify the ~/projects/imx8mp/build-imx8p-wayland/conf/local.conf file. Add the lines below to the file.
PREFERRED_PROVIDER_wpa-supplicant = "sterling-supplicant"
PREFERRED_PROVIDER_wpa-supplicant-cli = "sterling-supplicant"
PREFERRED_PROVIDER_wpa-supplicant-passphrase = "sterling-supplicant"

BBMASK += " \
    meta-summit-radio/meta-summit-radio/recipes-packages/openssl \
    meta-summit-radio/meta-summit-radio/recipes-packages/.*/.*openssl10.* \
    "

PREFERRED_RPROVIDER_wireless-regdb-static = "wireless-regdb"
LWB_REGDOMAIN = "US"
Note: for Yocto projects 3.3 (Hardknott) and earlier you would add:
PREFERRED_PROVIDER_wpa-supplicant = "sterling-supplicant" PREFERRED_PROVIDER_wpa-supplicant-cli = "sterling-supplicant" PREFERRED_PROVIDER_wpa-supplicant-passphrase = "sterling-supplicant" BBMASK += " \ meta-summit-radio/meta-summit-radio-pre-3.4/recipes-packages/openssl \ meta-summit-radio/meta-summit-radio-pre-3.4/recipes-packages/.*/.*openssl10.* \ " PREFERRED_RPROVIDER_wireless-regdb-static = "wireless-regdb" LWB_REGDOMAIN = "US" -
Clone the meta-summit-radio layer into ~/projects/imx8mp/sources directory
cd ~/projects/imx8mp/sources git clone https://github.com/Ezurio/meta-summit-radio -
Edit the ~/projects/imx8mp/sources/meta-summit-radio/meta-summit-radio/recipes-packages/images/sample-image-cp-lwb5plus.bb recipe by replacing lwb5plus-sdio-div-firmware with lwb5plus-usb-sa-firmware and adding laird-networkmanager. Then save it as mylwb5p.bb. A snippet of the saved file is shown below.
IMAGE_INSTALL += "\ iproute2 \ rng-tools \ ca-certificates \ tzdata \ alsa-utils \ htop \ ethtool \ iperf3 \ tcpdump \ iw \ kernel-module-lwb5p-backports-summit \ lwb5plus-usb-sa-firmware \ sterling-supplicant-lwb \ summit-networkmanager-st60 \ " -
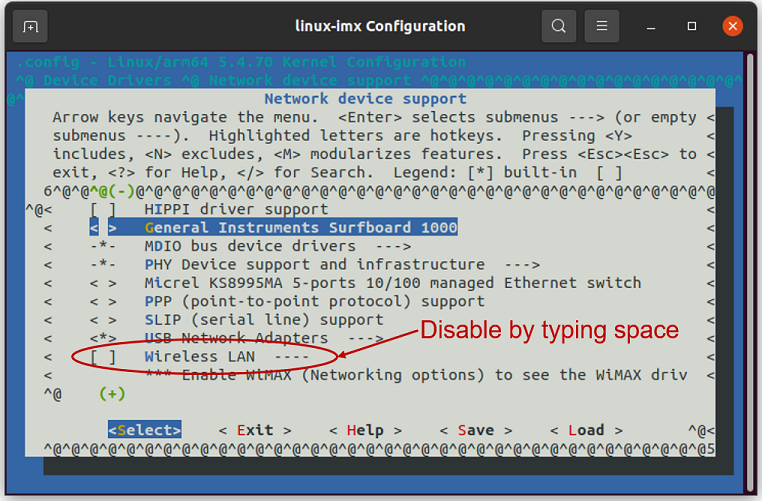
Next go to the build directory and run menuconfig to configure the Kernel.
cd ../build-imx8p-wayland bitbake -c menuconfig virtual/kernel-
Disable Wireless LAN drivers. Navigate to Device Drivers -> Network device support and disable Wireless LAN .
-
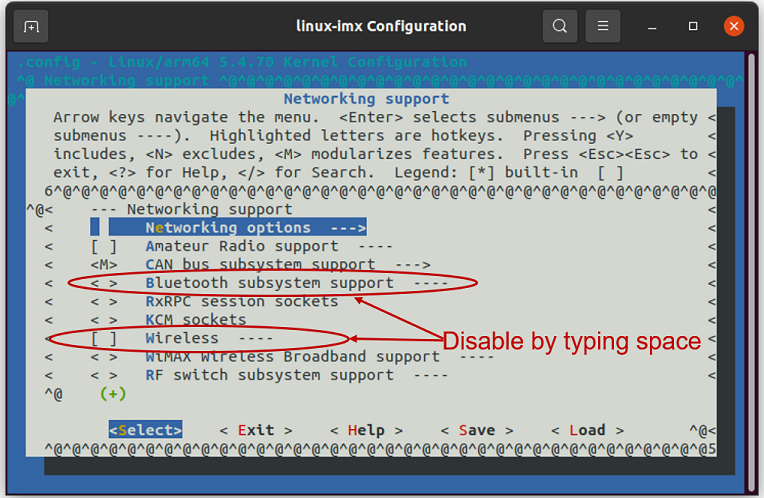
Disable Bluetooth subsystem support and Wireless. Navigate to Networking support and disable Bluetooth subsystem support and Wireless.
-
Save your changes and exit menuconfig
-
-
Build the image
bitbake mylwb5p -
Flash image into SD card. Note: for this particular tutorial the SD card is on /dev/mmcblk0. It may be different for your setup; so make sure you change the command below per your setup.
bzip2 -dc ~/projects/imx8mp/build-imx8p-wayland/tmp/deploy/images/imx8mpevk/mylwb5p-imx8mpevk.wic.bz2 | sudo dd bs=512K iflag=fullblock oflag=direct status=progress conv=fsync of=/dev/mmcblk0 sync -
Connect EVK to Serial Terminal via J23 (115200, N, 8, 1). Note for this tutorial we use /dev/ttyUSB2 port to connect. Your Linux PC might use a different port. Boot device and login as root.
-
Test Wi-Fi. Create a connection profile with nmcli. Then connect to the AP and ping a website.
  nmcli con add con-name "YourProfile" ifname wlan0 type wifi ssid "YourAP" wifi-sec.key-mgmt wpa-psk wifi-sec.psk "YourPassword"
  nmcli c u "YourProfile"
  ping www.google.com
-
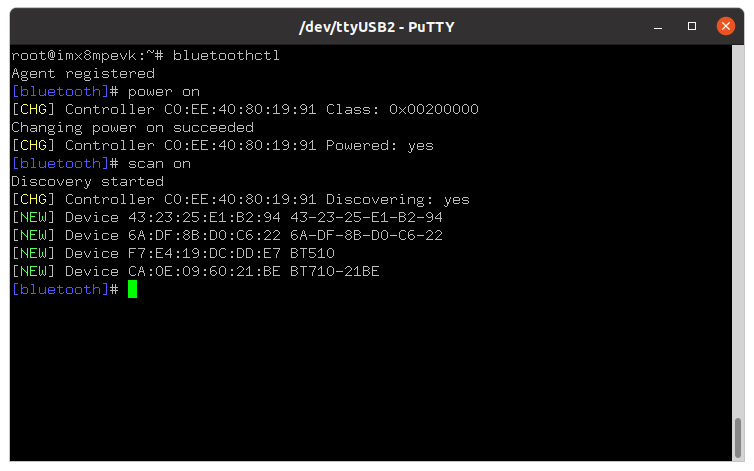
Test Bluetooth. Launch bluetoothctl. Then on the bluetoothctl prompt, type power on and then scan on.
References
- https://github.com/Ezurio/meta-summit-radio
- The modified files on this tutorial
- https://www.nxp.com/imx8mplusevk
Testing A2DP with LWB5+ Dongle on i.MX 8M Plus using Yocto
This tutorial will show you how to integrate the LWB5+ Dongle on an i.MX 8M Plus DVK using Yocto with pulseAudio included. You can test A2DP by streaming music from a smartphone to LWB5+ on imx8 board or vice versa.
Required Tools
- LWB5+ Dongle (Part No. 450-00137)
- i.MX 8M Plus EVK (Part No. 8MPLUSLPD4-EVK)
- Linux PC with a Yocto Build Environment. As a prerequisite for this tutorial, we are going to assume that you know how to setup a Yocto build environment. This is covered very well in NXP's documentation ( i.e. see i.MX_Yocto_Project_User's_Guide.pdf, Rev. L5.4.70_2.3.0 --- 31 December 2020 for details on how to install the required host packages and the repo utility, and how to setup git); so we will not cover it here. We will focus on how to add Ezurio's external layer into a Yocto build.
Setup
We will flash our image into a micro SD card. If you prefer, you can use the onboard eMMC, but for this tutorial. we will boot from a micro SD card. The LWB5+ Dongle will plug into J7. Power will be applied via J5, and J23 will be used to connect to a serial terminal (115200, N, 8, 1). If the build works, the drivers will automatically load on power up. We will then connect to an AP and do a ping to demonstrate that Wi-Fi works. Then, we will download audio file and test audio locally on imx8 first with pulseaudio. After that, we will connect to a smartphone via Bluetooth and stream music from a phone to LWB5+ so that we can hear it with earphone from imx8 plus EVK.
-
Download the i.MX Yocto Project Community BSP recipe layers
Reminder: Prior to proceeding, make sure the required host packages and repo utility are installed. Git must also be configured properly. Refer to i.MX_Yocto_Project_User's_Guide.pdf, Rev. L5.4.70_2.3.0 --- 31 December 2020 for details.
mkdir ~/projects/imx8mp cd ~/projects/imx8mp repo init -u https://github.com/nxp-imx/imx-manifest -b imx-linux-kirkstone -m imx-5.15.32-2.0.0.xml && repo sync -
Setup build configuration
DISTRO=fsl-imx-wayland MACHINE=imx8mpevk source imx-setup-release.sh -b build-imx8p-wayland -
Modify the ~/projects/imx8mp/build-imx8p-wayland/conf/bblayers.conf file. Add the line below to the file.
BBLAYERS += "${BSPDIR}/sources/meta-summit-radio/meta-summit-radio"Note: for Yocto projects 3.3 (Hardknott) and earlier the line you add would be
BBLAYERS += "${BSPDIR}/sources/meta-summit-radio/meta-summit-radio-pre-3.4" -
Modify the ~/projects/imx8mp/build-imx8p-wayland/conf/local.conf file. Add the lines below to the file.
PREFERRED_PROVIDER_wpa-supplicant = "summit-supplicant-lwb"
PREFERRED_PROVIDER_wpa-supplicant-cli = "summit-supplicant-lwb"
PREFERRED_PROVIDER_wpa-supplicant-passphrase = "summit-supplicant-lwb"

BBMASK += "\
    meta-summit-radio/meta-summit-radio/recipes-packages/openssl\
    meta-summit-radio/meta-summit-radio/recipes-packages/.*/.*openssl10.*\
    "

PREFERRED_RPROVIDER_wireless-regdb-static = "wireless-regdb"
LWB_REGDOMAIN = "US"
Note: for Yocto projects 3.3 (Hardknott) and earlier you would add:
PREFERRED_PROVIDER_wpa-supplicant = "summit-supplicant-lwb" PREFERRED_PROVIDER_wpa-supplicant-cli = "summit-supplicant-lwb" PREFERRED_PROVIDER_wpa-supplicant-passphrase = "summit-supplicant-lwb" BBMASK += "\ meta-summit-radio/meta-summit-radio-pre-3.4/recipes-packages/openssl\ meta-summit-radio/meta-summit-radio-pre-3.4/recipes-packages/.*/.*openssl10.*\ " PREFERRED_RPROVIDER_wireless-regdb-static = "wireless-regdb" LWB_REGDOMAIN = "US" -
Clone the meta-summit-radio layer into ~/projects/imx8mp/sources directory
cd ~/projects/imx8mp/sources git clone https://github.com/Ezurio/meta-summit-radio -b lrd-11.39.0.x -
Edit the ~/projects/imx8mp/sources/meta-summit-radio/meta-summit-radio/recipes-packages/images/sample-image-cp-lwb5plus.bb recipe by replacing lwb5plus-sdio-div-firmware with lwb5plus-usb-sa-firmware and adding laird-networkmanager. Then save it as mylwb5p-v11.bb. A snippet of the saved file is shown below.
IMAGE_INSTALL += "\ iproute2\ rng-tools\ ca-certificates\ tzdata\ alsa-utils\ htop\ ethtool\ iperf3\ tcpdump\ iw\ kernel-module-lwb5p-backports-summit\ lwb5plus-usb-sa-firmware\ summit-supplicant-lwb \ summit-supplicant-libs-lwb \ summit-networkmanager-lwb \ summit-networkmanager-lwb-nmcli \ packagegroup-fsl-tools-audio \ packagegroup-tools-bluetooth \ bluez5 \ pulseaudio \ pulseaudio-module-dbus-protocol \ pulseaudio-client-conf-sato \ " -
Next go to the build directory and run menuconfig to configure the Kernel.
cd ../build-imx8p-wayland
bitbake -c menuconfig virtual/kernel
Backports will replace the Wireless and Bluetooth stack. The CONFIG_FW_LOADER_USER_HELPER_FALLBACK needs to be removed to allow for faster loading of the firmware at boot.
Make the following modifications:
In the menuconfig use / to search for each of the below configuration parameters in all caps.
WLAN - deselect Device Drivers -> Network device support -> Wireless LAN CONFIG_BT - deselect Networking support -> Bluetooth subsystem support WIRELESS - deselect Networking support -> Wireless CONFIG_FW_LOADER_USER_HELPER_FALLBACK - deselect Device Drivers -> Generic Driver Options -> Firmware Loader -> Firmware loading Facility ->Force the firmware sysfs fallback mechanism when possible CONFIG_IMX_SDMA - set to module Device Drivers -> DMA Engine support -> i.MX SDMA support - Save your changes and exit menuconfig -
Build the image
bitbake mylwb5p-v11 -
Flash image into SD card.
Note: for this particular tutorial, the SD card is on /dev/sda1. It may be different for your setup; so make sure that you change the command below per your setup.
 bzip2 -dc ~/projects/imx8mp/build-imx8p-wayland/tmp/deploy/images/imx8mpevk/mylwb5p-imx8mpevk.wic.bz2 | sudo dd bs=512K iflag=fullblock oflag=direct status=progress conv=fsync of=/dev/sda1

 sync
Or alternatively, you can use balenaEtcher to burn wic image to sd card.
-
Connect EVK to Serial Terminal via J23 (115200, N, 8, 1). Note for this tutorial we use /dev/ttyUSB2 port to connect. Your Linux PC might use a different port. Boot device and login as root.
-
Create a Wi-Fi profile with nmcli and then test with ping after making a connection to that AP. Use the following format of commands if using WPA PSK.
nmcli con add con-name "YourProfile" ifname wlan0 type wifi ssid "YourAP" wifi-sec.key-mgmt wpa-psk wifi-sec.psk "YourPassword" nmcli c u "YourProfile" ping www.google.com -
List available audio output and choose the one for headphone on imx8plus EVK. In this example, we chose sink #2.
root@imx8mpevk:~# pactl list sinks Sink #0 State: SUSPENDED Name: alsa_output.platform-sound-bt-sco.mono-fallback Description: Built-in Audio Mono Driver: module-alsa-card.c ... Sink #1 State: SUSPENDED Name: alsa_output.platform-sound-hdmi.stereo-fallback Description: Built-in Audio Stereo Driver: module-alsa-card.c ... Sink #2 State: SUSPENDED Name: alsa_output.platform-sound-wm8960.stereo-fallback Description: Built-in Audio Stereo Driver: module-alsa-card.c ... Sink #3 State: SUSPENDED Name: alsa_output.platform-sound-xcvr.iec958-stereo Description: Built-in Audio Digital Stereo (IEC958) Driver: module-alsa-card.c root@imx8mpevk:~# pacmd set-default-sink 2 -
Download an audio file to test playing it out with aplay. You can choose your own audio file instead of the link below.
wget https://www2.cs.uic.edu/~i101/SoundFiles/BabyElephantWalk60.wav -
Play audio with the audio device name specified (-D) first. Then, play the audio to PulseAudio sound server which is prerequisite of BT audio streaming.
root@imx8mpevk:~# aplay -D sysdefault:CARD=wm8960audio BabyElephantWalk60.wav Playing WAVE 'BabyElephantWalk60.wav' : Signed 16 bit Little Endian, Rate 22050 Hz, Mono root@imx8mpevk:~# aplay -D pulse BabyElephantWalk60.wav Playing WAVE 'BabyElephantWalk60.wav' : Signed 16 bit Little Endian, Rate 22050 Hz, Mono -
Now it is ready to connect Bluetooth and stream audio sound. Enter bluetoothctl and power up Bluetooth radio and put it in discoverable mode.
root@imx8mpevk:~# bluetoothctl Agent registered [CHG] Controller C0:EE:40:82:6A:53 Pairable: yes [bluetooth]# power on [CHG] Controller C0:EE:40:82:6A:53 Class: 0x00200000 Changing power on succeeded [CHG] Controller C0:EE:40:82:6A:53 Powered: yes [bluetooth]# discoverable on Changing discoverable on succeeded [CHG] Controller C0:EE:40:82:6A:53 Discoverable: yes -
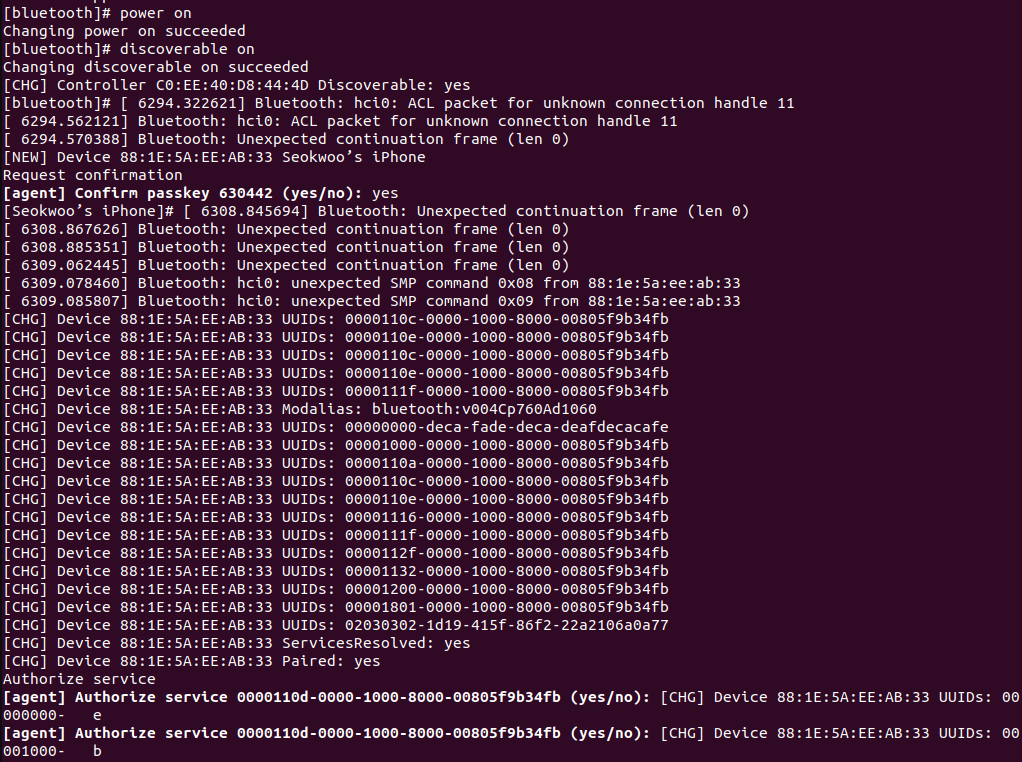
Then, scan from your smartphone to connect to the imx8mpevk device in the Bluetooth scan list under the Setting. Pair with numeric comparison and authorize services by typing yes on the terminal for imx8 EVK.
-
Play audio (e.g., mp3 music) from the smartphone and you should be able to hear through earphone plugged into headphone aux port on imx8 EVK.