/filters:background_color(white)/2024-03/LWB5-Plus-Modules-And-USB1.png)
Overview
The purpose of this document is to show how to use Ezurio's Sterling-LWB5+ USB stick on a Raspberry Pi 5 running Raspberry Pi OS. The integration is done on the target. This requires compiling and placing software on the Raspberry Pi device.
Hardware Requirements
- Ezurio Sterling-LWB5+ USB stick. P/N 450-00137 https://www.ezurio.com/part/450-00137
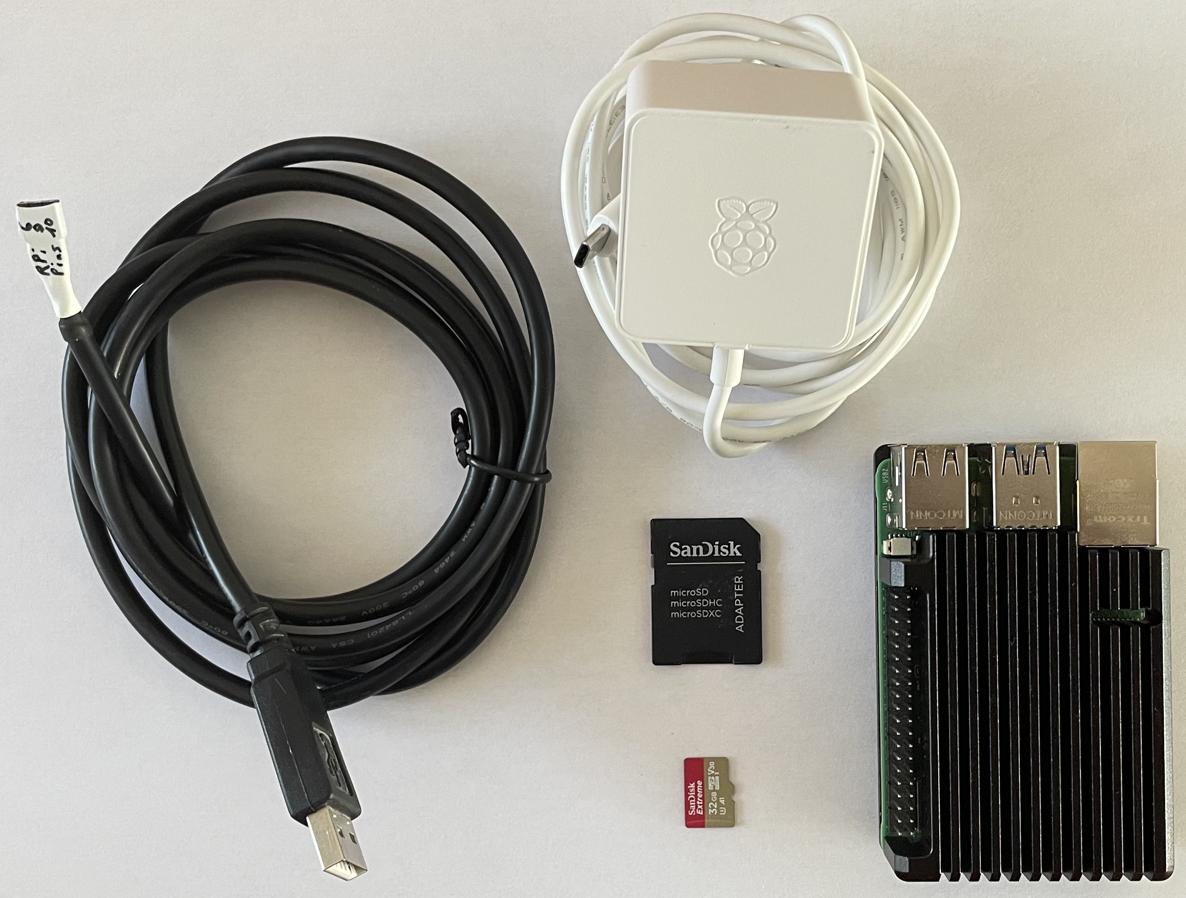
- Raspberry Pi 5 and power supply, Micro SDcard and possibly SD card adapter, USB/serial converter cable
Raspberry Pi preparation
Download Raspberry Pi OS image from https://www.raspberrypi.com/software/operating-systems/
Note: in this application note the image “Raspberry Pi OS Full” is used.
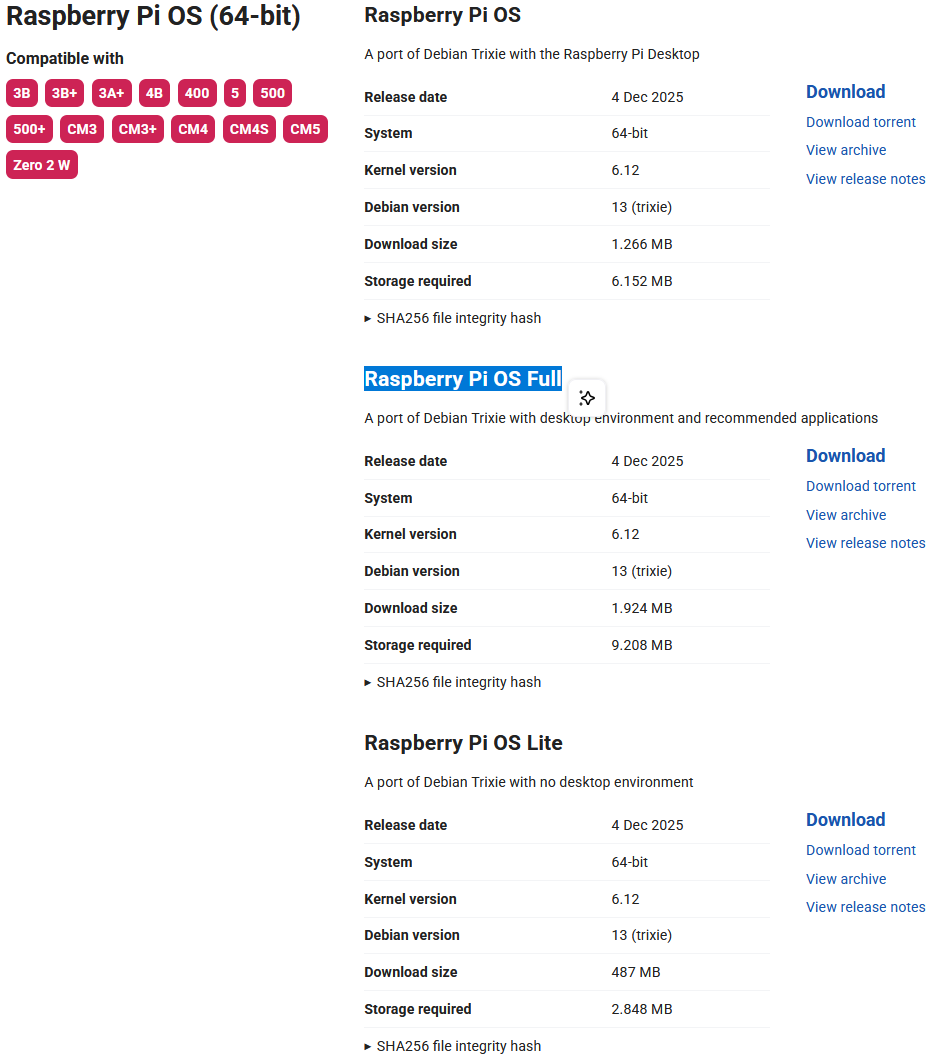
For example: “2025-12-04-raspios-trixie-arm64-full.img.xz”
Note: the Linux kernel version in this image is 6.12. matches the highest kernel version that is currently supported by Ezurios Backport-package.
Ezurio strives to upgrade their kernel support to the next LTS kernel version with newer Backport-package releases. This however might be after a new kernel version release is out for the RPi. Please check the Release Notes for the corresponding Wi-Fi module to identify the latest supported kernel version. Downgrade of kernel version might be necessary.
However, this is NOT the case when using an RPi image with kernel version 6.12 with Ezurio software package 13.24.0.20 like in this application note.
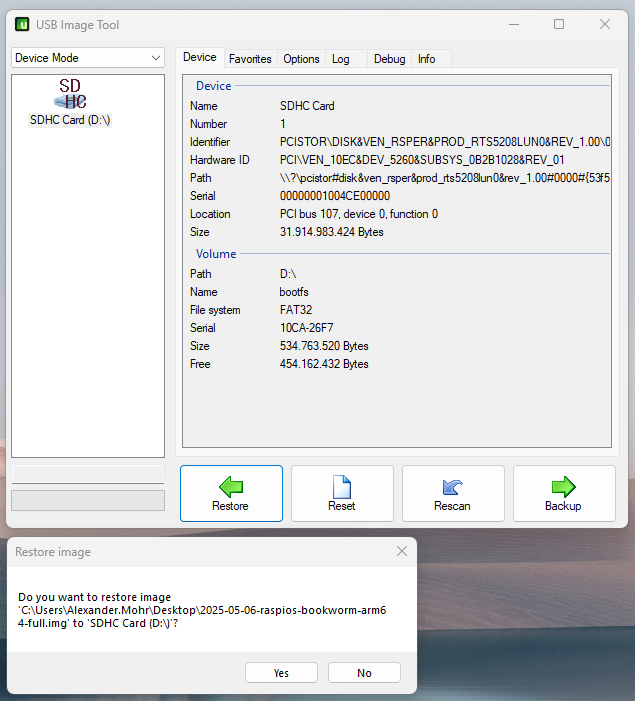
Unpack and flash downloaded image to the Micro SD card
Modify file config.txt in top-dir of partition bootfs
At the end the file add:
[all]
# to disable on-board Wifi and Bluetooth
dtoverlay=disable-wifi
dtoverlay=disable-bt

# to access the Pis debug UART
enable_uart=1
This disables the on-board Wi-Fi of the RPi and enables the debug UART on pins 6, 8, 10 on the Raspberry Pi 40-pin connector.
First boot
Initial setup
To provide login credentials and required initial settings, it is necessary to start the RPi into the GUI when booting for the first time.
- Connect a monitor to one of the RPi's HDMI connectors, keyboard/mouse to the USB connectors and an Ethernet cable that provides internet access.
- Follow the instructions on the monitor to set country, language, time zone, keyboard.
- Choose username and password, choose your browser and let the update process finish.
- Confirm the message “System is up to date” by clicking “OK”.
- You can now launch the Desktop and observe your success by clicking “Launch”.
Working from a terminal program
With the USB/serial converter cable, connect the RPi to a PC and open a terminal program (e.g. TeraTerm) at 115200 baud on the RPi's console and reboot the RPi.
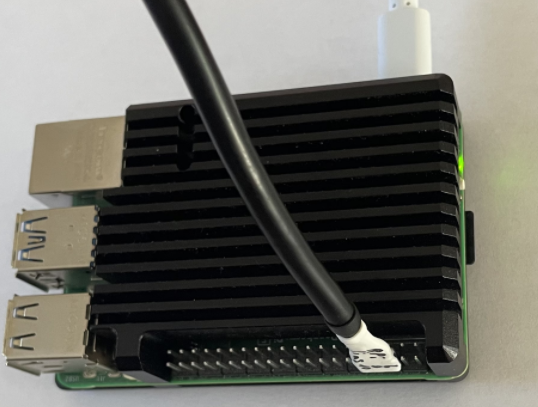

Note: Refer to Jeff Geerling's page to create such a cable: https://www.jeffgeerling.com/blog/2021/attaching-raspberry-pis-serial-console-uart-debugging
Kernel preparation
To install Ezurio's Backport driver package the kernel must be configured to set “Wireless” to <M> and to exclude “Bluetooth”.
Installing required tools for on target driver compilation
This command installs the required tools and their dependencies:
sudo apt install git bc bison flex libssl-dev make libncurses-devDownload kernel source
git clone --depth=1 https://github.com/raspberrypi/linux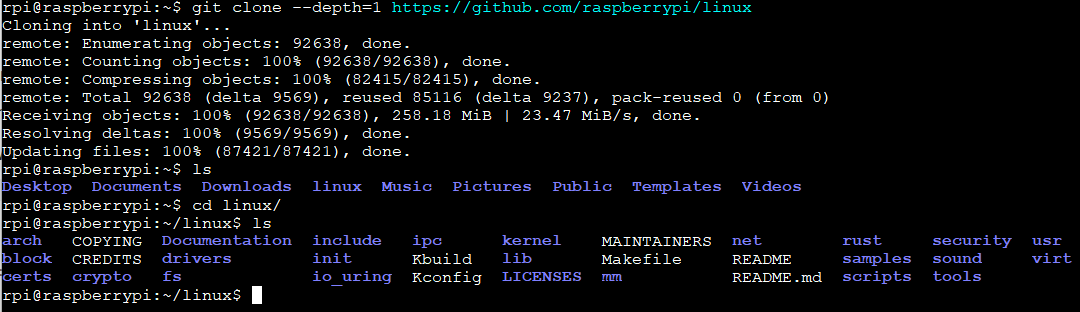
Modify kernel configuration
It is necessary to set “Wireless” to <M> and remove “Bluetooth” subsystem and IEEE 802.11 Networking Stack from the kernel configuration as those components will be replaced by the Ezurio Backport package.
Issue:
KERNEL=kernel_2712
make bcm2712_defconfig
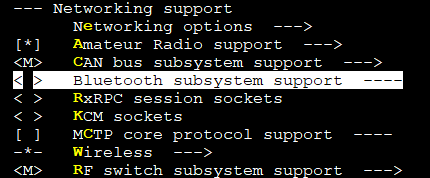
make menuconfigGo to Networking support --- >
Deselect Bluetooth as shown:
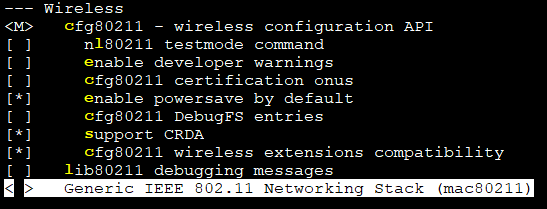
Go to Wireless --- >set Wireless to <M> and remove Generic IEEE 802.11 Networking Stack (max80211) as shown:
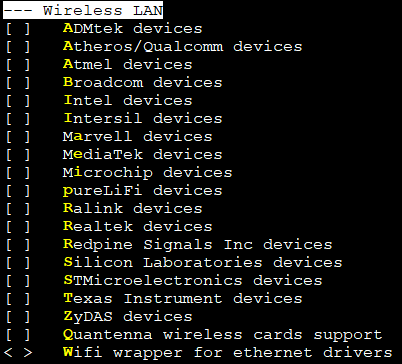
Go to Device drivers --- > Network device support --- > Wireless LAN --- >
Remove all Wireless LAN drivers without removing the subsystem (Wireless LAN) itself.


Save and exit menuconfig.
Compiling the kernel, kernel modules and device tree
Issue:
make -j4 Image.gz modules dtbsNote: This takes a app. 40-50min for the first run
Installing the kernel, kernel modules and device tree
sudo make -j4 modules_install
sudo cp /boot/firmware/$KERNEL.img /boot/firmware/$KERNEL-backup.img
sudo cp arch/arm64/boot/Image.gz /boot/firmware/$KERNEL.img
sudo cp arch/arm64/boot/dts/broadcom/*.dtb /boot/firmware/
sudo cp arch/arm64/boot/dts/overlays/*.dtb* /boot/firmware/overlays/
sudo cp arch/arm64/boot/dts/overlays/README /boot/firmware/overlays/
To observe the kernel change issue:
uname -a
sudo rebootuname -a
Note: you can reference this page for the RPi Linux kernel: https://www.raspberrypi.com/documentation/computers/linux_kernel.html
Backport installation
Placing Backports in file system
mkdir backports
cd backports
wget https://github.com/Ezurio/Connectivity_Stack_Release_Packages/releases/download/LRD-REL-13.24.0.20/summit-backports-13.24.0.20.tar.bz2
bunzip2 summit-backports-13.24.0.20.tar.bz2
tar xf summit-backports-13.24.0.20.tar -C .
ls
cd summit-backports-13.24.0.20
Configuring Backports
make defconfig-lwb
make -j4…

sudo make -j4 modules_installAdding kernel-module parameter for setting regulatory domain
Create /etc/modprobe.d/brcmfmac.conf with this content:
cat /etc/modprobe.d/brcmfmac.conf
options brcmfmac regdomain="ETSI"Note: instead of “ETSI” you can use any other supported regulatory domain.
Removing incompatible Raspberry Pi OS module parameter setting
sudo rm /usr/lib/modprobe.d/rpi-brcmfmac.confNote: instead of deleting the file it could be moved to a different location for future reference.
Changing UDEV rule to prevent it from querying the radio and causing it to malfunction
Edit “/lib/udev/rules.d/69-libmtp.rules” and add the three lines below “# Ezurio LWB5+ USB Dongle“.
# UDEV-style hotplug map for libmtp
# Put this file in /etc/udev/rules.d

ACTION!="add", ACTION!="bind", GOTO="libmtp_rules_end"
ENV{MAJOR}!="?*", GOTO="libmtp_rules_end"
SUBSYSTEM!="usb", GOTO="libmtp_rules_end"

# If we have a hwdb entry for this device, act immediately!
ENV{ID_MTP_DEVICE}=="1", SYMLINK+="libmtp-%k", GOTO="libmtp_rules_end"

# Fall back to probing.
# Some sensitive devices we surely don't wanna probe
# Color instruments
ATTR{idVendor}=="0670", GOTO="libmtp_rules_end"
ATTR{idVendor}=="0765", GOTO="libmtp_rules_end"
ATTR{idVendor}=="085c", GOTO="libmtp_rules_end"
ATTR{idVendor}=="0971", GOTO="libmtp_rules_end"
# Ezurio LWB5+ USB Dongle
ATTR{idVendor}=="04b4", ATTR{idProduct}=="bd30", GOTO="libmtp_rules_end"
ATTR{idVendor}=="04b4", ATTR{idProduct}=="bd29", GOTO="libmtp_rules_end"
ATTR{idVendor}=="04b4", ATTR{idProduct}=="640c", GOTO="libmtp_rules_end"
# Canon scanners that look like MTP devices (PID 0x22nn)
ATTR{idVendor}=="04a9", ATTR{idProduct}=="22*", GOTO="libmtp_rules_end"
# Canon digital camera (EOS 3D) that looks like MTP device (PID 0x3113)
ATTR{idVendor}=="04a9", ATTR{idProduct}=="3113", GOTO="libmtp_rules_end"
# Sensitive Atheros devices that look like MTP devices
ATTR{idVendor}=="0cf3", GOTO="libmtp_rules_end"
# Sensitive Atmel JTAG programmers
ATTR{idVendor}=="03eb", GOTO="libmtp_rules_end"
# Sensitive Philips device
ATTR{idVendor}=="0471", ATTR{idProduct}=="083f", GOTO="libmtp_rules_end"
# DUALi NFC readers
ATTR{idVendor}=="1db2", ATTR{idProduct}=="060*", GOTO="libmtp_rules_end"
# Printers
ENV{ID_USB_INTERFACES}=="*:0701??:*", GOTO="libmtp_rules_end"
sudo rebootBringing Up Wi-Fi and Bluetooth
Placing the firmware files
Fetch correct firmware file package:
wget https://github.com/Ezurio/Connectivity_Stack_Release_Packages/releases/download/LRD-REL-13.24.0.20/summit-lwb5plus-usb-sa-firmware-13.24.0.20.tar.bz2
bunzip2 summit-lwb5plus-usb-sa-firmware-13.24.0.20.tar.bz2
sudo tar xf summit-lwb5plus-usb-sa-firmware-13.24.0.20.tar -C /
Insert the Sterling-LWB5+ USB dongle.
In the dmesg log, these lines or similar should appear:

Issue “iw dev”:
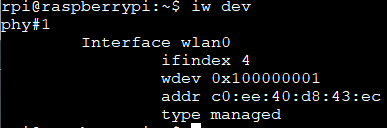
Issue “hciconfig”:

This demonstrates that both Wi-Fi and Bluetooth interfaces are present.
Final Notice
This application note is verified with the herein mentioned software versions. Subsequent software updates may change functionality. Contact Ezurio with any questions.