/filters:background_color(white)/2024-10/Sona%20IF573%20-%20Family.png)
Introduction
This document provides a tutorial on configuring the Sona IF573 wireless module to operate simultaneously in both Access Point (AP) mode and Client (Station, STA) mode across different Wi-Fi frequencies.
This guide is specifically tailored for the following hardware configuration:
- System-on-Module (SOM): Ezurio Nitrogen8M Plus SMARC SOM with Sona IF573 (N8MP_SMARC_SOM_8r16_IF573_3M_i)
- Carrier Board: Ezurio SMARC Carrier Board (SMARC_CAR)
sdcsupp, Ezurio’s fork of the wpa_supplicant.The Sona IF573 utilizes a feature known as Virtual Simultaneous Dual Band (VSDB). This capability allows the device to function as an AP on one frequency band (e.g., 2.4 GHz) and as an STA on a different frequency band (e.g., 5 GHz) by rapidly time-sharing the single radio.
Technical Considerations for AP/STA Mode
Frequency Band Recommendations
- AP Mode: It is generally recommended to configure the AP on the 2.4 GHz band.
- STA Mode: It is generally recommended to configure the STA on the 5 GHz or 6 GHz bands.
Dynamic Frequency Selection (DFS) and Channel Limitations
The use of the 5 GHz band for AP mode introduces a significant regulatory constraint known as Dynamic Frequency Selection (DFS).
- DFS requires the radio to constantly listen for and avoid interference with radar signals.
- The Sona IF573 is not capable of detecting RADAR signals.
- Depending on your geographic regulatory domain, this limitation will significantly restrict the available channels for AP operation in the 5 GHz band.
- STA mode does not have this same RADAR detection requirement, meaning you have a greater range of channels available for association.
6 GHz Band Support
- The Sona IF573 does not support AP mode in the 6 GHz band.
- STA mode can utilize the 6 GHz band, provided the module is configured with a regulatory domain that supports it.
Performance and Power Usage Impact
Running the radio in simultaneous AP/STA (VSDB) mode will negatively affect both power consumption and network throughput.
- This is due to the radio constantly switching between the configured frequencies to transmit and receive packets.
- For designs where battery life or throughput are critical requirements, it is strongly recommended to operate the radio in AP/STA mode on the same Wi-Fi channel and frequency band, if feasible.
Requirements
To follow this application note, the following hardware and software components are required:
- Nitrogen8M Plus SMARC SOM with Sona IF573 (N8MP_SMARC_SOM_8r16_IF573_3M_i)
- Ezurio SMARC Carrier Board (SMARC_CAR)
- Scarthgap pre-built Yocto image for the 8m+
- USB to DB9 adapter
Hardware Setup and Initial Programming
This section details the physical assembly of the components and the process for flashing the operating system image to the eMMC storage on the SOM.
Physical Assembly and Console Connection
SOM Insertion
Insert the Nitrogen8M Plus SOM into the designated SMARC port on the SMARC Carrier Board and secure it in place with screws.
Antenna Attachment
Attach two of the included FlexPIFA antennas to the radio ports on the SOM as shown. The third antenna port is for Bluetooth, which we will not be using in this tutorial, so you can leave it disconnected.
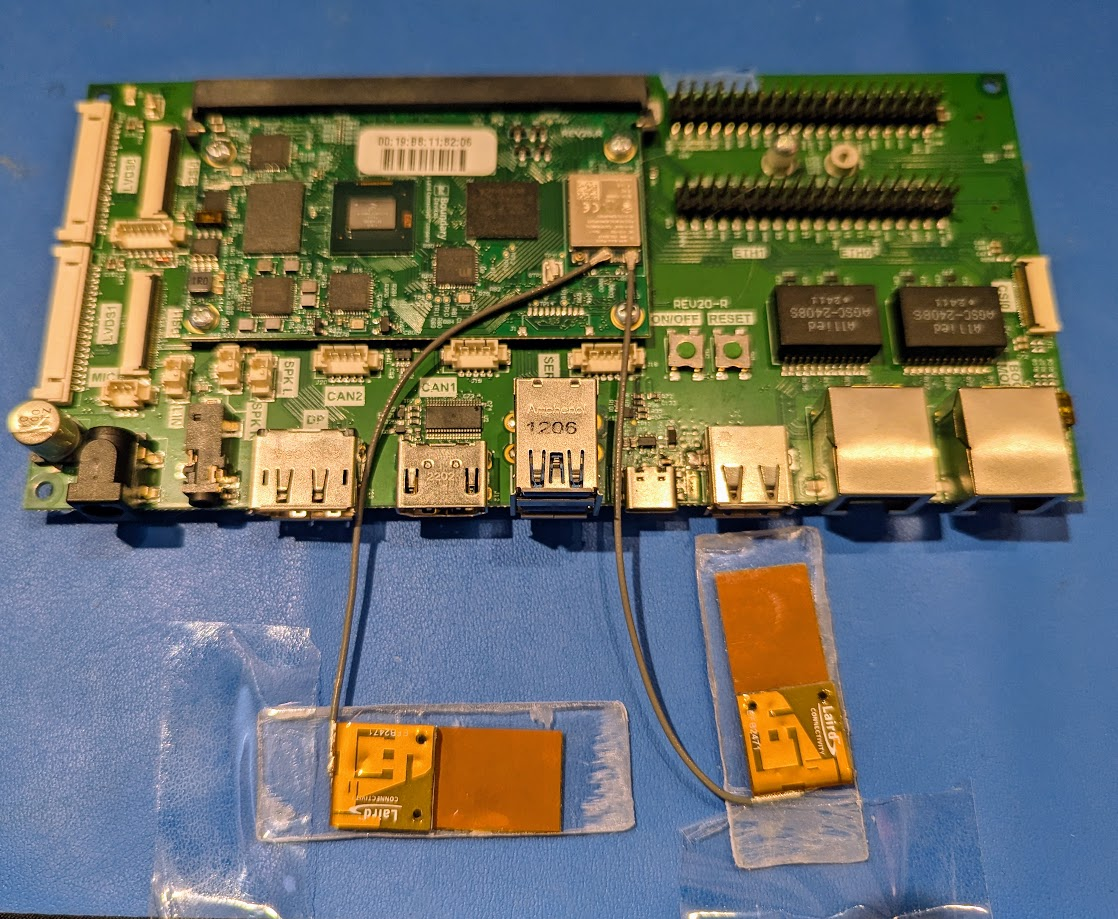
Note: For best performance, it is recommended to attach the antennas to polycarbonate and place them orthogonally (at right angles) as shown.
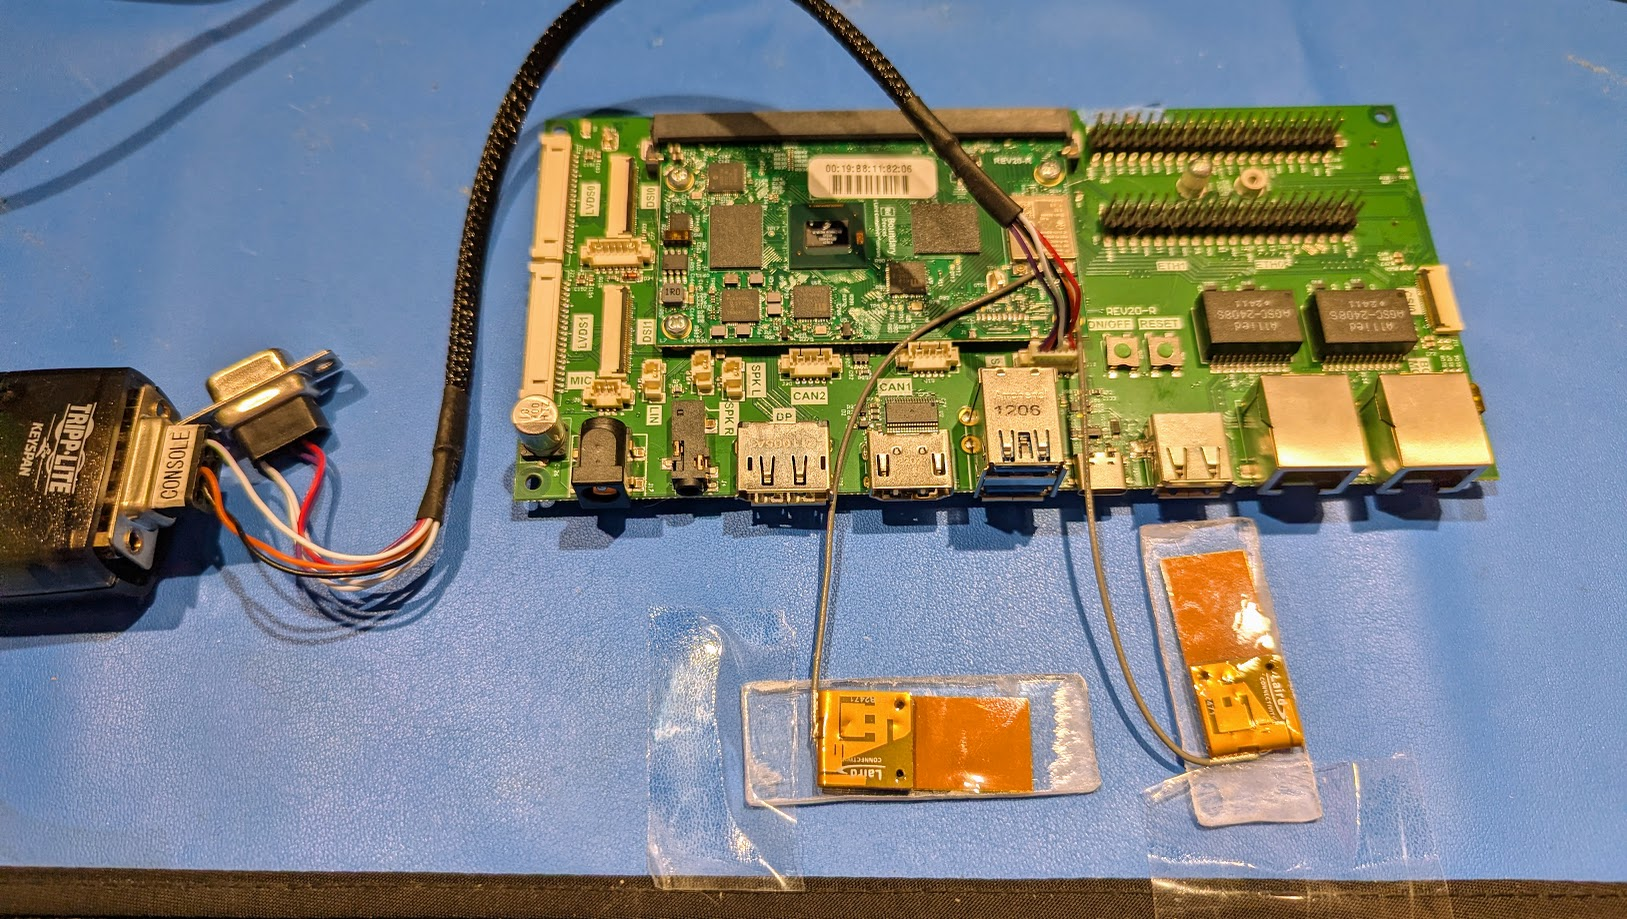
Console Setup
Connect the specialized cable (provided with the kit) to the SERIAL connector on the SMARC Carrier Board.
The other end of this cable features two DB9 connectors. Connect your USB-to-DB9 adapter to the connector labeled CONSOLE.
Start your preferred terminal software (e.g., minicom or TeraTerm) on the host machine.
Configure the terminal port settings to: 115200 Baud, No Parity (N), 8 Data Bits, 1 Stop Bit (115200/N/8/1).
Programming the image to eMMC
There are several methods for programming the eMMC. For this guide, we will use the highly reliable U-Boot USB Mass Storage (UMS) Gadget Method. (For information on other methods, please consult the document: Programming eMMC on Ezurio System-On-Modules).
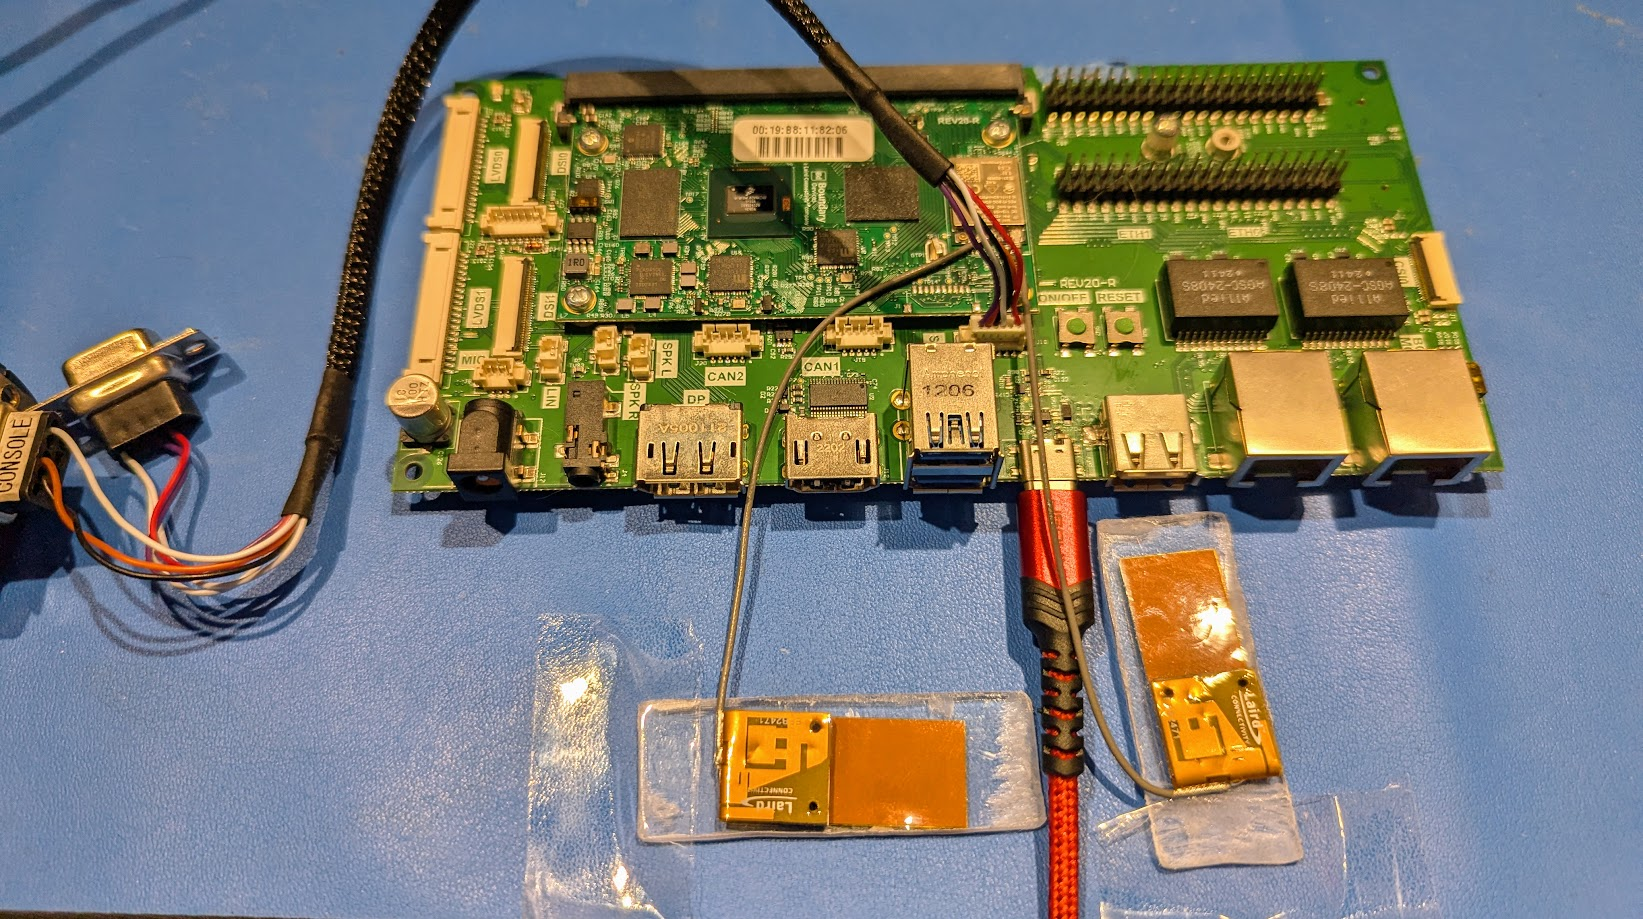
Connect USB
Plug a USB-C cable from your host machine into the USB-C port on the SMARC Carrier Board.
Access U-Boot
- Power up the carrier board by plugging in the power adapter.
- In your terminal software, immediately press any character (e.g., Space or Enter) to stop the auto-boot process and access the U-Boot prompt(
=>). - Enable UMS Gadget: Enable the UMS Gadget for the eMMC. The primary eMMC device is typically
mmc 0.At the U-Boot prompt, enter the following command:
=> ums 0 mmc 0:0
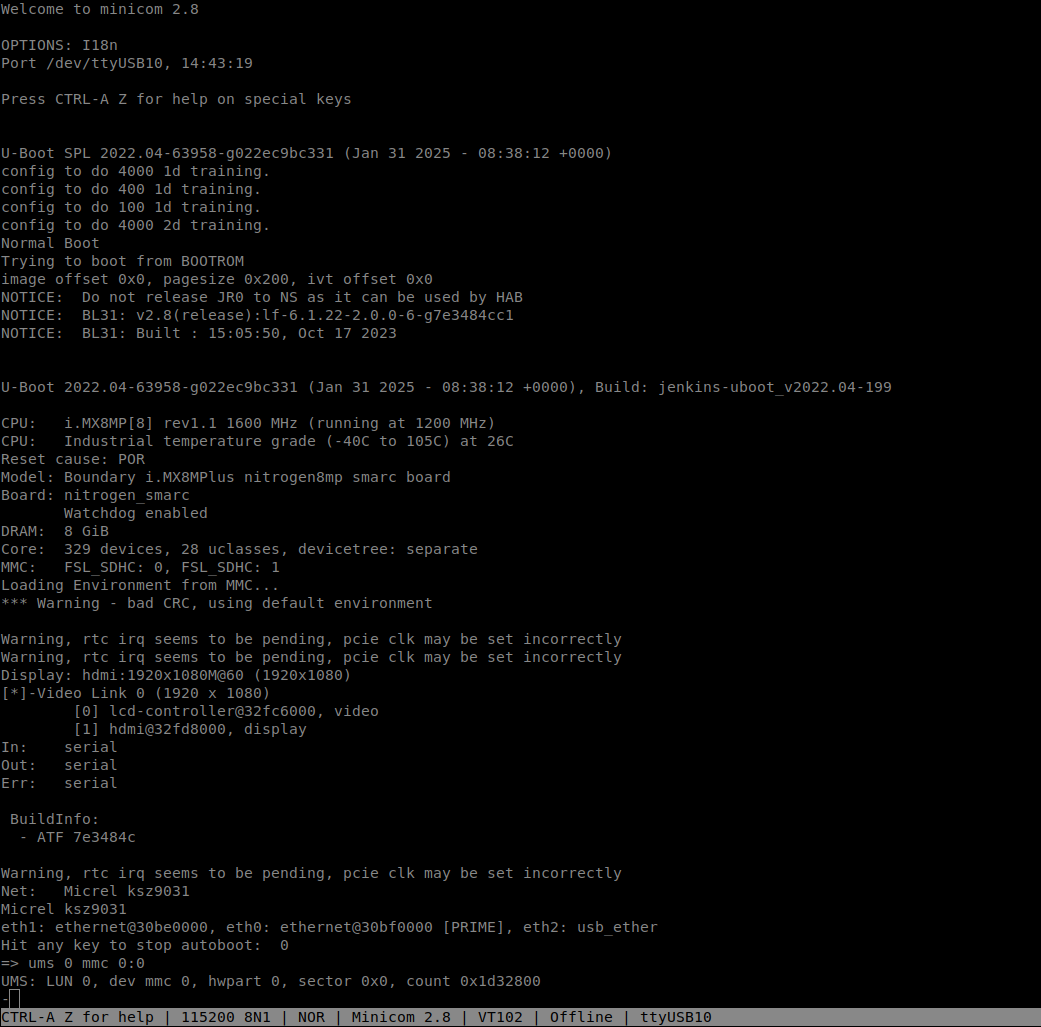
Flash the Image
At this stage, your host machine should recognize the SOM's eMMC as a new USB drive/device.
- It is recommended to use
ddfrom a Linux terminal or balenaEtcher for a graphical experience to flash the image file.- The is an example using balenaEtcher.
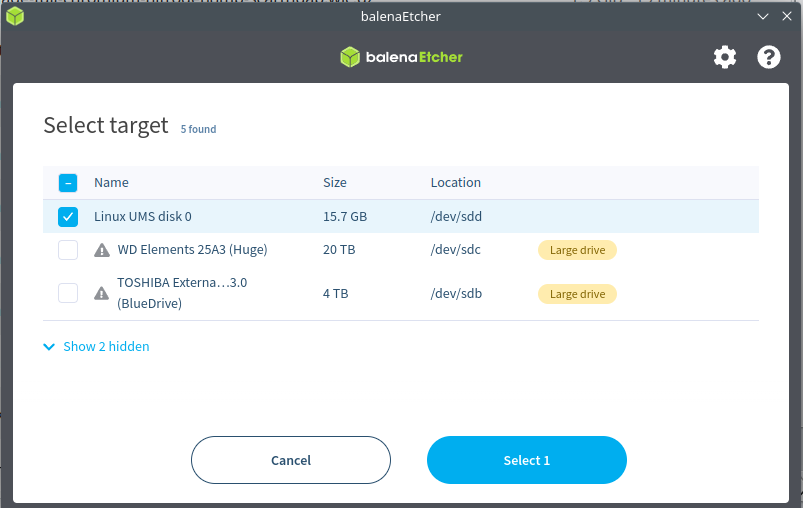
Finalize: Once the flashing process is complete, you can safely remove the power and the USB-C cable. The board is now ready to boot the new image.
Basic Configuration (Network Manager)
Booting the device
- Once you have flashed the image and unplugged the USB-C and power cables with the Console cable connected to the DB9 cable and your terminal emulation program running, connect the power. The SOM boots.
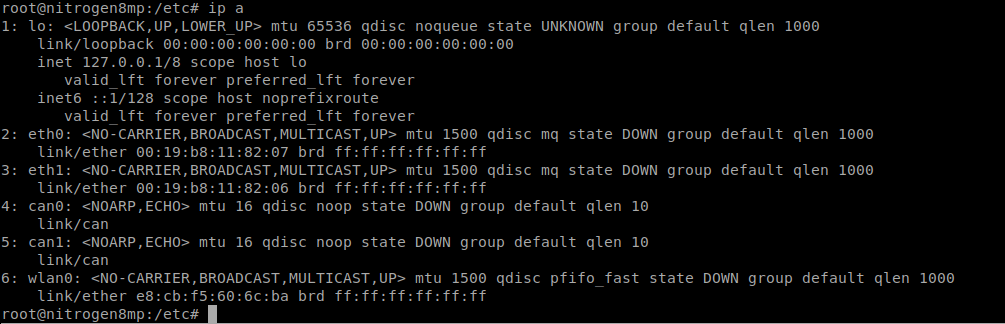
- Once you see the login: prompt, enter root and press enter.
To confirm that the radio is loaded correctly, you can enter ip -a. You should see an entry for wlan:0
Disabling Hostapd to Prevent Conflicts
Before configuring the wireless interfaces using nmcli, you must ensure that the hostapd service, which might be configured to start automatically by the default image, is stopped and disabled.
| Command | Purpose |
|---|---|
systemctl stop hostapd | Immediately terminates any running instance of the service. |
systemctl status hostapd | Check Status (Optional): Verifies the service is stopped. |
systemctl disable hostapd | Removes the system boot links, ensuring hostapd does not restart on subsequent reboots. |
Expected Status Output
When you runsystemctl status hostapd, the expected output should show the service state as inactive or dead.If the hostapd package was not pre-installed or is named something else, you might see the message "Unit hostapd.service could not be found." This is also acceptable, as it confirms the service is not active and cannot cause a conflict.Ensure NetworkManager is Running
Before runningnmcli commands, confirm that the NetworkManager service is running. If it is disabled or stopped, your configuration commands will fail.Check Status
Usesystemctl status to check the service status.systemctl status NetworkManagerStart/Enable (If needed)
If the status shows "inactive" or "disabled," use the following commands:
systemctl enable NetworkManager
systemctl start NetworkManager
Note: Enabling the service ensures NetworkManager will start automatically on future reboots.
nmcli Configuration Steps
The Virtual Simultaneous Dual Band (VSDB) feature requires creating a second virtual interface (wlan1) linked to the physical device (wlan0) to operate in AP mode.Create the Virtual AP Interface (wlan1)
Use the iw command to create the virtual interface that will be dedicated to Access Point mode. iw dev wlan0 interface add wlan1 type __apMake the Virtual Interface Permanent
By default, the virtual interface (wlan1) created via the iw command is removed when the device reboots. To ensure wlan1 is created automatically on every boot, we will create a systemd service.Create the systemd Service File
Usevi to create the service file:vi /etc/systemd/system/create-wlan1.serviceEnter the following content into the file:
[Unit]
Description=Create Virtual AP Interface for VSDB
Documentation=man:iw(8)
After=sys-subsystem-net-devices-wlan0.device
BindsTo=sys-subsystem-net-devices-wlan0.device

[Service]
Type=oneshot
RemainAfterExit=yes
ExecStart=/usr/sbin/iw dev wlan0 interface add wlan1 type __ap
User=root
Group=root
StandardOutput=journal
StandardError=journal

[Install]
WantedBy=multi-user.target
Enable and Start the Service
systemctl daemon-reload
systemctl enable create-wlan1.service
systemctl start create-wlan1.service
Note: The name of the service file must match the name you use in the systemctl commands.
Configure and Activate the AP Network (wlan1)
Create Basic AP
nmcli con add con-name aptest ifname wlan1 type wifi ssid aptest autoconnect yes 802-11-wireless.mode ap ipv4.method manual ipv4.addresses 192.168.42.1/24Configure WPA3 security
Modify the connection to set the frequency band, channel, and WPA3-SAE security.
nmcli con modify aptest wifi.band bg wifi.channel 6 wifi-sec.key-mgmt sae wifi-sec.psk "myappsk1"Activate the connection
nmcli con up aptestConfigure and Activate the Client Network (wlan0)
Create a NetworkManager connection profile named home on the primary interface wlan0. This connection will associate with your existing Wi-Fi network (e.g., on the 5 GHz band).nmcli con add con-name home ifname wlan0 type wifi ssid FAE-6g 802-11-wireless-security.key-mgmt sae 802-11-wireless-security.psk "mypresharedkey"Activate the connection
nmcli con up homeCompleting the Network Setup
The configuration steps above successfully create and activate both the Access Point (wlan1) and Client (wlan0) interfaces. However, clients connected to the AP will not have internet access until the routing path is defined.To enable client devices connected to theaptestnetwork to reach the external network viawlan0, proceed to the "IP Routing and Network Address Translation (NAT)" section.Advanced Configuration (hostapd and sdcsupp)
To use the advanced configuration files, we must first disable NetworkManager and enable the core wireless utilities (hostapd and wpa_supplicant) for interface control.Disable NetworkManager and Enable Hostapd
Since the previous section usednmcli (which controls NetworkManager), we need to disable the service responsible for it and enable the services we plan to use.| Command | Purpose |
|---|---|
systemctl stop NetworkManager | Immediately stops the running NetworkManager service. |
systemctl disable NetworkManager | Prevents NetworkManager from starting automatically on future reboots. |
systemctl enable hostapd | Enables the hostapd service, ensuring it starts automatically on future reboots for AP functionality. |
systemctl enable wpa_supplicant | Ensures wpa_supplicant starts automatically on future reboots for STA functionality. |
Create the Virtual Interface
You must first create the virtual AP interface (wlan1). If you did this in the nmcli section, you can skip this step.To confirm that you do not need to create a wlan1 interface, enter ip a at the command prompt. If you see a wlan0 and a wlan1 interface you can go on to the next step, if not, use the iw command to create the virtual interface that will be dedicated to Access Point mode:iw dev wlan0 interface add wlan1 type __apConfigure the Access Point (AP) using hostapd
Backup Existing Configuration
It is best practice to back up the default configuration file before creating a new one.
mv /etc/hostapd.conf /etc/hostapd.conf.orighostapd to manage the virtual AP interface (wlan1) on the 2.4 GHz band with mixed-mode WPA2/WPA3 security.Create the Hostapd Configuration File
Usevi (or your preferred editor) to create the file /etc/hostapd.conf:vi /etc/hostapd.confEnter Configuration Details
Enter the following configuration. This sets up a basic 2.4 GHz AP with WPA2-PSK security.
ctrl_interface=/var/run/hostapd
interface=wlan1
driver=nl80211
ssid=SonaAP_Hostapd
channel=6
hw_mode=g
wmm_enabled=1

# WPA2 Security
wpa=2
rsn_pairwise=CCMP
ieee80211w=2
wpa_key_mgmt=WPA-PSK
Edit the Hostapd Service File for Stability
You must add dependencies to thehostapd.service file to prevent startup failure due to race conditions at boot.- Use
vito edit the service file (location may vary, commonly found here):vi /usr/lib/systemd/system/hostapd.service - Locate the
[Unit]section and add the following two lines to ensure the service waits for the physical interface (wlan0) to be fully initialized by the kernel:[Unit] Description=Hostapd IEEE 802.11 AP, IEEE 802.1X/WPA/WPA2/EAP/RADIUS Authenticator After=sys-subsystem-net-devices-wlan0.device Requires=sys-subsystem-net-devices-wlan0.device # ... rest of file ...
Reload and Restart Hostapd
After saving the change, reload the systemd configuration to recognize the new dependencies and restart the service:
systemctl daemon-reload
systemctl enable hostapd
systemctl restart hostapd
Configure the Client (STA) using sdcsupp
The client interface (wlan0) will be controlled directly by Ezurio’s fork of the wpa_supplicant called sdcsupp to associate with the external Wi-Fi network.Disable the default service
Create a configuration file specific to the SSID inside the recommended directory.
systemctl stop sdcsupp
systemctl disable sdcsupp
Create the sdcsupp Configuration File
Create a configuration file specific to the SSID inside the recommended directory.
mkdir -p /etc/wpa_supplicant
vi /etc/wpa_supplicant/FAE-6g.conf
Enter Network Details
Enter the configuration for your target network using WPA3 (SAE) security.
ctrl_interface=/var/run/sdcsupp
ctrl_interface_group=0
update_config=1

network={
    ssid="FAE-6g"
    psk="yourpresharedkeyhere"
    key_mgmt=SAE
    ieee80211w=2
    }
Create the Custom Service File
vi /etc/systemd/system/sdcsupp-client.serviceEnter the Custom Service Content
[Unit]
Description=Ezurio SDC Supplicant Client for wlan0
Requires=sys-subsystem-net-devices-wlan0.device
After=sys-subsystem-net-devices-wlan0.device

[Service]
Type=simple
ExecStart=/usr/sbin/sdcsupp -i wlan0 -c /etc/wpa_supplicant/FAE-6g.conf
Restart=on-failure

[Install]
WantedBy=multi-user.target
Enable and Start the New Service
systemctl daemon-reload
systemctl enable sdcsupp-client.service
systemctl start sdcsupp-client.service
IP Routing and Network Address Translation (NAT)
The goal of this section is to turn the Sona IF573 into a router: clients connect to the AP interface (wlan1), and traffic is forwarded to the external network via the associated STA interface (wlan0).Assign a Static IP to the AP Interface
Set Static IP Persistence
Create a service to ensure the static IP remains across reboots, as NetworkManager is disabled.
vi /etc/systemd/system/set-ap-static-ip.serviceEnter the following content
[Unit]
Description=Set static IP for AP interface wlan1
After=sys-subsystem-net-devices-wlan1.device
Requires=sys-subsystem-net-devices-wlan1.device

[Service]
Type=oneshot
RemainAfterExit=yes
ExecStart=/sbin/ip addr add 192.168.42.1/24 dev wlan1

[Install]
WantedBy=multi-user.target
Enable and start the service
systemctl daemon-reload
systemctl enable set-ap-static-ip.service
systemctl start set-ap-static-ip.service
Bring the Interface Up
ip link set dev wlan1 upConfigure dnsmasq for the AP Network
Create a minimal configuration file for dnsmasq to serve IPs on the wlan1 interface.Disable the Default Service
systemctl stop dnsmasq
systemctl disable dnsmasq
Create the dnsmasq-custom.service file
vi /etc/systemd/system/dnsmasq-custom.serviceContent
[Unit]
Description=DNS forwarder and DHCP server (Custom)
After=network.target

[Service]
Type=simple
ExecStart=/usr/bin/dnsmasq -C /etc/dnsmasq.conf --keep-in-foreground
Restart=on-failure

[Install]
WantedBy=multi-user.target
Update /etc/dnsmasq.conf
vi /etc/dnsmasq.confContent
interface=wlan1
dhcp-range=192.168.42.10,192.168.42.250,12h
dhcp-option=3,192.168.42.1
dhcp-option=6,192.168.42.1
no-resolv
Start the Custom dnsmasq Service
systemctl daemon-reload
systemctl enable dnsmasq-custom.service
systemctl start dnsmasq-custom.service
Enable IP Forwarding
The Linux kernel must be instructed to forward packets between interfaces, which is the core function of a router.
Enable Forwarding Temporarily
Enable IP forwarding immediately for the current session.
echo 1 > /proc/sys/net/ipv4/ip_forwardEnable Forwarding Permanently
Edit the system configuration file to ensure IP forwarding remains active after a reboot.
vi /etc/sysctl.confUncomment or add the following line
net.ipv4.ip_forward = 1Apply the permanent change without rebooting
sysctl -pConfigure Network Address Translation (NAT)
NAT is essential to translate the private IP addresses of clients connected towlan1 into the single public IP address assigned to the wlan0 interface by the upstream router. This allows the outgoing traffic to be correctly routed over the internet.Apply the NAT Rule
Useiptables to set up the MASQUERADE rule. This rule takes all traffic originating from the local AP network (192.168.42.0/24) and sends it out through the STA interface (wlan0), dynamically replacing the source IP address with wlan0's external IP.iptables -t nat -A POSTROUTING -o wlan0 -j MASQUERADEExplanation
-t nat: Specifies the Network Address Translation table.-A POSTROUTING: Appends the rule to the chain executed just before the packet leaves the system.-o wlan0: Specifies the outgoing interface (your client interface).-j MASQUERADE: The jump target that performs dynamic NAT
Save the iptables Rules
By default,iptables rules are lost upon reboot. You must use a utility like iptables-save to persist them.iptables-save > /etc/iptables/rules.v4Set NAT Persistence
Create a service to restore the NAT rules on boot.
vi /etc/systemd/system/netfilter-persistent.serviceContent
[Unit]
Description=Netfilter Persistent Rules
After=network.target

[Service]
Type=oneshot
ExecStart=/sbin/iptables-restore /etc/iptables/rules.v4
RemainAfterExit=yes

[Install]
WantedBy=multi-user.target
Enable and start the service
systemctl daemon-reload
systemctl enable netfilter-persistent.service
systemctl start netfilter-persistent.service
Conclusion and Next Steps
You have successfully configured the Sona IF573 module to operate in Virtual Simultaneous Dual Band (VSDB) mode, establishing a persistent Access Point (AP) and a functional Client (STA) connection. This setup utilizes dedicated system services (hostapd, sdcsupp, dnsmasq-custom) and persistent kernel settings (iptables, sysctl) to ensure stability across reboots.Key Achievements
Service Stability
The system is configured to run the AP, STA, and DHCP services reliably using custom systemd unit files, avoiding common conflicts and race conditions.
Persistent Networking
The static IP address and the critical NAT/IP forwarding rules are applied automatically at boot time, ensuring the network is operational without manual intervention.
Functional Gateway
The device successfully operates as a network gateway, routing traffic from the local AP network (wlan1) out through the client connection (wlan0).Final Verification
To confirm the entire setup is robust, perform a full end-to-end test:
Reboot the System
Perform a final system reboot to verify all services (hostapd, sdcsupp-client, dnsmasq-custom) start correctly.
Verify IP
After logging in, confirm the static IP is correctly set:ip a show wlan1 should show inet 192.168.42.1/24.Client Connectivity
Connect a laptop or smartphone to the SonaAP_Hostapd network and verify it receives a 192.168.42.x IP address and can successfully browse the internet.
Troubleshooting Tip
If the external connection fails, always verify the NAT rule is loaded:iptables -t nat -L POSTROUTING -v. If the rule is missing, ensure the netfilter-persistent.service is enabled and active