/filters:background_color(white)/2024-01/BL54L15-Group.png)
/filters:background_color(white)/2024-06/BL54L15ug_SA%20and%20ST-right11.363.png)
/filters:background_color(white)/2024-03/canvas-software-suite-red.png)
Introduction
The BL54L15/BL54L15µ DVKs are supported by Canvas Platform Firmware as part of the Canvas Software Suite. This firmware provides developers a path to quickly design and build applications using the Python language and leverage Python-based APIs for access to the underlying hardware and radio feature set. This guide focuses on developing software for the BL54L15 DVK, though the principles described apply to the BL54L15µ DVK as well and to any PCB on which the BL54L15/BL54L15µ/BL54L10 module is placed as long as the appropriate SWD and serial port access is provided by the PCB to use with Canvas Tools for programming.
Note: There does not exist a BL54L10 DVK and the BL54L15 DVK should be used for software development.
Note: If not explicitly mentioned otherwise, all the below applies to both the BL54L15 DVK and the BL54L15µ DVK.
Getting Started
The BL54L15 DVK is equipped with a USB port (silk screen label Debugger) that is used to provide two USB-to-UART interfaces to the BL54L15 DVK plus one Segger J-Link interface. This is the primary interface you will use when developing software for the BL54L15 DVK.
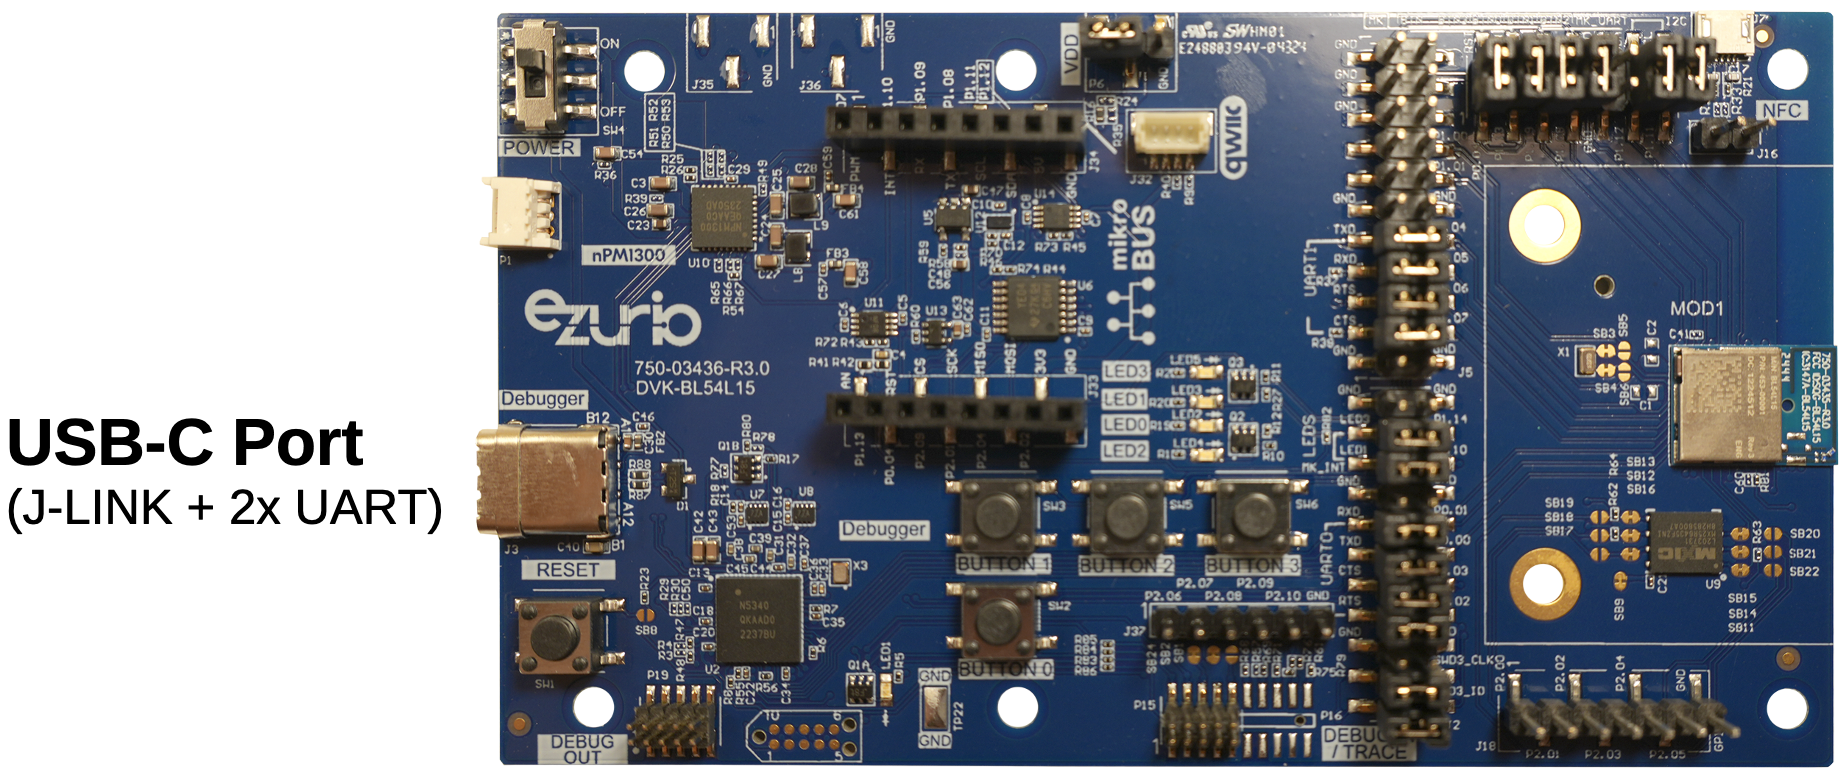
This USB port exposes two USB serial ports to the host PC. Once the Canvas firmware has been programmed, one serial port will provide access to the Python REPL prompt (>>>). The other can be used by your own Canvas application. You can attach to the Python REPL serial port with 115200 baud, 8N1 to verify your DVK is running Canvas Firmware.
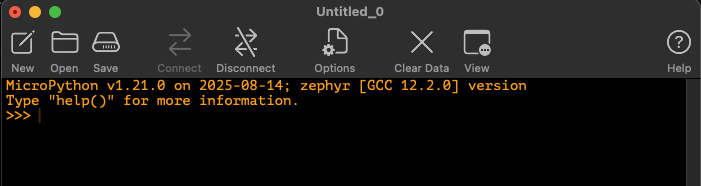
If you do not see this output, you can press the RESET button (SW1, near the USB connector) to reset the firmware and something similar to the output above will appear in a serial terminal.
If you still do not see any output similar to above, you may need to initially load Canvas Firmware onto your DVK board. To do so, follow the steps in the next section to update your Canvas Firmware.
Updating Canvas Firmware
Downloading the Latest Firmware Image
The latest version of Canvas Firmware for the BL54L15 and BL54L10 DVK can be found here:
For the BL54L15 there exist multiple Canvas firmware variants which differ in the following:
Whether the module’s internal flash or an external serial flash memory is used for the file system; and
Whether CAN bus support is included.
All firmware versions will run on the DVK. The BL54L10 has fewer variants since it does not support CAN bus.
In most cases the dvk_ext_flash variant will be a good first start. Download the latest version of the hex file named like build.bl54l15.ext_flash_…_merged.hex. The hex file is used to program a complete firmware image onto the BL54L15 DVK including the bootloader and Canvas firmware.
Programming the Firmware onto the DVK
The BL54L15 DVK has an integrated J-Link JTAG adapter, so no additional hardware is required. There exist multiple tools for programming the firmware image and we highlight two here.
nrfutil Command Line Tool
The nrfutil utility supports programming the BL54L15 module. With nrfutil installed, you may use it from a command line to program the DVK board as follows:
nrfutil device program --firmware build.bl54l15.ext_flash_2.1.0.1755144917_merged.hex --options chip_erase_mode=ERASE_ALLAfter programming the firmware press the RESET button to boot the newly programmed firmware.
nrfConnect for Desktop Programmer
You can install the nRF Connect for Desktop app on your PC and this includes a Programmer app with a graphical UI.
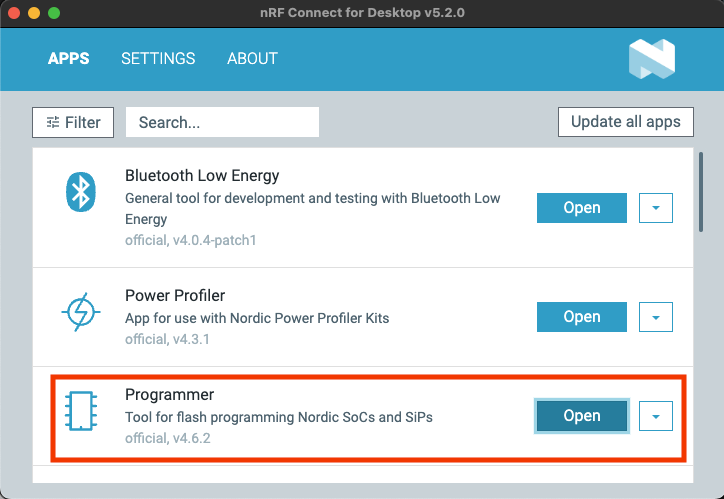
Once started the Programmer app will look like below:
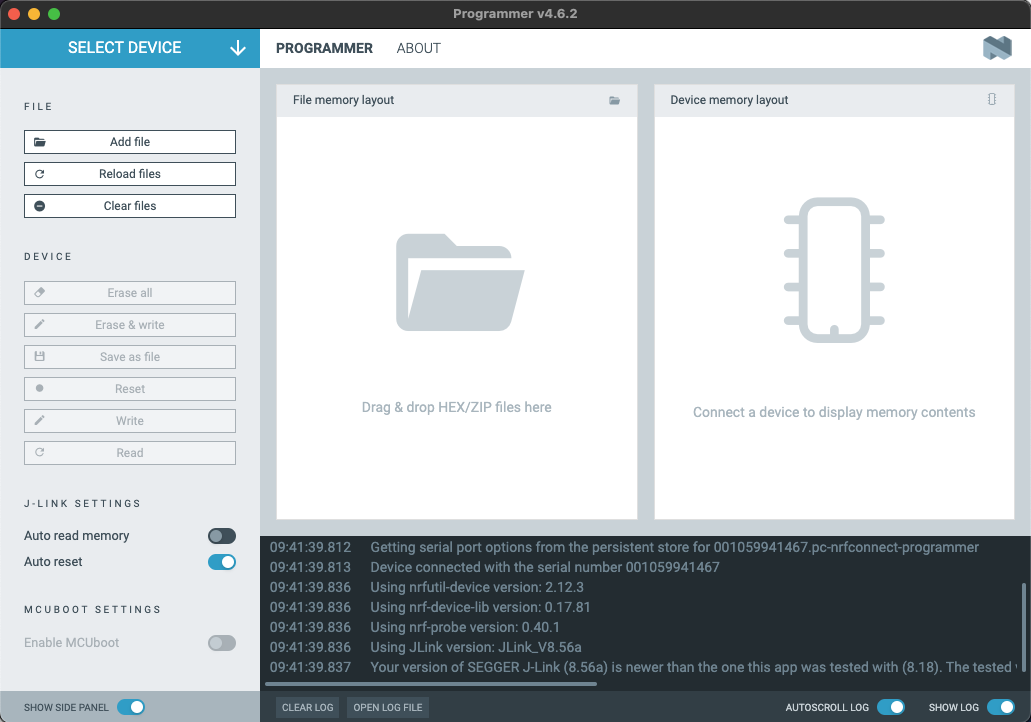
You can now expand “SELECT DEVICE” and select the J-Link device exposed by the DVK and it will auto-connect to the nRF54L15:
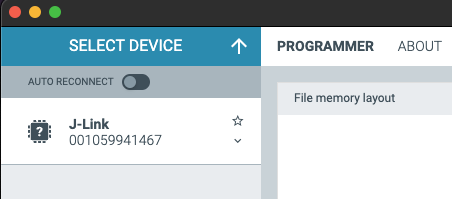
You can now drag & drop the hex file into the “File memory layout” section:

Pressing “Erase & write” will now program the firmware to your DVK and the progress can be observed in the log section.
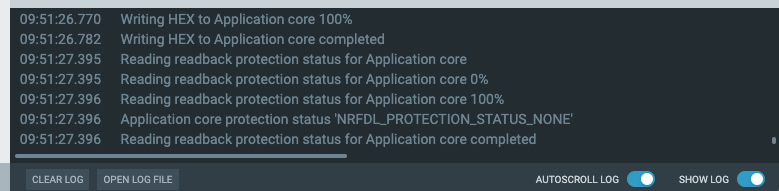
After programming the firmware press the RESET button to boot the newly programmed firmware.
Installing Visual Studio Code and the Xbit Extension
Install Visual Studio Code (VS Code) on your machine.
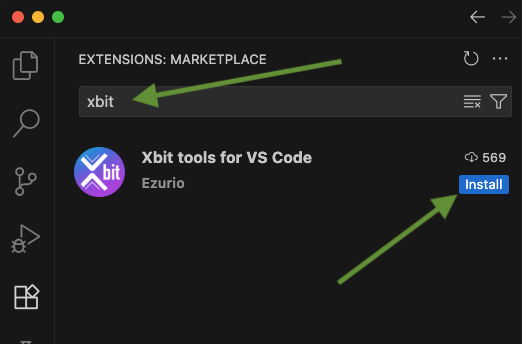
To simplify authoring and editing Pythons scripts for applications on Canvas-enabled hardware, we’ve developed the Xbit VS Code Extension(orXbit VSC for short). Xbit VSC is available right from inside the VS Code Extensions menu via the Extensions Marketplace. Click the Extensions menu and search for ‘xbit’.
Interacting with the BL54L15 DVK via Python REPL
The Canvas firmware provides a Python execution environment right on the BL54L15 DVK. This environment can be interacted with through the Python REPL serial port. The Xbit VS Code extension will automatically detect this serial port and provide easy access to the REPL terminal.
To access the Python REPL, ensure your DVK’s USB debug port is attached to your workstation and open the Xbit VS Code extension. Navigate to the USB DEVICES panel and locate the serial port associated with your DVK board. Click the board name (e.g. ‘Module COM6' on a PC or similar on Linux or Mac) to connect to the board and expand a listing of its filesystem (a fresh installed firmware has just a folder “update” but no additional files). In the lower right, you’ll find a tab labeled TERMINAL. If you press the ENTER key in the TERMINAL panel, you’ll see the REPL prompt for the device (>>>). From here, you can type Python commands interactively with the DVK board.
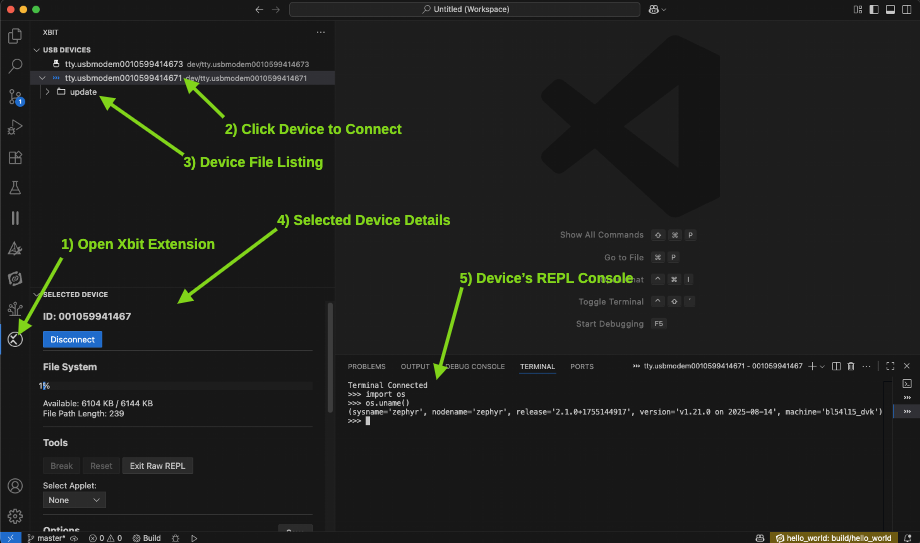
One common set of commands provides an easy way to display the Canvas Firmware version running on your device. Type the following lines, pressing ENTER after each one into the REPL terminal to display the system version information. The Canvas Firmware version is the string value for the property named release.
>>> import os
>>> os.uname()
If the commands were issued properly, you should see a Python tuple displayed similar to the following:
(sysname='zephyr', nodename='zephyr', release='2.1.0+1755144917',
version='v1.21.0 on 2025-08-14', machine='bl54l15_dvk')
Creating a Python File
The Python interpreter built into the Canvas Firmware running on the BL54L15 DVK is designed to look for two specially named Python files in its filesystem at system boot. These files are named boot.py and main.py. If a file named boot.py exists in the filesystem, the Python code in that file will be executed automatically on boot, allowing you to easily configure the hardware for your preferred startup conditions. After executing the boot.py script, the interpreter looks for a main.py and if it exists, executes it. This allows you to automatically launch a Python script application after system boot.
To create a Python file on the device, right-click the device name in the USB DEVICES panel in the Xbit VS Code extension and select Create File. This will bring up a field where you can specify the name of the file (e.g., ‘main.py’).

The new file will now appear in the file listing under the device in the USB DEVICES panel. To edit the file, click on the file in the panel and a new editor tab will display. You can now type in this editor and save using FILE → SAVE or the hotkey for saving a file on your platform to save the updated file back to the device. To edit a file already on the device, just click the name of the file and an editor tab will open where you can modify and save the file like you usually would any text file within VS Code.
Next Steps
Now that you have your DVK connected to your workstation and have the Xbit VS Code extension up and running and interacting with the board, you are ready to try out some sample Python applications or develop your own. Note that sample applications may not be named main.py, in which case in order for the script to run on startup, simply rename the script to main.py before loading to the board. Alternately, use the Right-click context menu within Xbit VS Code extension to rename the file to main.py in order for the device to automatically run the script after a reset.
Python Sample Applications
We’ve provided a set of simple Python applications for you to get started with some simple examples and test out the hardware. These samples are hosted in a public GitHub repository and will evolve over time to include more examples of exciting things you can do with Python on the Canvas Firmware with your DVK board. Please check this GitHub repository for a list of sample applications:https://github.com/LairdCP/canvas_python_samples
NOTE: Not all sample applications work properly with all Canvas Firmware supported hardware. Please take note of the requirements described in each sample application to ensure it is compatible with your hardware. The Canvas API Compatibility Table is a useful resource for determining which Python APIs are available on each Canvas-enabled hardware product.
Python API Documentation
Once you’ve taken a look at some sample applications and start to become familiar with how Python can be used to develop applications on the device, you can check out our detailed Python API documentation for more details on what hardware is accessible from Python and how to use it.
Canvas Python API Documentation on GitHub
Canvas API Compatibility Table - BL54L15 DVK
The following table lists the specific Python APIs available on the BL54L15 DVK.
Python API Compatibility | |||||||||||||||||
machine. | machine. | machine. | machine. | canvas_ble. | canvas_ble. | canvas_ble. | canvas_ble. | canvas_ble. | canvas. | canvas_ble | Floating | canvas. | mbedTSL | NFC Tag | Native USB | CAN bus | |
| BL54L15 DVK |  | | | | | | | | | | | | | | |  | |
| BL54L10 | | | | | | | | | | | | | | | | | |
Canvas Firmware Feature Support | |||||||
Bootloader | OTA FW Update | MicroPython Engine | Filesystem | RTOS Shell | Xbit VS Code | .zip App Update | |
BL54L15 DVK | | | | | | | |
| BL54L10 | | | | | | | |
BL54L15 DVK Features
The BL54L15 DVK has four LEDs that can be controlled through Python.
from machine import Pin

# Create four Pin objects for LEDs
leds = [Pin("LED" + str(x), Pin.OUT, 0) for x in range(0,4)]

# Polarity of the GPIO is same as the polarity of the LED
leds[0].off() # Turn LED0 off
leds[1].on()  # Turn LED1 on
leds[2].off() # Turn LED2 off
leds[3].on()  # Turn LED3 on
The BL54L15 DVK has four buttons that can be accessed through Python.
from machine import Pin

# Button callback
def cb_factory(n):
    def cb(e):
        print("Button {} state {}".format(n, e))
        # Turn on LED if button is pressed
        if e:
            leds[n].on()
        else:
            leds[n].off()
    return cb

# Create four Pin objects for buttons
buttons = [Pin("BUTTON" + str(x), Pin.IN, Pin.PULL_NONE) for x in range(0,4)]

# Create four Pin objects for LEDs
leds = [Pin("LED" + str(x), Pin.OUT, 0) for x in range(0,4)]

# Register event handlers
for x in range(0,4):
    buttons[x].configure_event(cb_factory(x), Pin.EVENT_BOTH)
More Resources
Please check this GitHub repository for a list of sample applications: