/filters:background_color(white)/2024-10/Sona%20IF573%20-%20Family.png)
Introduction
This guide covers tutorials for specific applications with the Sona IF573 module.
More documentation, ordering information, and resources related to the Sona IF573 can be found on our website:
https://www.ezurio.com/sona-if573-series
Wi-Fi/Cellular/Bluetooth Coexistence for the Sona IF573 Radios
Introduction
Getting multiple radios communicating in the same device can be very challenging. This document describes a few coexistence scenarios that we have seen recently, and the steps taken to help mitigate them.
Coexistence challenges between Cellular and 2.4GHz Wi-Fi/Bluetooth are inherent in the technology due to the frequency bands in which they operate. These challenges exist regardless of the specific chipset/module implementation.
Scenarios:
Scenario 1
Description
When the LTE antenna is close to the Wi-Fi antenna (around 30dB of isolation) and the LTE radio is transmitting on Band 12 (707.5 MHz) the LTE signal is received by the Wi-Fi antenna. This will cause the radio to generate a 3rd harmonic at around 2.1 GHz which could potentially cause the LTE module to fail certification due to spurious emissions. This issue can be present even if the Wi-Fi radio is turned off and would be an inherent problem exhibited by any 2.4 GHz Wi-Fi radio.
Possible Effects
- The spurious emissions could cause the device to fail in-country cellular carrier and/or EMC regulatory certification
- Problems with interference and Packet Error Rate on either the Wi-Fi or the Cellular radio may also be present.
- Band 12 is used by all 4 major US carriers as well as Bell and Rogers in Canada.
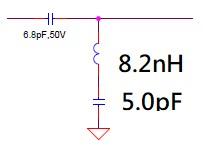
Recommended Solution
Addition of an L-C Notch Filter to reject the unwanted frequencies on the RF path will solve this issue. If a customer uses an LTE module in their system, adding the L-C notch filter is a requirement in order to pass carrier certifications. This holds true for all designs incorporating any 2.4GHz Wi-Fi solution including the Sona IF573.
Scenario 2
Description
The Wi-Fi radio may exhibit issues with sensitivity when the Wi-Fi and LTE signals are co-located (around 20dB of isolation) and are operated simultaneously.
Possible Effects
- The device could see problems sending or receiving 2.4 GHz (802.11 b/g/n) Wi-Fi data while the cellular radio is transmitting. This would likely result in an increased Bit Error Rate or lost Wi-Fi packets decreasing total throughput. These effects are reduced if the Wi-Fi and LTE radios only transmit simultaneously on an infrequent basis or are generally mutually exclusive in their operation.
- This issue only occurs in LTE bands whose Uplink frequency is located between 1800 MHz and 2700 MHz. In our testing it occurred in LTE Band 1 Uplink (1920-1980 MHz), LTE Band 2 Uplink (1850-1910 MHz), and LTE Band 7 Uplink (2500-2570 MHz).
- Band 1 is currently used by T-Mobile, Orange, O2, Vodafone, 3, EE and others in Europe and Asia.
- Band 1 is currently not used in North America.
- Band 2 is currently used by AT&T, T-Mobile, Verizon Bell Canada and others in North America.
- Band 2 is currently not used in Europe or Asia.
- Band 7 is currently used by T-Mobile, Orange, O2, Vodafone, 3, EE, China Telecom, Chunghwa, and others in Europe and Asia.
- Band 7 is currently not used in North America.
- Band 1 is currently used by T-Mobile, Orange, O2, Vodafone, 3, EE and others in Europe and Asia.
Recommended Solutions
Hardware Solution
- A hardware only solution would be to add a diplexer to the RF path to split the 2.4 GHz signal from the 5 GHz and 6 GHz signals, then insert a BAW filter on the 2.4 GHz chain. An additional diplexer would be needed to merge the 2.4 GHZ back to the 5 GHZ and 6 GHz signals.
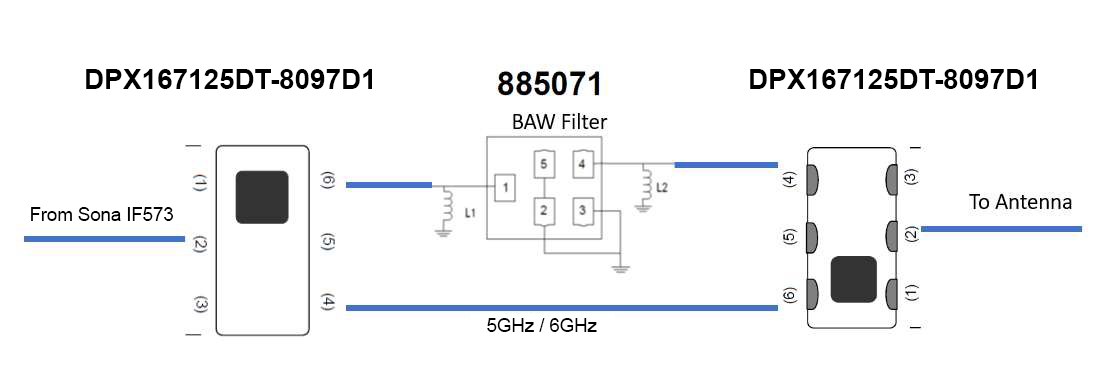
- This solution will reduce the Wi-Fi TX power and RX sensitivity by 2dB due to the added loss of the components.
- The 2.4 GHz chain could remain split from the 5 GHz and 6 GHz signals by not adding the 2nd diplexer This would then minimize the 2dB loss on the 5 and 6 GHz signals however it would require the addition of separate antennas for each band.
Software/Application Solution
- Design the SW architecture to mitigate the likelihood that both 2.4GHz Wi-Fi & Cellular will transmit simultaneously and buffer Cellular or Wi-Fi data accordingly.
- Focus design around TCP-like (vs UDP) protocols to ensure ACKs and error checks on data transmissions. Any coexistence issues with 2.4GHz Wi-Fi exhibited while the Cellular radio is transmitting will subside/cease to exist the moment the Cellular radio stops transmitting.
Effectively, for infrequent and non-streaming Wi-Fi/Cellular transmission use-cases, when ACKs are implemented using the TCP protocol, the system will recover quickly. In many customer applications, the perceived use-case issues will be transparent to the end-user.
IF573 integration on Jetson Orin Nano (lrd-11.x)
Introduction
This is a comprehensive guide to integrating the Sona IF573 Wi-Fi radio module with the NVIDIA Jetson Orin Nano. This guide is written to assist developers, engineers, and technology enthusiasts in seamlessly incorporating our Sona IF573 Wi-Fi module into their Jetson Orin Nano projects.
Purpose of the Guide
The Jetson Orin Nano, known for its powerful computing capabilities in AI and machine learning applications, becomes even more versatile when combined with the Sona IF573, a high-performance Wi-Fi module. This combination unlocks new possibilities in areas like IoT, autonomous robotics, and smart devices. However, the process of integrating a sophisticated Wi-Fi module with the Jetson platform can present unique challenges, ranging from hardware setup and driver configuration to ensuring optimal performance and stability.
This guide aims to address these challenges in a structured manner. It is designed to provide:
-
Step-by-Step Instructions: Clear, concise, and easy-to-follow steps detailing the hardware setup, ensuring that your Sona IF573 module is correctly connected to the Jetson Orin Nano.
-
Software Configuration: Guidance on configuring the necessary drivers and software on the Jetson Orin Nano to ensure full compatibility with the Sona IF573 module.
-
Optimization Tips: Tips and best practices for optimizing Wi-Fi performance and reliability, crucial for applications requiring robust wireless communication.
-
Troubleshooting Advice: Solutions to common issues that might arise during the installation and operation of the Sona IF573 with the Jetson Orin Nano, saving you time and frustration.
By the end of this guide, you will have a fully functional, high-performance wireless setup on your Jetson Orin Nano.
The Jetson Orin Nano
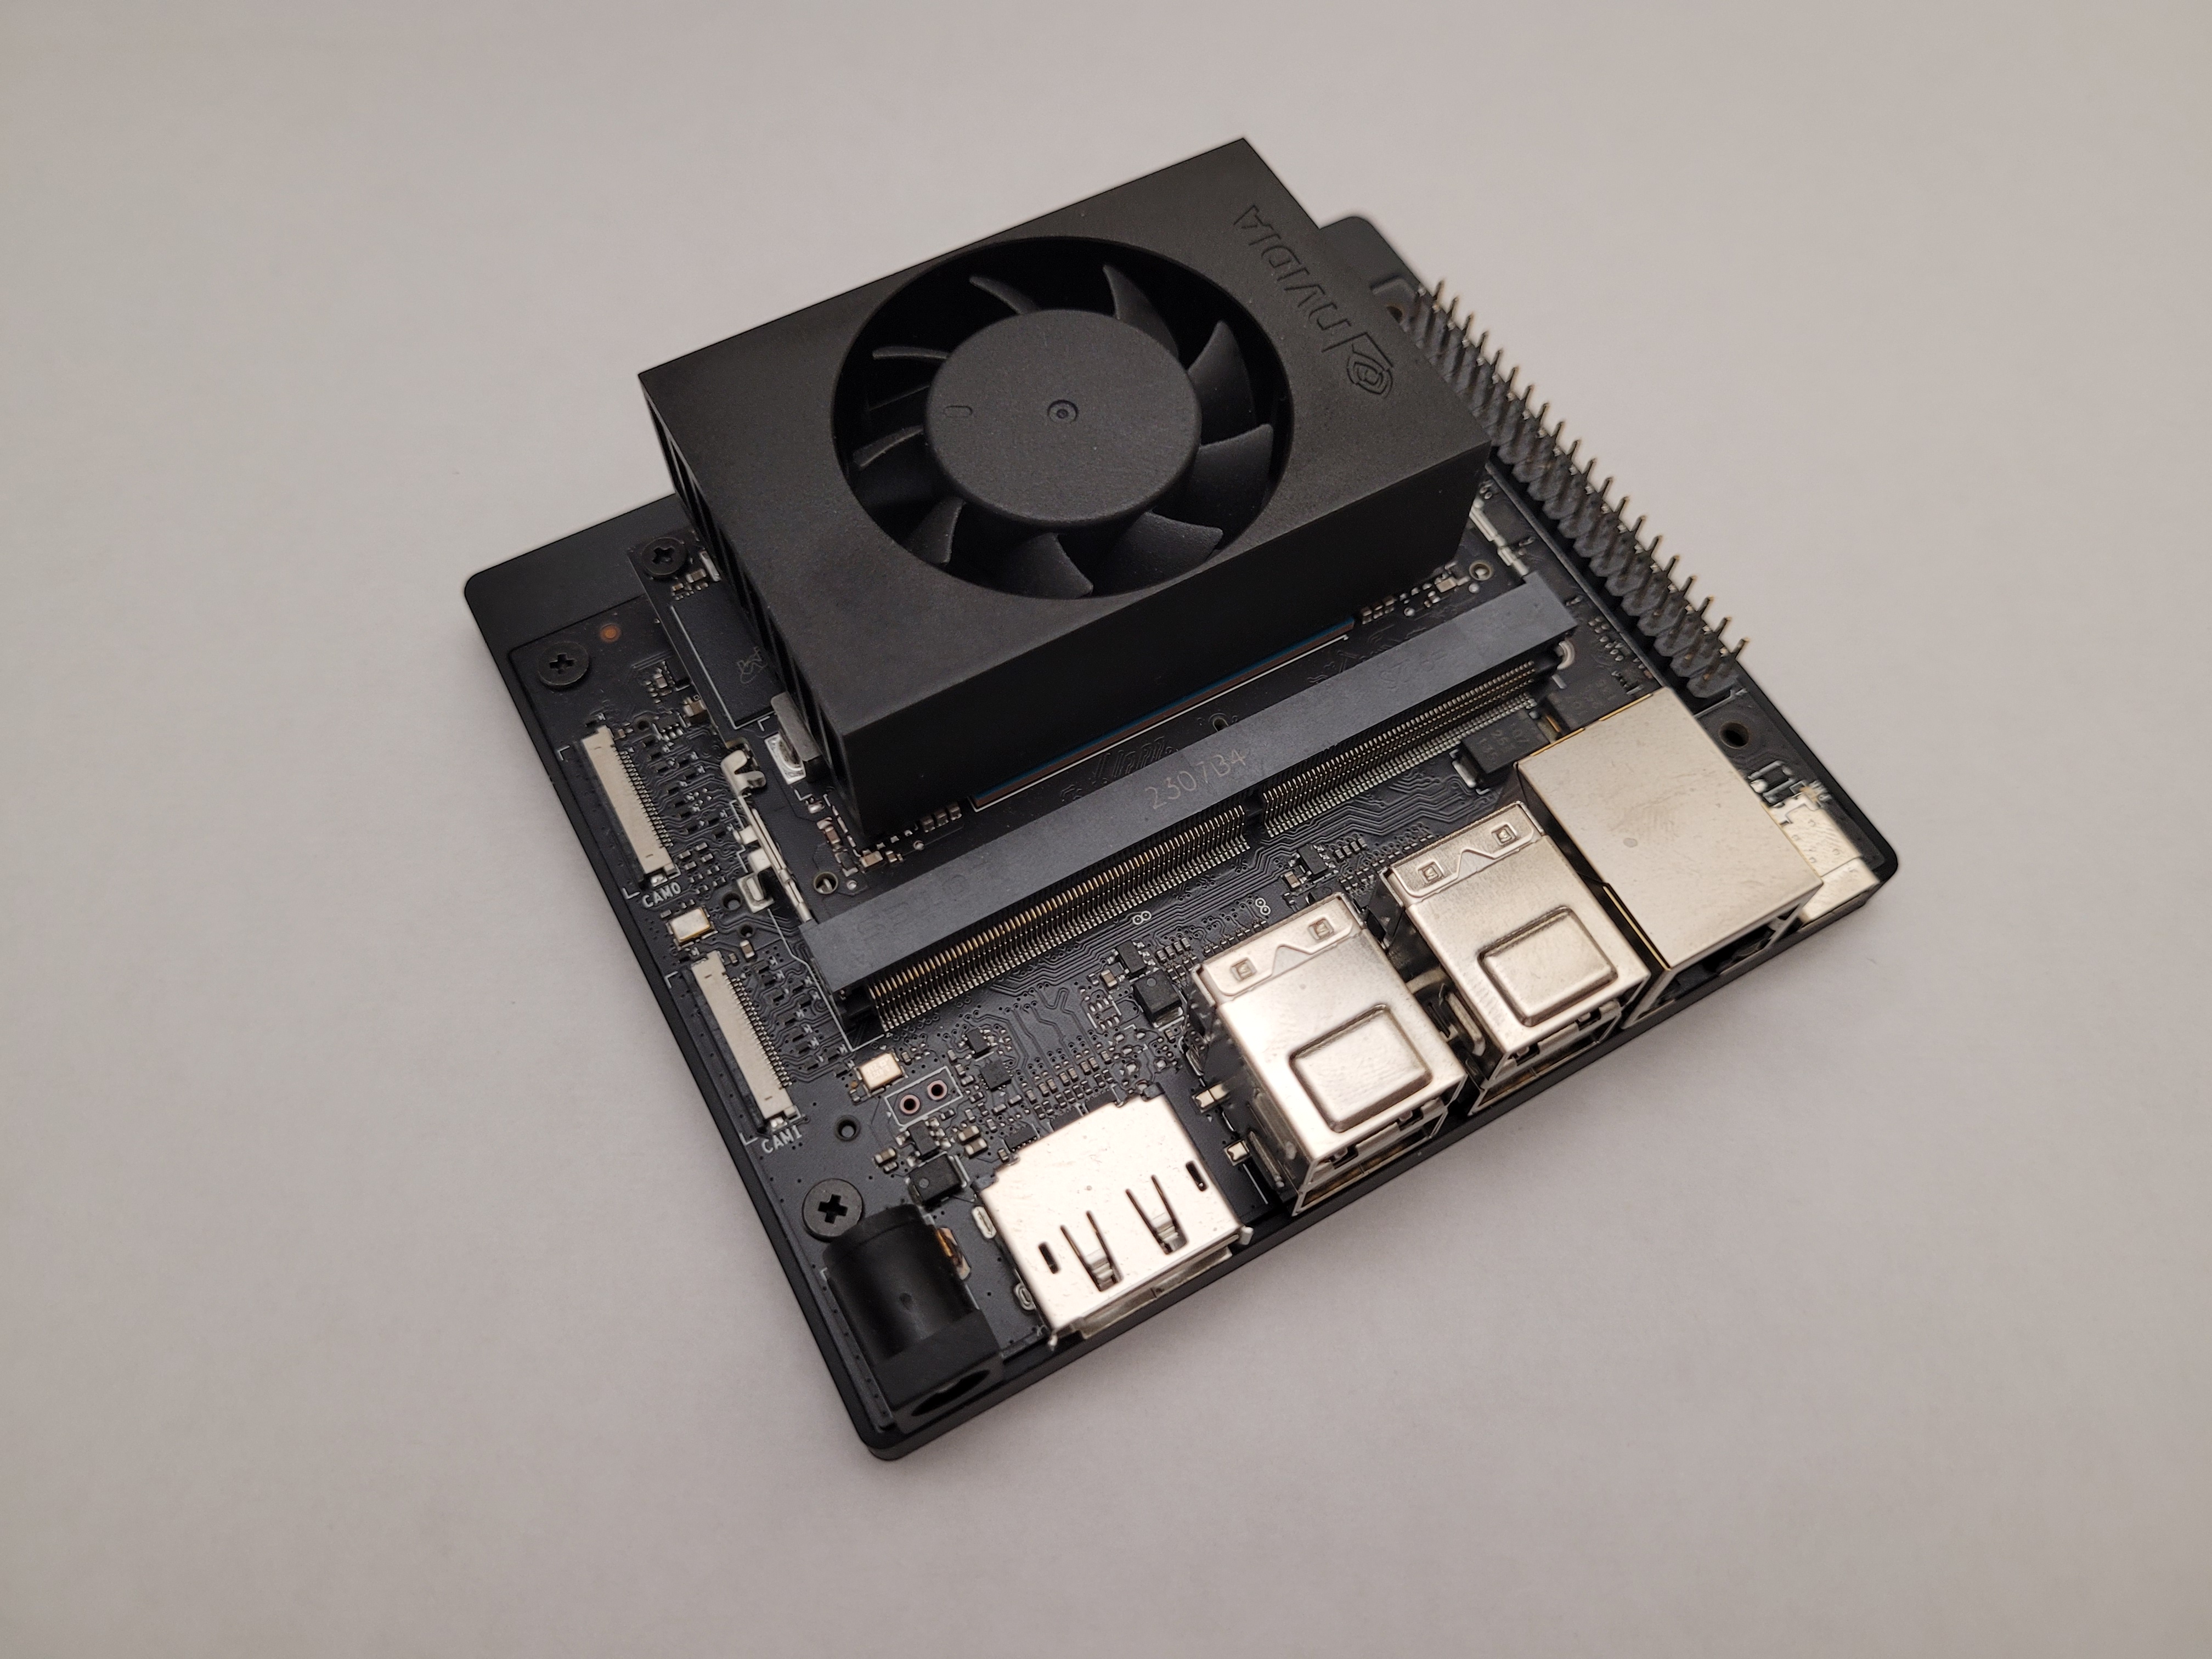
Proper Installation of the IF573 in the M.2 Slot on the Jetson Development Board
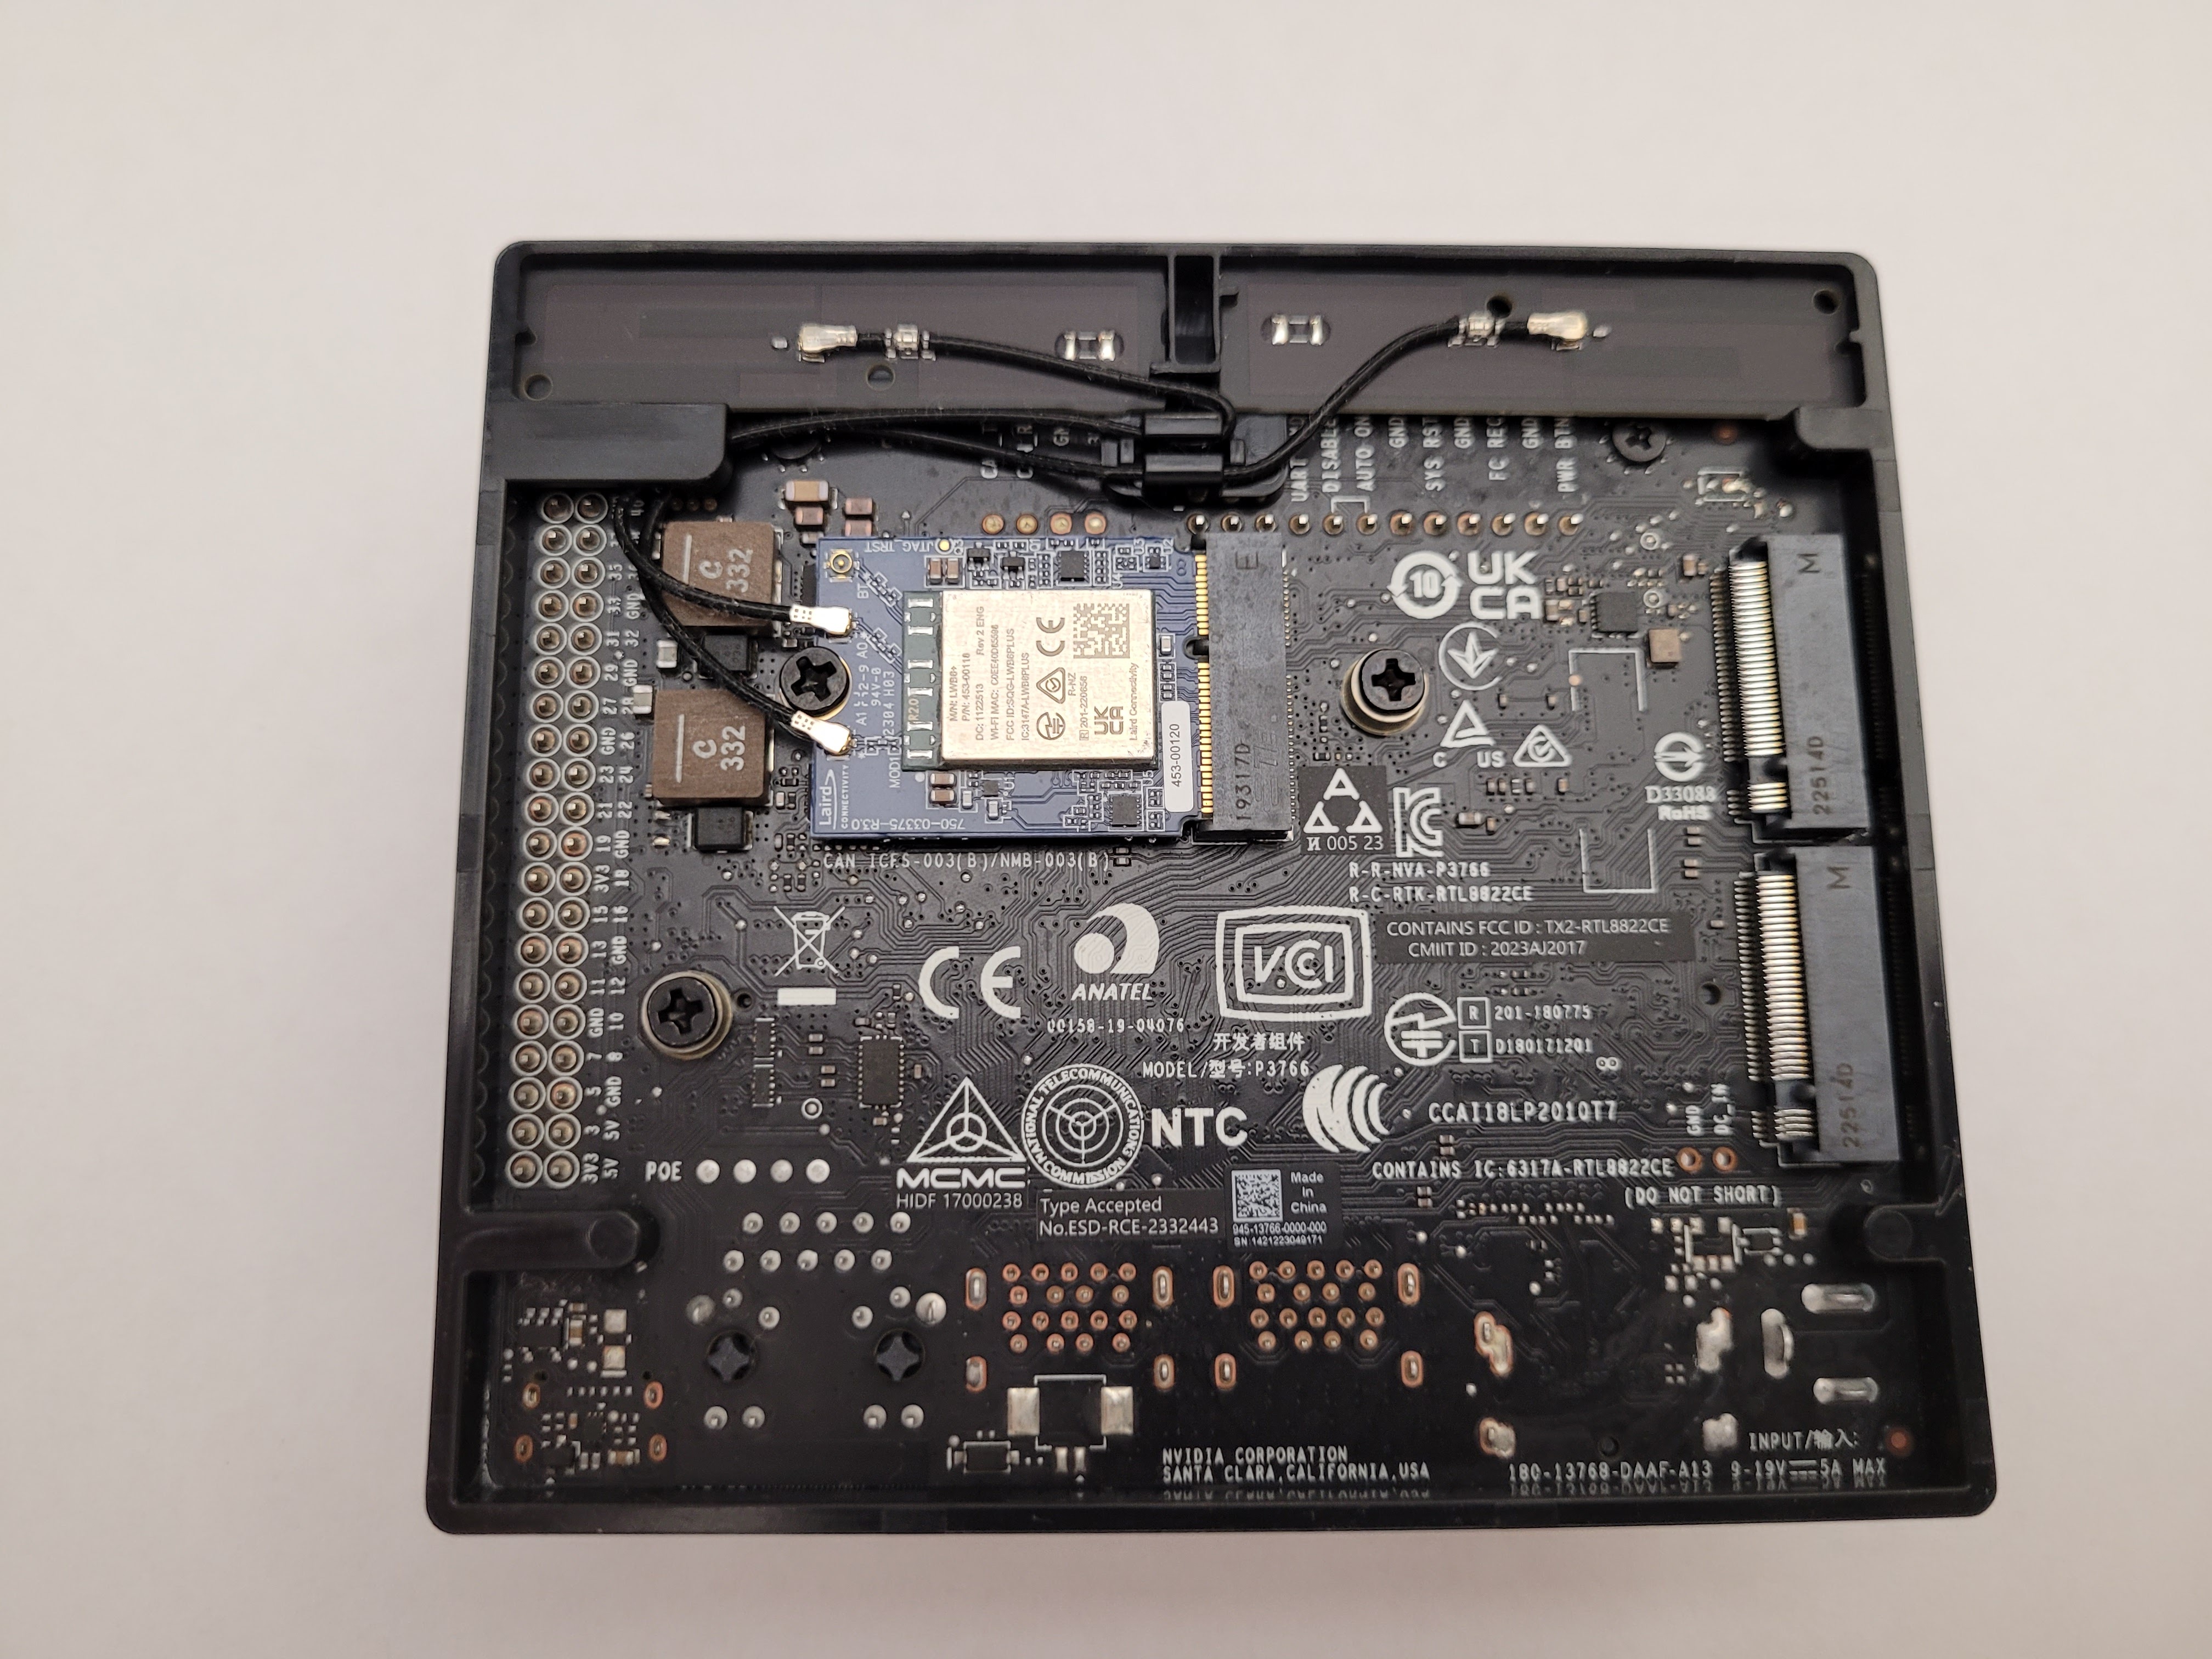
IMPORTANT: The IF573 requires a tri-band antenna, while the Jetson Carrier Board antenna is dual band. Also, an additional antenna must be added for Bluetooth.
-
FlexMIMO 6E EFD2471A3S-10MH4L PIFA MHF4L
https://www.ezurio.com/documentation/datasheet-flexmimo-6e Connects to A0 and A1 (WLAN) ports on the Sona™ IF573 M.2 Module on the DVK.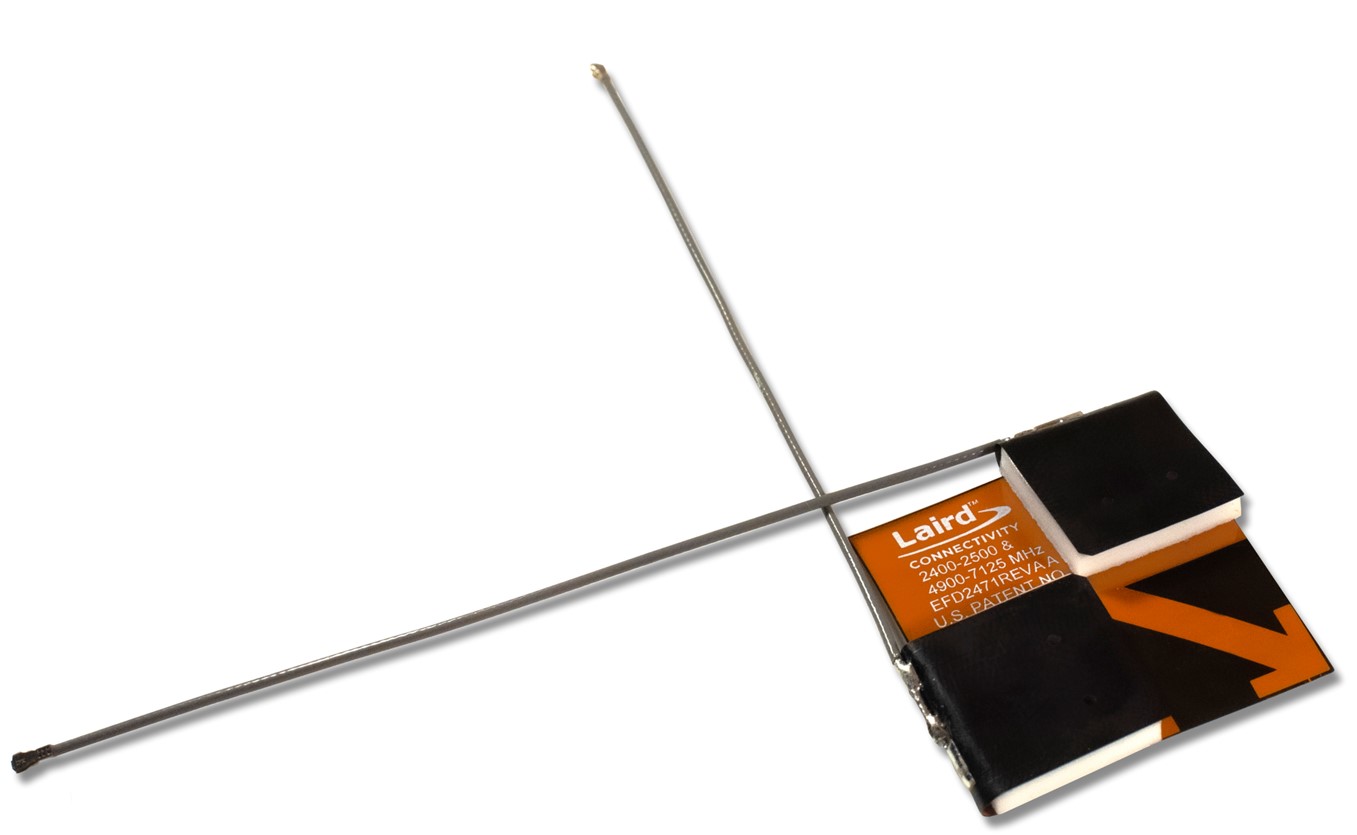
-
FlexPIFA 6E EFB2471A3S-10MH4L PIFA MHF4L
https://www.ezurio.com/documentation/datasheet-flexpifa-6e Connects to BT (Bluetooth™) port on the Sona™ IF573 M.2 Module on the DVK.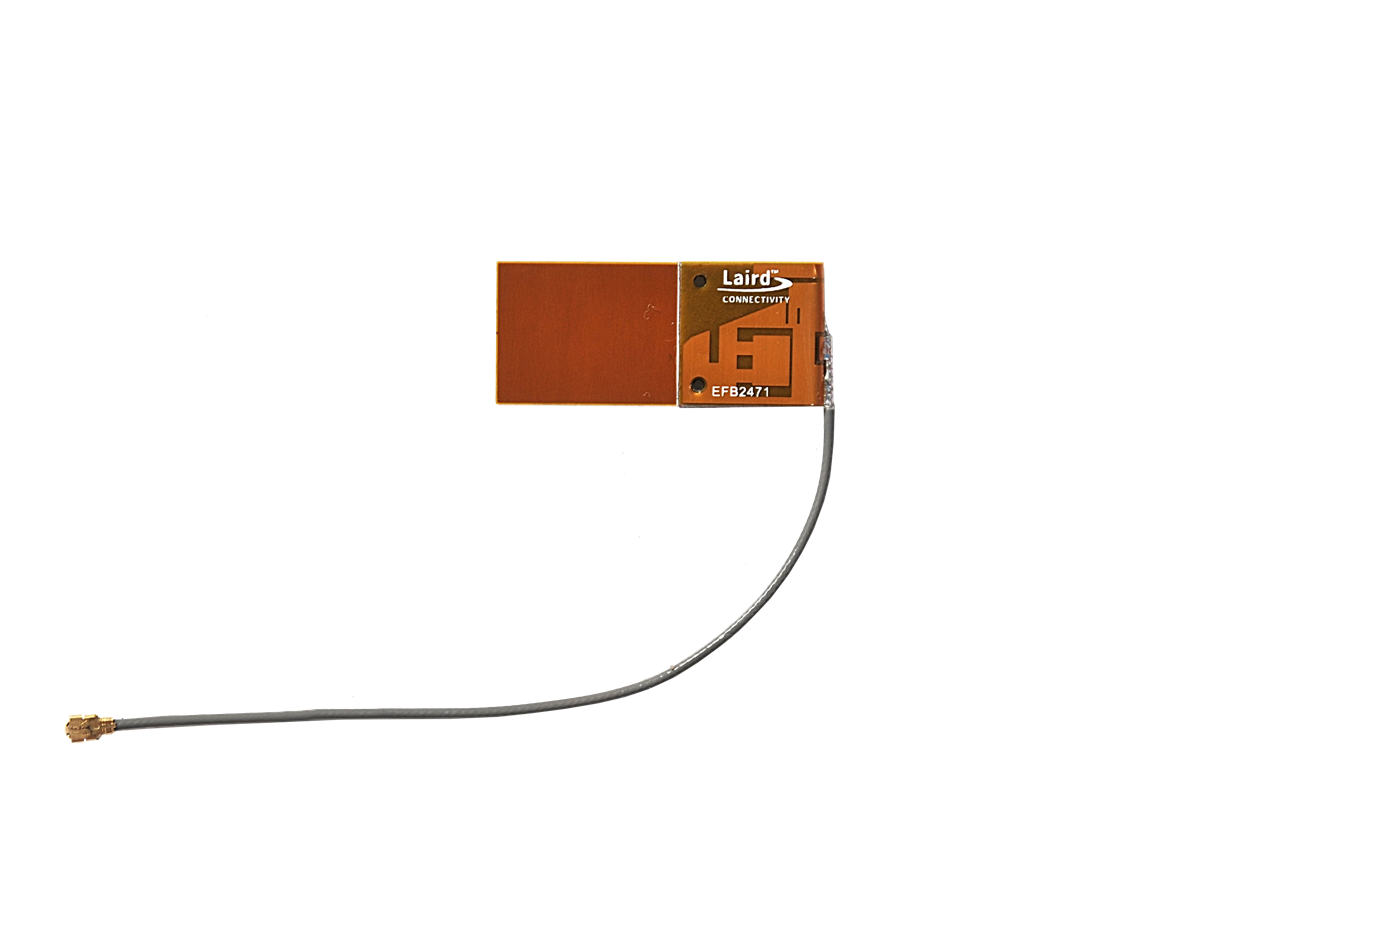
IMPORTANT NOTES:
-
The host computer, or build server, must have Ubuntu 18.04 or 20.04
-
On the Jetson Orin Nano the SDIO feature is not supported in software. For WiFi/Bluetooth use cases, recommendation is to use PCIe. https://docs.nvidia.com/jetson/archives/r35.4.1/DeveloperGuide/text/SO/JetsonOrinSeries.html#not-supported-features
-
The Sona IF573 software version used in this guide is version 11.0.0.138
Toolchain = Aarch64 gcc-9.3-glibc-2.31
Linux Kernel = Version 5.10.120
Bootloader Notes
Release Notes for Jetpack r35.4.1
1. Register for a NVIDIA developer account
2. Install essential host packages (Copy and paste as a whole block)
sudo apt install gawk wget git diffstat unzip texinfo gcc build-essential \
chrpath socat cpio python3 python3-pip python3-pexpect xz-utils debianutils \
iputils-ping python3-git python3-jinja2 libegl1-mesa libsdl1.2-dev python3-subunit \
mesa-common-dev zstd liblz4-tool file locales flex screen libncurses-dev \
perl-modules imagemagick graphviz dvipng latexmk librsvg2-bin texlive-lang-chinese \
texlive-xetex libtest-pod-perl python3-sphinx libssl-dev libelf-dev bison \
libnl-3-dev libdbus-1-dev
3. Install the NVIDIA sdkmanager
Note: sdkmanager can be installed graphically or via the command line. Command line installation information can be found here: https://docs.nvidia.com/sdk-manager/sdkm-command-line-install/index.html
cd ${HOME}/Downloads
wget https://developer.nvidia.com/downloads/sdkmanager/secure/clients/sdkmanager-2.0.0.11402/sdkmanager_2.0.0-11402_amd64.deb
sudo apt install ./sdkmanager_2.0.0-11402_amd64.deb
sdkmanager --cli
Note: If the host machine has a UI you can skip the Command Line Setup and launch sdkmanager from the UI if prefered.
Follow the NVIDIA guide to flash the Jetson with a default image from the sdkmanager.
Important: INitial flashing with the demo image is required to program the EEPROM with the bootloader data.
4. Get the Cross Compilation Toolchain
sudo mkdir /opt/gcc-9.3-glibc-2.31
cd /opt/gcc-9.3-glibc-2.31
sudo wget -O gcc-9.3-glibc-2.31.tar.gz https://developer.nvidia.com/embedded/jetson-linux/bootlin-toolchain-gcc-93
sudo tar -xzvf gcc-9.3-glibc-2.31.tar.gz -C ./
5. Source environment variables.
Note: These environment variables must be sourced each time a new terminal in opened while following this guide. (Copy and paste as a whole block)
export LAIRD_RELEASE=11.0.0.138 ; \
export L4T_JETPACK_VER=JetPack_5.1.2_Linux_JETSON_ORIN_NANO_TARGETS ; \
export L4T_NAME=jetson ; \
export L4T_BRANCH=35 ; \
export L4T_MAJOR=4 ; \
export L4T_MINOR=1 ; \
export L4T_VERSION="${L4T_BRANCH}.${L4T_MAJOR}.${L4T_MINOR}" ; \
export L4T_RELEASE_TAG="${L4T_NAME}_${L4T_VERSION}" ; \
export L4T_KERNEL_DIR=kernel-5.10/ ; \
export L4T_KERNEL_VER=5.10.120 ; \
export L4T_KERNEL_VER_SUFFIX=-tegra ; \
export L4T_TOOLCHAIN_PREFIX=/opt/gcc-9.3-glibc-2.31/bin/aarch64-buildroot-linux-gnu- ; \
export L4T_JETPACK_HOME="${HOME}/nvidia/nvidia_sdk/${L4T_JETPACK_VER}/Linux_for_Tegra" ; \
export L4T_KSRC_DIR="${L4T_JETPACK_HOME}/sources/kernel" ; \
export L4T_KBUILD_DIR_OUT="${L4T_KSRC_DIR}/build" ; \
export L4T_KMODULES_DIR_OUT="${L4T_KSRC_DIR}/modules" ; \
export ARCH=arm64 ; \
export CROSS_COMPILE=${L4T_TOOLCHAIN_PREFIX}
6. Get the Kernel Source and Apply NVIDIA Binaries
cd ${L4T_JETPACK_HOME}
./source_sync.sh -t ${L4T_RELEASE_TAG}
sudo ./apply_binaries.sh
7. (Optional) Backup a Copy of Synced Sources
Note: Backing up a fresh copy of the source is useful if the build needs to be restarted. This is optional and not required.
cd ../..
sudo cp -ra ./JetPack_5.1.2_Linux_JETSON_ORIN_NANO_TARGETS ./JetPack_5.1.2_Linux_JETSON_ORIN_NANO_TARGETS.SOURCE_SYNCED
8. Compile Kernel
cd ${L4T_KSRC_DIR}
make -C ${L4T_KERNEL_DIR}/ ARCH=arm64 mrproper
make -C ${L4T_KERNEL_DIR}/ ARCH=arm64 O=${L4T_KBUILD_DIR_OUT} LOCALVERSION=-tegra CROSS_COMPILE=${L4T_TOOLCHAIN_PREFIX} tegra_defconfig
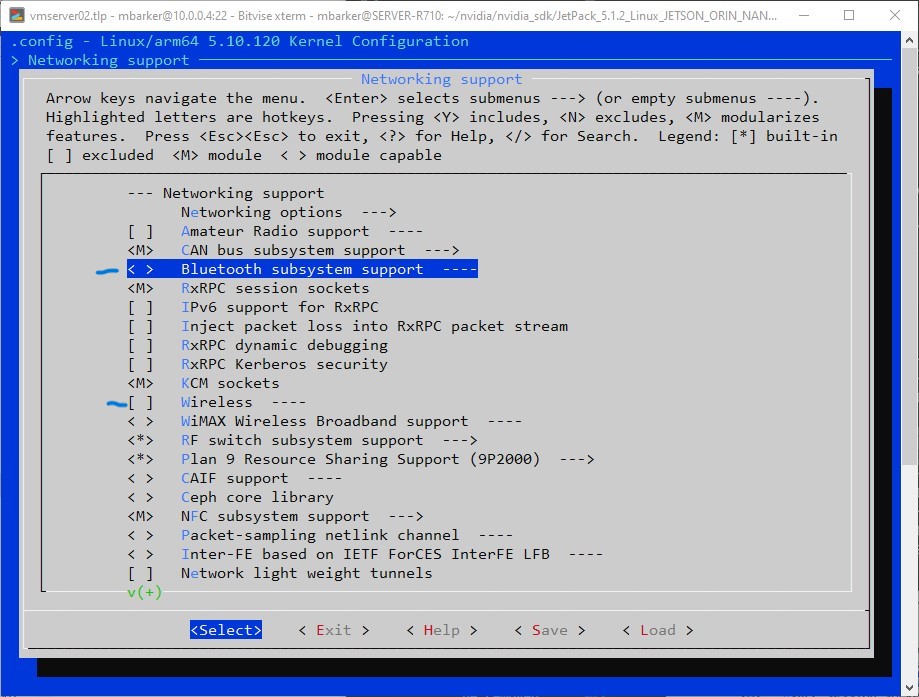
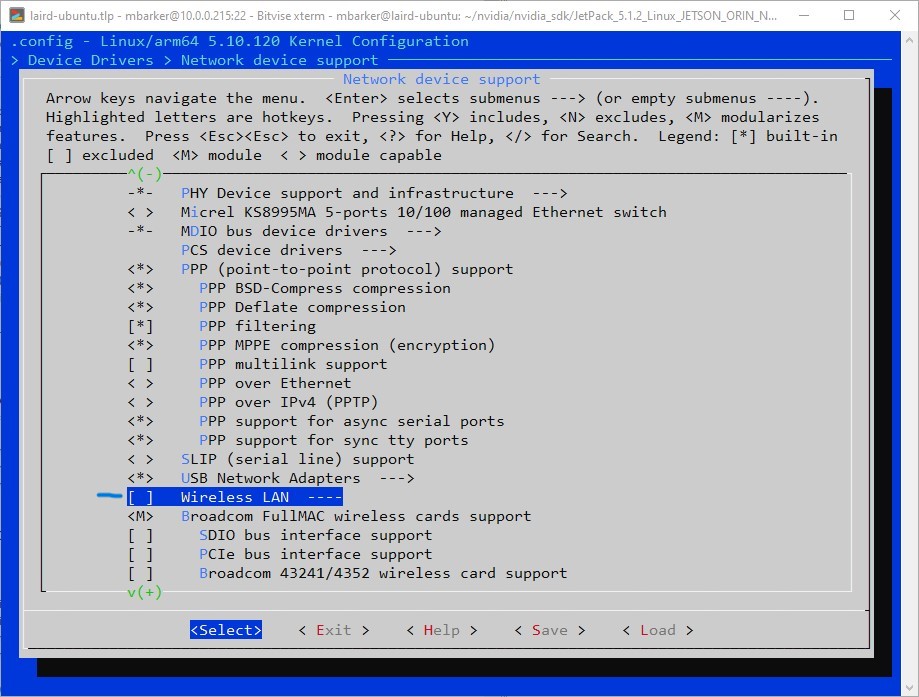
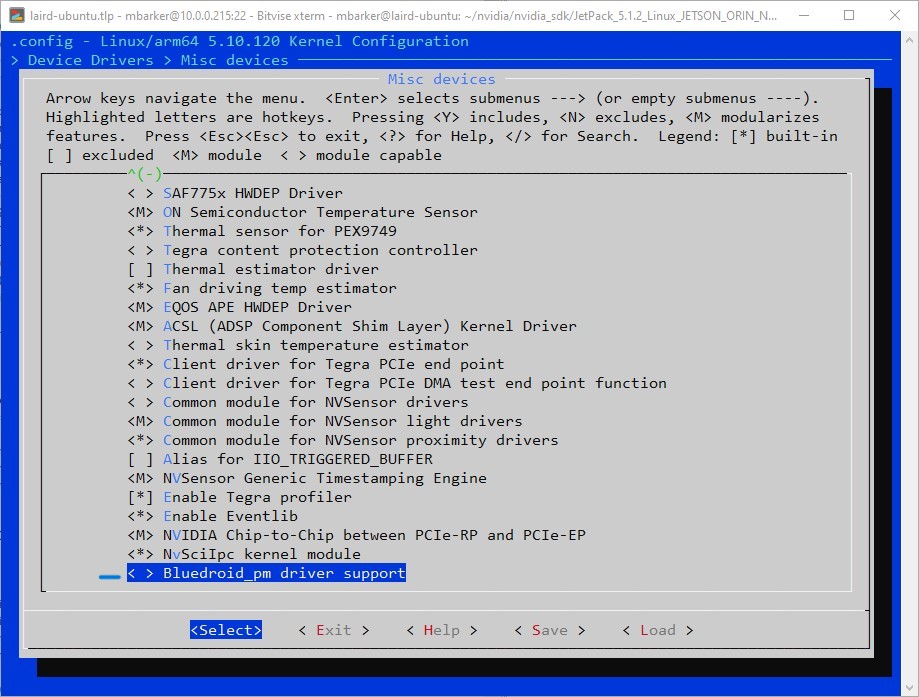
make -C ${L4T_KERNEL_DIR}/ ARCH=arm64 O=${L4T_KBUILD_DIR_OUT} LOCALVERSION=-tegra CROSS_COMPILE=${L4T_TOOLCHAIN_PREFIX} menuconfigImportant: In the menuconfig the following items need to be removed:
- deselect Device Drivers -> Network device support -> Wireless LAN
- deselect Device Drivers -> Misc drivers -> Bluedroid_pm driver support
- deselect Networking support -> Bluetooth subsystem support
- deselect Networking support -> Wireless
make -C ${L4T_KERNEL_DIR}/ ARCH=arm64 O=${L4T_KBUILD_DIR_OUT} LOCALVERSION=-tegra CROSS_COMPILE=${L4T_TOOLCHAIN_PREFIX} -j8
make -C ${L4T_KERNEL_DIR}/ ARCH=arm64 O=${L4T_KBUILD_DIR_OUT} LOCALVERSION=-tegra CROSS_COMPILE=${L4T_TOOLCHAIN_PREFIX} INSTALL_MOD_PATH=${L4T_KMODULES_DIR_OUT} modules_install
9. Copy kernel to nvidia sdk manager directory
cd ${L4T_KBUILD_DIR_OUT}/arch/arm64/boot
cp -r * ${L4T_JETPACK_HOME}/kernel/
10. Delete old kernel modules in Nvidia SDK Manager directory (kernel)
cd ${L4T_JETPACK_HOME}/rootfs/usr/lib/modules/${L4T_KERNEL_VER}${L4T_KERNEL_VER_SUFFIX}/kernel
sudo rm -rf *
11. Copy kernel modules from build over to Nvidia SDK Manager directory (rootfs)
cd ${L4T_KMODULES_DIR_OUT}
sudo cp -r * ${L4T_JETPACK_HOME}/rootfs/usr
cd ${L4T_JETPACK_HOME}/rootfs/usr/lib/modules
sudo ln -s ${L4T_KERNEL_VER}${L4T_KERNEL_VER_SUFFIX}/ ${L4T_KERNEL_VER}
In the IF573 software package find the backports and the IF573 firmware and copy these archives into $L4T_KSRC_DIR directory.
backports-laird-11.0.0.138.tar.bz2
laird-if573-pcie-firmware-11.0.0.138.tar.bz2
summit_supplicant-src-11.0.0.138.tar.gz
12. Extract the IF573 PCIe firmware to the Nvidia SDK Manager rootfs directory (${L4T_JETPACK_HOME}/rootfs/)
cd $L4T_KSRC_DIR
sudo tar xvf laird-if573-pcie-firmware-${LAIRD_RELEASE}.tar.bz2 -C ${L4T_JETPACK_HOME}/rootfs/
Note: This will extract the following files:
lib/firmware/brcm/CYW55560A1.hcd
lib/firmware/cypress/CYW55560A1_v001.002.087.0225.0065.hcd
lib/firmware/cypress/cyfmac55572-pcie.trxse
lib/firmware/cypress/cyfmac55572-pcie-prod_v18.53.212.28.trxse
lib/firmware/cypress/cyfmac55572-pcie.txt
lib/firmware/cypress/cyfmac55572-if573.txt
lib/firmware/cypress/cyfmac55572-if573_v20231020.clm_blob
lib/firmware/cypress/cyfmac55572-pcie.clm_blob
LICENSE
13. Extract the Backports and the WPA Supplicant
tar xvf backports-laird-${LAIRD_RELEASE}.tar.bz2
tar xvf summit_supplicant-src-${LAIRD_RELEASE}.tar.gz
14. Compile the Backports and the WPA Supplicant
cd $L4T_KSRC_DIR/laird-backport-${LAIRD_RELEASE}
export KLIB_BUILD="${L4T_KBUILD_DIR_OUT}"
export KLIB="${L4T_KMODULES_DIR_OUT}"
make ARCH=arm64 CROSS_COMPILE=${L4T_TOOLCHAIN_PREFIX} defconfig-lwb
make ARCH=arm64 CROSS_COMPILE=${L4T_TOOLCHAIN_PREFIX} -j8
15. Find the backport modules and tar and extract to Nvidia SDK Manager directory
find . -name *.ko -print0 | tar -cvf laird_modules.tar --null -T -
sudo mkdir ${L4T_JETPACK_HOME}/rootfs/lib/modules/${L4T_KERNEL_VER}/updates
sudo tar xvf laird_modules.tar -C ${L4T_JETPACK_HOME}/rootfs/lib/modules/${L4T_KERNEL_VER}/updates
Note: These are the files that will be extracted:
./compat/compat.ko
./drivers/bluetooth/btbcm.ko
./drivers/bluetooth/btusb.ko
./drivers/bluetooth/hci_uart.ko
./drivers/net/wireless/broadcom/brcm80211/brcmfmac/brcmfmac.ko
./drivers/net/wireless/broadcom/brcm80211/brcmutil/brcmutil.ko
./net/bluetooth/hidp/hidp.ko
./net/bluetooth/bluetooth.ko
./net/bluetooth/bnep/bnep.ko
./net/bluetooth/rfcomm/rfcomm.ko
./net/wireless/cfg80211.ko
16. Create User and Create a SD Card Image
cd ${L4T_JETPACK_HOME}Optional - Create a username and password
Note: This will create an image with the user ezurio and the password connect.
sudo ./tools/l4t_create_default_user.sh -u ezurio -p connect -a -n jetson-orin --accept-licenseCreate the SD Card Image
sudo ./tools/jetson-disk-image-creator.sh -o sd-jetson-if573_${LAIRD_RELEASE}.img -b jetson-orin-nano-devkit -d SDNote: Use Balena Etcher software to flash the image to an SD card.
Download Etcher here: https://etcher.balena.io/#download-etcher
17. Final Setup and Regulatory Domain Configuration on Jetson Nano
Login to the Jetson Nano
Note: If a user and password were not defined in step 16 there is a setup after flashing that is required to login, this is done with the graphical interface or via serial port console. This tutorial assumes the user knows this and how to finish setting up the Jetson Nano.
Option A - Module Parameter Configuration (Recommended for Development Purposes)
The Sona IF573 and Sterling LWBx radios support regulatory domain configuration using a brcmfmac module parameter. The module parameter is called 'regdomain', and it takes a country code string. The string must be one of the values listed as a Country Code in the per-radio regulatory release notes for the radio (or 'ETSI' for use in EU countries), and can only be used if the radio type in use supports that country. Module parameter configuration is the easiest to implement however it may not be secure from end user modification. Device tree configuration is preferred for a production system and will override the module parameter if both are present.
Important: The driver will fail to load unless the regulatory domain is configured properly.
# Sample contents of /etc/modprobe.d/brcmfmac.conf configured for operation in
#  the United States
options brcmfmac regdomain="US"
Note: The initial list of supported regulatory domains includes US, CA, AU, JP, ETSI
Option B - Device Tree Configuration (When Building a Production System)
The Sona IF573 and Sterling LWBx radios support regulatory domain configuration using the device tree. The configuration must be located in the device tree node corresponding to the Wi-Fi portion of the radio. The node path will vary based on host platform architecture. The node must contain the standard brcmfmac 'compatible' property. The regulatory domain is configured with a new property called 'laird,regdomain'. This property must be set to one of the values listed as a Country Code in the per-radio regulatory release notes for the radio (or 'ETSI' for use in EU countries). The string can only be used if the radio type in use supports that country. Device tree configuration is the preferred mechanism because it is secure against end user modification. Device tree configuration will override module parameter configuration if both are present.
# Sample device tree node for a PCIE/UART Sona IF573 module configured for
# operation in the United States
# Note that the compatible string must be "brcm,bcm4329-fmac"

&pcie {
    pcie@0 {
        reg = <0x0000 0 0 0 0>;
        #address-cells = <3>;
        #size-cells = <2>;

        brcmf_pcie: wifi@1 {
            reg = <0x000000 0 0 0 0>;
            compatible = "brcm,bcm4329-fmac";

            laird,regdomain = "US";
        };
    };
};
Run depmod
This will probe all the modules on the system and allow the new modules to be seen.
sudo depmod -a
sudo reboot