Getting Started with the Nitrogen95 EVK: Unboxing to Running in Under an Hour

A practical walkthrough for engineers evaluating the i.MX 95 platform

Published on April 28, 2026

Getting Started with the Nitrogen95 EVK: Unboxing to Running in Under an Hour

The Reality: “Quick Start” Usually Isn’t Quick

Most engineers have been through this before. You get a new evaluation kit in, block off an afternoon to bring it up, and end up spending that time figuring out power, chasing missing accessories, or digging through documentation just to get a boot prompt.

That’s usually where things slow down. Not because the silicon is difficult, but because the system around it isn’t fully put together.

With something like the NXP i.MX 95, that’s a problem. This is a platform designed for higher-end embedded systems like industrial HMIs, edge AI, vision-enabled devices, medical systems. If you’re evaluating it, you don’t want to spend your time on basic bring-up. You want to understand how the platform behaves in a real world scenario.

Ezurio’s Nitrogen95 SMARC Evaluation Kit is built for this. It’s not just showing the processor. It’s giving you a complete, working platform from the start including display, wireless, carrier board, and software.

Unboxing: What You Get Is a Full System, Not Just a Board

The first thing you notice is that this is not a barebones dev kit. You’re not opening a box and seeing a SOM and a reference carrier that still needs the system built around it.

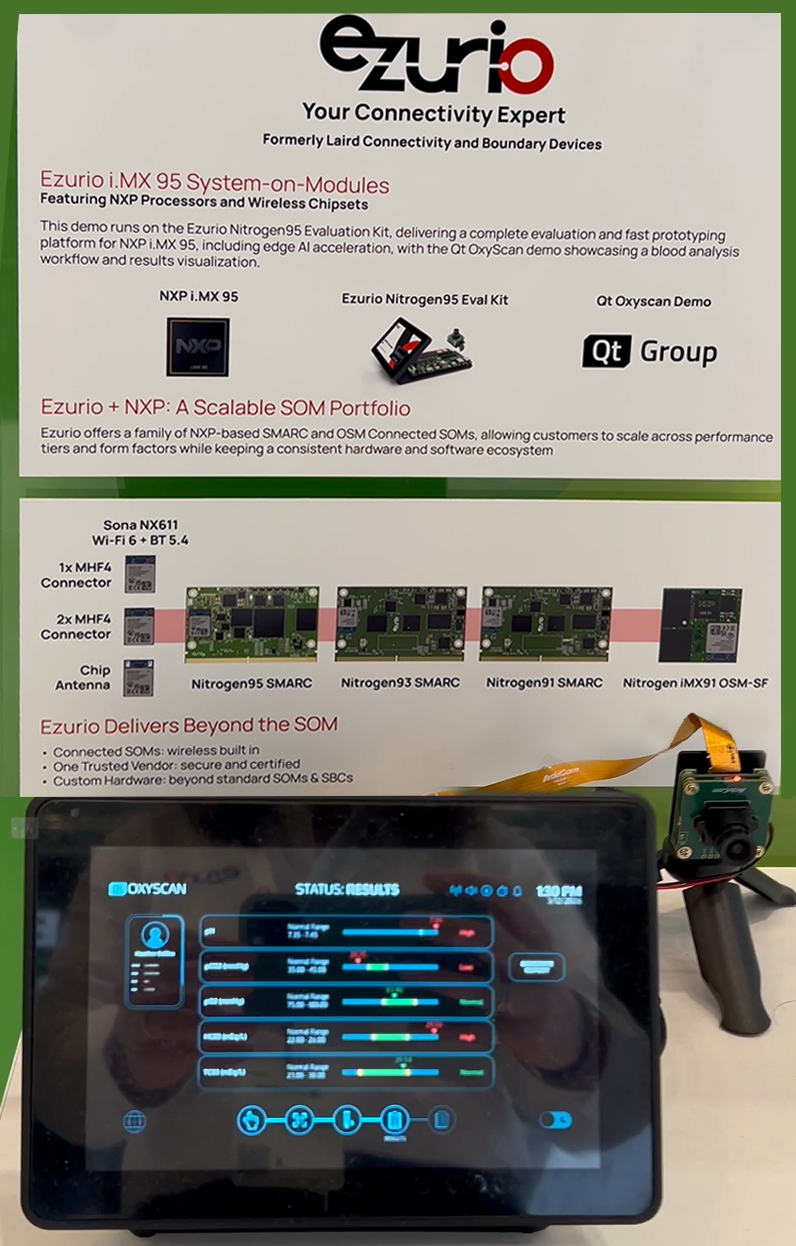
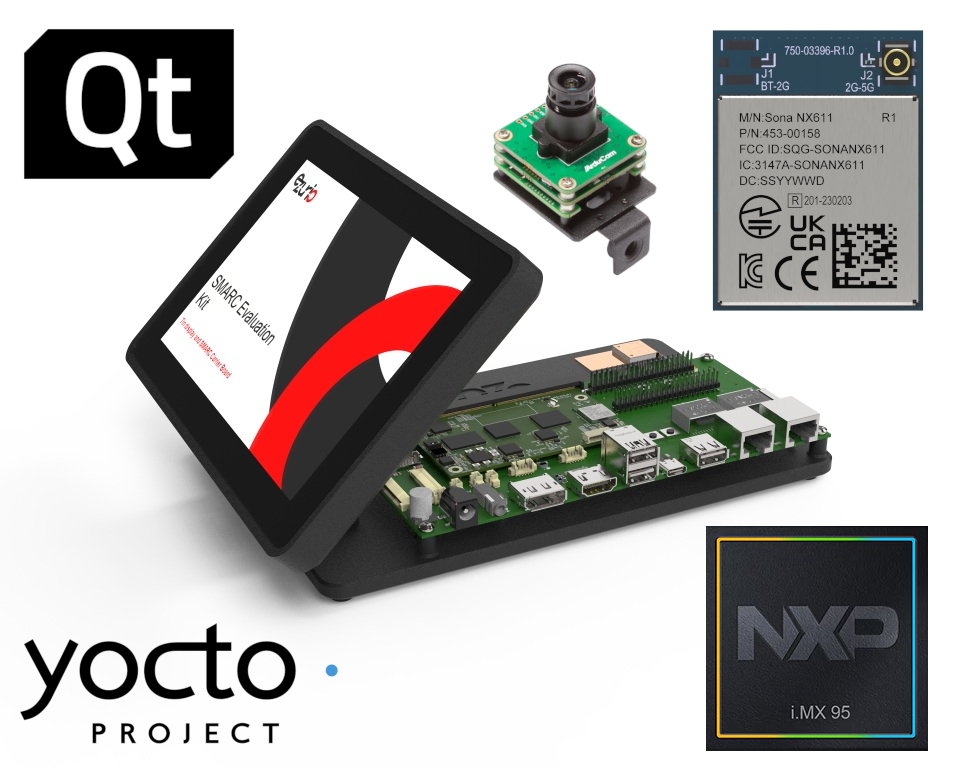
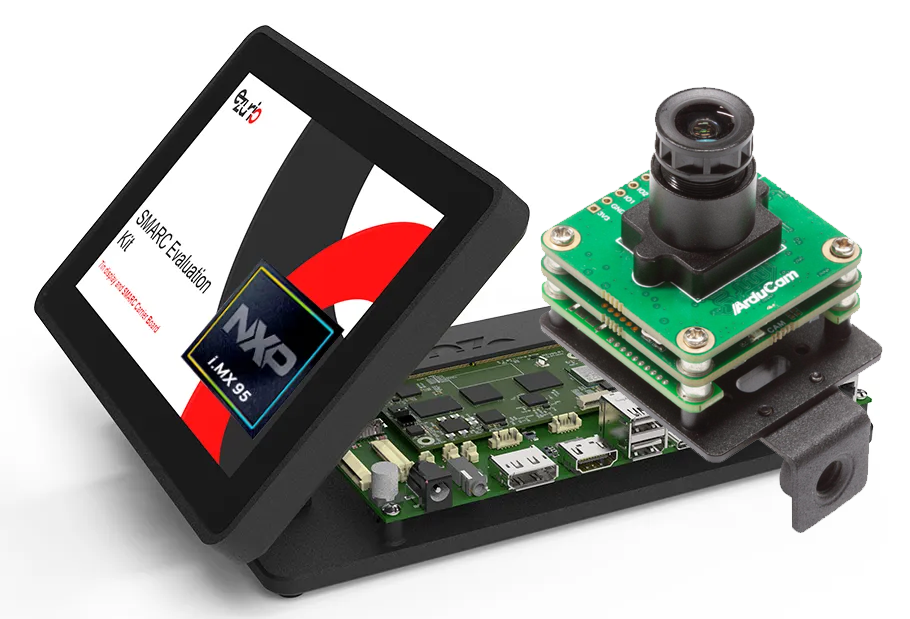
What you get is already much closer to an end product. The i.MX 95 processor, using Nitrogen95 SMARC module, is installed on the carrier board, the heatsink is mounted, and the 7-inch touchscreen is integrated into an enclosure with a stand. Even the wireless is already accounted for, with the Sona™ NX611 module providing Wi-Fi 6 + Bluetooth 5.4 as part of the system.

From a practical standpoint, that means you’re not making early decisions to get started. You don’t have to pick a display interface, figure out how to attach an antenna, or decide how to physically interact with the board. Those problems are already solved in a way that reflects how a real embedded product would be built.

This matters more than it seems. Early evaluation environments usually shape design decisions. When you start with a complete system, you’re evaluating the platform in a context that actually resembles your end application, whether that’s an HMI, a gateway, or a vision-enabled device.

Read about our Nitrogen95 EVK at Embedded World showcasing a live Qt demo using this exact kit!

Nitrogen 95 SMARC EVK Demo - NXP EW 20261.png

Minimal Assembly by Design

There’s very little to do before powering the system on. The SOM, carrier board, display, and enclosure are already assembled. The display is connected over MIPI-DSI, the heatsink is attached, and the mechanical setup can sit on a desk and be used immediately. You can adjust the screen angle like a small, embedded panel, which sounds simple, but makes a difference when you’re interacting with it for more than a few minutes.

At this stage, the only real checks are basic ones. You want to confirm that the antenna connection is secure if you plan to use wireless, and if you’re working with the camera, you’ll connect it to the CSI interface and provide power through the carrier board. Beyond that, there’s no configuration required to reach a usable state. 

From Plug-In to Linux in Seconds

Once powered, the system boots directly from eMMC. There’s no need to flash an image or prepare external media unless you specifically want to.

The Nitrogen95 EVK ships with U-Boot and a Yocto-based Boot to Qt image already installed. That combination gives you a bootloader, a Linux environment, and a working application layer from the start. The boot process is quick, usually under 30 seconds, and you get immediate visuals on the display.

You’ll see the standard Linux boot indicators followed by the Ezurio boot animation, and then the system transitions into the Boot to Qt Demo Launcher. At that point, you’re no longer in “bring-up mode.” You’re interacting with a running system.

This is one of the more important differences compared to lower-level evaluation setups. You’re not validating whether Linux boots. You’re validating how the platform behaves as a complete embedded system, including graphics, input, and application runtime.

To learn more, visit our Quick Start Guide: Nitrogen95 SMARC Beta Evaluation Kit

nitrogen95-smarc-dvk.png

A Working System & Display Out of the Box

Once the system is up, the touchscreen becomes the primary way of interaction. The Boot to Qt includes a set of demo applications that are useful for more than demonstration. They give you a quick read on responsiveness, rendering performance, and overall system behavior.

You can move through different UI examples, interact with touch elements, and see how the system handles basic workloads. This gives you an immediate sense of how the platform is for HMI-driven applications.

More importantly, this happens without any setup on your side. You’re not compiling code or deploying an application just to see something on the screen. The system is already in a state where it can be evaluated as a user-facing device.

At this point, you’ve effectively gone from unboxing to a running Linux-based application environment in a matter of minutes.

Access and Debug

Once you move past the UI, the next step is accessing the system directly. The Nitrogen95 EVK gives you multiple paths, depending on how you prefer to work. Ethernet is the simplest. The board acts as a DHCP client, so once it’s connected to a network, it will obtain an IP address automatically. SSH is enabled by default, which means you can log in and start working in a Linux shell immediately.

For deeper visibility, the serial console provides access to boot logs and low-level debug output. Using the included serial cable and standard terminal settings, you can watch the full boot process, interact with U-Boot, and troubleshoot at a lower level if needed.

What’s important here is that none of this requires extra setup. Networking, SSH, and system services are already configured and running. 

What You Actually Validate in the First Hour

The value of a setup like this is how quickly it answers real questions. Within the first hour, you can confirm that the system boots reliably, that the display and input stack are working, and that you can access the platform over both network and serial interfaces. You can inspect system information, check CPU and memory usage, and verify that services are running as expected.

You’re also evaluating the broader capabilities of the i.MX 95 platform. This includes the multi-core Cortex-A55 application processing, the real-time cores, the graphics, and the ability to support advanced features like camera input and AI acceleration.

Because this is running on a full SMARC-based system, you’re also getting a sense of how this could translate into a production design. The carrier board has the interfaces you would expect, like Ethernet, USB, CAN, SPI, I2C, and more, so you can start thinking about integration early.

Final Take

With the Nitrogen95 EVK, the path from unboxing to a fully operational system is straightforward because the integration work is already done. The hardware is assembled, the software is installed, and the interfaces are ready to use.

That allows you to focus on what actually matters: understanding how the i.MX 95 performs in your application, how it handles your workloads, and whether it gives you the headroom you need for what comes next.


Nitrogen95 SMARC SOM

  • i.MX 95 Processor
  • NX611 Wi-Fi 6 + BT 5.4
  • NXP PF09 PMIC & PF53 Regulator
  • 2 Eval Kits: With / Without Camera
N959_6_SMARCwith NX611 - front connector removed_4.png


Nitrogen95 Eval Kit

  • Ready & Complete Kit: Display, SOM, Carrier Board, Antenna, Cables
  • i.MX 95 SOM (Nitrogen95 SMARC)
  • Pre-certified & integrated Wi-Fi 6 / 6E
  • 2 Kit Variations: With or Without 4K Camera
Nitrogen95 EVK with Camera