/filters:background_color(white)/2025-02/Nitrogen%2093%20NX611%20front-1port.png)
BSP Features Summary
EZ BSP is a software platform for Ezurio System-on-Modules (SOMs). It provides a security-first Linux stack based on Buildroot and Yocto Project, validated and supported for Ezurio hardware. The platform includes tooling, documentation, and reference examples to accelerate integration while maintaining reproducibility and hardening baselines.
- Security-first BSP for Ezurio SOMs (U-Boot, kernel, rootfs, middleware)
- Beyond vendor BSP: adds hardening, update, and provisioning workflows
- Builds with Buildroot and Yocto Project; open-source, industry-standard toolchains
- Validated on Ezurio hardware; supported with developer docs, tools, and reference images
BSP Components
Bootloader (U-Boot)
U-Boot is the bootloader used by EZ BSP to initialize hardware and load the Linux kernel. It is the first software component to run in the Rich Execution Environment after the processor’s Secure ROM, and is responsible for loading and handing off execution to the kernel FIT image stored on non-volatile storage.
For details on how U-Boot is optionally secured as a signed and encrypted artifact, see the Security-Related Operations section.
Linux Kernel
EZ BSP ships a board-specific Linux kernel configured and validated for Ezurio SOM hardware. The kernel is delivered as a FIT (Flattened Image Tree) image and provides the foundation for all device drivers, filesystems, and user-space services.
For details on how the kernel is verified at boot and how it enforces file system integrity and encryption at runtime, see Linux Kernel under Trusted Execution Environment (TEE) Components in the Security Architecture chapter.
Root Filesystem
The root filesystem (rootfs) provides the base operating environment for EZ BSP, including the init system, system libraries, and core utilities. It is delivered as a read-only partition optionally secured with dm-verity to prevent tampering.
Device Drivers
EZ BSP includes the kernel drivers required to support Ezurio SOM peripherals, including wireless interfaces, storage controllers, display and GPIO subsystems, and any SOM-specific hardware blocks. Drivers are configured via the board-specific device tree and kernel configuration. Overlays and fragments can be added to support the customer’s host board hardware.
Middleware and Libraries
EZ BSP includes a set of middleware components and libraries that provide common services to customer applications, including networking stacks, cryptographic libraries, and the OP-TEE client API for interfacing with the Trusted Execution Environment.
For details on the TEE client libraries available to applications, see Trusted Execution Environment (TEE) Components in the Security Architecture chapter.
Getting Started
Requirements
Host requirements
For Buildroot-based EZ BSP:
- 100 GB free HDD space
For Yocto-based EZ BSP:
- 300 GB free HDD space
Build environment
EZ BSP supports building on the following systems:
- Ubuntu 22.04 LTS (Yocto)
- Ubuntu 24.04 LTS (Buildroot)
Pulling Sources With repo
Use manifest files with the Google repo tool to fetch all Yocto layers and related source trees needed for a build.Development Prerequisites
- Supported linux host with
git,python3, andcurlinstalled. - Access to GitHub repositories under
Ezurio(https://github.com/ezurio ) and any other remotes referenced by the manifest.
Initial Configuration
Installrepo (if not already installed):mkdir -p "$HOME/bin"
curl -fsSL https://storage.googleapis.com/git-repo-downloads/repo -o "$HOME/bin/repo"
chmod a+x "$HOME/bin/repo"
export PATH="$HOME/bin:$PATH"repo available in new shells, add this line to your shell profile (for example ~/.bashrc):export PATH="$HOME/bin:$PATH"Configure your Git identity (required by repo)
git config --global user.email "you@example.com"
git config --global user.name "Your Name"
Additional host packages
The following additional host packages may be required for EZ BSP; apt names given:
autoconf bash bc bison bsdmainutils build-essential bzip2 ca-certificates \
chrpath cmake coccinelle cpio diffstat dosfstools flex gawk gdisk \
gperf gzip help2man libncurses-dev libtool-bin locales lz4 \
make openssh-client patch perl python-is-python3 python3 rsync screen \
sed sudo tar texinfo unzip wget whois xxd zstd
Buildroot
See also the official Buildroot user manual.
Initialize a Workspace
Choose or create a workspace directory where all sources will be downloaded.
mkdir -p ~/work/imx93-smarc-buildroot
cd ~/work/imx93-smarc-buildroot
Run repo init against this manifest repository and file:
(See also https://github.com/Ezurio/Summit-SOM-Buildroot-Release-Packages/releases)
repo init \
  -u https://github.com/Ezurio/Summit-SOM-Buildroot-Release-Packages \
  -b master \
  -m som_13.134.0.17.xml
Sync All Sources
repo sync --no-clone-bundle --force-sync --pruneVerify
Afterrepo sync completes, your working directory should contain repos defined in the manifest:buildroot— Buildroot Projectsummit-radio-external— Ezurio Wi-Fi/Bluetooth connectivity layer (Summit supplicant, drivers, firmware)som-external— Ezurio SOM integration layer (board configuration - device trees; defconfigs, SOM support packages, security/update tooling)
Build the Target Image
make -C som-external nitrogen_imx93Build artifact location
~/work/imx93-smarc-buildroot/output/nitrogen_imx93/images/Flash SD card
Insert a micro SD card (µSD) into an SD card reader and attach it to your host PC.
Then execute the following:
cd ~/work/imx93-smarc-buildroot/output/nitrogen_imx93/images/
sudo ./mksdcard.sh [block device name, e.g. /dev/sdX, /dev/mmcblkX]
Always verify proper block device node for your SD card reader with lsblk or sudo dmesg. Improper device node could over-write operating system.
e.g.lsblk -o NAME,SIZE,VENDOR,MODEL,TRANA USB SD card reader and card may report in like manner to:
sda 58.3G SanDisk SDDR-C531 usbSee section “Boot SD card” for boot information, as well as “Flash onboard eMMC“ for onboard eMMC flashing instructions.
Yocto
See also the official Yocto Project (Walnascar) Documentation.
Initialize a Workspace
Choose or create a workspace directory where all sources will be downloaded.
mkdir -p ~/work/imx93-smarc-yocto
cd ~/work/imx93-smarc-yocto
Run repo init against this manifest repository and file:
(See also https://github.com/Ezurio/Summit-SOM-Yocto-Release-Packages)
repo init \
  -u https://github.com/Ezurio/Summit-SOM-Yocto-Release-Packages \
  -b refs/tags/SUMMIT-REL-6.16.0.20
  -m nitrogen_6.16.0.20.xml
Sync All Sources
repo sync --no-clone-bundle --force-sync --pruneVerify
Afterrepo sync completes, your working directory should contain a sources/ directory containing projects defined in the manifest, plus a setup script symlinked into the top level by the manifest:sources/poky— Yocto Project reference distribution (BitBake + core metadata)sources/meta-openembedded,sources/meta-arm,sources/meta-qt6— supporting layers- Silicon vendor BSP layers —
sources/meta-freescale*andsources/meta-imx(Nitrogen) sources/meta-summit-radio— Ezurio Wi-Fi/Bluetooth connectivity layer (Summit supplicant, drivers, firmware)sources/meta-summit-som— Ezurio SOM integration layer (machines, distros, images, security/update tooling)sources/meta-swupdate— update framework- A top-level
setup-environment-nxp(Nitrogen), used to create and configure a build directory
Setup Build Environment
Afterrepo sync completes, run the following from the workspace root:MACHINE=imx93-nitrogen-smarc DISTRO=summitsom-wayland . setup-environment-nxp buildbuild output directory.Optional - set distribution
The default distribution is summitsom-wayland. Note that for testing, a cmd image can successfully be built from the default distribution.
There are two standard options to change theDISTRO:local.conf:
In yourbuild/conf/local.conf file, add a line defining the DISTRO variable. For example:DISTRO = 'summitsom-cmd'On the command line:
When callingbitbake to build the image, define the DISTRO variable. For example:DISTRO="summitsom-cmd" bitbake image-summitsom-cmdEzurio reference distributions
| Name | Description |
|---|---|
| summitsom-cmd | command-line only; suitable for headless systems without graphical displays |
| summitsom-wayland | graphical interface (wayland) provided |
| summitsom-xwayland | graphical interface (wayland) provided, plus backwards compatibility for legacy X11 applications |
Build the Target Image
Several image recipe choices are provided by Ezurio.
Ezurio reference image recipes
| Name | Description | For use on |
|---|---|---|
| image-summitsom-cmd | command-line only image; suitable for headless systems without graphical displays | DVK |
| image-summitsom-devel | command-line only image with build essentials and 5G free space | DVK |
| image-summitsom-weston | graphical interface (Weston Terminal) provided | DVK |
| image-summitsom-com | for com-som’s, includes Summit Remote Control Manager REST management server | customer COM-SOM |
With the environment set up, build the image with:
bitbake image-summitsom-cmdBuild artifact location:
<build>/tmp/deploy/images/imx93-nitrogen-smarc/image-summitsom-cmd-imx93-nitrogen-smarc.swu
<build>/tmp/deploy/images/imx93-nitrogen-smarc/image-summitsom-cmd-imx93-nitrogen-smarc.wic.bz2
Build the Weston Image
To build the Weston (GUI) image, run:
bitbake image-summitsom-westonBuild artifacts:
<build>/tmp/deploy/images/imx93-nitrogen-smarc/image-summitsom-weston-imx93-nitrogen-smarc.swu
<build>/tmp/deploy/images/imx93-nitrogen-smarc/image-summitsom-weston-imx93-nitrogen-smarc.wic.bz2
Flash SD card
Insert a micro SD card (µSD) into an SD card reader and attach it to your host PC.
Then execute the following:
cd <build>/tmp/deploy/images/imx93-nitrogen-smarc/
sudo ./mksdcard.sh [block device name, e.g. /dev/sdX, /dev/mmcblkX]
Always verify proper block device node for your SD card reader with lsblk or sudo dmesg. Improper device node could over-write operating system.
e.g.lsblk -o NAME,SIZE,VENDOR,MODEL,TRANA USB SD card reader and card may report in like manner to:
sda 58.3G SanDisk SDDR-C531 usbBoot SD card
Insert the µSD card into the SMARC carrier board. See User Guide - Nitrogen93 SMARC | Ezurio For SD boot, adjust the boot switches as follows:
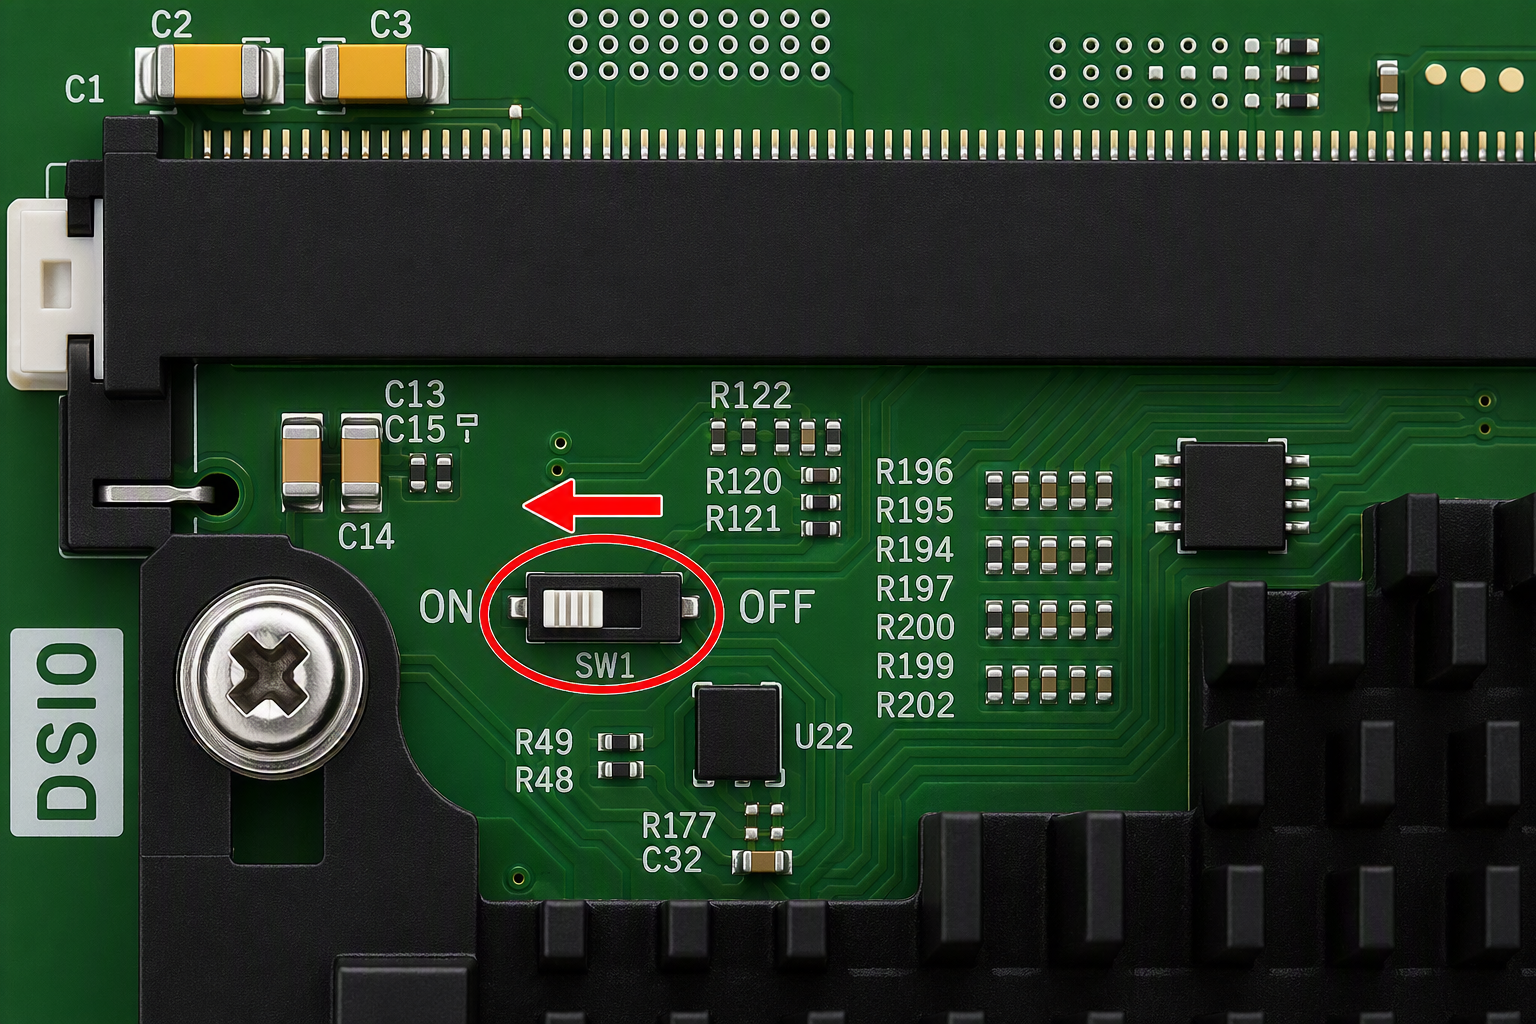
- Boot mode switches (reference designator S1) on SMARC carrier board switch 1 should be set to OFF. Switches 2-3 should be set to ON. (These instructions apply to SMARC carrier boards rev 20+. For older rev 10-R SMARC carrier, switch 1 must be set ON, and switches 2-3 OFF.) For location and description, see User Guide - Nitrogen93 SMARC | Ezurio .
SW1 on the N93 SMARC must be in the "ON" position.
- Connect the DB-9 RS-232 debug cable to a host PC and configure your terminal program parameters to 115200 baud, 8N1, and power on the board. See also Serial Console section from relevant board User Guide.
First Boot
Login Credentials
Username: root
Password: summit
First Boot Hardware Configuration
Upon first boot, you should configure the BSP with the correct attached hardware using the built-inset-mode script. For the Nitrogen93, this includes Wi-Fi radio and (optionally) a camera or touchscreen display if attached. Based on which module you have, enter the appropriate command below. Once configured, the SOM will automatically reboot and apply the new configuration.You can run the set-mode script without parameters to receive a list of available overlay settings.
set-modeWithout Display or Camera
set-mode wifi-nx6xxWith MIPI-DSI Display and Camera
set-mode wifi-nx6xx dsi0-7 csi0-ov5645Flash onboard eMMC
This step is optional if you would prefer to boot the system from onboard SOM eMMC, rather than SD card.
Push method is much more firewall friendly especially when working on WSL, requires no setup and as such is the preferred choice.
Push method:
IP is the ethernet address of the target. When using the USB ethernet gadget (CDC/NCM), the hard coded USB network IP is 10.10.3.1
- with BSD netcat:
nc -N -W 5 "${IP}" 9000 < <path>/nitrogen_imx93.swu- with GNU netcat:
nc -q 0 -w 5 "${IP}" 9000 < <path>/nitrogen_imx93.swuIn the case of push failure, verify swupdate service is running on the target:
systemctl status swupdate
* swupdate.service - SWUpdate daemon
     Loaded: loaded (/usr/lib/systemd/system/swupdate.service; disabled; preset: disabled)
     Active: active (running) since Thu 2025-05-29 17:49:24 UTC; 1 year 0 months ago
Pull method:
Start an HTTP server on the development PC, below is an example with python but any server could be used:
Buildrootcd output/nitrogen_imx93/images/ && python3 -m http.serverYocto
cd <build>/tmp/deploy/images/imx93-nitrogen-smarc/ && python3 -m http.serverDownload and apply the target image SWUpdate file (.swu) from the target board:
Buildrootfw_update http://[development.PC.IP.address]:8000/nitrogen_imx93.swuYocto
fw_update http://[development.PC.IP.address]:8000/image-summitsom-cmd-imx93-nitrogen-smarc.swu
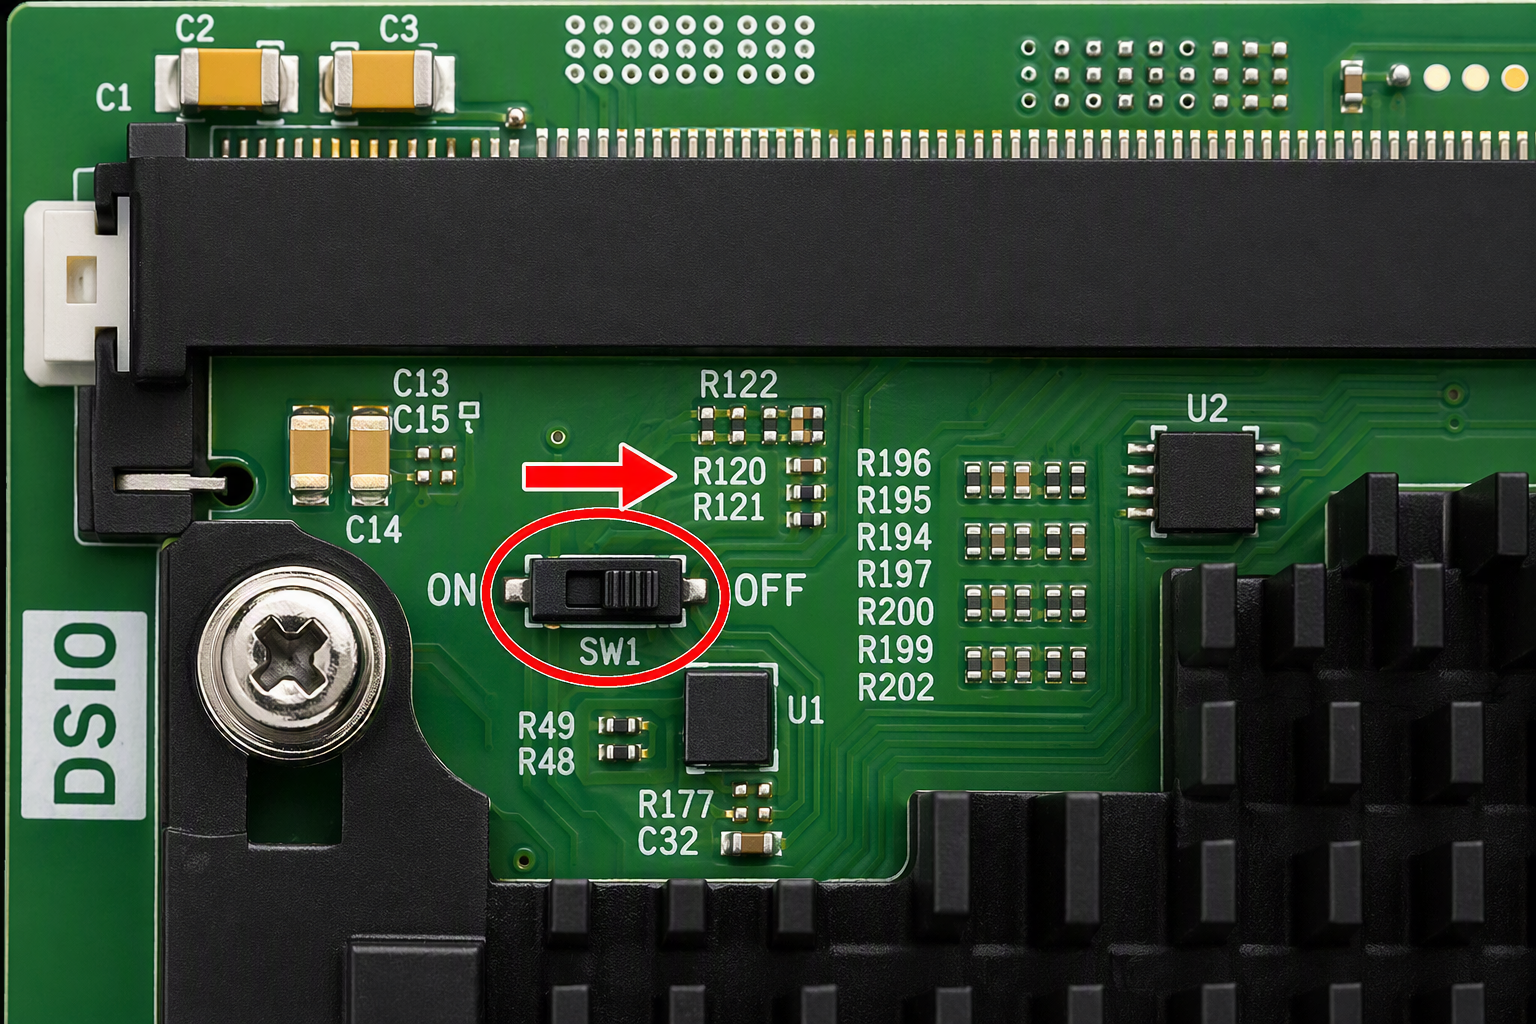
fw_update will indicate whether or not it succeeded. For other delivery options, see fw_update --help. In the case of success, reconfigure the SOM boot pins for onboard eMMC boot, and restart the SOM. Once running from onboard eMMC, this process may be repeated for subsequent updates, and automatic a/b side flashing will be employed.- See User Guide - Nitrogen93 SMARC | Ezurio. For eMMC boot, boot mode switches (reference designator S1 on SMARC carrier board) switch 1 should be set to OFF. Switches 2-3 should be set to ON. (These instructions apply to SMARC carrier boards rev 20+. For older rev 10-R SMARC carrier, switch 1 must be set ON, and switches 2-3 OFF.)
SW1 on the N93 SMARC must be in the "OFF" position.
Flash onboard eMMC via USB ROM boot
TBD - forthcoming Ezurio release will include support
Image Customization
Secure DISTROs
EZ BSP supports building high-security images via a set of DISTROs. For example:summitsom-cmd-securesummitsom-wayland-securesummitsom-xwayland-secure
There are two standard options to enable the secure image builds:
local.conf:
In yourbuild/conf/local.conf file, add a line defining the DISTRO variable. For example:DISTRO = 'summitsom-wayland-secure'On the command line:
When callingbitbake to build the image, define the DISTRO variable. For example:DISTRO="summitsom-wayland-secure" bitbake image-summitsom-cmdSigned Images
By default, secure EZ BSP images are signed with a set of dummy, example keys/certificates (see thekeys directory of meta-summit-som). You can specify a custom set of keys/certificates by re-defining the SIG_DATA_PATH variable. SIG_DATA_PATH is the path to the directory containing the SPSDK YAML configuration file (e.g., spsdk_ahab.yaml, see the SPSDK Configuration File section below for more info) and two sub-directories: crts and keys.crts: Contains image signing public certificates and fuse tables (generated by NXP’scstandsrktooltools)keys: Contains image signing private keys (generated by NXP’scsttool), the image signing private key password file, the firmware update signing key/certificate, and the kernel signing key/certificate
The EZ BSP expects a file/directory structure like:
<SIG_DATA_PATH>
├── crts
│   ├── CA/SRKx public certificates
│   ├── SRK_x_fuse.bin
│   └── SRK_x_table.bin
├── keys
│   ├── CA/SRKx private keys
│   ├── dev.crt
│   ├── dev.key
│   ├── key_pass.txt
│   ├── update_signing.crt
│   └── update_signing.key
└── spsdk_ahab.yaml
See the Generating Image Signing Keys/Certificates section below for a more information on how to create the expected file/directory structure.
There are three standard options to define theSIG_DATA_PATH variable when performing a build:Board-specific MACHINE configuration
The recommended project structure when working with Yocto and EZ BSP is to create a separate Yocto meta layer which contains all of the board-specific configurations necessary to support your custom carrier board on top of the Nitrogen93 SOM. Within such a layer, you will need to define aMACHINE configuration for your custom board (e.g., my-custom-board.conf, and within this configuration file, you can re-define the SIG_DATA_PATH variable:SIG_DATA_PATH = '/path/to/sig/data'local.conf:
In yourbuild/conf/local.conf file, add a line defining the SIG_DATA_PATH variable. For example:SIG_DATA_PATH = '/path/to/sig/data'On the command line:
When callingbitbake to build the image, define the SIG_DATA_PATH variable. For example:SIG_DATA_PATH="/path/to/sig/data" bitbake image-summitsom-cmdDISTRO enables and enforces the use of signed firmware updates. Firmware Update Signing Key/Certificate
The EZ BSP build scripts expect the firmware update signing key and certificate to be namedupdate_signing.key|.crt and to be located in the SIG_DATA_PATH/keys directory:<SIG_DATA_PATH>/keys
├── update_signing.crt
└── update_signing.keyThe firmware update signing key and certificate can be generated using OpenSSL. For example:
openssl genrsa -out update_signing.key 2048
openssl req -batch -new -x509 -days 7300 -key update_signing.key -out update_signing.crtupdate_signing.key key to sign the SWUpdate .swu update file (the default EZ BSP build output) and copy update_signing.crt certificate to the root filesystem of the resulting image. Then, in the field, when a firmware update is initiated, SWUpdate verifies the provided .swu file against the update_signing.crt certificate and will not apply the update if the verification fails.Kernel Signing Key/Certificate
The EZ BSP build scripts expect the kernel signing key and certificate to be nameddev.key|.crt and to be located in the SIG_DATA_PATH/keys directory:<SIG_DATA_PATH>/keys
├── dev.crt
└── dev.keyThe kernel signing key and certificate can be generated using OpenSSL. For example:
openssl genrsa -out dev.key 2048
openssl req -batch -new -x509 -days 7300 -key dev.key -out dev.crtdev.key key to sign the kernel FIT image and embed the public key from the dev.crt certificate into the U-Boot device tree. As part of the boot process, U-Boot verifies the kernel FIT image against this public key and will not jump to it if the verification fails.Generating Image Signing Keys/Certificates
Generating image signing keys and certificates is a process governed by NXP is covered extensively by the Code Signing Tool (CST), a tool which requires authenticated access and an NDA with NXP. Please contact NXP for more information on the CST and generating image signing keys/certificates (SRKs).
The EZ BSP build scripts expect the image signing keys/certificates to be arranged following the default structured used by the CST.
SPSDK Configuration File
AHAB-based NXP processors, like the i.MX 93-based Nitrogen93, utilize the NXP Secure Provisioning SDK (SPSDK) to generate signed images. The SPSDK uses a YAML configuration file to control the image signing process. This includes defining the processor family, which key is used to sign the image, which public certificate hashes (SRKs) to include, etc. The default Nitrogen93 EZ BSP uses a demonstration configuration file frommeta-summit-som; however, please refer to the SPSDK documentation for a complete explanation of all available configuration options.Security Architecture
Security Components Overview
To enable the desired security of the EZ BSP, several hardware and software components are used. These components are described in this section, along with the security exploits they are intended to prevent.
The following diagram depicts the major components related to security, and their interactions.
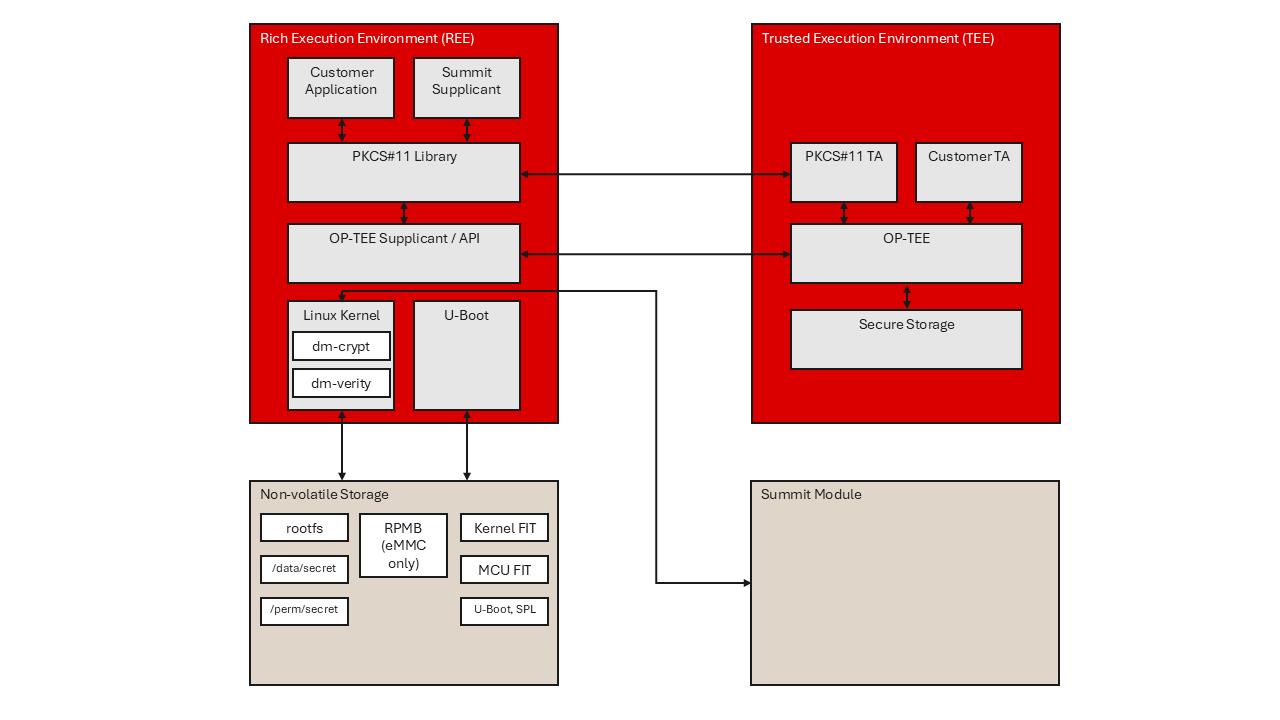
Hardware Components
Non-Volatile Storage
Non-volatile storage is the embedded flash memory on a Summit module. This can be either eMMC or, in some cases, NAND. By default, the non-volatile storage is partitioned according to the following layout:
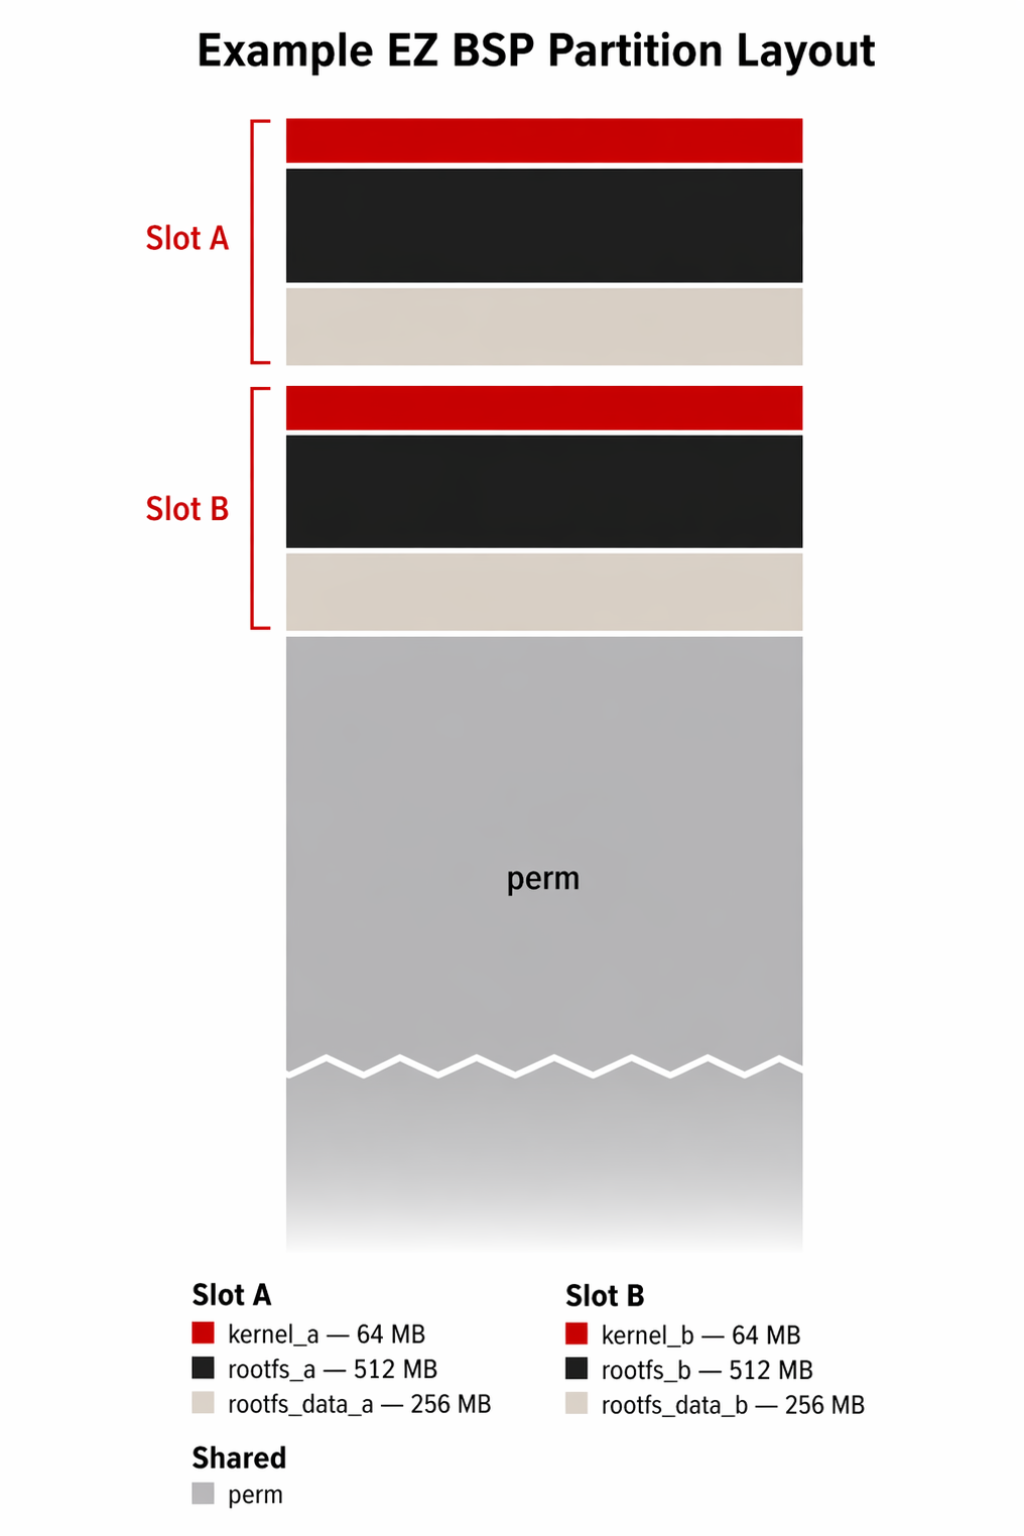
NOTE: The partition sizes can be adjusted to best fit the overall size of the non-volatile storage and the intended use case. The sizes above are the default and are meant to be configured appropriately.
The following components are contained in the non-volatile storage:
RPMB (eMMC only)
The Replay Protected Memory Block (RPMB) is a physical partition within an eMMC chip that is designed for secure storage. Access to RPMB is protected against replay attacks using a shared secret with the host processor.
kernel_a/_b
Thekernel_a/_b partitions hold the kernel FIT images. The kernel FIT images contain the Linux kernel as a flattened image tree (FIT). The FIT images are secured with a signature that is verified using a public key stored in U-Boot. There are multiple kernel FIT images stored on the non-volatile storage to support security features (e.g., separate kernel command line to contain the dm-verity root hash).rootfs_a/_b
The rootfs is the root filesystem for the Linux image. The rootfs is secured using dm-verity to provide a hash over all data blocks.
/data
/data is the data partition (customer data, configuration, etc.). /data is protected using encryption provided by dm-crypt in the kernel./perm
/perm is the permanent data partition (customer data, configuration, etc.) which is not affected by firmware updates. At the same this partition hosts OP-TEE secure file storage, data encrypted key storage, log storage.Partition Configuration and Customization
Partition sizes can be adjusted to suit the overall capacity of the non-volatile storage device and the requirements of the target use case. The defaults shown in the layout diagram above are a starting point and are expected to be tailored during integration. Key considerations when adjusting partition sizes include the size of the kernel FIT images, the expected volume of customer data in/data and /perm, and any overhead required for the A/B update scheme. Partition layout is defined in the U-Boot device tree and build configuration.Kernel FIT Images
The kernel FIT images contain the Linux kernel as a flattened image tree (FIT). The FIT images are secured with a signature that is verified using a public key stored in U-Boot. There are multiple kernel FIT images stored on the non-volatile storage to support security features (e.g., separate kernel command line to contain the dm-verity root hash).
U-Boot
U-Boot is the Linux kernel bootloader and is part of the boot artifacts loaded from non-volatile storage by the processor. It is secured using a signature that is verified by a public key and can also be encrypted using a symmetric key that is subsequently decrypted at boot.
MCU FIT Image (optional)
The MCU FIT image contains the application that runs on the embedded microcontroller. The MCU FIT image is loaded by U-Boot.
Trusted Execution Environment (TEE) Components
The Trusted Execution Environment (TEE) is a set of software components that have access to trusted device resources such as critical memory regions and peripherals.
OP-TEE
OP-TEE (Open Portable Trusted Execution Environment) is the trusted execution environment hypervisor based on Arm TrustZone technology. Software components in the REE communicate with OP-TEE via a supplicant to access components such as Trusted Applications in the TEE.
Trusted Applications (TAs)
Trusted Applications are software modules that run in the TEE and are managed by the OP-TEE hypervisor. They respond to requests from rich world software components such as the Linux kernel via a supplicant, and can interact directly with secured resources.
PKCS#11 TA
OP-TEE provides a TA that implements PKCS#11 operations for cryptographic key creation and storage and cryptographic operations that execute in the TEE. This TA uses trusted resources and the secure storage function provided OP-TEE.
Customer TA
Customers can provide their own implementation of trusted applications for specific operations (e.g., use of sensitive data that has been decrypted in the TEE, etc.) as an extension of OP-TEE. These TAs can run at the request of software in the REE via a supplicant.
Trusted Storage
OP-TEE provides a trusted storage implementation to protect sensitive data such that it is only available in the TEE. The Trusted Applications use the OP-TEE Trusted Storage to maintain data securely. The OP-TEE Trusted Storage can use two different methods to secure data on disk.
Rich Execution Environment (REE) Storage
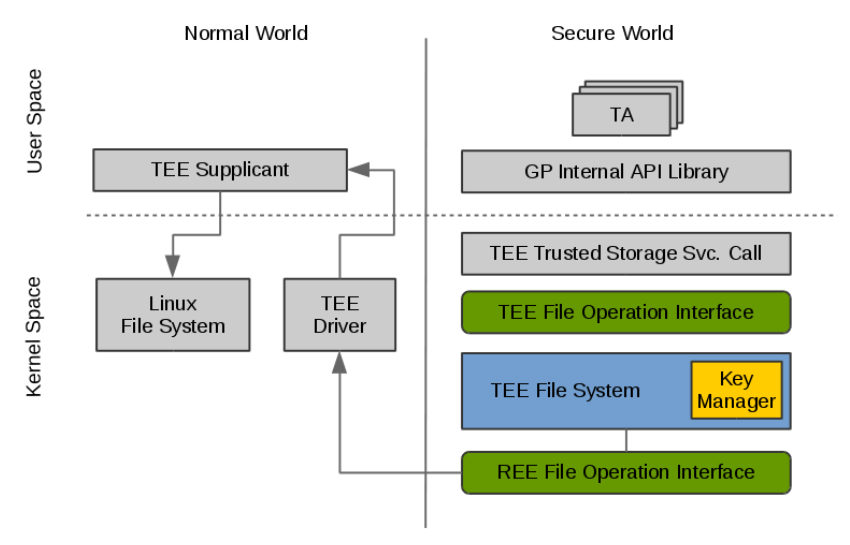
By default, OP-TEE enables Rich Execution Environment (REE) storage. When a TA calls the write function provided by Trusted Storage to write data to a persistent object, a corresponding syscall implemented in the Trusted Storage service will be called, which in turn will invoke a series of TEE file operations to store the data. TEE file system will then encrypt the data and send REE file operation commands and the encrypted data to TEE supplicant by a series of RPC messages. TEE supplicant will receive the messages and store the encrypted data accordingly to the Linux file system. Reading files are handled in a similar manner.
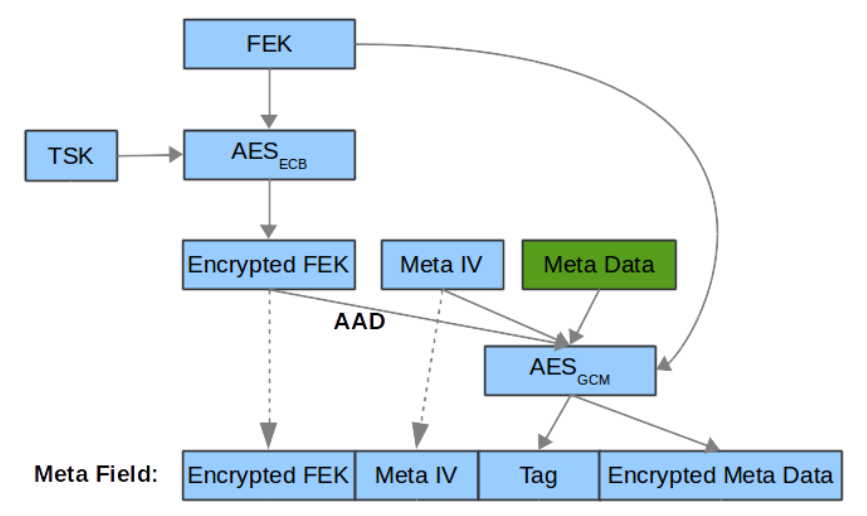
Data encryption in the REE method is performed using multiple layers of encryption. A unique file encryption key (FEK) is generated and stored with a block of data. The FEK is encrypted using a Trusted Application Storage Key (TSK) which is unique per Trusted Application. The TSK is derived from the root Secure Storage Key (SSK), which is unique per device and generated using a unique hardware ID.
RPMB Secure Storage (eMMC only)
When enabled in the OP-TEE build, Trusted Applications can use RPMB Secure Storage.
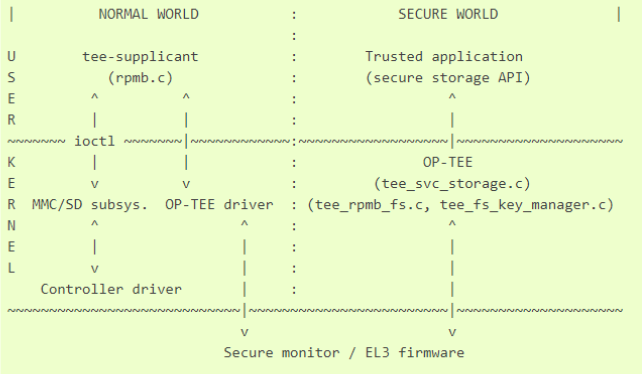
There is no eMMC controller driver in OP-TEE. The device operations all have to go through the normal world. RPMB operations are initiated on request from the FS layer. Memory buffers for requests and responses are allocated in shared memory.
The RPMB partition in eMMC can not be accessed until a key has been programmed on the device: this is a one time action for the lifetime of the device. Once the key has been written on the eMMC controller, the controller uses it to authenticate requests. OP-TEE can be configured to write the key to the RPMB controller. OP-TEE can either embed a built-in RPMB key or derive it from platform specific secrets. The former case might be useful during development while the latter is recommended for production devices.
Deriving the key from secrets avoids OP-TEE from having to store it in memory therefore reducing the attack surface; OP-TEE derives the RPMB key from an internal set that includes the eMMC serial number and more importantly the Hardware Unique Key (HUK). For this configuration to be effective, the Hardware Unique Key - a unique identifier for the particular instantiation of the SoC - must not be publicly accessible. By default, OP-TEE utilizes the Derived Key Encryption Key (DKEK), which is derived from the Key Encryption Key (KEK), as the HUK.
Rich Execution Environment (REE) Components
The Rich Execution Environment (REE) is a set of software components that have limited access to only non-secure resources such as non-critical specific memory regions and peripherals.
U-Boot
U-Boot, the Linux bootloader, is launched as the first REE software component. It verifies the Linux kernel FIT image stored in non-volatile storage using a public key and then launches the kernel.
The Linux Kernel
The Linux kernel is loaded from the Kernel FIT image and launched by U-Boot in the REE. It verifies the rootfs using a root hash embedded in the FIT image boot script that is provided to dm-verity to verify all data blocks. The kernel uses dm-crypt to encrypt and decrypt storage in the/data partition on non-volatile storage. The kernel manages the non-volatile storage.dm-crypt
The Linux kernel provides encryption of disk partitions via the dm-crypt kernel module.
dm-verity
The Linux kernel provides the ability to verify the contents of a disk partition via the dm-verity kernel module.
OP-TEE Supplicant & API
The OP-TEE supplicant and API provide the ability for processes running in the Rich Execution Environment to communicate with OP-TEE and Trusted Applications. The Supplicant provides functionality from Linux kernel required by OP-TEE (e.g., access to read and write storage), while the API provides the ability for user-space processes to access functionality provided by Trusted Applications.
Summit Supplicant
The Summit Supplicant is a user-space application that runs under Linux, and makes login requests to the WiFi network on behalf of other networking applications (e.g., Network Manager). For certain Wi-Fi network configurations (e.g., 802.1X authentication), the Summit Supplicant uses client certificates and private keys to perform authentication.
PKCS#11 Library
The PKCS#11 Library is an implementation of the standardized PKCS#11 API for applications to perform cryptographic operations (key generation, encryption/decryption, signing, etc.) using the PKCS#11 Trusted Application running in the Trusted Execution Environment, via the OP-TEE API.
Customer Applications
Customers can implement and provide applications on the Summit platform that run in the Rich Execution Environment (e.g., as Linux user-space processes) that utilize services provided by OP-TEE or Trusted Applications, via the OP-TEE API.
Security-Related Operations
Secure Boot
Boot Process
A Summit module performs chain-of-trust boot that is rooted in hardware, from the first boot code to the root filesystem.
- The CPU reset triggers the CPU to begin the boot process
- The Secure ROM starts and validates (and optionally) decrypts U-Boot against the keys burned into the Secure Boot OTP fuses
- U-Boot loads the Kernel FIT image from non-volatile storage
- U-Boot verifies the signature of the Kernel FIT using a public key that is embedded in U-Boot
- Once the Kernel FIT signature has been verified, U-Boot launches the kernel
- The kernel locates the rootfs on non-volatile storage
- The kernel verifies the dm-verity root hash of the rootfs block device using a pre-computed root hash stored in the Kernel FIT image
- Once the kernel verifies the root hash, the rootfs block device is mounted
- dm-verity will verify the hash of individual blocks on rootfs as they are loaded
Secure Boot Image Creation
Signed Secure Boot images are generated using a set of signing scripts provided by the silicon vendor in conjunction with a set of asymmetric keys.
Encrypted Filesystem
The EZ BSP provides one or more fully encrypted (via dm-crypt) disk volumes that are used to protect customer private data (e.g., WiFi passwords) when stored on the non-volatile storage.
Secure Firmware Updates
The EZ BSP utilizes SWUpdate as a secure firmware update mechanism to sign and verify firmware update packages, ensuring only authorized updates are applied to the device. For full details on creating, signing, and applying firmware updates, see the Firmware Updates chapter.
Secure Device Provisioning
Secure Boot Provisioning
The Secure Boot mechanism on Summit module requires the use of properly configured OTP keys, and this process is facilitated in the factory by the use of the keywriter tools provided by the silicon vendor. As a one-time setup step, a number of keys (symmetric and/or asymmetric) are generated on a secure server.
From these keys, a key certificate blob is generated which contains hashes of the public keys. During the manufacturing process, the key certificate blob is written to each module’s OTP eFuses, and Secure Boot is enabled. After this, Secure Boot is enforced on the module, and it will only boot properly-signed firmware images.
Chain of Trust
Key Management
In addition to the keys generated above, the following keys are also created on a secure server:
- Secure Firmware Update Public/Private Key: used to generate/verify secure firmware updates
- Encrypted Filesystem Key: generated by Linux kernel at the 1st boot as the OP-TEE backed trusted keyand used to encrypt/decrypt the encrypted filesystem via
dm-crypt - Kernel Signing Public/Private Key: used by U-Boot to verify the kernel before loading it
All keys and certificates MUST be stored securely (e.g., in an HSM).
Firmware Updates
SWUpdate Overview
EZ BSP uses SWUpdate as its firmware update framework. SWUpdate provides a reliable authenticated mechanism for delivering over-the-air (OTA) and local firmware updates to deployed devices. It supports the A/B partition scheme used by EZ BSP, enabling atomic updates with automatic rollback on failure. Update packages are distributed as signed.swu files, ensuring integrity and authenticity before any update is applied.Signing and Verifying Update Packages
Update packages are signed using an RSA private key and verified on the target device using the corresponding public key, which must be installed on the device prior to update. The private key is used at build time to sign the.swu file; the public key on the target verifies the package before it is applied. This ensures that only update packages produced by an authorized party can be installed on the device.Applying Updates (A/B Partition Scheme)
EZ BSP uses an A/B partition scheme for firmware updates. The device maintains two complete sets of firmware partitions (_a and _b). The currently running firmware occupies one slot while the update is written to the inactive slot. Once the update is verified and written, the bootloader is instructed to switch to the updated slot on next boot. If the updated slot fails to boot successfully, the bootloader automatically reverts to the previously known-good slot.For practical instructions on updating your system, see the Flash onboard eMMC section above.
References
- https://optee.readthedocs.io/en/latest/building/userland_integration.html
- https://sbabic.github.io/swupdate