/filters:background_color(white)/2024-10/BL654-Series.png)
Introduction
The goals of this document include the following:
- To detail the setup procedure for interfacing with the DVK-BL654, Part # 455-00001 & 455-00002
- To explain the method of upgrading the firmware for the DVK-BL654, Part # 455-00001 & 455-00002 over the UART interface instead of over the JTAG interface.
Requirements
- Ezurio DVK-BL654, Part # 455-00001 & 455-00002 (or equivalent RS-232 to serial connection to the BL654 Modules Part # 451-00001 & 451-00002)
- FTDI USB to Serial drivers for DVK-BL654 (found at http://www.ftdichip.com/FTDrivers.htm)
- USB-A to USB-Micro cable
- UwTerminalX, provided by Ezurio at https://github.com/ezurio/UwTerminalX
- Desired firmware package, found in the Software Downloads tab of the BL654 Product Page
Overview
To upgrade the module, you must use Ezurio’s development board or your own equivalent implementation to provide an UART connection to the module’s serial port.
Initial Setup using BL654 Development Kit
To set up, complete the following steps.
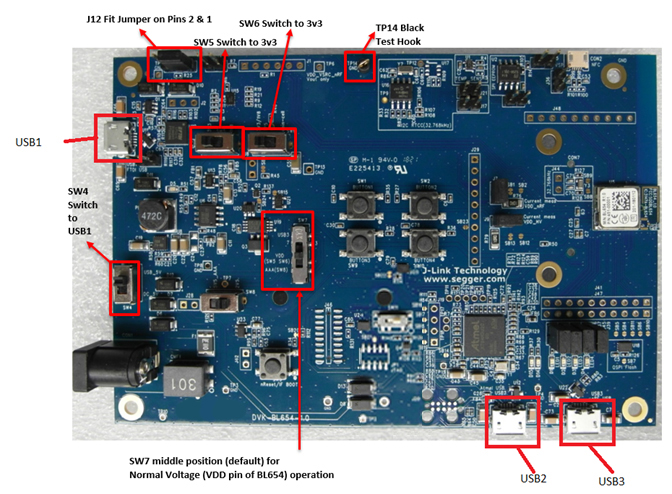
Configure the BL654 development kit to the following settings:
- DC/USB power source switch (SW4) to USB_5V
- Switches SW6 and SW5 to 3V3
- Set SW7 in the middle position as shown on the Figure 1
- Connect USB1 on the development kit to your PC via the included USB-A to USB Micro cable.
- Install the FTDI USB to Serial driver (found at http://www.ftdichip.com/FTDrivers.htm).
- Ensure that the Windows Device Manager displays a new virtual COM port for the USB to Serial adapter.
- Launch UwTerminalX (available at https://github.com/ezurio/UwTerminalX)
- From the Update tab in UwTerminalX, click Check for Updates to ensure you’re using the latest version of UwTerminalX with support for the BL654.
From the Config tab in Device drop-down menu, select BL65x to populate the baud, parity, stop bits, data bits, and handshaking settings. If “BL65x” is not a selectable device, set the following:
- Baudrate: 115200
- Parity: None
- Stop Bits: 1
- Data Bits: 8
- Handshaking: CTS/RTS
- In the Port dropdown, select the COM port associated with your development kit.
- At the top of the screen, click OK.
Checking Firmware Version
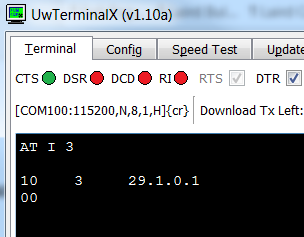
Once the module has been connected, type AT I 3 to display the firmware version (Figure 2).
Warning: Upgrading the firmware clears any programs, configuration keys or data stored on the module.
Upgrading the Firmware
To upgrade the firmware, follow these steps:
- Download your desired firmware from the software downloads tab of the BL654 Product Page.
Extract the following files (located in the Firmware directory of the firmware upgrade .zip file) to a directory on your PC:
- BL654xUartFwUpgrade.exe (The firmware upgrade utility)
- XXXX.uwf (The firmware image)
Run the firmware upgrade process utility from that directory.
- If not already connected, attach the module to your PC’s serial port. If you are using the DVK-BL654, ensure that you are connected to the board’s USB1 connection (see Figure 1).
Warning for customers using VSP:
If you have enabled out-of-the-box Virtual Serial Port Service operation by pulling SIO2 to VCC or changing config register 100 (using AT+SET 100=”0xhhhh”), then you must do one of the following before starting the upgrade:
- Ensure SIO2 is at 0v
OR - Submit the command AT+CFG 100 0x0000 and ensure you get a successful 00 response.
You may also submit the command AT&F* to put the module into factory default mode to ensure that the upgrade starts from a known state and ensure SIO2 is at 0v.
- StartBL654xUartFwUpgrade.exe to display the launch window (Figure 3).
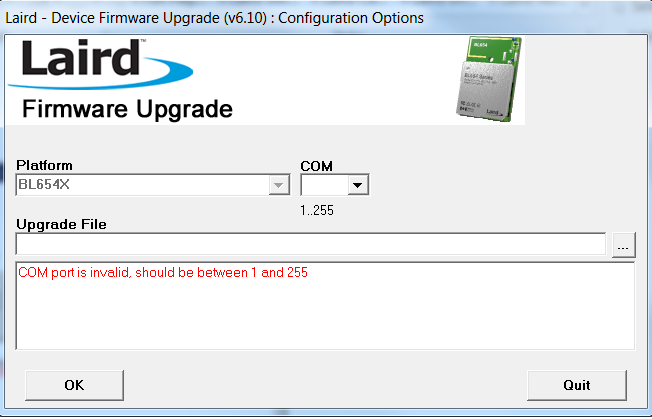
- Ensure that the selected platform is BL654x.
- Select the applicable COM port number from the drop-down menu.
- If the upgrade field is empty, click … to select the applicable xxx.uwf file. The .uwf file may already have been detected if it is the only file in that folder.
- When the settings are correct, the large message field below Upgrade File clears.
- Click OK.
- The following screen confirms the firmware version (Figure 4).
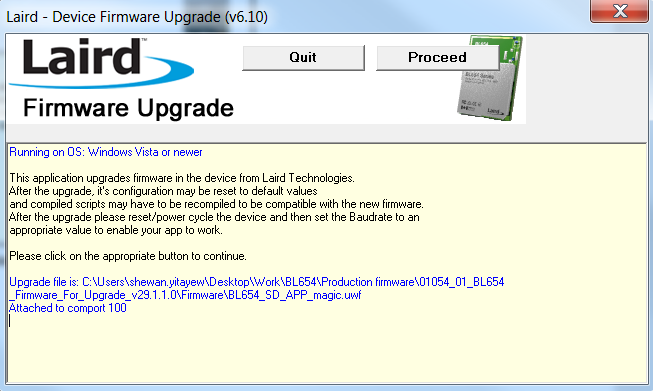
- If the firmware version is correct, click Proceed.
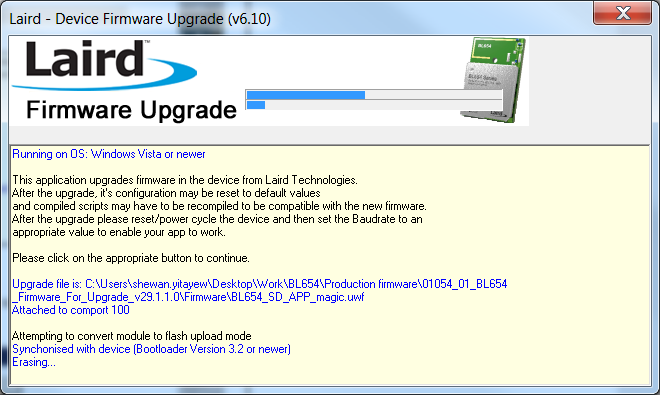
The download process starts, with the screen showing the progress and describing the status (Figure 5).
- When the upgrade is complete, the screen indicates completion and requests that you power cycle the module (Figure 6).
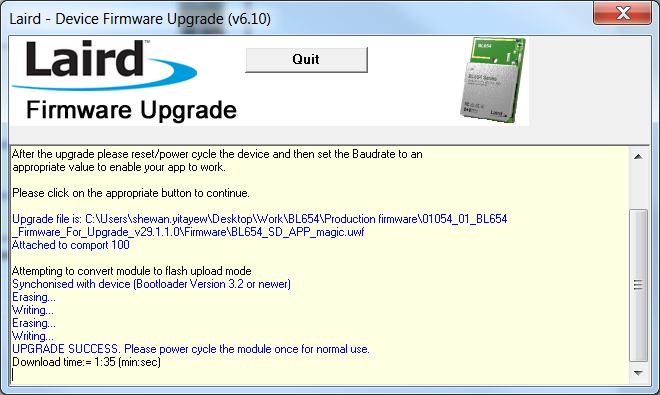
- Cycle power to the module.
- Click Quit.
The module is upgraded and ready for operation. Confirm the upgrade by running UwTerminalX and checking the version using AT I 3. You should see the new firmware version displayed.
Further Information
Further information relating to the BL654 module is available from the Ezurio BL654 product page at https://www.ezurio.com/products/bl654-ble-thread-nfc-modules
| Version | Date | Notes | Contributor(s) | Approver |
|---|---|---|---|---|
| 1.0 | 04 July 2017 | Initial Release | Shewan Yitayew | Jonathan Kaye |
| 2.0 | 15 Apr 2025 | Ezurio rebranding | Sue White | Dave Drogowski |