/filters:background_color(white)/2024-10/Sterling-LWB+-Family.png)
LWB+ integration on imx6ullevk
This tutorial shows how to integrate the LWB+ on the imx6ullevk. The LWB+ uses SDIO for the Wi-Fi interface and UART for the bluetooth interface. It is assumed the user is familiar with Linux and embedded systems. Included in this tutorial is the physical setup including hardware modifications needed, the Yocto setup and build, and verifying the Wi-Fi and Bluetooth are functional.
Requirements
Required items:
- imx6ullevk
- LWB+ devkit - 453-00085-K1
- 3.3V power supply
- breadboard jumper wires
- arduino headers or breadboard pins
- Soldering iron
- Oscilloscope (Optional)
Setup
Hardware setup
imx6ullevk modifications
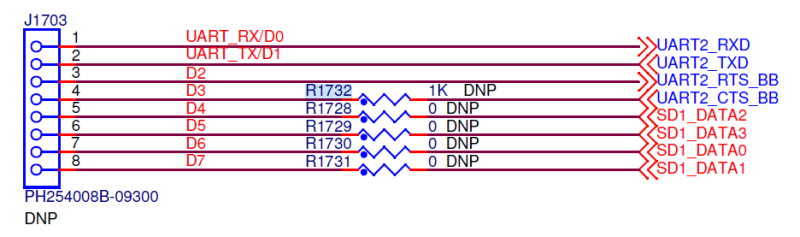
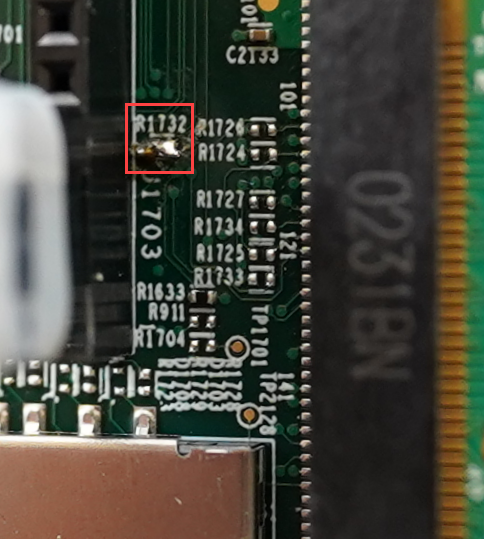
Populate R1732
-
R1732 needs installed to enable UART2 CTS line.
-
R1732 shorted together.
Arduino headers
For ease of use, we recommend you install Arduino headers to support breadboard jumper wires. Breadboard pins can also be used if Arduino headers are not available. It is easier to populate R1732 before installing Arduino headers due to the tight space.
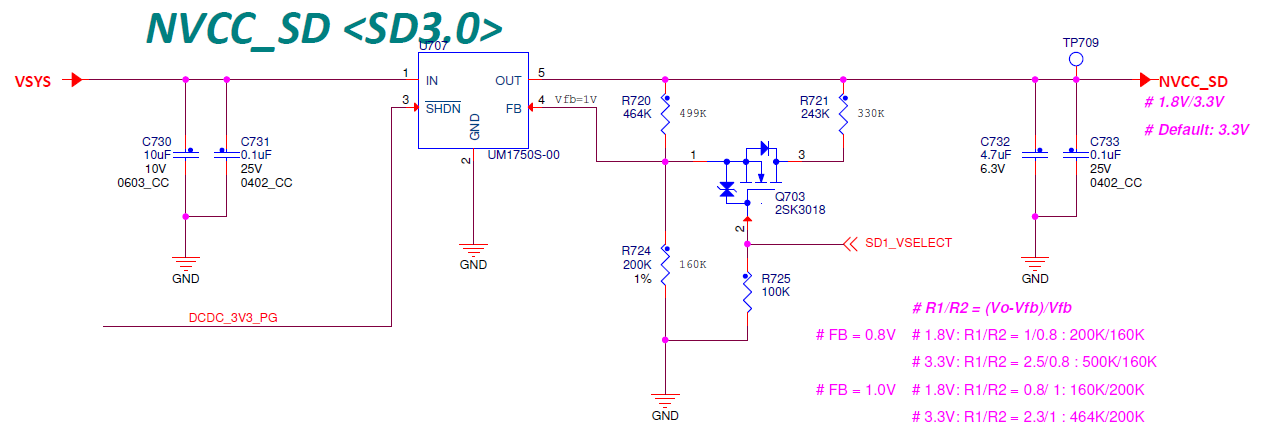
Compute Module breakout - NVCC_SD / SD VDD_IO
-
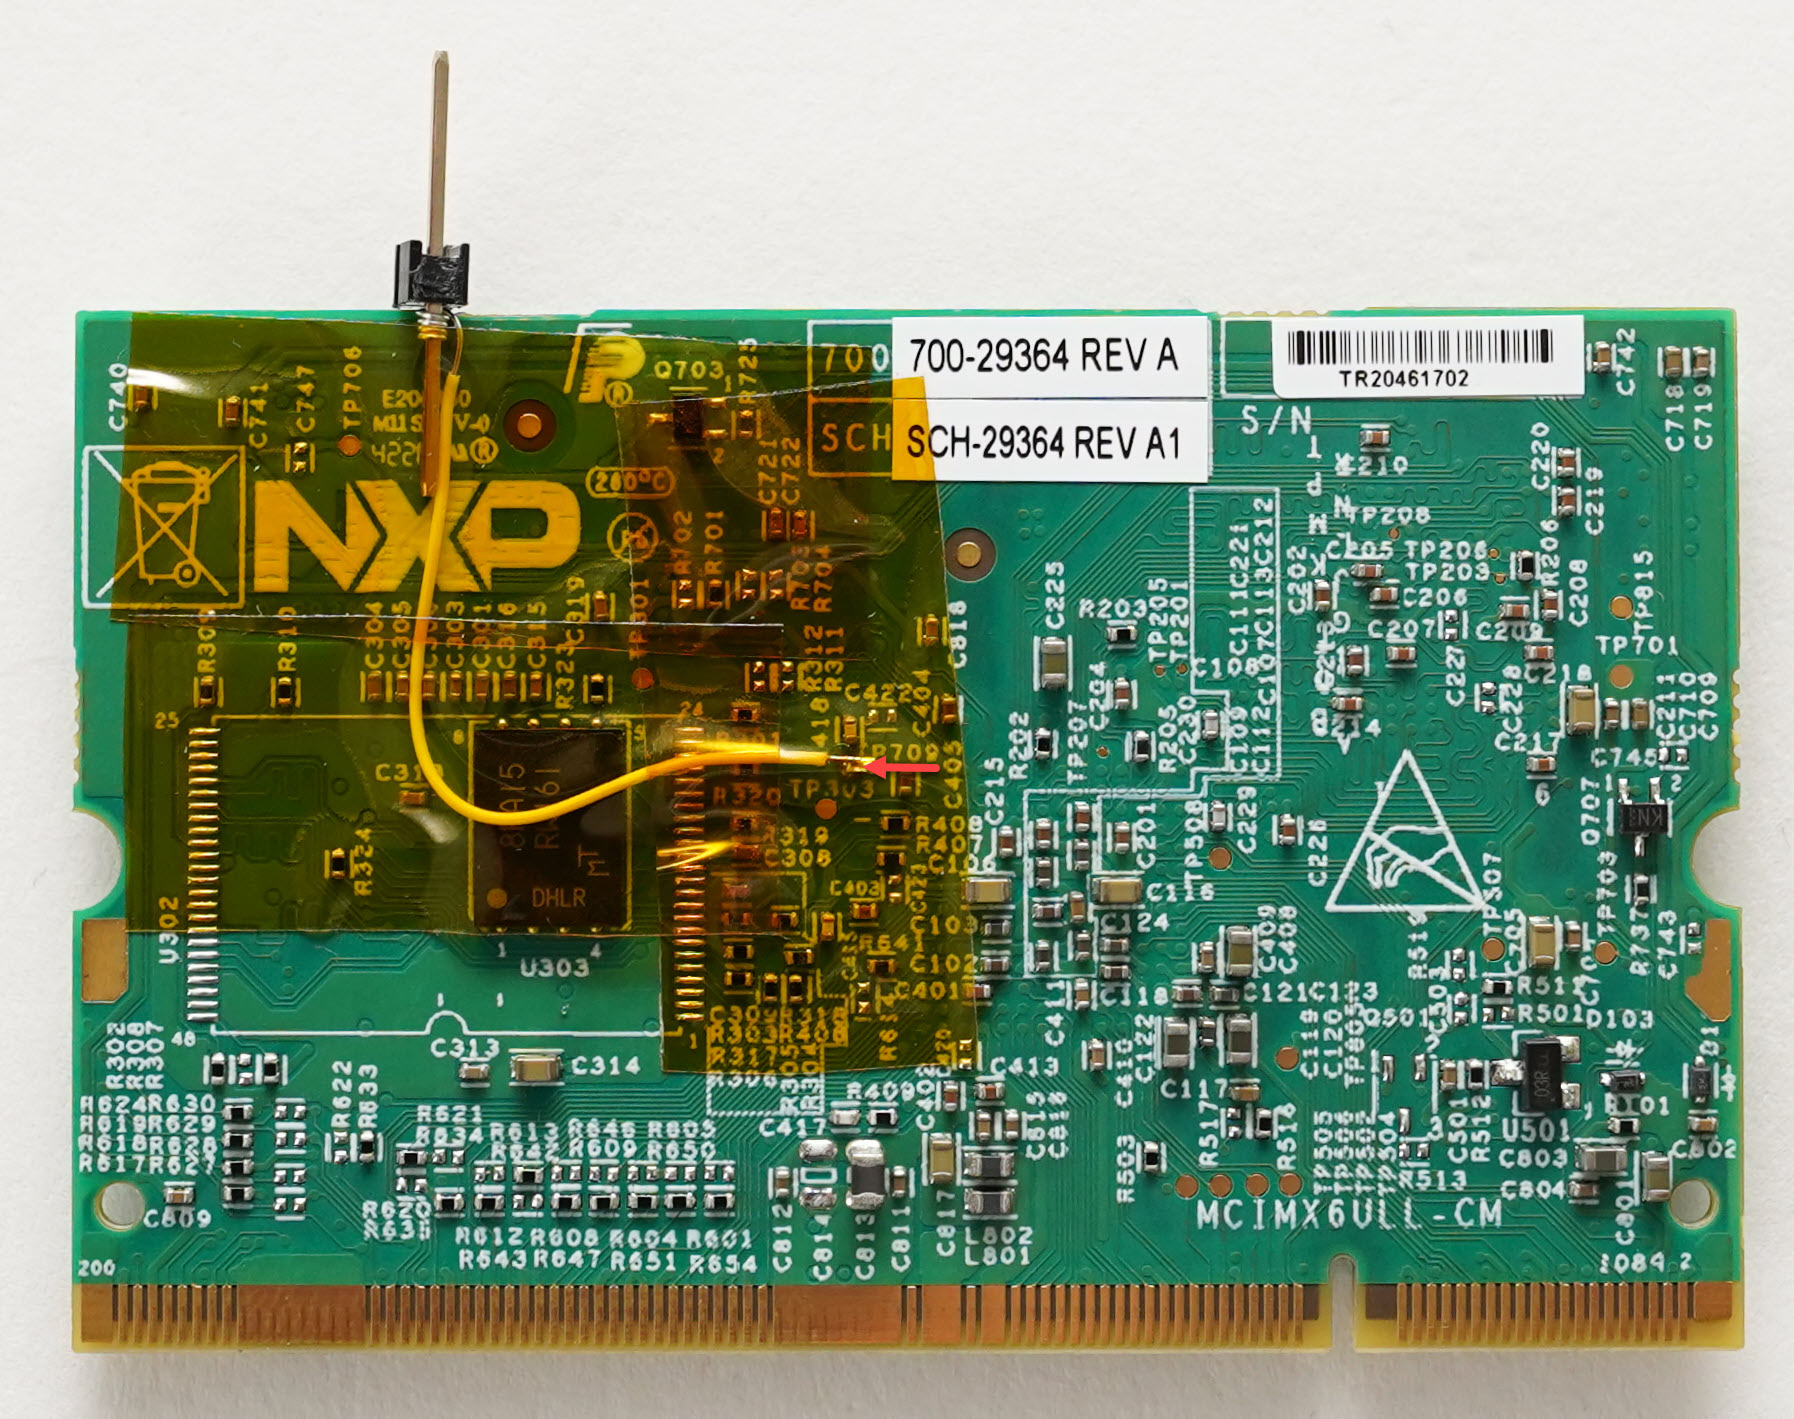
The SDIO VDD I/O signal voltage needs broken out on the compute module and ran to VDD_IO of the LWB+.
-
TP709 (NVCC_SD) broken out to breadboard pin with wire wrap.
Breadboard jumper connections
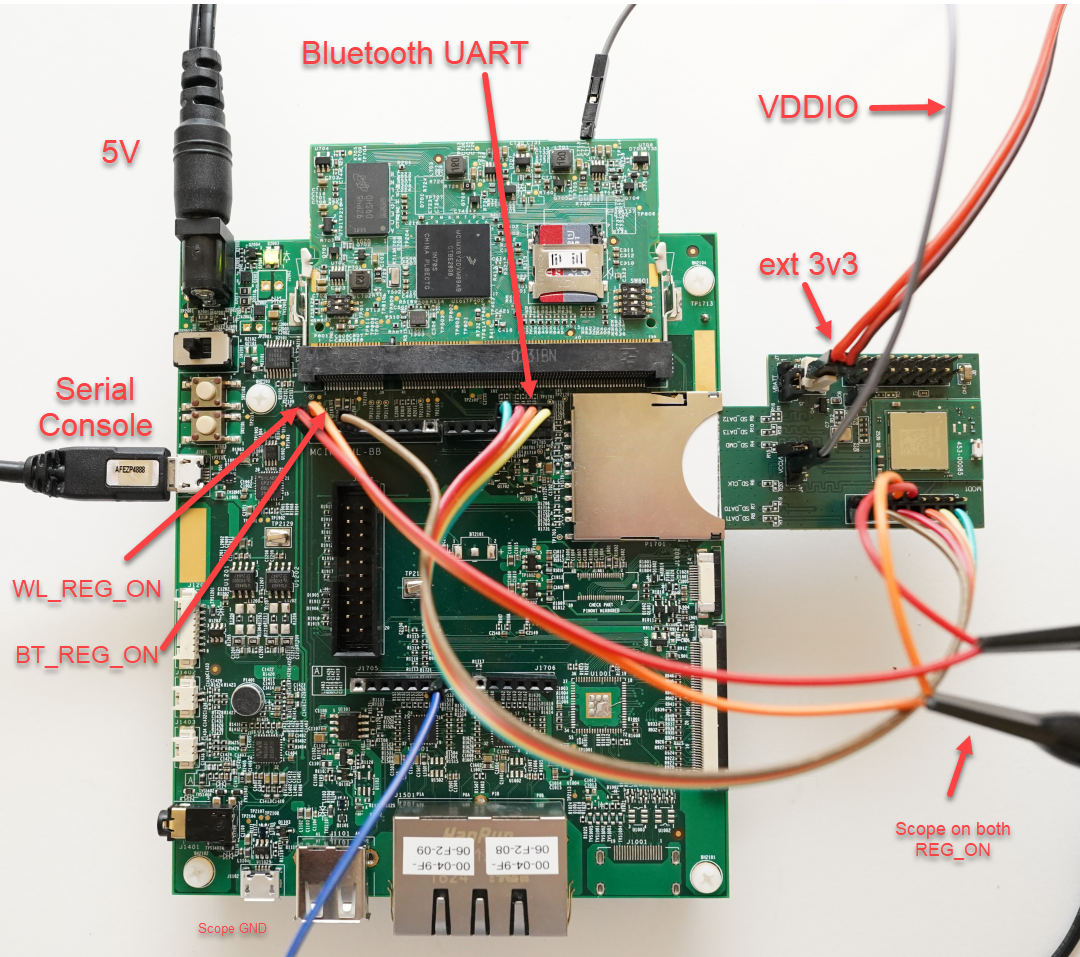
Below are the connections between the LWB+ for UART and regulators for Wi-Fi and Bluetooth.
| Signal | Signal Direction | Target Board | LWB+ |
|---|---|---|---|
| Tx | Host to LWB | J1703-P2 | J3-P10 |
| Rx | LWB to Host | J1703-P1 | J3-P8 |
| RTS | Host to LWB | J1703-P4 | J3-P6 |
| CTS | LWB to Host | J1703-P3 | J3-P14 |
| GND | J1704-P7 | J3-16 | |
| BT_REG_ON | Host to LWB | J1704-P9 | J3-13 |
| WL_REG_ON | Host to LWB | J1704-P10 | J3-11 |
| VDDIO | IMX to LWB | NVCC_SD CM | J4-2 |
The imx6ullevk and LWB+ fully connected together.
LWB+ setup
- Jumper J7 needs set to pins 2-3 (EXT)
- Jumper J4 needs removed and pin 2 ran to the Compute Module
- J5 needs connected to a 3.3V source
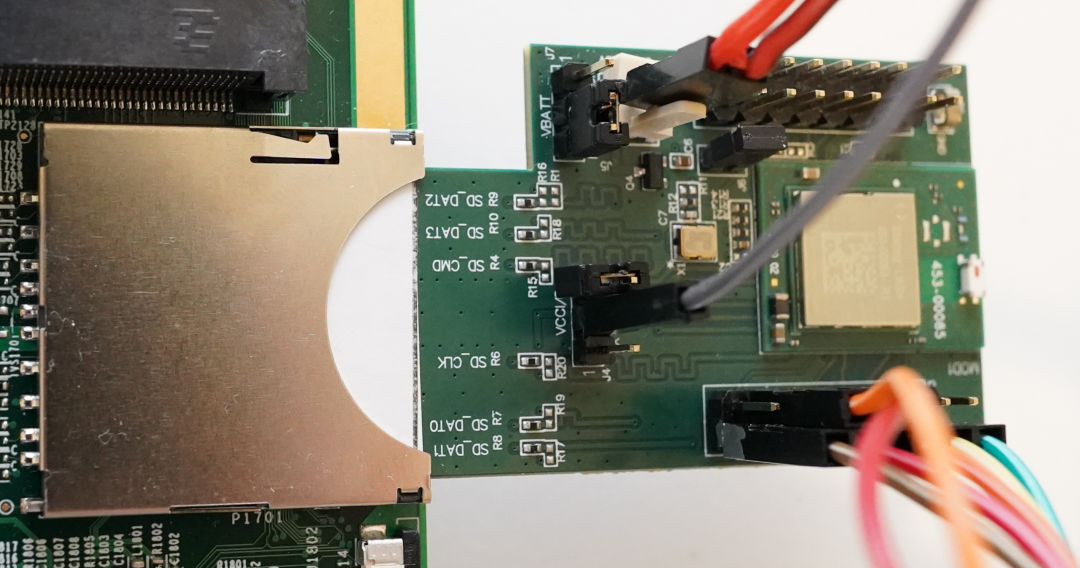
Note: A few layers of thin labels have been placed and cut to shape at the end of the LWB+ to ensure a snug fit into the SD card slot.
Yocto setup and build
Create project folders
mkdir -p ~/projects/yocto-honister
cd ~/projects/yocto-honister
Download Yocto Honister release
repo init -u https://source.codeaurora.org/external/imx/imx-manifest -b imx-linux-honister -m imx-5.15.5-1.0.0.xml

repo sync
Setup build config
Create a build directory and set the DISTRO and MACHINE type.
DISTRO=fsl-imx-fb MACHINE=imx6ullevk source imx-setup-release.sh -b build-imx6ullevkResourcing environment
If the terminal is closed the environment will need to be resourced.
cd ~/projects/yocto-honister
. setup-environment build-imx6ullevk


cd ~/projects/yocto-honister
travis@MS-7A95:~/projects/yocto-honister
$ . setup-environment build-imx6ullevk/

Welcome to Freescale Community BSP

The Yocto Project has extensive documentation about OE including a
reference manual which can be found at:
    http://yoctoproject.org/documentation

For more information about OpenEmbedded see their website:
    http://www.openembedded.org/

You can now run 'bitbake <target>'

Common targets are:
    core-image-minimal
    meta-toolchain
    meta-toolchain-sdk
    adt-installer
    meta-ide-support

Your configuration files at build-imx6ullevk/ have not been touched.
Edit local.conf
Add the following to the end of the conf/local.conf file.
vi conf/local.conf


PREFERRED_PROVIDER_wpa-supplicant = "sterling-supplicant-lwb"
PREFERRED_PROVIDER_wpa-supplicant-cli = "sterling-supplicant-lwb"
PREFERRED_PROVIDER_wpa-supplicant-passphrase = "sterling-supplicant-lwb"

BBMASK += " \
    meta-summit-radio/meta-summit-radio/recipes-packages/openssl \
    meta-summit-radio/meta-summit-radio/recipes-packages/.*/.*openssl10.* \
    "

PREFERRED_RPROVIDER_wireless-regdb-static = "wireless-regdb"
LWB_REGDOMAIN = "US"
Note: for Yocto projects 3.3 (Hardknott) and earlier you would enter this:
PREFERRED_PROVIDER_wpa-supplicant = "sterling-supplicant-lwb"
PREFERRED_PROVIDER_wpa-supplicant-cli = "sterling-supplicant-lwb"
PREFERRED_PROVIDER_wpa-supplicant-passphrase = "sterling-supplicant-lwb"

BBMASK += " \
    meta-summit-radio/meta-summit-radio-pre-3.4/recipes-packages/openssl \
    meta-summit-radio/meta-summit-radio-pre-3.4/recipes-packages/.*/.*openssl10.* \
    "

PREFERRED_RPROVIDER_wireless-regdb-static = "wireless-regdb"
LWB_REGDOMAIN = "US"
Edit bblayers.conf
Add the meta-summit-radio as a bblayer at the end of the bblayer.conf file. Note do to changes in syntax in Yocto Honister the meta-summit-radio repo has been split between meta-summit-radio and meta-summit-radio-pre-3.4 in the same repo, thus the change in the bblayer path. Since Yocto Honister is used the layer used is shown below. If used pre-Honister the directory would change to /sources/meta-summit-radio/meta-summit-radio-pre-3.4.
vi conf/bblayers.conf


BBLAYERS += "${BSPDIR}/sources/meta-summit-radio/meta-summit-radio"
Download Yocto meta-layer (meta-summit-radio)
cd ../sources

#clone the meta layer for yocto
git clone https://github.com/Ezurio/meta-summit-radio
Copy sample image recipe
Copy a sample image recipe and rename the recipe to something memorable. Here I've used my initials, the product name, the product interface (sdio/uart or su), and the meta-summit-radio current release for the image recipe name. When Yocto builds the image it will add the platform name(imx6ullevk) to the filename.
In the end the filename will be: tal-lwbp-su-lrd10-imx6ullevk-20220603211329.rootfs.wic.bz2 giving a nice understanding who built it, what Wi-Fi module it's for, the interface used, which driver release, platform, and date created.
cd meta-summit-radio/meta-summit-radio/recipes-packages/images

#copy the bitbake recipe example
cp sample-image-cp-lwb5plus.bb tal-lwbp-su-lrd10.bb
Edit sample image recipe
The sample recipe needs updated to pull in the LWB+ driver (backports) and firmware (lwbplus-firmware).
vi tal-lwbp-su-lrd10.bb


IMAGE_INSTALL += "\
        iproute2 \
        rng-tools \
        ca-certificates \
        tzdata \
        alsa-utils \
        htop \
        ethtool \
        iperf3 \
        tcpdump \
        iw \
        kernel-module-lwb-backports-laird \
        lwbplus-firmware \
        sterling-supplicant-lwb \
        summit-networkmanager \
        summit-networkmanager-nmcli \
        libgpiod \
        libgpiod-tools \
        hostapd \
        "
Configure the kernel
cd ~/projects/yocto-honister/build-imx6ullevk
bitbake -c menuconfig virtual/kernel
Backports will replace the wireless and bluetoth stack. The CONFIG_FW_LOADER_USER_HELPER_FALLBACK needs removed to allow for faster loading of the firmware at boot.
Make the following modifications:
In the menuconfig use / to search for each of the below configuration parameters in all caps.
WLAN
- deselect Device Drivers -> Network device support -> Wireless LAN

CONFIG_BT
- deselect Networking support -> Bluetooth subsystem support

WIRELESS
- deselect Networking support -> Wireless

CONFIG_FW_LOADER_USER_HELPER_FALLBACK
- deselect Device Drivers -> Generic Driver Options -> Firmware Loader
    -> Firmware loading Facility ->Force the firmware sysfs fallback mechanism when possible

CONFIG_IMX_SDMA
- set to module Device Drivers -> DMA Engine support -> i.MX SDMA support
Disable nxp drivers
Comment out the whole section (4 lines): # NXP Wi-Fi firmware & extra Wlan SDK
vi ..sources/meta-imx/meta-bsp/conf/layer.conf


# NXP WiFi firmware & extra Wlan SDK
#MACHINE_FIRMWARE:append = " ${@bb.utils.contains('MACHINE_FEATURES', 'nxp8987', 'linux-firmware-nxp89xx', '', d)}"
#MACHINE_FIRMWARE:append = " ${@bb.utils.contains('MACHINE_FEATURES', 'nxp8997', 'linux-firmware-nxp89xx', '', d)}"
#MACHINE_EXTRA_RRECOMMENDS:append = " ${@bb.utils.contains('MACHINE_FEATURES', 'nxp8987', 'nxp-wlan-sdk kernel-module-nxp89xx', '', d)}"
#MACHINE_EXTRA_RRECOMMENDS:append = " ${@bb.utils.contains('MACHINE_FEATURES', 'nxp8997', 'nxp-wlan-sdk kernel-module-nxp89xx', '', d)}"
Modify devicetree
The devicetree needs modified to enable the outputs for the WL_REG and BT_REG. Below is a diff that shows the difference between the imx6ul-14x14-evk.dtsi and the modified imx6ul-14x14-evk.dtsi.lwbplus. A bluetooth regulator is created, wifi mmc-pwrseq is created and tied to the usdhc1, and regulator outputs are setup on gpio1 30 and 31.
For reference:
cd ~/projects/yocto-honister/build-imx6ullevk/tmp/work-shared/imx6ullevk/kernel-source/arch/arm/boot/dts
--- imx6ul-14x14-evk.dtsi 2022-06-06 09:57:31.208840447 -0400
+++ imx6ul-14x14-evk.dtsi.lwbplus 2022-06-06 09:57:31.208840447 -0400
@@ -78,6 +78,25 @@
gpios = <&gpio_spi 3 GPIO_ACTIVE_LOW>;
};
+ reg_bt: regulator-bt {
+ compatible = "regulator-fixed";
+ regulator-name = "bt";
+ gpio = <&gpio1 31 GPIO_ACTIVE_HIGH>;
+ startup-delay-us = <100>;
+ enable-active-high;
+ regulator-min-microvolt = <3300000>;
+ regulator-max-microvolt = <3300000>;
+ regulator-always-on;
+ };
+
+ wifi_pwrseq: wifi-pwrseq {
+ compatible = "mmc-pwrseq-simple";
+ regulator-name = "wifi-pwrseq";
+ pinctrl-names = "default";
+ reset-gpios = <&gpio1 30 GPIO_ACTIVE_LOW>;
+ post-power-on-delay-ms = <250>;
+ };
+
sound-wm8960 {
compatible = "fsl,imx-audio-wm8960";
model = "wm8960-audio";
@@ -155,6 +174,7 @@
wlf,gpio-cfg = <1 3>;
clocks = <&clks IMX6UL_CLK_SAI2>;
clock-names = "mclk";
+ status = "disabled";
};
ov5640: ov5640@3c {
@@ -424,6 +444,7 @@
keep-power-in-suspend;
wakeup-source;
vmmc-supply = <®_sd1_vmmc>;
+ mmc-pwrseq = <&wifi_pwrseq>;
status = "okay";
};
@@ -518,9 +539,11 @@
pinctrl_i2c2: i2c2grp {
fsl,pins = <
- MX6UL_PAD_UART5_TX_DATA__I2C2_SCL 0x4001b8b0
+ MX6UL_PAD_UART5_RX_DATA__GPIO1_IO31 0x00003031
+ MX6UL_PAD_UART5_TX_DATA__GPIO1_IO30 0x00003031
+ /* MX6UL_PAD_UART5_TX_DATA__I2C2_SCL 0x4001b8b0
MX6UL_PAD_UART5_RX_DATA__I2C2_SDA 0x4001b8b0
- >;
+ */ >;
};
pinctrl_lcdif_dat: lcdifdatgrp {
Find sample image
Search for the image name and ensure bitbake can see it.
bitbake -s | grep tal-


$ bitbake -s | grep tal-
python-incremental-native                          :17.5.0-r0
python3-incremental-native                         :21.3.0-r0
tal-lwbp-su-lrd10                                     :1.0-r0
Build image
Depending on the CPU, hard drive, and internet connection this can take a while to run. We recommend running the build overnight if a slower PC is used.
bitbake tal-lwbp-su-lrd10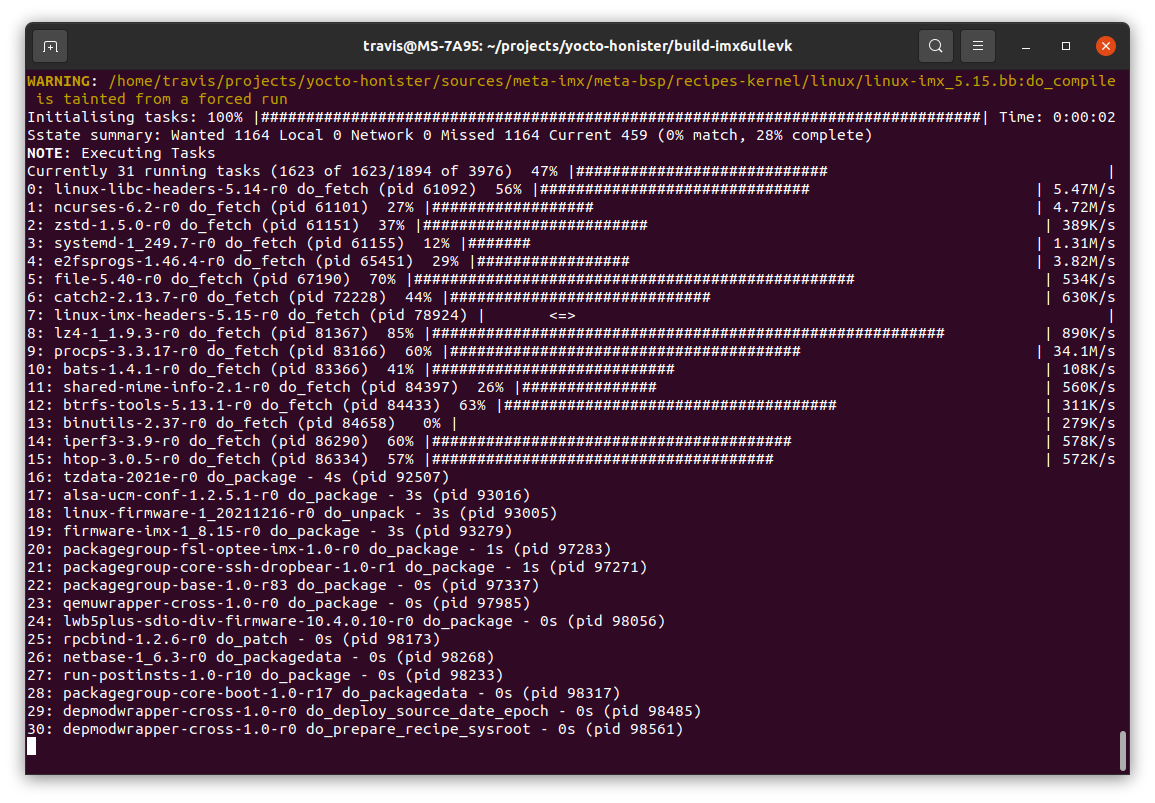
flashing image to micro sd card
The SD flashing program used is Balena Etcher a cross platform flashing tool to put the wic.bz2 image onto a micro SD card.
Use BalenaEtcher to flash the image file ending in wic.bz2. The file location will be in ~/projects/yocto-hardknott/build-imx6ullevk/tmp/deploy/images/imx6ullevk/.
$ cd ~/projects/yocto-honister/build-imx6ullevk/tmp/deploy/images/imx6ullevk/
$ ls -alh *wic.bz2
-rw-r--r-- 2 travis travis 102M Jun  3 14:02 tal-lwbp-su-lrd10-imx6ullevk-20220603180047.rootfs.wic.bz2
lrwxrwxrwx 2 travis travis   58 Jun  3 14:03 tal-lwbp-su-lrd10-imx6ullevk.wic.bz2 -> tal-lwbp-su-lrd10-imx6ullevk-20220603180047.rootfs.wic.bz2
Bring up and verification
Install micro SD card
Install the micro on the Compute Module.
Connect to console
Use a terminal program to connect to the serial console over the USB cable.
Example terminal programs:
Check dmesg
During or after boot, check dmesg for driver and firmware loading.
Shown below:
- mmc-pwrseq is set
- backports loaded
- firmware downloaded
- regulatory domain set to "US"
dmesg | egrep 'brcm|backport|mmc'


root@imx6ullevk:~# dmesg | egrep 'brcm|backport|mmc'
[    0.000000] Kernel command line: console=ttymxc0,115200 root=/dev/mmcblk1p2 rootwait rw
[    2.001389] sdhci-esdhc-imx 2190000.mmc: Got CD GPIO
[    2.014565] sdhci-esdhc-imx 2190000.mmc: allocated mmc-pwrseq
[    2.046189] mmc1: SDHCI controller on 2194000.mmc [2194000.mmc] using ADMA
[    2.105702] mmc1: host does not support reading read-only switch, assuming write-enable
[    2.117507] mmc1: new high speed SDHC card at address aaaa
[    2.127493] mmcblk1: mmc1:aaaa SD32G 29.7 GiB
[    2.156353]  mmcblk1: p1 p2
[    2.340476] mmc0: SDHCI controller on 2190000.mmc [2190000.mmc] using ADMA
[    2.530806] EXT4-fs (mmcblk1p2): mounted filesystem with ordered data mode. Opts: (null). Quota mode: none.
[    2.589314] mmc0: new high speed SDIO card at address 0001
[    5.839291] EXT4-fs (mmcblk1p2): re-mounted. Opts: (null). Quota mode: none.
[   11.619149] brcmutil: loading out-of-tree module taints kernel.
[   11.625521] brcmutil: loading out-of-tree module taints kernel.
[   11.699262] Loading modules backported from Summit Linux version LRD-REL-10.4.0.10-0-gf2716e8912e5
[   11.833986] Backport generated by backports.git v10.4.0.10
[   12.320038] brcmfmac: brcmf_fw_alloc_request: using brcm/brcmfmac43439-sdio for chip BCM43439/5
[   12.415309] brcmfmac mmc0:0001:1: Direct firmware load for brcm/brcmfmac43439-sdio.fsl,imx6ull-14x14-evk.bin failed with error -2
[   12.542549] brcmfmac: brcmf_fw_request_firmware: no board-specific nvram available (ret=-2), device will use brcm/brcmfmac43439-sdio.t
[   12.816273] brcmfmac: brcmf_fw_alloc_request: using brcm/brcmfmac43439-sdio for chip BCM43439/5
[   12.908703] brcmfmac: brcmf_c_preinit_dcmds: Firmware: BCM43439/5 wl0: Oct  6 2021 04:40:45 version 7.95.48 (9e85f5c CY) FWID 01-e3ef7
[   13.086190] brcmfmac: brcmf_cfg80211_attach: Using regulatory domain US
root@imx6ullevk:~#
Testing Wi-Fi
Check iw to see that phy is up and running.
iw dev


root@imx6ullevk:~# iw dev
phy#0
        Unnamed/non-netdev interface
                wdev 0x2
                addr c2:ee:40:b0:49:86
                type P2P-device
                txpower 31.00 dBm
        Interface wlan0
                ifindex 7
                wdev 0x1
                addr c0:ee:40:b0:49:86
                type managed
                channel 1 (2412 MHz), width: 20 MHz, center1: 2412 MHz
                txpower 31.00 dBm
root@imx6ullevk:~#
Add network connection in NetworkManager
nmcli con add con-name "test" ifname wlan0 type wifi ssid "test" wifi-sec.key-mgmt wpa-psk wifi-sec.psk "password1"Connect to "test" network listed in NetworkManager
nmcli c u "test"Connection information using: iw wlan0 station dump
root@imx8mpevk:~# iw wlan0 station dump


root@imx6ullevk:~# iw wlan0 station dump
Station 94:83:c4:01:6f:d8 (on wlan0)
        inactive time:  0 ms
        rx bytes:       2651
        rx packets:     16
        tx bytes:       5338
        tx packets:     36
        tx failed:      0
        signal:         -45 dBm
        tx bitrate:     65.0 MBit/s
        rx bitrate:     58.5 MBit/s
        authorized:     yes
        authenticated:  yes
        associated:     yes
        WMM/WME:        yes
        TDLS peer:      no
        DTIM period:    2
        beacon interval:100
        short preamble: yes
        short slot time:yes
        connected time: 21 seconds
        current time:   956491579 ms
Ping test
ping 8.8.8.8


root@imx6ullevk:~# ping 8.8.8.8
PING 8.8.8.8 (8.8.8.8): 56 data bytes
64 bytes from 8.8.8.8: seq=0 ttl=55 time=32.981 ms
64 bytes from 8.8.8.8: seq=1 ttl=55 time=29.779 ms
64 bytes from 8.8.8.8: seq=2 ttl=55 time=33.251 ms
64 bytes from 8.8.8.8: seq=3 ttl=55 time=33.208 ms
^C
--- 8.8.8.8 ping statistics ---
4 packets transmitted, 4 packets received, 0% packet loss
round-trip min/avg/max = 29.779/32.304/33.251 ms
root@imx6ullevk:~#
iperf3 results
For this test to work, you must set up an iperf3 server on the connected network. Start an iperf3 server with the commands 'iperf3 -s'.
iperf3 -c 10.0.0.2
iperf3 -c 10.0.0.2 -R


root@imx6ullevk:~# iperf3 -c 10.0.0.2
Connecting to host 10.0.0.2, port 5201
[  5] local 10.0.0.37 port 59068 connected to 10.0.0.2 port 5201
[ ID] Interval           Transfer     Bitrate         Retr  Cwnd
[  5]   0.00-1.00   sec  4.94 MBytes  41.4 Mbits/sec    0    201 KBytes
[  5]   1.00-2.00   sec  4.47 MBytes  37.5 Mbits/sec    0    201 KBytes
[  5]   2.00-3.00   sec  4.54 MBytes  38.1 Mbits/sec    0    228 KBytes
[  5]   3.00-4.00   sec  4.47 MBytes  37.5 Mbits/sec    0    240 KBytes
[  5]   4.00-5.00   sec  4.47 MBytes  37.5 Mbits/sec    0    240 KBytes
[  5]   5.00-6.00   sec  4.41 MBytes  37.0 Mbits/sec    0    240 KBytes
[  5]   6.00-7.00   sec  4.35 MBytes  36.5 Mbits/sec    0    240 KBytes
[  5]   7.00-8.00   sec  4.35 MBytes  36.5 Mbits/sec    0    240 KBytes
[  5]   8.00-9.00   sec  4.35 MBytes  36.5 Mbits/sec    0    240 KBytes
[  5]   9.00-10.00  sec  4.35 MBytes  36.5 Mbits/sec    0    240 KBytes
- - - - - - - - - - - - - - - - - - - - - - - - -
[ ID] Interval           Transfer     Bitrate         Retr
[  5]   0.00-10.00  sec  44.7 MBytes  37.5 Mbits/sec    0             sender
[  5]   0.00-10.00  sec  44.1 MBytes  37.0 Mbits/sec                  receiver

iperf Done.
root@imx6ullevk:~# iperf3 -c 10.0.0.2 -R
Connecting to host 10.0.0.2, port 5201
Reverse mode, remote host 10.0.0.2 is sending
[  5] local 10.0.0.37 port 59072 connected to 10.0.0.2 port 5201
[ ID] Interval           Transfer     Bitrate
[  5]   0.00-1.00   sec  4.93 MBytes  41.4 Mbits/sec
[  5]   1.00-2.00   sec  4.84 MBytes  40.6 Mbits/sec
[  5]   2.00-3.00   sec  4.93 MBytes  41.4 Mbits/sec
[  5]   3.00-4.00   sec  4.72 MBytes  39.6 Mbits/sec
[  5]   4.00-5.00   sec  5.01 MBytes  42.0 Mbits/sec
[  5]   5.00-6.00   sec  5.20 MBytes  43.6 Mbits/sec
[  5]   6.00-7.00   sec  5.03 MBytes  42.2 Mbits/sec
[  5]   7.00-8.00   sec  4.78 MBytes  40.1 Mbits/sec
[  5]   8.00-9.00   sec  5.04 MBytes  42.3 Mbits/sec
[  5]   9.00-10.00  sec  4.95 MBytes  41.5 Mbits/sec
- - - - - - - - - - - - - - - - - - - - - - - - -
[ ID] Interval           Transfer     Bitrate         Retr
[  5]   0.00-10.00  sec  51.7 MBytes  43.3 Mbits/sec    0             sender
[  5]   0.00-10.00  sec  49.4 MBytes  41.5 Mbits/sec                  receiver

iperf Done.
Testing Bluetooth
Bluetooth attach to bluez
btattach -B /dev/ttymxc1 -P bcm -S 3000000 &


root@imx6ullevk:~# btattach -B /dev/ttymxc1 -P bcm -S 3000000 &
[1] 202
Attaching Primary controller to /dev/ttymxc1
root@imx6ullevk:~#
[   26.651179] Bluetooth: HCI UART driver ver 2.3
[   26.655659] Bluetooth: HCI UART protocol H4 registered
[   26.698247] Bluetooth: HCI UART protocol Broadcom registered
Switched line discipline from 0 to 15
Device index 0 attached
[   26.852244] Bluetooth: hci0: BCM: chip id 147
[   26.859832] Bluetooth: hci0: BCM: features 0x0e
[   26.887365] Bluetooth: hci0: CYW4343A2
[   26.891259] Bluetooth: hci0: BCM4343A2 (001.003.016) build 0000
[   26.906070] Bluetooth: hci0: BCM4343A2 'brcm/BCM4343A2.hcd' Patch
[   27.823484] Bluetooth: hci0: CYW43439 UART 26 MHz wlbga_BU Laird
[   27.829719] Bluetooth: hci0: BCM4343A2 (001.003.016) build 0000
[   27.998565] NET: Registered protocol family 38
[   28.088258] Bluetooth: RFCOMM TTY layer initialized
[   28.093194] Bluetooth: RFCOMM socket layer initialized
[   28.100936] Bluetooth: RFCOMM ver 1.11
Bluetooth scan
bluetoothctl


root@imx6ullevk:~# bluetoothctl
Agent registered
[CHG] Controller C0:EE:40:B0:03:9D Pairable: yes
[bluetooth]# power on
[CHG] Controller C0:EE:40:B0:03:9D Class: 0x00200000
Changing power on succeeded
[CHG] Controller C0:EE:40:B0:03:9D Powered: yes
[bluetooth]# scan on
Discovery started
[CHG] Controller C0:EE:40:B0:03:9D Discovering: yes
[NEW] Device E7:A3:99:CE:06:A2 BL654 BME280 Sensor
[bluetooth]#
LWB+ integration on imx8mpevk
LWB+ integration on i.MX8M Plus EVK
This tutorial shows how to integrate the LWB+ on the imx8mp-evk. The LWB+ uses SDIO for the Wi-Fi interface and UART for the Bluetooth interface. It is assumed the user is familiar with Linux and embedded systems. Included in this tutorial are the physical setup, Yocto setup and build, and verifying the Wi-Fi and Bluetooth are functional.
Requirements
Required items:
- imx8mp-evk
- LWB+ devkit - 453-00085-K1
- breadboard jumper wires
- SD to micro SD adapter (Examples: ST-SD-USD, Cablecc)
Physical setup
i.MX 8M Plus (imx8mp)
This tutorial uses the microSD slot on the imx8mp as the Wi-Fi interface. This requires the software to be loaded on to the emmc which can be done with the uuu utility with the Serial Download boot mode or using u-boot with the ums tool.
The imx8mp bb expansion header is used to connect the power, Bluetooth UART, and REG_ON pins for Wi-Fi and Bluetooth.
Schematic of the expansion header: 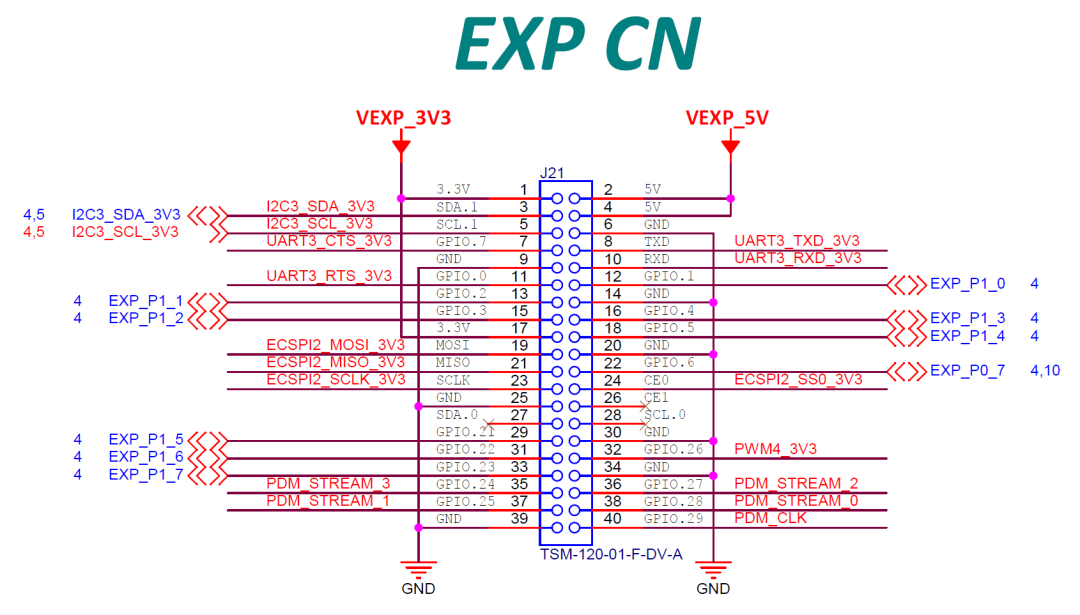
The UART3 lines are used for the bluetooth UART. The ECSPI2 MOSI and SCLK are used for the REG_ON pins to control resets.
LWB+
| Jumper | Position | Use |
|---|---|---|
| J4 | 2-3 | VCCIO 3.3v |
| J5 | Ext Voltage from imx8 | |
| J6 | 1-2 | VDD 3.3v |
| J7 | 2-3 | VBATT EXT |
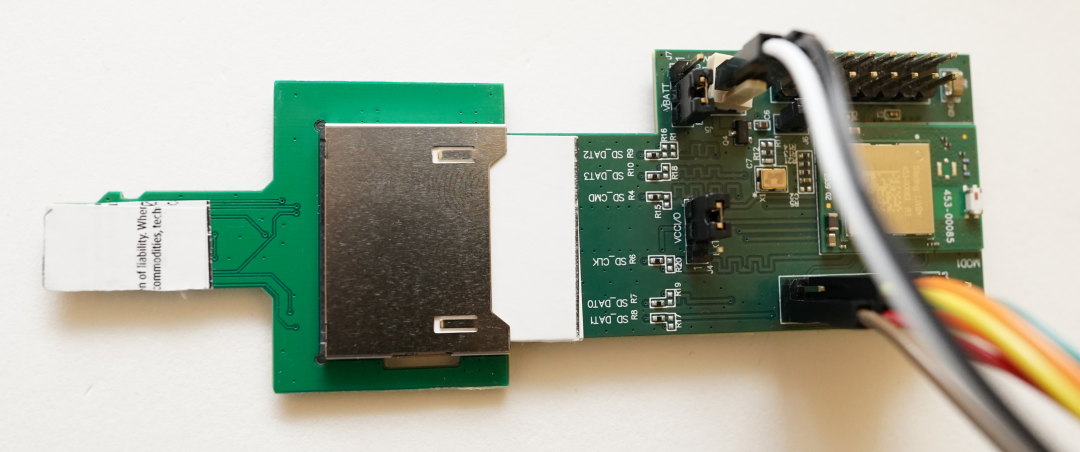
Note on LWB+ and SD adapter
Cut and place to shape two layers of stickers on the LWB+ and the adapter board that goes into the imx8mp and micro SD to SD adapter to ensure the devices are not loose. Example used here is a UPS tracking receipt that is a label. The label is thin thus requiring 2-4 layers on each. This connection can be very sensitive and delicate, so ensure it's supported properly and not bending the micro sd tab which is the vulnerable point of the connection.
Physical Connections
| LWB+ | LWB+ Notes | imx8mp | imx8mp Notes | |
|---|---|---|---|---|
| J3.6 | BT CTS | -> | J21.7 | uart3.cts |
| J3.8 | BT TXD | -> | J21.10 | uart3.rxd |
| J3.10 | BT RXD | -> | J21.8 | uart3.txd |
| J3.14 | BT RTS | -> | J21.11 | uart3.rts |
| J3.16 | GND | -> | J21.9 | GND |
| J3.11 | WL_REG_ON | J21.23 | GPIO5.io10 | |
| J3.13 | BT_REG_ON | J21.19 | GPIO5.io11 | |
| J5.3.3 | 3.3v input | <- | J21.1 | 3.3v supply |
| J5.GND | GND | <- | J21.6 | GND |
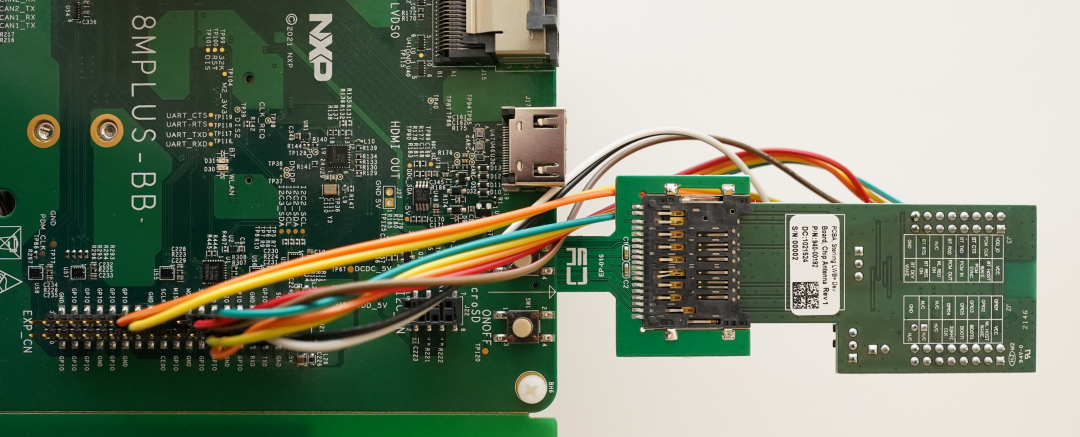
Yocto setup and build
Get yocto-honister
repo init -u https://source.codeaurora.org/external/imx/imx-manifest -b imx-linux-honister -m imx-5.15.5-1.0.0.xml
repo sync

DISTRO=fsl-imx-wayland MACHINE=imx8mpevk source imx-setup-release.sh -b build-imx8mpevk
Get meta-summit-radio
cd ../sources
git clone https://github.com/Ezurio/meta-summit-radio
Update image in ~/projects/yocto-honister/sources/meta-summit-radio/meta-summit-radio/recipes-packages/images
tal-lwbp-su-lrd10.bb copied from sample-image-cp-lwb5plus.bb and edited the below:
Note: for Yocto projects 3.3 (Hardknott) and earlier you would update the file located in ~/projects/yocto-honister/sources/meta-summit-radio/meta-summit-radio-pre-3.4/recipes-packages/images
IMAGE_INSTALL += "\
    iproute2 \
    rng-tools \
    ca-certificates \
    tzdata \
    alsa-utils \
    htop \
    ethtool \
    iperf3 \
    tcpdump \
    iw \
    kernel-module-lwb-backports-summit \
    lwbplus-firmware \
    sterling-supplicant-lwb \
    summit-networkmanager-st60 \
        libgpiod \
    libgpiod-tools \
    hostapd \
    "
build-imx8mpevk/conf/bblayers.conf
BBLAYERS += "${BSPDIR}/sources/meta-summit-radio/meta-summit-radio"

Note: for Yocto projects 3.3 (Hardknott) and earlier you would enter this:
BBLAYERS += "${BSPDIR}/sources/meta-summit-radio/meta-summit-radio-pre-3.4"
build-imx8mpevk/conf/local.conf
PREFERRED_PROVIDER_wpa-supplicant = "sterling-supplicant-lwb"
PREFERRED_PROVIDER_wpa-supplicant-cli = "sterling-supplicant-lwb"
PREFERRED_PROVIDER_wpa-supplicant-passphrase = "sterling-supplicant-lwb"

BBMASK += " \
    meta-summit-radio/meta-summit-radio/recipes-packages/openssl \
    meta-summit-radio/meta-summit-radio/recipes-packages/.*/.*openssl10.* \
    "

PREFERRED_RPROVIDER_wireless-regdb-static = "wireless-regdb"
LWB_REGDOMAIN = "US"
Note: for Yocto projects 3.3 (Hardknott) and earlier you would enter this:
PREFERRED_PROVIDER_wpa-supplicant = "sterling-supplicant-lwb"
PREFERRED_PROVIDER_wpa-supplicant-cli = "sterling-supplicant-lwb"
PREFERRED_PROVIDER_wpa-supplicant-passphrase = "sterling-supplicant-lwb"

BBMASK += " \
    meta-summit-radio/meta-summit-radio-pre-3.4/recipes-packages/openssl \
    meta-summit-radio/meta-summit-radio-pre-3.4/recipes-packages/.*/.*openssl10.* \
    "

PREFERRED_RPROVIDER_wireless-regdb-static = "wireless-regdb"
LWB_REGDOMAIN = "US"

### kernel menuconfig
bitbake -c menuconfig virtual/kernel
Make the following modifications:

***In the menuconfig use / to search for each of the below configuration parameters in caps.***
WLAN
- deselect Device Drivers -> Network device support -> Wireless LAN
CONFIG_BT
- deselect Networking support -> Bluetooth subsystem support
WIRELESS
- deselect Networking support -> Wireless
CONFIG_FW_LOADER_USER_HELPER_FALLBACK
- deselect Device Drivers -> Generic Driver Options -> Firmware Loader -> Firmware loading Facility ->Force the firmware sysfs fallback mechanism when possible
CONFIG_IMX_SDMA
- set to module Device Drivers -> DMA Engine support -> i.MX SDMA support
Disable nxp drivers
Comment out the whole section (4 lines): # NXP Wi-Fi firmware & extra Wlan SDK
vi ..sources/meta-imx/meta-bsp/conf/layer.conf


### NXP WiFi firmware & extra Wlan SDK
#MACHINE_FIRMWARE:append = " ${@bb.utils.contains('MACHINE_FEATURES', 'nxp8987', 'linux-firmware-nxp89xx', '', d)}"
#MACHINE_FIRMWARE:append = " ${@bb.utils.contains('MACHINE_FEATURES', 'nxp8997', 'linux-firmware-nxp89xx', '', d)}"
#MACHINE_EXTRA_RRECOMMENDS:append = " ${@bb.utils.contains('MACHINE_FEATURES', 'nxp8987', 'nxp-wlan-sdk kernel-module-nxp89xx', '', d)}"
#MACHINE_EXTRA_RRECOMMENDS:append = " ${@bb.utils.contains('MACHINE_FEATURES', 'nxp8997', 'nxp-wlan-sdk kernel-module-nxp89xx', '', d)}"
Modify devicetree
Below is a diff of the changes made in the devicetree as a patch.
For reference:
Location of the devicetree is: ~/projects/yocto-honister/build-imx8mpevk/tmp/work-shared/imx8mpevk/kernel-source/arch/arm64/boot/dts/freescale/imx8mp-evk.dts
cd ~/projects/yocto-honister/build-imx8mpevk/tmp/work-shared/imx8mpevk/kernel-source/arch/arm64/boot/dts/freescale/
--- imx8mp-evk.dts 2022-06-01 12:11:11.540506538 -0400
+++ imx8mp-evk.dts.lwbplus 2022-06-01 12:05:27.722792689 -0400
@@ -34,6 +34,26 @@
<0x1 0x00000000 0 0xc0000000>;
};
+ wifi_pwrseq: wifi-pwrseq {
+ compatible = "mmc-pwrseq-simple";
+ regulator-name = "wifi-pwrseq";
+ pinctrl-names = "default";
+ reset-gpios = <&gpio5 10 GPIO_ACTIVE_LOW>;
+ post-power-on-delay-ms = <150>;
+ };
+
+ reg_bt: regulator-bt {
+ compatible = "regulator-fixed";
+ regulator-name = "bt";
+ gpio = <&gpio5 11 GPIO_ACTIVE_HIGH>;
+ startup-delay-us = <100>;
+ enable-active-high;
+ regulator-min-microvolt = <3300000>;
+ regulator-max-microvolt = <3300000>;
+ regulator-always-on;
+ };
+
reg_can1_stby: regulator-can1-stby {
compatible = "regulator-fixed";
regulator-name = "can1-stby";
@@ -272,7 +292,8 @@
pinctrl-names = "default";
pinctrl-0 = <&pinctrl_ecspi2 &pinctrl_ecspi2_cs>;
cs-gpios = <&gpio5 13 GPIO_ACTIVE_LOW>;
- status = "okay";
+ //status = "okay";
+ status = "disabled"; /* added */
spidev1: spi@0 {
reg = <0>;
@@ -888,8 +909,10 @@
pinctrl-0 = <&pinctrl_usdhc2>, <&pinctrl_usdhc2_gpio>;
pinctrl-1 = <&pinctrl_usdhc2_100mhz>, <&pinctrl_usdhc2_gpio>;
pinctrl-2 = <&pinctrl_usdhc2_200mhz>, <&pinctrl_usdhc2_gpio>;
+ max-frequency = <100000000>;
cd-gpios = <&gpio2 12 GPIO_ACTIVE_LOW>;
vmmc-supply = <®_usdhc2_vmmc>;
+ mmc-pwrseq = <&wifi_pwrseq>;
bus-width = <4>;
status = "okay";
};
@@ -919,6 +942,8 @@
pinctrl_hog: hoggrp {
fsl,pins = <
+ MX8MP_IOMUXC_ECSPI2_MOSI__GPIO5_IO11 0x00000146
+ MX8MP_IOMUXC_ECSPI2_SCLK__GPIO5_IO10 0x00000146
MX8MP_IOMUXC_HDMI_DDC_SCL__HDMIMIX_HDMI_SCL 0x400001c3
MX8MP_IOMUXC_HDMI_DDC_SDA__HDMIMIX_HDMI_SDA 0x400001c3
MX8MP_IOMUXC_HDMI_HPD__HDMIMIX_HDMI_HPD 0x40000019bitbake
bitbake tal-lwbp-su-lrd10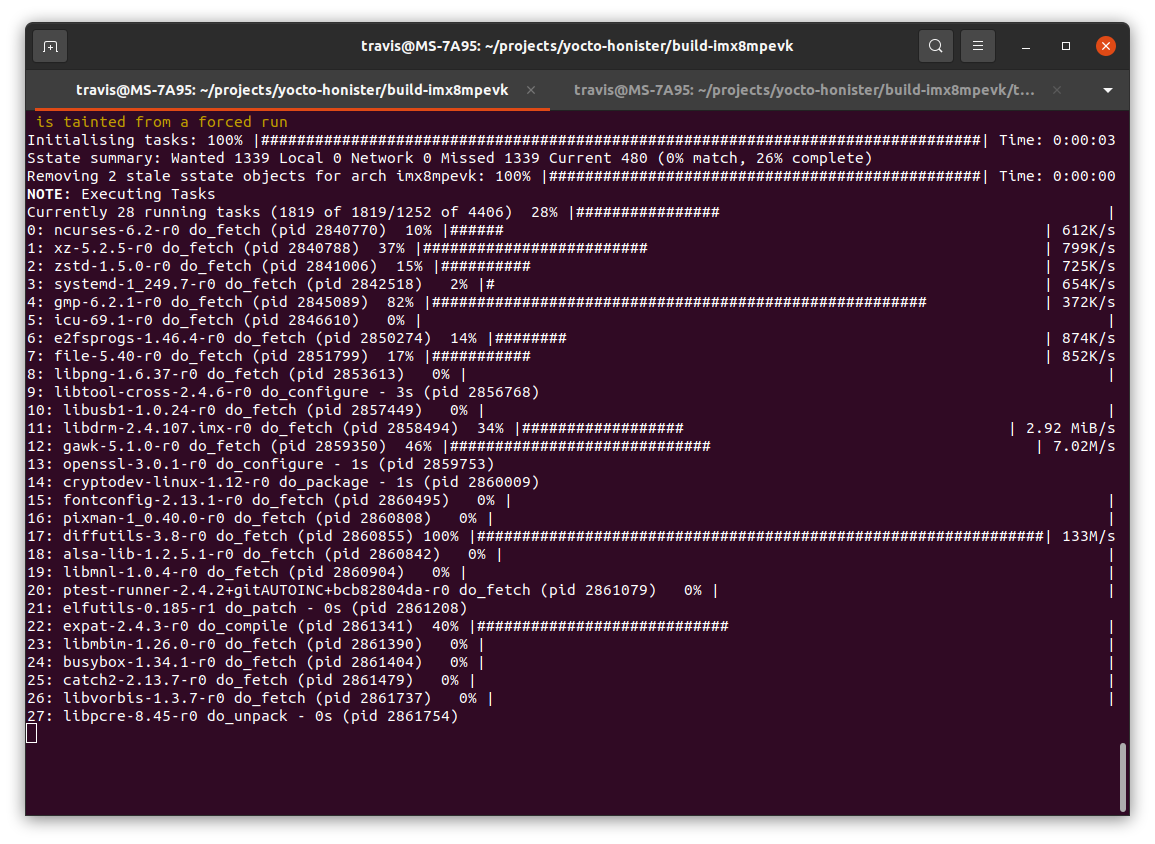
Flashing with u-boot and ums
-
Ensure the usb-c cable from PORT1 is connected to the PC.
-
Enter u-boot and enter the following command:
ums 0 mmc 2 -
The emmc is now shown on the host PC and can be flash using dd in Linux or balenaetcher.
bzip2 -dkf tal-lwbp-su-lrd10-imx8mpevk.wic.bz2 sudo dd if=tal-lwbp-su-lrd10-imx8mpevk.wic of=/dev/sdb bs=1M status=progress sync -
Reboot the device with the LWB+ attached.
Test module
Wi-Fi
iw dev


root@imx8mpevk:~# iw dev
phy#0
        Unnamed/non-netdev interface
                wdev 0x2
                addr c2:ee:40:b0:03:9c
                type P2P-device
                txpower 31.00 dBm
        Interface wlan0
                ifindex 5
                wdev 0x1
                addr c0:ee:40:b0:03:9c
                ssid dogfish
                type managed
                channel 1 (2412 MHz), width: 20 MHz, center1: 2412 MHz
                txpower 31.00 dBm
Wi-Fi iperf3 tests
iperf3 -c 10.0.0.2


root@imx8mpevk:~# iperf3 -c 10.0.0.2
Connecting to host 10.0.0.2, port 5201
[  5] local 10.0.0.37 port 38532 connected to 10.0.0.2 port 5201
[ ID] Interval           Transfer     Bitrate         Retr  Cwnd
[  5]   0.00-1.00   sec  5.44 MBytes  45.6 Mbits/sec    0    226 KBytes
[  5]   1.00-2.00   sec  4.47 MBytes  37.5 Mbits/sec    0    266 KBytes
[  5]   2.00-3.00   sec  5.10 MBytes  42.7 Mbits/sec    0    266 KBytes
[  5]   3.00-4.00   sec  4.66 MBytes  39.1 Mbits/sec    0    266 KBytes
[  5]   4.00-5.00   sec  5.03 MBytes  42.2 Mbits/sec    0    277 KBytes
[  5]   5.00-6.00   sec  4.54 MBytes  38.1 Mbits/sec    0    277 KBytes
[  5]   6.00-7.00   sec  4.91 MBytes  41.2 Mbits/sec    0    277 KBytes
[  5]   7.00-8.00   sec  4.78 MBytes  40.1 Mbits/sec    0    277 KBytes
[  5]   8.00-9.00   sec  4.47 MBytes  37.5 Mbits/sec    0    277 KBytes
[  5]   9.00-10.00  sec  4.54 MBytes  38.1 Mbits/sec    0    277 KBytes
- - - - - - - - - - - - - - - - - - - - - - - - -
[ ID] Interval           Transfer     Bitrate         Retr
[  5]   0.00-10.00  sec  47.9 MBytes  40.2 Mbits/sec    0             sender
[  5]   0.00-10.00  sec  47.4 MBytes  39.8 Mbits/sec                  receiver

iperf Done.


iperf3 -c 10.0.0.2 -R


root@imx8mpevk:~# iperf3 -c 10.0.0.2 -R
Connecting to host 10.0.0.2, port 5201
Reverse mode, remote host 10.0.0.2 is sending
[  5] local 10.0.0.37 port 38536 connected to 10.0.0.2 port 5201
[ ID] Interval           Transfer     Bitrate
[  5]   0.00-1.00   sec  6.14 MBytes  51.5 Mbits/sec
[  5]   1.00-2.00   sec  6.39 MBytes  53.6 Mbits/sec
[  5]   2.00-3.00   sec  6.43 MBytes  53.9 Mbits/sec
[  5]   3.00-4.00   sec  6.42 MBytes  53.9 Mbits/sec
[  5]   4.00-5.00   sec  6.40 MBytes  53.7 Mbits/sec
[  5]   5.00-6.00   sec  6.36 MBytes  53.4 Mbits/sec
[  5]   6.00-7.00   sec  6.29 MBytes  52.8 Mbits/sec
[  5]   7.00-8.00   sec  6.26 MBytes  52.5 Mbits/sec
[  5]   8.00-9.00   sec  6.41 MBytes  53.8 Mbits/sec
[  5]   9.00-10.00  sec  6.55 MBytes  55.0 Mbits/sec
- - - - - - - - - - - - - - - - - - - - - - - - -
[ ID] Interval           Transfer     Bitrate         Retr
[  5]   0.00-10.00  sec  66.5 MBytes  55.8 Mbits/sec    0             sender
[  5]   0.00-10.00  sec  63.7 MBytes  53.4 Mbits/sec                  receiver

iperf Done.
Bluetooth
btattach -B /dev/ttymxc2 -P bcm -S 3000000 &


root@imx8mpevk:~# btattach -B /dev/ttymxc2 -P bcm -S 3000000 &
[1] 488
Attaching Primary controller to /dev/ttymxc2
[ 2929.323498] Bluetooth: HCI UART driver ver 2.3
[ 2929.327993] Bluetooth: HCI UART protocol H4 registered
[ 2929.333521] Bluetooth: HCI UART protocol Broadcom registered
root@imx8mpevk:~# Switched line discipline from 0 to 15
Device index 0 attached
[ 2929.456927] Bluetooth: hci0: BCM: chip id 147
[ 2929.464112] Bluetooth: hci0: BCM: features 0x0e
[ 2929.492213] Bluetooth: hci0: CYW4343A2
[ 2929.495986] Bluetooth: hci0: BCM4343A2 (001.003.016) build 0000
[ 2929.503453] Bluetooth: hci0: BCM4343A2 'brcm/BCM4343A2.hcd' Patch
[ 2930.414080] Bluetooth: hci0: CYW43439 UART 26 MHz wlbga_BU Laird
[ 2930.420123] Bluetooth: hci0: BCM4343A2 (001.003.016) build 0000
[ 2930.587952] NET: Registered PF_ALG protocol family
[ 2930.606343] Bluetooth: RFCOMM TTY layer initialized
[ 2930.611282] Bluetooth: RFCOMM socket layer initialized
[ 2930.616521] Bluetooth: RFCOMM ver 1.11

root@imx8mpevk:~# bluetoothctl
Agent registered
[..CHG..] Controller C0:EE:40:B0:49:87 Pairable: yes
[bluetooth]# power on
[..CHG..] Controller C0:EE:40:B0:49:87 Class: 0x00200000
Changing power on succeeded
[..CHG..] Controller C0:EE:40:B0:49:87 Powered: yes
[bluetooth]# scan on
Discovery started
[..CHG..] Controller C0:EE:40:B0:49:87 Discovering: yes
[..NEW..] Device D7:DD:31:1F:D7:CF D7-DD-31-1F-D7-CF
[..NEW..] Device 7A:65:4F:4B:65:EF 7A-65-4F-4B-65-EF
[..NEW..] Device E7:A3:99:CE:06:A2 BL654 BME280 Sensor
Bluetooth troubleshooting
Use lower speed if having issues with btattach, due to the length of jumper wires a higher speed connection might not work or be reliable.
btattach -B /dev/ttymxc2 -P bcm -S 115200 &LWB+ integration on imx8mpevk (lrd-11.x)
LWB+ integration on i.MX8M Plus EVK (lrd-11.x)
This tutorial shows how to integrate the LWB+ on the imx8mp-evk. The LWB+ uses SDIO for the Wi-Fi interface and UART for the Bluetooth interface. It is assumed the user is familiar with Linux and embedded systems. Included in this tutorial are the physical setup, Yocto setup and build, and verifying the Wi-Fi and Bluetooth are functional.
Note: This guide is for Ezurio code lrd-11.x and higher. For Ezurio code lrd-10.x or for kernel 5.15 or lower please see: https://lairdcp.github.io/guides/LWBp-tutorials/1.0/imx8mp-lwbplus.html
Requirements
Required items:
- imx8mp-evk
- LWB+ devkit - 453-00085-K1
- breadboard jumper wires
- SD to micro SD adapter (Examples: ST-SD-USD, Cablecc)
Physical setup
i.MX 8M Plus (imx8mp)
This tutorial uses the microSD slot on the imx8mp as the Wi-Fi interface. This requires the software to be loaded on to the emmc which can be done with the uuu utility with the Serial Download boot mode or using u-boot with the ums tool.
The imx8mp bb expansion header is used to connect the power, Bluetooth UART, and REG_ON pins for Wi-Fi and Bluetooth.
Schematic of the expansion header:
The UART3 lines are used for the bluetooth UART. The ECSPI2 MOSI and SCLK are used for the REG_ON pins to control resets.
LWB+
| Jumper | Position | Use |
|---|---|---|
| J4 | 2-3 | VCCIO 3.3v |
| J5 | Ext Voltage from imx8 | |
| J6 | 1-2 | VDD 3.3v |
| J7 | 2-3 | VBATT EXT |
Note on LWB+ and SD adapter
Cut and place to shape two layers of stickers on the LWB+ and the adapter board that goes into the imx8mp and micro SD to SD adapter to ensure the devices are not loose. Example used here is a UPS tracking receipt that is a label. The label is thin thus requiring 2-4 layers on each. This connection can be very sensitive and delicate, so ensure it's supported properly and not bending the micro sd tab which is the vulnerable point of the connection.
Physical Connections
| LWB+ | LWB+ Notes | imx8mp | imx8mp Notes | |
|---|---|---|---|---|
| J3.6 | BT CTS | -> | J21.7 | uart3.cts |
| J3.8 | BT TXD | -> | J21.10 | uart3.rxd |
| J3.10 | BT RXD | -> | J21.8 | uart3.txd |
| J3.14 | BT RTS | -> | J21.11 | uart3.rts |
| J3.16 | GND | -> | J21.9 | GND |
| J3.11 | WL_REG_ON | J21.23 | GPIO5.io10 | |
| J3.13 | BT_REG_ON | J21.19 | GPIO5.io11 | |
| J5.3.3 | 3.3v input | <- | J21.1 | 3.3v supply |
| J5.GND | GND | <- | J21.6 | GND |
Yocto setup and build
Get yocto-mickeldore
repo init -u https://github.com/nxp-imx/imx-manifest -b imx-linux-mickledore -m imx-6.1.22-2.0.0.xml
repo sync

DISTRO=fsl-imx-wayland MACHINE=imx8mpevk source imx-setup-release.sh -b build-imx8mpevk
Get meta-summit-radio
cd ../sources
git clone https://github.com/Ezurio/meta-summit-radio
Update image in ~/projects/yocto-mickledore/sources/meta-summit-radio/meta-summit-radio/recipes-packages/images
Copy sample-image-lwb5plus.bb to lwbp-lrd11.bb make the IMAGE_INSTALL section like below:
IMAGE_INSTALL += "\
    iproute2 \
    rng-tools \
    ca-certificates \
    tzdata \
    alsa-utils \
    htop \
    ethtool \
    iperf3 \
    tcpdump \
    iw \
    kernel-module-lwb-backports-summit \
    lwbplus-firmware \
    summit-supplicant-lwb \
    summit-supplicant-libs-lwb \
    summit-networkmanager-lwb \
    summit-networkmanage-lwb-nmcli \
    libgpiod \
    libgpiod-tools \
    hostapd \
    "
~/projects/yocto-mickledore/build-imx8mpevk/conf/bblayers.conf
Edit your bblayers.conf file and add the following to the bottom.
BBLAYERS += "${BSPDIR}/sources/meta-summit-radio/meta-summit-radio"~/projects/yocto-mickledore/build-imx8mpevk/conf/local.conf
Edit your local.conf file and add the following to the bottom.
PREFERRED_PROVIDER_wpa-supplicant = "summit-supplicant-lwb"
PREFERRED_PROVIDER_wpa-supplicant-cli = "summit-supplicant-lwb"
PREFERRED_PROVIDER_wpa-supplicant-passphrase = "summit-supplicant-lwb"

BBMASK += " \
    meta-summit-radio/meta-summit-radio/recipes-packages/openssl \
    meta-summit-radio/meta-summit-radio/recipes-packages/.*/.*openssl10.* \
    "

PREFERRED_RPROVIDER_wireless-regdb-static = "wireless-regdb"
LWB_REGDOMAIN = "US"
Note: You do not need to use LWB_REGDOMAIN to specify the regulatory domain. You could choose to implement it using a device tree setting or configure the module parameter some other way. However, the regulatory domain must be configured for the LWB+ in some manner.
kernel menuconfig
Run the following command to launch the kernel menuconfig.
bitbake -c menuconfig virtual/kernelMake the following modifications:
In the menuconfig use / to search for each of the below configuration parameters in caps.
WLAN
- deselect Device Drivers -> Network device support -> Wireless LAN

CONFIG_BT
- deselect Networking support -> Bluetooth subsystem support

CFG80211
- set to module (M) Networking support -> Wireless -> cfg80211 - wireless configuration API

CONFIG_FW_LOADER_USER_HELPER_FALLBACK
- deselect Device Drivers -> Generic Driver Options -> Firmware Loader
    -> Firmware loading Facility ->Force the firmware sysfs fallback mechanism when possible

CONFIG_IMX_SDMA
- set to module (M) Device Drivers -> DMA Engine support -> i.MX SDMA support
Save your changes and exit menuconfig.
Disable nxp drivers
Edit the file ~/projects/yocto-mickledore/sources/meta-imx/meta-bsp/conf/layer.conf Comment out the whole section (4 lines): # NXP Wi-Fi firmware & extra Wlan SDK
# NXP WiFi firmware & extra Wlan SDK
#MACHINE_FIRMWARE:append = " ${@bb.utils.contains('MACHINE_FEATURES', 'nxp8987', 'linux-firmware-nxp89xx', '', d)}"
#MACHINE_FIRMWARE:append = " ${@bb.utils.contains('MACHINE_FEATURES', 'nxp8997', 'linux-firmware-nxp89xx', '', d)}"
#MACHINE_FIRMWARE:append = " ${@bb.utils.contains('MACHINE_FEATURES', 'iw612', 'linux-firmware-nxp89xx', '', d)}"
#MACHINE_EXTRA_RRECOMMENDS:remove = "kernel-module-nxp89xx"
#MACHINE_EXTRA_RRECOMMENDS:append = " ${@bb.utils.contains('MACHINE_FEATURES', 'nxp8987', 'nxp-wlan-sdk kernel-module-nxp89xx', '', d)}"
#MACHINE_EXTRA_RRECOMMENDS:append = " ${@bb.utils.contains('MACHINE_FEATURES', 'nxp8997', 'nxp-wlan-sdk kernel-module-nxp89xx', '', d)}"
#MACHINE_EXTRA_RRECOMMENDS:append = " ${@bb.utils.contains('MACHINE_FEATURES', 'iw612', 'iw612-sdk kernel-module-iw612', '', d)}"
Modify devicetree
Below is a diff of the changes made in the devicetree as a patch.
For reference:
Location of the devicetree is: ~/projects/yocto-honister/build-imx8mpevk/tmp/work-shared/imx8mpevk/kernel-source/arch/arm64/boot/dts/freescale/imx8mp-evk.dts
cd ~/projects/yocto-honister/build-imx8mpevk/tmp/work-shared/imx8mpevk/kernel-source/arch/arm64/boot/dts/freescale/
--- imx8mp-evk.dts 2022-06-01 12:11:11.540506538 -0400
+++ imx8mp-evk.dts.lwbplus 2022-06-01 12:05:27.722792689 -0400
@@ -34,6 +34,26 @@
<0x1 0x00000000 0 0xc0000000>;
};
+ wifi_pwrseq: wifi-pwrseq {
+ compatible = "mmc-pwrseq-simple";
+ regulator-name = "wifi-pwrseq";
+ pinctrl-names = "default";
+ reset-gpios = <&gpio5 10 GPIO_ACTIVE_LOW>;
+ post-power-on-delay-ms = <150>;
+ };
+
+ reg_bt: regulator-bt {
+ compatible = "regulator-fixed";
+ regulator-name = "bt";
+ gpio = <&gpio5 11 GPIO_ACTIVE_HIGH>;
+ startup-delay-us = <100>;
+ enable-active-high;
+ regulator-min-microvolt = <3300000>;
+ regulator-max-microvolt = <3300000>;
+ regulator-always-on;
+ };
+
reg_can1_stby: regulator-can1-stby {
compatible = "regulator-fixed";
regulator-name = "can1-stby";
@@ -272,7 +292,8 @@
pinctrl-names = "default";
pinctrl-0 = <&pinctrl_ecspi2 &pinctrl_ecspi2_cs>;
cs-gpios = <&gpio5 13 GPIO_ACTIVE_LOW>;
- status = "okay";
+ //status = "okay";
+ status = "disabled"; /* added */
spidev1: spi@0 {
reg = <0>;
@@ -888,8 +909,10 @@
pinctrl-0 = <&pinctrl_usdhc2>, <&pinctrl_usdhc2_gpio>;
pinctrl-1 = <&pinctrl_usdhc2_100mhz>, <&pinctrl_usdhc2_gpio>;
pinctrl-2 = <&pinctrl_usdhc2_200mhz>, <&pinctrl_usdhc2_gpio>;
+ max-frequency = <100000000>;
cd-gpios = <&gpio2 12 GPIO_ACTIVE_LOW>;
vmmc-supply = <®_usdhc2_vmmc>;
+ mmc-pwrseq = <&wifi_pwrseq>;
bus-width = <4>;
status = "okay";
};
@@ -919,6 +942,8 @@
pinctrl_hog: hoggrp {
fsl,pins = <
+ MX8MP_IOMUXC_ECSPI2_MOSI__GPIO5_IO11 0x00000146
+ MX8MP_IOMUXC_ECSPI2_SCLK__GPIO5_IO10 0x00000146
MX8MP_IOMUXC_HDMI_DDC_SCL__HDMIMIX_HDMI_SCL 0x400001c3
MX8MP_IOMUXC_HDMI_DDC_SDA__HDMIMIX_HDMI_SDA 0x400001c3
MX8MP_IOMUXC_HDMI_HPD__HDMIMIX_HDMI_HPD 0x40000019bitbake
bitbake lwbp-lrd11
Flashing with u-boot and ums
-
Ensure the usb-c cable from PORT1 is connected to the PC.
-
Enter u-boot and enter the following command:
ums 0 mmc 2 -
The emmc is now shown on the host PC and can be flash using dd in Linux or balenaetcher.
bzip2 -dkf tal-lwbp-su-lrd10-imx8mpevk.wic.bz2 sudo dd if=tal-lwbp-su-lrd10-imx8mpevk.wic of=/dev/sdb bs=1M status=progress sync -
Reboot the device with the LWB+ attached.
Test module
Wi-Fi
iw dev


root@imx8mpevk:~# iw dev
phy#0
        Unnamed/non-netdev interface
                wdev 0x2
                addr c2:ee:40:b0:03:9c
                type P2P-device
                txpower 31.00 dBm
        Interface wlan0
                ifindex 5
                wdev 0x1
                addr c0:ee:40:b0:03:9c
                ssid dogfish
                type managed
                channel 1 (2412 MHz), width: 20 MHz, center1: 2412 MHz
                txpower 31.00 dBm
Wi-Fi iperf3 tests
iperf3 -c 10.0.0.2


root@imx8mpevk:~# iperf3 -c 10.0.0.2
Connecting to host 10.0.0.2, port 5201
[  5] local 10.0.0.37 port 38532 connected to 10.0.0.2 port 5201
[ ID] Interval           Transfer     Bitrate         Retr  Cwnd
[  5]   0.00-1.00   sec  5.44 MBytes  45.6 Mbits/sec    0    226 KBytes
[  5]   1.00-2.00   sec  4.47 MBytes  37.5 Mbits/sec    0    266 KBytes
[  5]   2.00-3.00   sec  5.10 MBytes  42.7 Mbits/sec    0    266 KBytes
[  5]   3.00-4.00   sec  4.66 MBytes  39.1 Mbits/sec    0    266 KBytes
[  5]   4.00-5.00   sec  5.03 MBytes  42.2 Mbits/sec    0    277 KBytes
[  5]   5.00-6.00   sec  4.54 MBytes  38.1 Mbits/sec    0    277 KBytes
[  5]   6.00-7.00   sec  4.91 MBytes  41.2 Mbits/sec    0    277 KBytes
[  5]   7.00-8.00   sec  4.78 MBytes  40.1 Mbits/sec    0    277 KBytes
[  5]   8.00-9.00   sec  4.47 MBytes  37.5 Mbits/sec    0    277 KBytes
[  5]   9.00-10.00  sec  4.54 MBytes  38.1 Mbits/sec    0    277 KBytes
- - - - - - - - - - - - - - - - - - - - - - - - -
[ ID] Interval           Transfer     Bitrate         Retr
[  5]   0.00-10.00  sec  47.9 MBytes  40.2 Mbits/sec    0             sender
[  5]   0.00-10.00  sec  47.4 MBytes  39.8 Mbits/sec                  receiver

iperf Done.


iperf3 -c 10.0.0.2 -R


root@imx8mpevk:~# iperf3 -c 10.0.0.2 -R
Connecting to host 10.0.0.2, port 5201
Reverse mode, remote host 10.0.0.2 is sending
[  5] local 10.0.0.37 port 38536 connected to 10.0.0.2 port 5201
[ ID] Interval           Transfer     Bitrate
[  5]   0.00-1.00   sec  6.14 MBytes  51.5 Mbits/sec
[  5]   1.00-2.00   sec  6.39 MBytes  53.6 Mbits/sec
[  5]   2.00-3.00   sec  6.43 MBytes  53.9 Mbits/sec
[  5]   3.00-4.00   sec  6.42 MBytes  53.9 Mbits/sec
[  5]   4.00-5.00   sec  6.40 MBytes  53.7 Mbits/sec
[  5]   5.00-6.00   sec  6.36 MBytes  53.4 Mbits/sec
[  5]   6.00-7.00   sec  6.29 MBytes  52.8 Mbits/sec
[  5]   7.00-8.00   sec  6.26 MBytes  52.5 Mbits/sec
[  5]   8.00-9.00   sec  6.41 MBytes  53.8 Mbits/sec
[  5]   9.00-10.00  sec  6.55 MBytes  55.0 Mbits/sec
- - - - - - - - - - - - - - - - - - - - - - - - -
[ ID] Interval           Transfer     Bitrate         Retr
[  5]   0.00-10.00  sec  66.5 MBytes  55.8 Mbits/sec    0             sender
[  5]   0.00-10.00  sec  63.7 MBytes  53.4 Mbits/sec                  receiver

iperf Done.
Bluetooth
btattach -B /dev/ttymxc2 -P bcm -S 3000000 &


root@imx8mpevk:~# btattach -B /dev/ttymxc2 -P bcm -S 3000000 &
[1] 488
Attaching Primary controller to /dev/ttymxc2
[ 2929.323498] Bluetooth: HCI UART driver ver 2.3
[ 2929.327993] Bluetooth: HCI UART protocol H4 registered
[ 2929.333521] Bluetooth: HCI UART protocol Broadcom registered
root@imx8mpevk:~# Switched line discipline from 0 to 15
Device index 0 attached
[ 2929.456927] Bluetooth: hci0: BCM: chip id 147
[ 2929.464112] Bluetooth: hci0: BCM: features 0x0e
[ 2929.492213] Bluetooth: hci0: CYW4343A2
[ 2929.495986] Bluetooth: hci0: BCM4343A2 (001.003.016) build 0000
[ 2929.503453] Bluetooth: hci0: BCM4343A2 'brcm/BCM4343A2.hcd' Patch
[ 2930.414080] Bluetooth: hci0: CYW43439 UART 26 MHz wlbga_BU Laird
[ 2930.420123] Bluetooth: hci0: BCM4343A2 (001.003.016) build 0000
[ 2930.587952] NET: Registered PF_ALG protocol family
[ 2930.606343] Bluetooth: RFCOMM TTY layer initialized
[ 2930.611282] Bluetooth: RFCOMM socket layer initialized
[ 2930.616521] Bluetooth: RFCOMM ver 1.11

root@imx8mpevk:~# bluetoothctl
Agent registered
[..CHG..] Controller C0:EE:40:B0:49:87 Pairable: yes
[bluetooth]# power on
[..CHG..] Controller C0:EE:40:B0:49:87 Class: 0x00200000
Changing power on succeeded
[..CHG..] Controller C0:EE:40:B0:49:87 Powered: yes
[bluetooth]# scan on
Discovery started
[..CHG..] Controller C0:EE:40:B0:49:87 Discovering: yes
[..NEW..] Device D7:DD:31:1F:D7:CF D7-DD-31-1F-D7-CF
[..NEW..] Device 7A:65:4F:4B:65:EF 7A-65-4F-4B-65-EF
[..NEW..] Device E7:A3:99:CE:06:A2 BL654 BME280 Sensor
Bluetooth troubleshooting
Use lower speed if having issues with btattach, due to the length of jumper wires a higher speed connection might not work or be reliable.
btattach -B /dev/ttymxc2 -P bcm -S 115200 &