/filters:background_color(white)/2024-09/Nitrogen%2091%20front.png)
/filters:background_color(white)/2025-02/Nitrogen%2093%20NX611%20front-1port.png)
/filters:background_color(white)/2024-06/SMARC_CAR%20Kit.png)
Getting Started
NOTE 2/3/2025: If you are bringing up a newly-purchased Nitrogen93 SMARC, please ensure that the bootloader is up-to-date. The latest u-boot images can be found here and flashed onto the board using the Flashing Procedure in this guide.
This guide documents how to quickly get up and running with the Ezurio's Nitrogen93 SMARC module and Universal SMARC Carrier.
In the Box
The development kit contains the following items:
- 1x Nitrogen93 SMARC module
- 1x Universal SMARC Carrier
- 2x Mounting Screws
- 1x Power Supply 5V
- 1x Serial Cable
On the Board
The Nitrogen93 SMARC module and Universal SMARC Carrier contains the following components and interfaces:
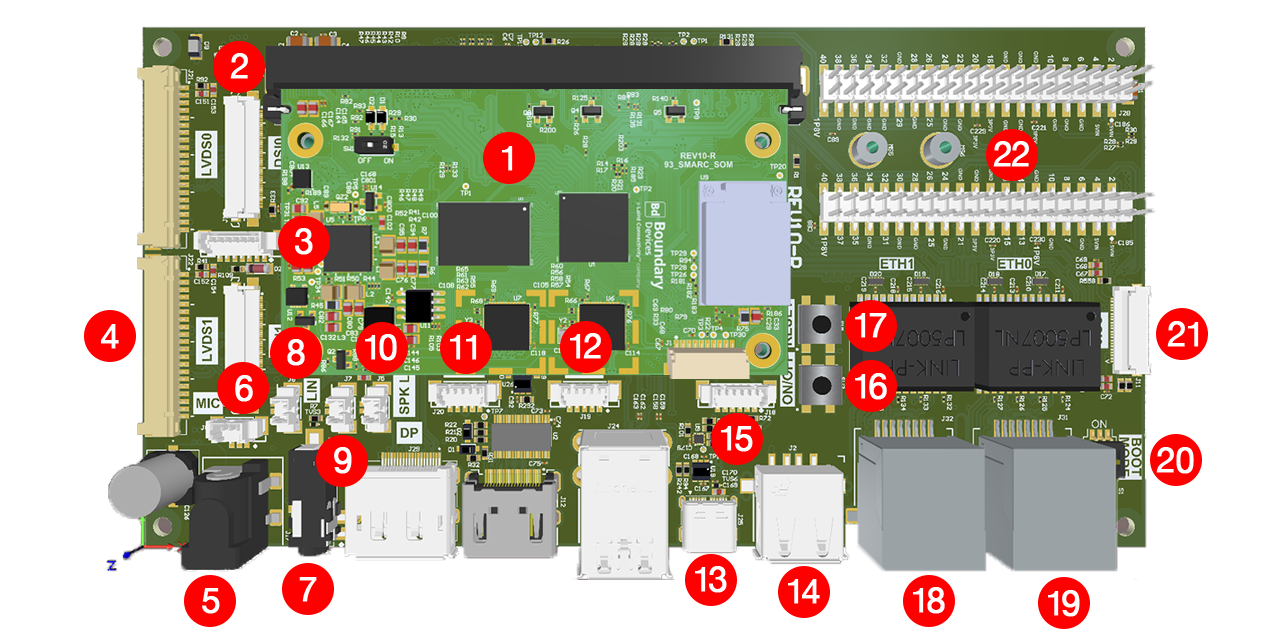
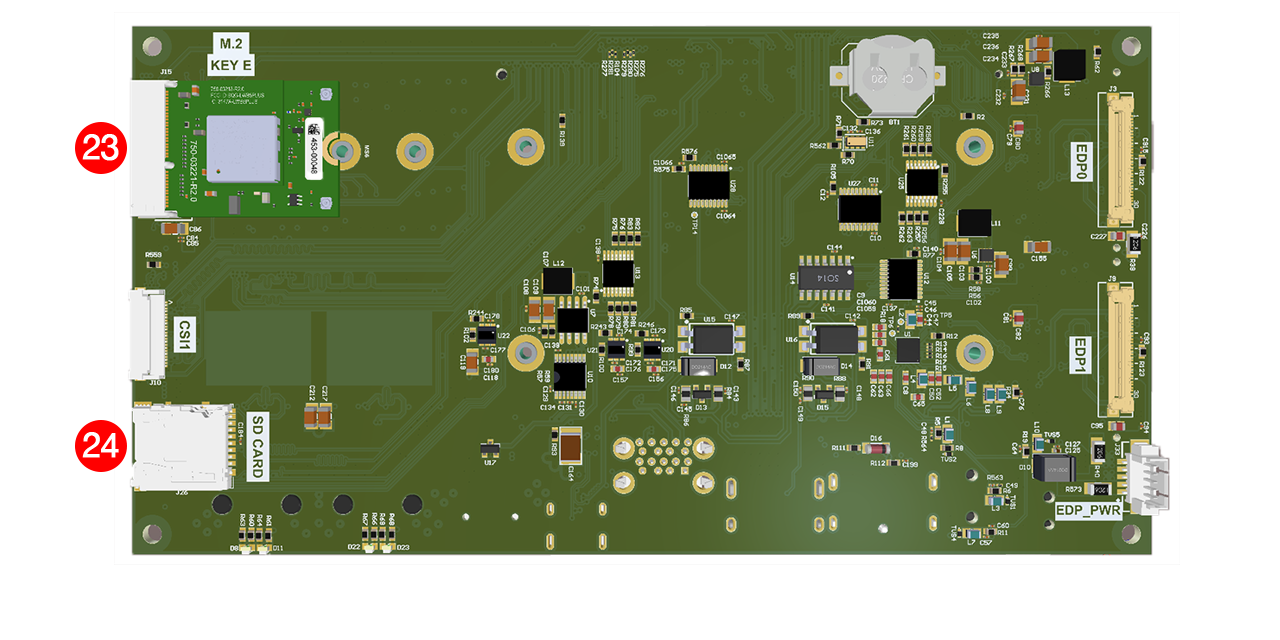
- Nitrogen93 SMARC module
- DSI 0 Display Connector (J13)
- LVDS I2C connector - Touch (J23)
- LVDS Display Connector (J22)
- Barrel Plug Power Adapter (J17)
- 3 Pin Molex Connector for Mic (J8)
- 3.5mm Audio Jack (J4)
- 2 Pin Molex Connector for Line In (J6)
- 2 Pin Molex Connector for Speaker Right (J7)
- 2 Pin Molex Connector for Speaker Left (J5)
- 5 Pin Molex Connector for Can 2 (J20)
- 5 Pin Molex Connector for Can 1 (J19)
- High-Speed USB-C OTG Connector (J25)
- 1x USB-A 2.0 Port (J2)
- 6 Pin Molex Connector for Serial (J18)
- On/Off Switch (SW2)
- Reset Switch (SW1)
- Gigabit Ethernet 1 Connector (J32)
- Gigabit Ethernet 0 Connector (J31)
- Boot Mode Switches (S1)
- CSI 0 Connector (J11)
- 2x Expansion Connectors (J27 and J28)
- M.2 Connector (J15)
- Micro SD Card Slot (J26)
Board Assembly
The Nitrogen93 SMARC module and Universal SMARC Carrier arrive disassembled. In order to assemble, you will need to insert the Nitrogen93 SMARC module into the Universal SMARC Carrier and mount it using the screws.
To assemble, complete the following steps:
-
Insert the Nitrogen93 SMARC module into J1 of the Universal SMARC Carrier.
-
Use the mounting screws to mount the Nitrogen93 SMARC module on the Universal SMARC Carrier.
Serial Console
A console cable is provided with our Nitrogen93 SMARC module and Universal SMARC Carrier.
-
Attach the DB9 connector labeled "CONSOLE" to a serial port or a USB-to-Serial Converter.
-
Connect the other end of the console cable to J18 on the SMARC Carrier.
Connecting USB-To-Serial Converter to Linux
Verify mounting information by grepping dmesg
Type the following command:
dmesg | grep ttyUSBYou will notice that it mounts on :
/dev/ttyUSB0Connecting USB-To-Serial Converter to Windows
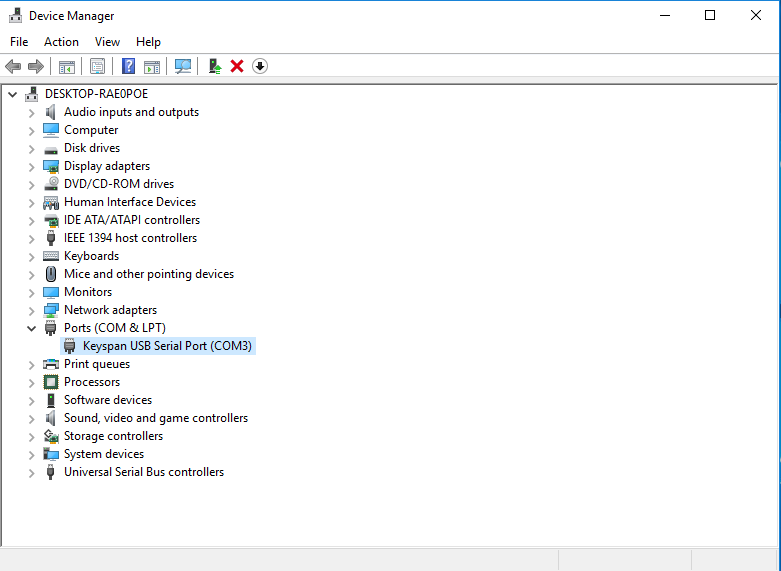
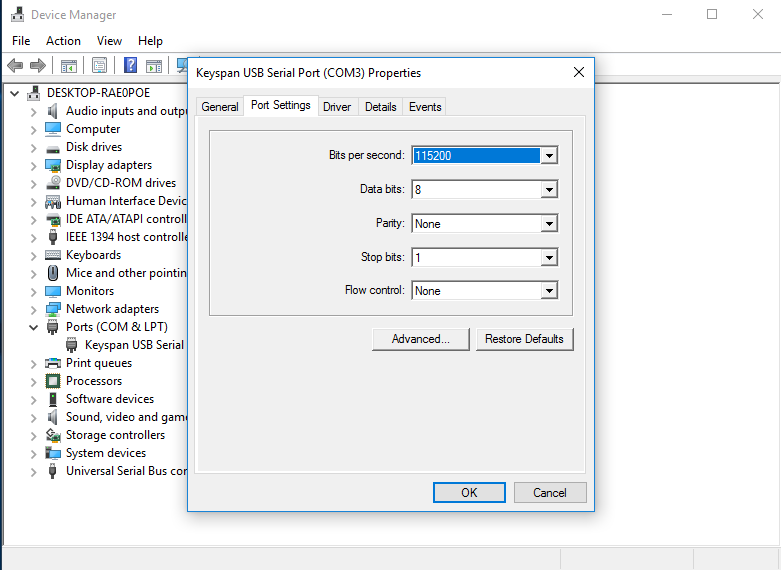
Verify under Device manager:
Serial Configuration
- The default serial speed rate is 115200.
Linux: minicom
Use the following command to set the correct permissions:
sudo usermod -a -G dialout $USERThe minicom command is simple:
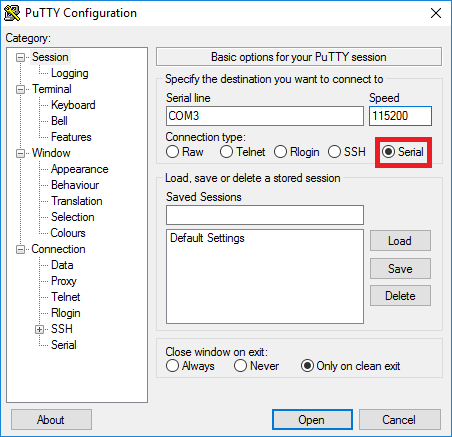
minicom -wD /dev/ttyUSBxWindows: PuTTY
Download PuTTY Here.
For Windows, you will need to configure the serial port under Device Manager. See the following steps:
-
Open up the Device Manager.
-
Expand the Ports (COM & LPT) tab
-
Right click on Keyspan USB Serial Port and select Properties
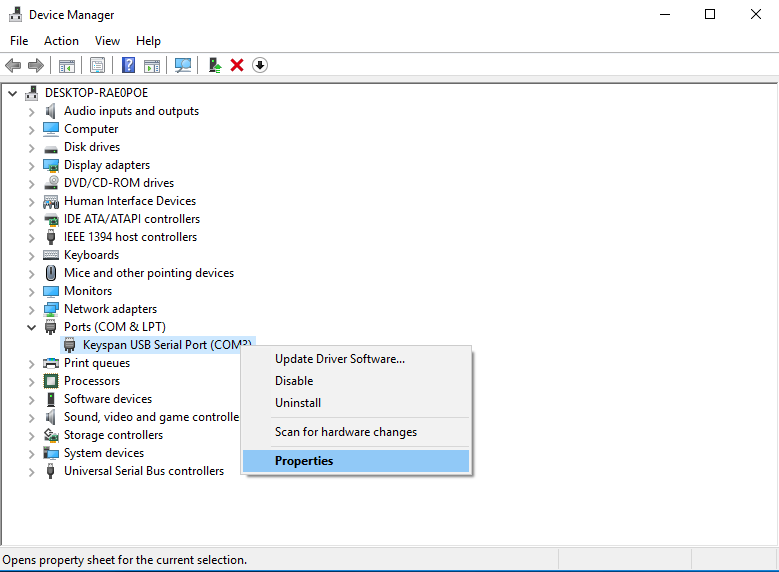
-
Select the Port Settings tab and change the Bits per Second to 115200
-
Open PuTTY and select the serial radio button and enter the COM# shown in Device Manager as well as setting the baud rate to 115200 and open the console.
Programming eMMC
Click Here and follow the flashing instructions for the desired associated release.
Additional Resources
Additional resources can be found Here.
Flashing Yocto Mickledore on the Nitrogen93 SMARC
Yocto Mickledore
Overview
Here you will see an example of how to flash Yocto Mickledore onto the eMMC of the 93_SMARC_SOM. In this example, we will use balenaEtcher as follows.
Downloading balenaEtcher
-
Download balenaEtcher Here for Linux.

-
Once downloaded, locate and right click the balenaEtcher icon. Select Properties.
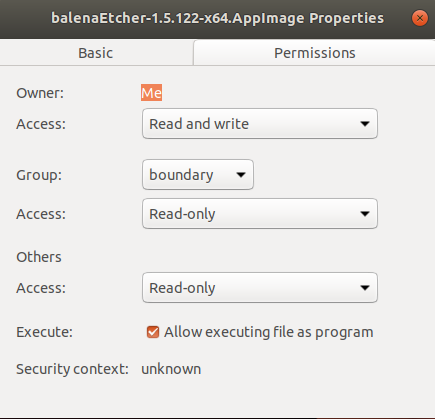
-
Select the Permissions tab and check the box in front of Allow executing file as program.
Flashing eMMC
-
Download the Yocto Mickledore Image here.
-
Connect the serial cable to the SMARC Carrier and the serial output (console) to your computer.
-
Connect a USB-C cable from your host machine to the SMARC Carrier.
-
On the host machine, start the terminal software.
-
Set the connection baud rate to 115200 with no hardware flow control.
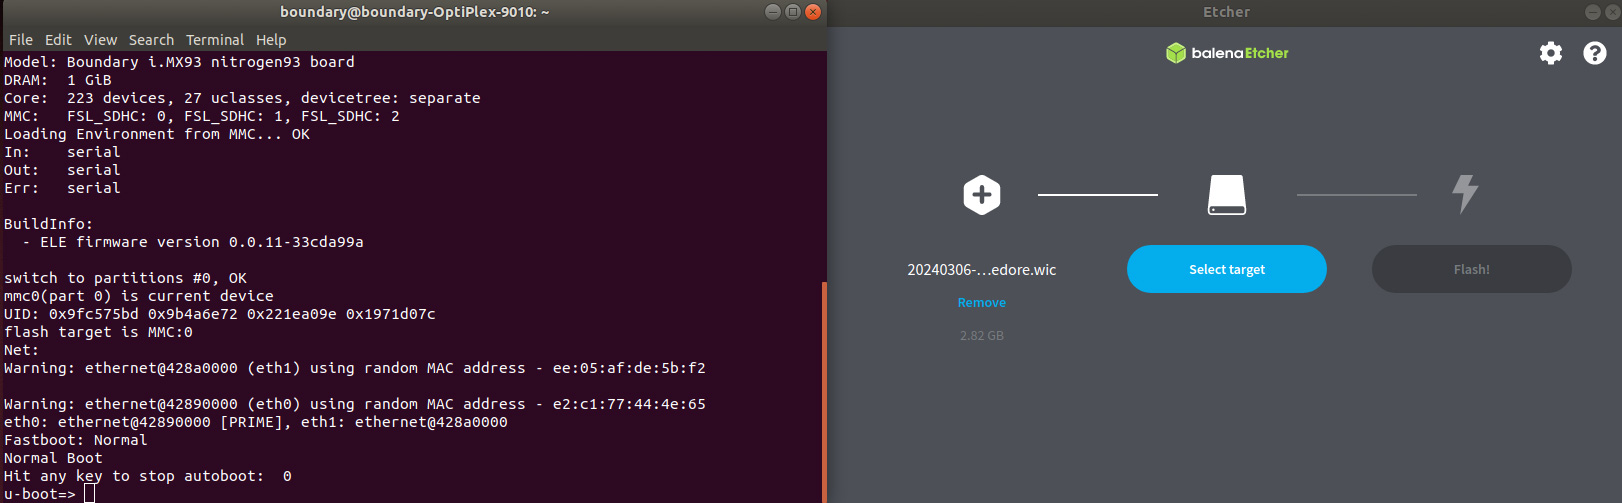
-
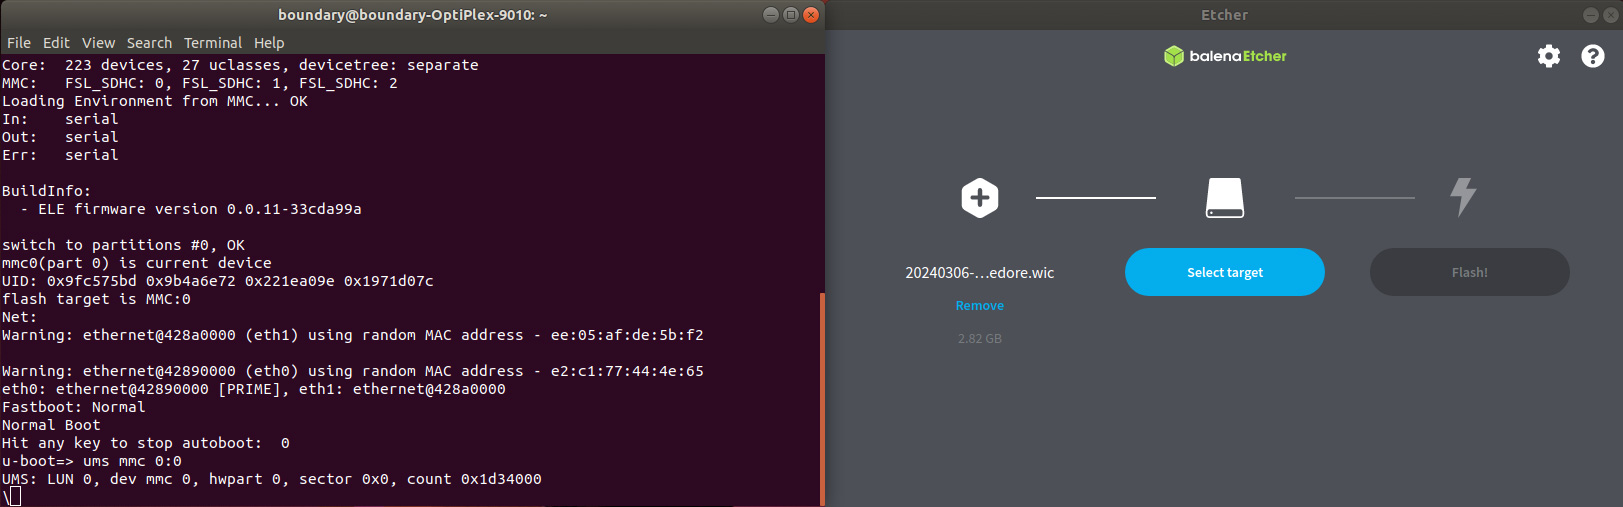
Power up the board and stop auto-boot process to get U-Boot prompt. Enter any character on the terminal software to stop auto-boot. Open up balenaEtcher.
-
Enable the UMS Gadget for the eMMC . (If your emmc is mmc 1, use 1 instead of 0). Type the following command:
ums 0 mmc 0:0 -
Click Flash from file and select the Yocto Mickledore image. Then click on Select Target and select Linux UMS. After this, select Flash
-
The image will begin to flash and it will verify once flashing is complete.
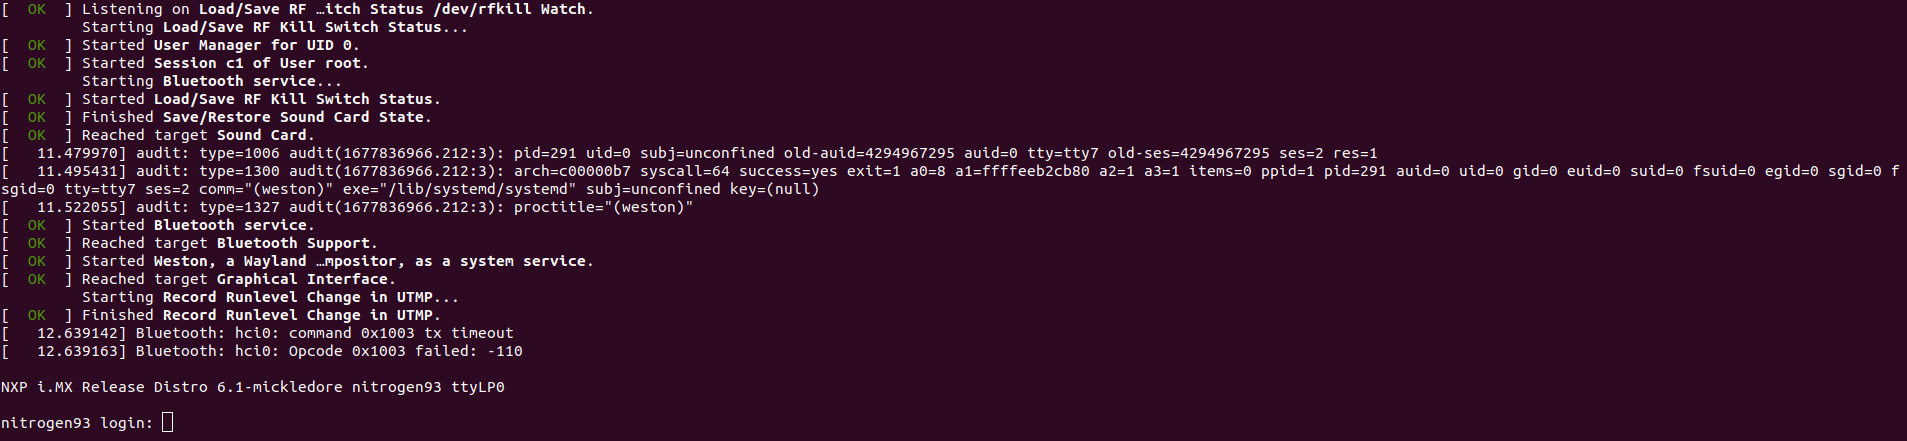
Once the image have been flashed, reset the board and it will boot into Yocto. See image above for fully booted image.